Process your First Order
With the initial configurations set, you can begin generating and fulfilling orders with ShipStream. The following steps are summarized, and users can find more information about each topic within this knowledge base. Here is a breakdown of the steps you will take to fulfill an example order.
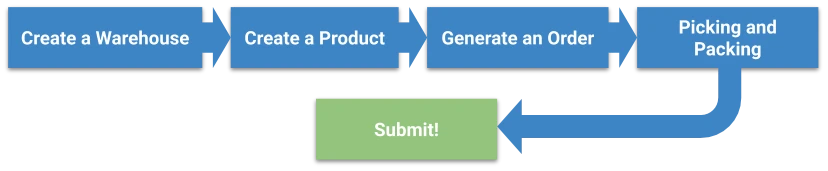
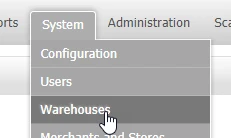
1. Create a Warehouse
The Warehouse must be created before before stocking inventory in it.
- Navigate to System > Warehouses.
- From this section, you should see a default warehouse listed. Enable the warehouse by clicking the item in the list and choose Enabled as the status. Or you can click Add New Warehouse from the top right of the Grid View to start a new Warehouse.
- Click Save Warehouse in the top right of the pane.
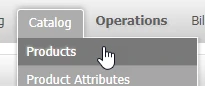
2. Create a Product
- Navigate to Catalog > Products.
- Click Add Product at the top right of the pane.

- Choose which Merchant will sell this item, then select which Attribute Set the product will show on the next screen. The Attribute Sets are configurable under Catalog > Product Attributes.
- Click Continue.
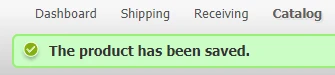
- On the General Tab, you must describe the product. Fill out all of the required form fields, then click the Save and Continue Edit button. If successful you will see a green notification that "The product has been saved".
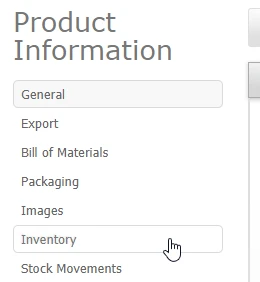
In order to show this product in the warehouse, you must assign the inventory amount. While still viewing the new product, click the Inventory Tab of the Product Information menu at the left side of the window.
 If the Inventory Report and Warehouse panes do not show when the Inventory Tab is selected, you may need to click Save and Continue Edit.
- Use the Default warehouse that was enabled in the first phase. To do this locate the pane with the Warehouse Name below the Inventory Report.

- On the right, type a location from the warehouse where the item will be stored in the input box next to the Assign Location button and then click Assign Location.
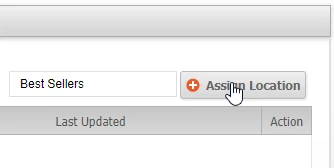
- You will see the item appear with the location you just created in the warehouse pane. From here, click Count all the way on the right side of the new location.
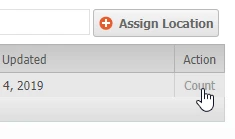
- The Count modal window will appear and you can input how many of the items you have or have available.
- This screen will require a reason for the adjustment which is used to track significant adjustments to inventory amounts, then click Submit.
- Click Save, and now you are ready to process an order for this product.
3. Generate an Order
- Navigate to Shipping > Orders.

- Click Create New Order.
- Click on Add Products to select your product to be ordered.
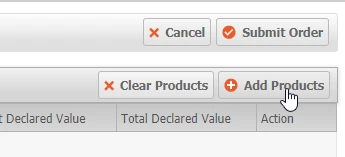
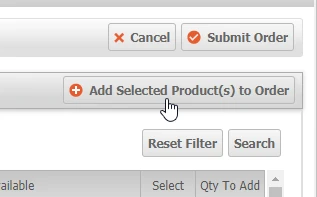
- In the Add Products pane, you should see the product you created in the previous steps. Now select it or check the box to the right under the “Select” column.
- Click Add Selected Products(s) to Order.
- It should now appear in the Items Ordered list on the next screen. If you need to update the item amounts or remove an item you can enter the correct quantity in the Items Ordered pane and click Update Item and Qty’s. You can also choose Remove from the drop-down menu to the right of each item in the Action column to delete them from the list.
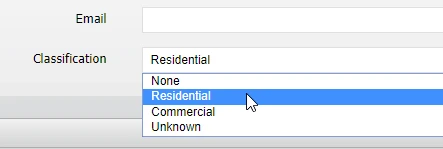
- Enter the shipping address for the customer by filling out the required shipping address information and be sure to specify a classification at the end such as Residential, Commercial, or Unknown.
Choose a Shipping Method from the list to the right.
At least one carrier must be enabled as discussed in the Shipping Method section of the Initial Configuration steps.- Now you may click Submit Order.
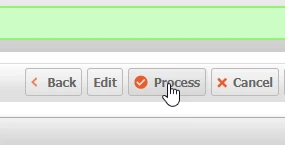
- If you see a success notification, then you may now process the order by clicking Process above the Shipping Address pane.
4. Picking and Packing
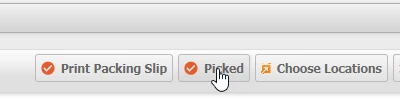
- Once the order is being processed, the item must be physically picked from the rack.
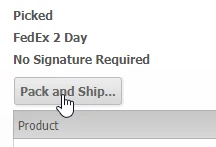
- After that has been done, click the Picked button to continue.
- When the order is picked, the next page will show a button in the Shipment pane, Pack and Ship… Click this to proceed.
- When the Create Packages window appears, enter the weight and dimensions of the package and click Add Products.
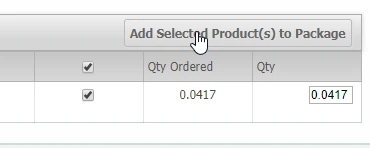
- Now you may select the products to be placed in the package by clicking each check mark between “Weight” and “Qty Ordered” or the smallest one at the top row to select all products, then click Add Selected Product(s) to Package.
- This will make a Delete button appear on the right in case you need to make changes. Now you can click Ship Offline (since this is a test order).
5. Submit
Congratulations, you've processed your first example order!
If you had any trouble, you may want to try these troubleshooting methods:
- If you receive an error regarding the General / Store information, refer to the Initial Configuration section and fill out your Store Information.
- If you receive an error such as “ Error: ERROR: Authentication Failed” this means you must first obtain an account number from your carrier and follow the steps to Setup a Shipping Method listed in Initial Configurations.
- You may receive an error that says “Address classification must be specified”. To fix this, return to the previous screen and click Edit above the Shipping Address pane. Now specify a shipping address classification at the bottom of the form (Residential, Commercial, or Unknown).