Version 2026.4
Structured Inventory Adjustment Reasons
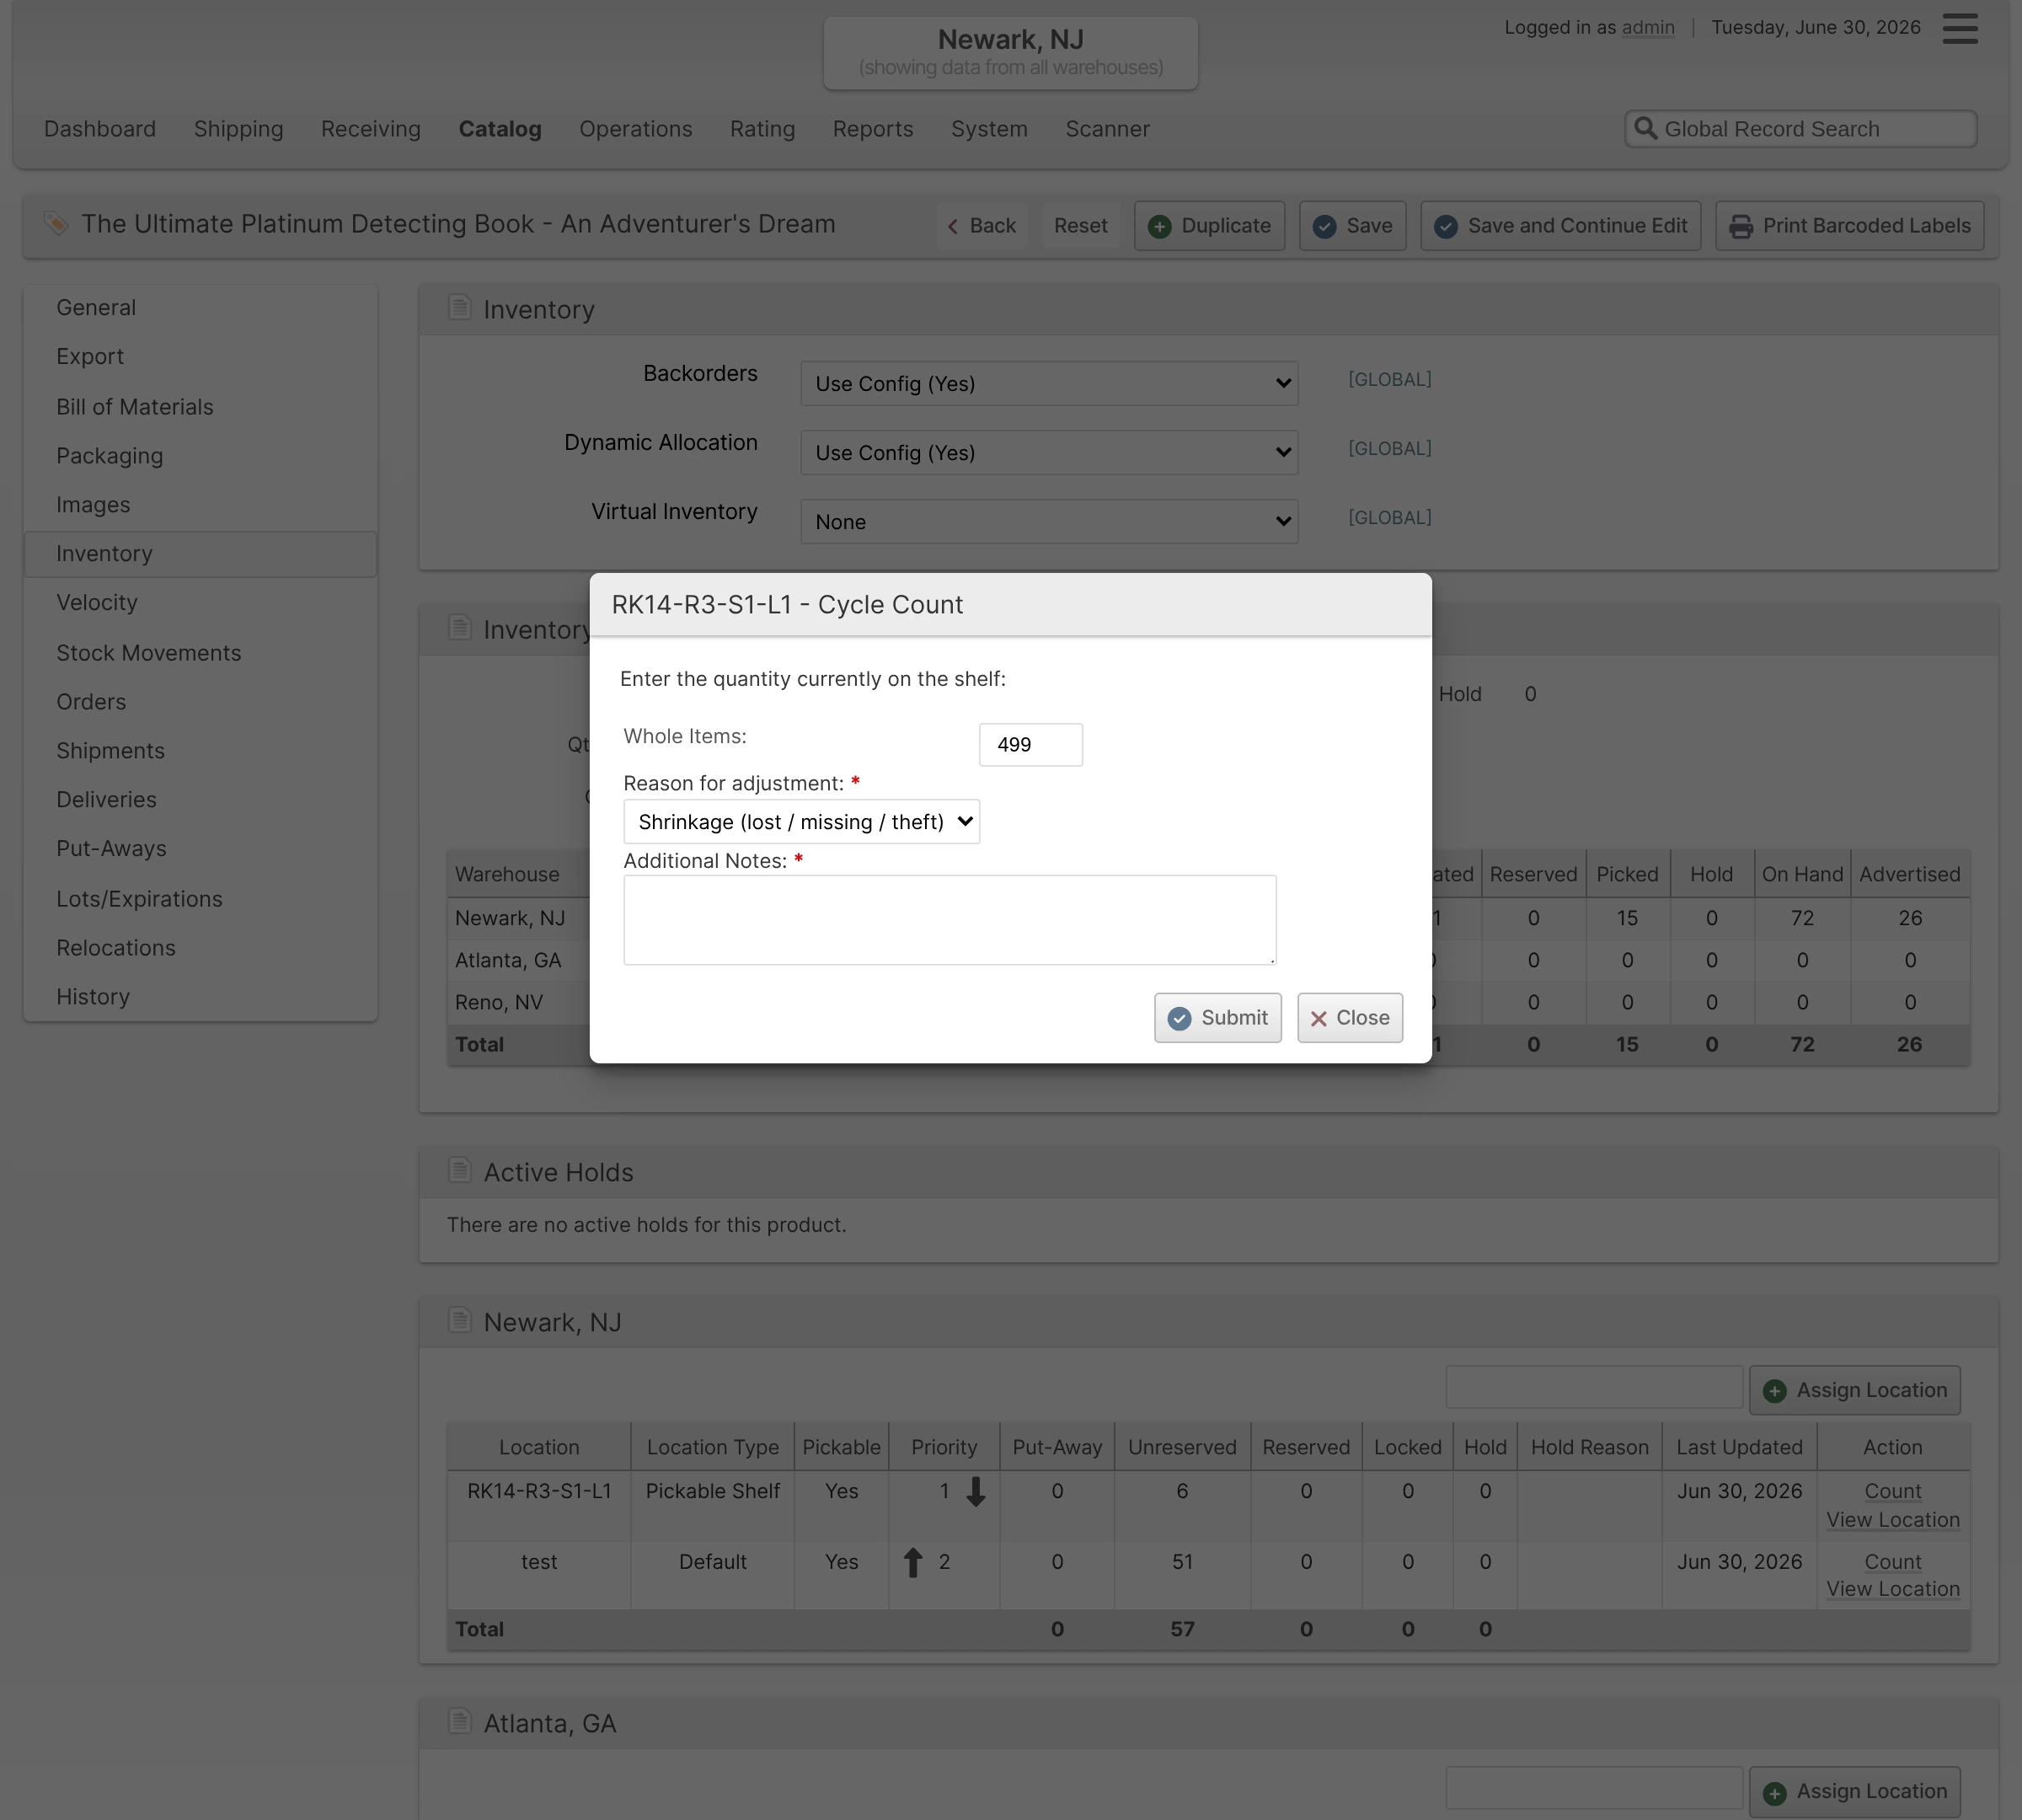
Inventory adjustments now capture a structured reason instead of free-form text, so every cycle count and quantity correction is classified by why it happened — Cycle Count Variance, Found / Located, Shrinkage, Damaged, Defective, Expired / Obsolete, Receiving Error, Customer Return, and more. Adjustments become reportable and reconcilable across the warehouse, and they drive meaningful codes on outbound EDI instead of one catch-all.
You choose an Adjustment Reason wherever inventory changes: the Scanner Cycle Count flow (with a per-session default and an optional per-count override so counting stays fast), the Approve step of a Stock Take, the Count dialog on a product's Inventory tab, and the inventory adjustment API. The old free-text field becomes an optional Additional notes field, and a few reasons (such as Shrinkage and Other) prompt for a note explaining the change. Whether a reason is mandatory is controlled per Merchant by Require reason for stock adjustment at System -> Configuration -> Stock -> General.
The reason appears as a filterable Adjustment Reason column on the Stock Movement Log, the Product History grid, and the Stock Takes grid, and is included in inventory adjustment API responses and webhooks.
For trading partners, physical adjustments sent on the 947 Warehouse Inventory Adjustment Advice now carry an EDI 947 reason code that reflects the chosen reason, mapped through a new per-subscription Inventory Adjustment Advice — Adjustment Reason Codes map — replacing the previous behavior of reporting every physical adjustment under the single code AH (Inspection Required).

Slotting Rules
Until now, a warehouse worker could put a product into any open location, and a mis-slotted item — a temperature-sensitive SKU on a dry-storage shelf, an oversized item in a forward-pick bin, one merchant's goods in another's zone — was only caught when someone noticed. Slotting Rules let you encode your storage policy once and have ShipStream enforce it at the moment of placement, right on the scanner, before the mistake is made.
Classifying your products
Two new pages turn product attributes into labels your rules can use:
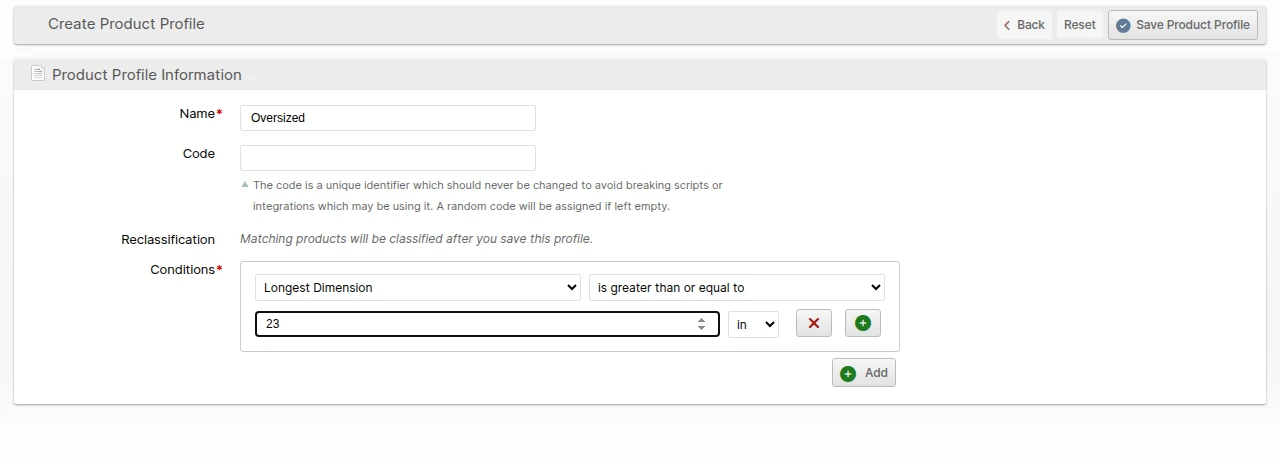
- Product Profiles (System -> Product -> Product Profiles) are reusable flags a product can carry — Fragile, Hazmat, Temperature Controlled, Requires Overbox — and a product can match as many as apply. You build each profile with a visual condition builder over product attributes (with unit-aware weights and dimensions), or write an advanced expression for anything the builder doesn't cover.
- Handling Classes (System -> Product -> Handling Classes) are mutually exclusive, per-warehouse buckets — Smalls, Team Lift, Fork-Only — where each product lands in exactly one class. Classes are evaluated in a sort order you control, first match wins, so classification is predictable.
Both classify your catalog automatically in the background as products and stock change; each page's grid shows how many products match and whether classification is up to date.
Defining and enforcing rules
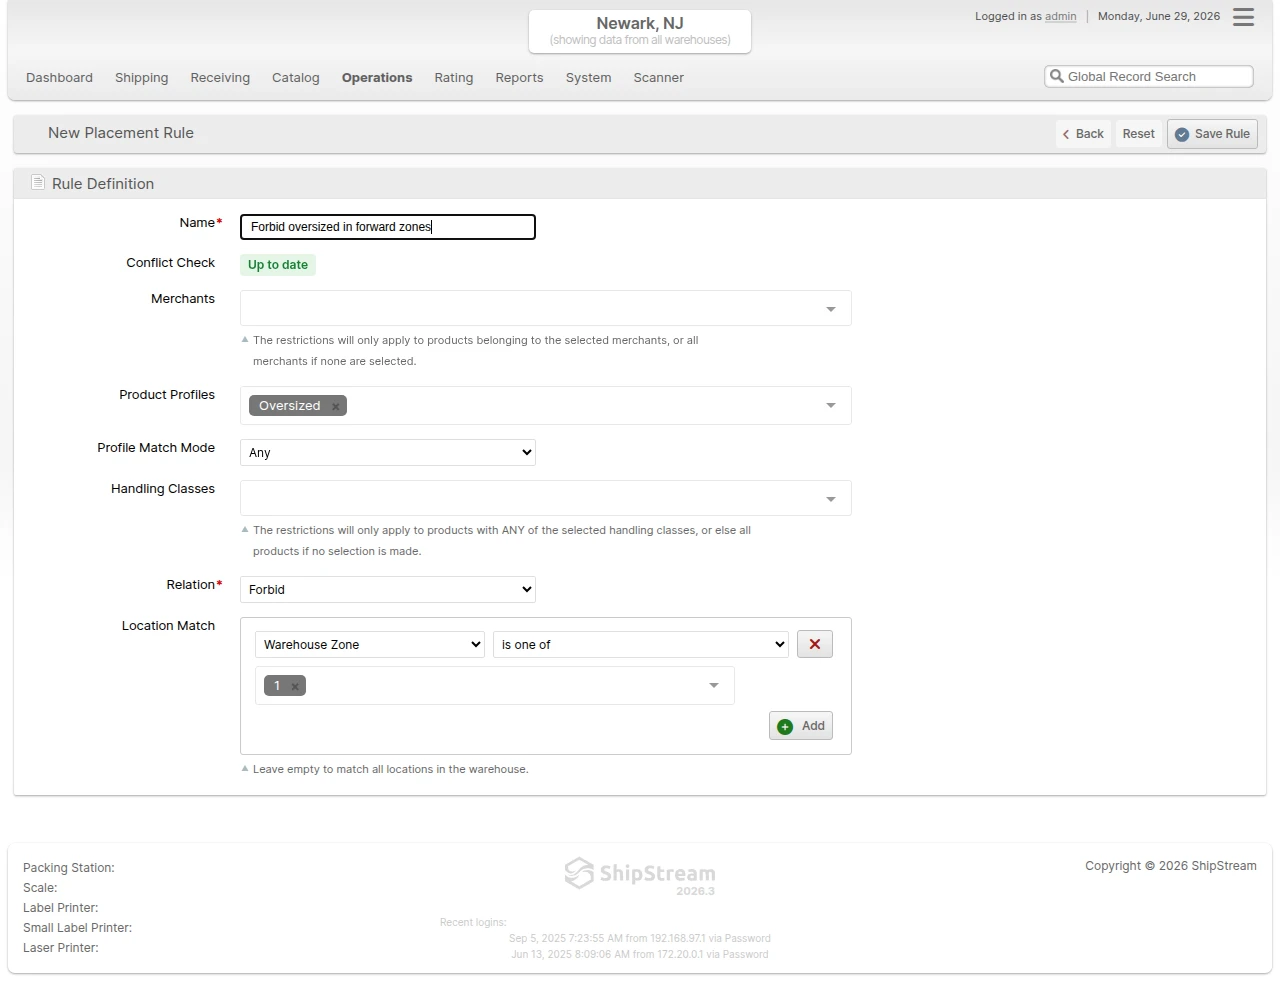
Slotting Rule Sets (Operations -> Warehouse -> Slotting Rules) are where it comes together. A rule pairs a subject (products, chosen by merchant, profile, or handling class) with a relation and an object (a location, rack, zone, or location tag):
- Require and Forbid are hard rules — they block a placement that violates them.
- Prefer and Discourage are weighted suggestions — they warn, but let the operator proceed.
You group rules into rule sets you can enable or disable as a unit — a cold-chain program, a Q4 seasonal layout — and ShipStream flags rule sets that contradict each other (where some products would have no valid location left) so you catch an unworkable setup before it reaches the floor.
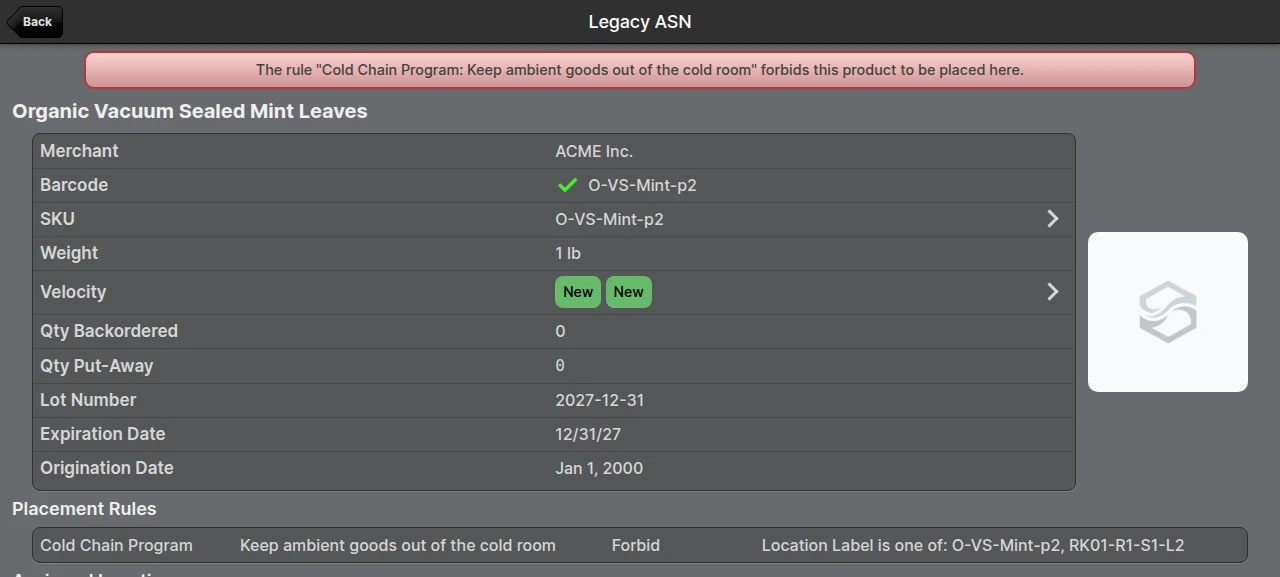
On the scanner, during both put-away and relocation, the operator sees the rules that apply to the product and gets a single verdict when a location is scanned: a forbidden or required-elsewhere location is blocked, a discouraged or non-preferred location shows a warning they can acknowledge and continue, and a location that satisfies a rule shows a brief confirmation. Warehouses with no active rules see no change to these flows.
Finally, read-only Profiles and Handling Class columns — both filterable — have been added to the Products, Velocities, and Inventory Holds grids.
Pick Routes
Until now, the order in which pickers walked a batch was fixed: it came straight from each Rack's Picking Order, so a warehouse had exactly one path and changing it meant re-uploading your rack data. Pick Routes let you define multiple named pick paths per warehouse — a foot-traffic route, a forklift route that runs down one side of an aisle and back the other, a seasonal layout, a split-test — and assign a different one to each Asset Policy, so the right pickers get the right path without touching your racks.
A new Operations -> Warehouse -> Pick Routes screen lets you create and name routes, each locked to a single warehouse (up to ten per warehouse). You manage a route's rack sequence as a spreadsheet: Download the current order as CSV or Excel — two columns, Rack Name and Picking Order — reorder it, and Import it back. Each Rack's edit form also replaces its single Picking Order field with a Picking Order by Route table, so you can set that Rack's position in each of its Warehouse's routes right on the rack page — handy for tweaking one Rack without re-uploading a whole route. Every warehouse starts with one Default route, created automatically and seeded from your existing rack order, so picking is unchanged the moment you upgrade; new racks you add later join the Default route automatically.
To put a route to work, pin it on an Asset Policy — the edit form gains a per-warehouse Pick Routes mapping where each warehouse can take a specific route or stay on its Default. When a batch is created it resolves its route from the Asset Policy in effect, falling back to the warehouse default, and orders the racks within each Zone accordingly. Which route serves as a warehouse's Default is set at System -> Configuration -> Warehouse -> Operations -> General -> Warehouse Default Pick Route. The resolved route appears as a new filterable, sortable Pick Route column on the Picking Batches grid and on the batch view page.
See Pick Routes for the full guide.
Retailers
ShipStream now has a dedicated Retailer record for the business partners you fulfill for — big-box stores, distributors, and other B2B trading partners such as Walmart or Target. A Retailer keeps a partner's identifiers, receiving locations, packing requirements, and shipping defaults together in one place, and a single Retailer can roll up to a Parent Retailer so you can group a chain and its individual distribution centers under one top-level partner.
Manage Retailers under Shipping -> Retailers. Each Retailer captures core identity (Name, Legal Name, DBA, and an immutable Code), its Fulfillment Model (Wholesale, Drop Ship, or Mixed), and standing shipping defaults such as Default Shipping Method, Allowed Shipping Methods, Default Duties Payor, and a default Third-Party Billing group. Dedicated tabs store the Retailer's EDI Identifiers (DUNS, GLN, SPS Trading Partner ID, and more), Ship-To Locations (distribution centers, stores, mark-for, and drop-ship addresses), uploaded Routing Guides, and a read-only Action Log. Retailers also support Custom Fields configured under System -> Shipping -> Retailer Custom Fields.
On order creation, attach a Retailer through a new Retailer popup — doing so auto-fills the order's Default Duties Payor, Third-Party Billing group, and shipping method from that Retailer's defaults, but only where the order doesn't already carry an explicit value, so a manual choice is never overwritten. Picking one of the Retailer's Ship-To Locations auto-fills the order's shipping address. The Retailer edit page gains Orders and Shipments tabs listing everything placed for that partner, and the Sales -> Orders grid gains a filterable Retailer column. Order and Shipment records — in both the Global API and the Merchant API — now additively expose the linked Retailer and Ship-To Location, and both order and shipment search support filtering by retailer.
For orders placed over EDI, SPS Commerce imports now auto-assign a Retailer — and, where the inbound ship-to is recognized, a Ship-To Location — to every order by matching the trading-partner ID and ship-to code against that merchant's Retailer EDI Identifiers and Ship-To Locations. Two new SPS Commerce plugin settings, Require Retailer Match and Auto-Create Ship-To Locations, control whether an unrecognized trading partner or ship-to blocks the import or is allowed through unassigned/auto-created. The Retailer edit page also gains an EDI Documents tab listing that partner's inbound EDI messages.

Protected Customer Data Controls for Webhooks
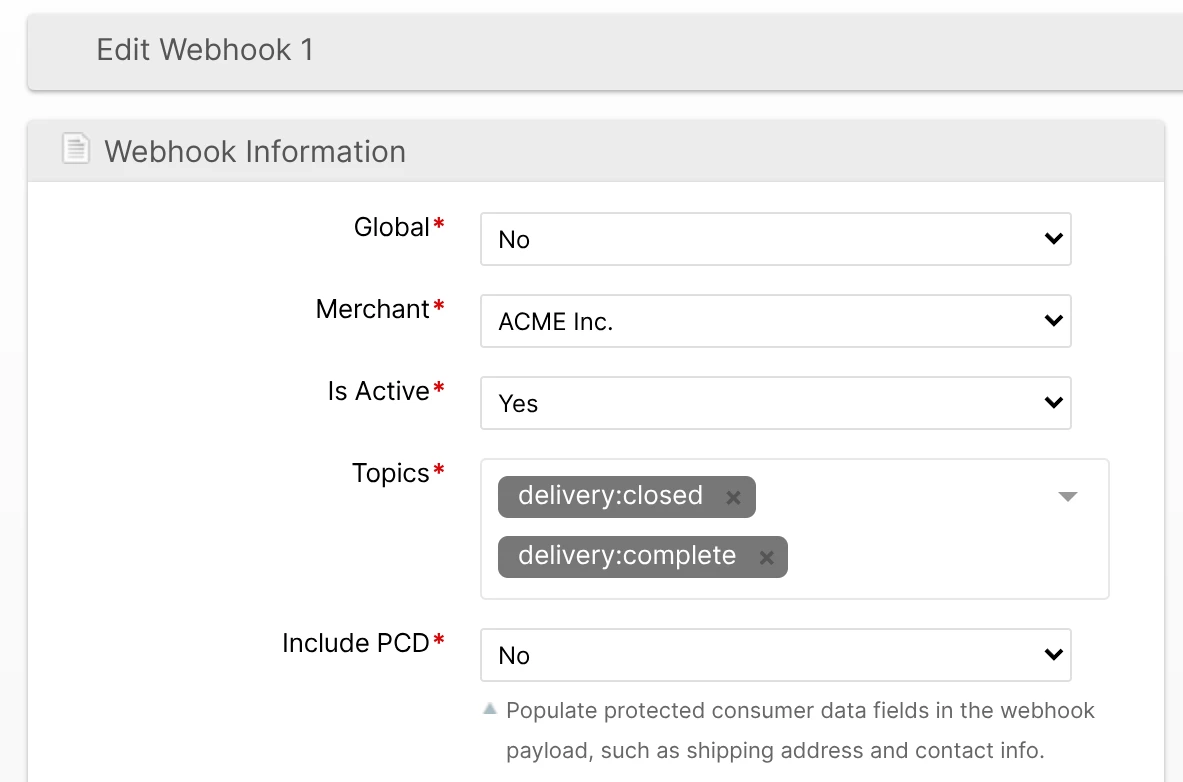
Webhooks can now include a customer's full shipping address — but only when you explicitly allow it. Because a webhook is sometimes delivered to a third-party system that has no need for customer contact details, every webhook gains an Include PCD setting that controls whether Protected Customer Data — the shipping address, including name, company, street, phone, and email — appears in the payload. With it off, those fields are omitted entirely, so you can wire up an integration without ever exposing customer PII to it.
Include PCD appears right after Topics on the webhook create/edit form and is also available through the Merchant API. It defaults to off for new webhooks. When enabled, a shipping_address field is added to every order:* and shipment:* event, formatted to match the address fields of the Merchant API Order endpoints.
Each time a webhook actually sends Protected Customer Data, the disclosure is recorded in the PCD audit log — which data was sent to which endpoint — alongside ShipStream's existing disclosure auditing. The shipping address is also now masked when you view recent webhook deliveries in the admin panel, with reveal-on-demand for authorized users.
Finally, all merchant-specific events now carry merchant_code and brand_code at the top level of the message, making it easier to attribute and route events when one endpoint receives traffic for several merchants or brands.
order:address_changed, any delivery:* topic, or plugin:error — has Include PCD switched on automatically and keeps receiving the same data with no action required. The new shipping_address field stays opt-in (default off) for every other webhook, and no new permissions are required.BFO Pick Sheets on Label Printers
Bulk Fulfill Order (BFO) pick sheets can now print on a 4"x6" thermal label printer in addition to the existing 8.5"x11" laser sheet. Warehouses that have moved off laser printers no longer need to keep one around just for BFO picking — the pick sheet prints on the same label printer the rest of the area already uses.
A new Pick Sheet Paper Size setting at the top of System -> Configuration -> Warehouse -> Operations -> Bulk Fulfill Order chooses the format: Laser (8.5"x11") or Label (4"x6"). It can be set at the default, warehouse group, and warehouse scopes, so each warehouse can match its own hardware. The label sheet carries all the same information as the laser version — the BFO barcode header, the Merchant / Asset Type / Carrier / weight details, and the Shipment Items and Packaging Items tables — rearranged to fit the smaller label. Long orders flow across multiple labels with a "Page X out of Y" footer, and both single-BFO printing and batch (merged) printing honor the selected size.
Auto-Print Packing Slips for Paperless Picking
Packing slips can now print automatically when a packer starts packing a Paperless-picked shipment, not only shipments handled through a Bulk Fulfill Order. With the new setting enabled, scanning the LPN or packing slip to load a paperless-picked shipment sends its packing slip to the printer right away, so packers no longer print it by hand.
Enable it per Brand at System -> Configuration -> Warehouse -> Scanner -> Packing -> Print Packing Slip for Paperless. The slip prints once, as the shipment moves from picked to packing, so reloading the screen won't reprint it.
A companion Default Just-In-Time Paper Size setting at System -> Configuration -> Shipping -> Packing Slip Design -> General sets the paper size for slips printed at the packing station — used by both Paperless and Bulk Fulfill Order packing. Leave it on Inherit Default Paper Size to follow your Default Paper Size, or choose Letter, Half-Letter, or Label (4"x6") — so, for example, paperless stations can print to a label printer while paper-based picking keeps using laser.
Allow Partial Batches
Warehouses that pick most efficiently in full carts can now prevent under-filled picking batches from being created. A new Allow Partial Batches toggle — beside Include Future Target Ship Dates in the Scanner (Precise Batch, Quick Batch, and the create-batch steps) and on the admin Start New Picking Batch dialog — controls whether a batch may be created before it reaches capacity.
When the toggle is off (full-only), ShipStream blocks batch creation unless the batch fills to capacity — by shipment count, total weight, or total volume — and greys out the Asset Type rows that can't fill, so pickers don't have to know the limit ahead of time. Attempting to create an under-filled batch shows the warning "There are not enough shipments to fill this batch. To bypass this test, check Allow Partial Batches and try again."
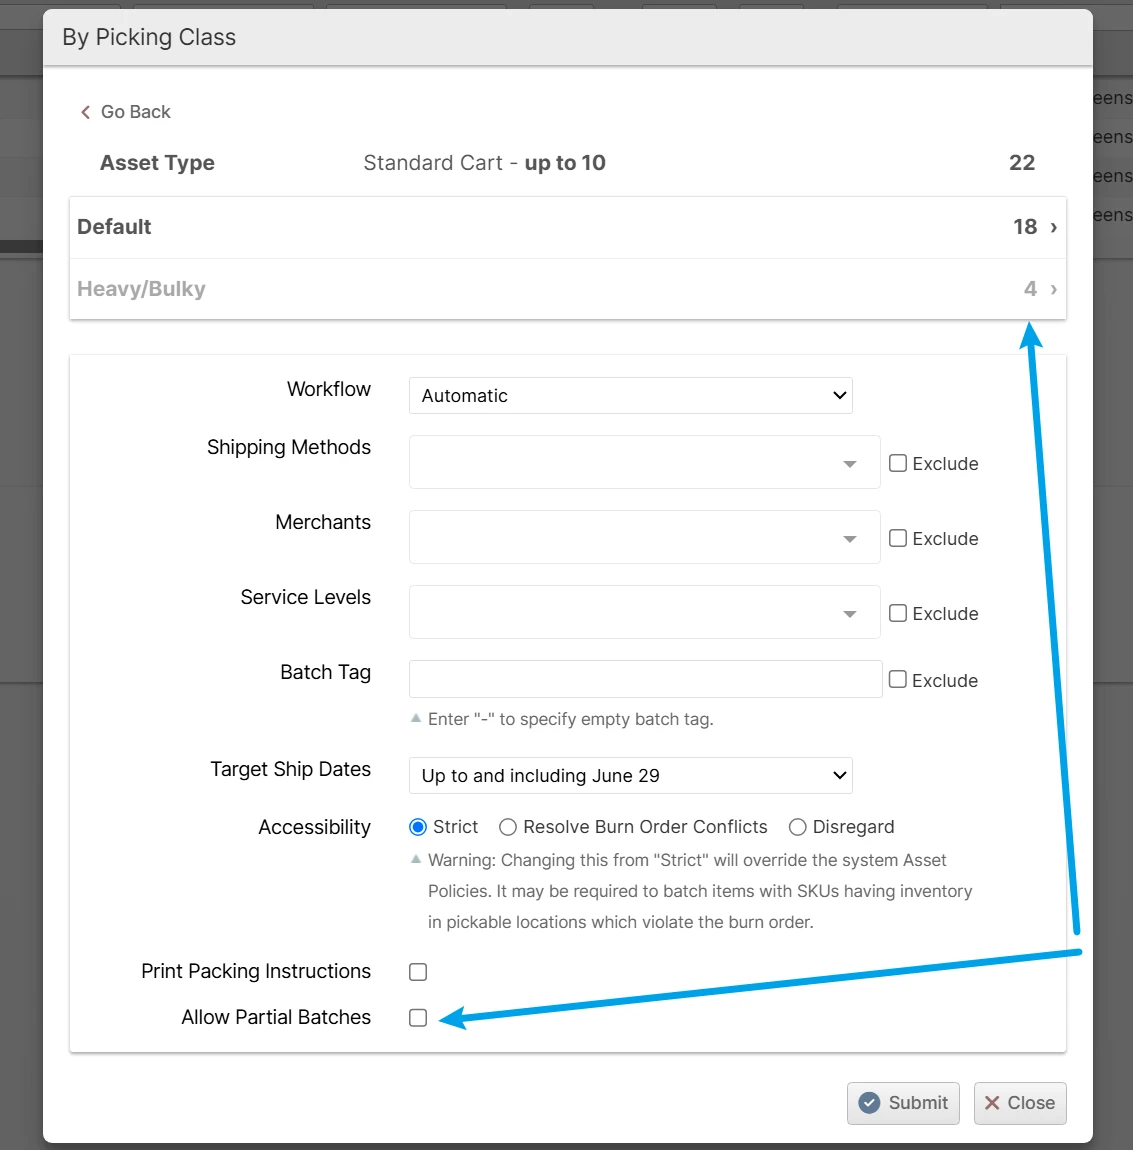
The toggle's availability and starting state come from a new System -> Configuration -> Warehouse -> Operations -> Batching -> Allow Partial Batches setting, configurable per warehouse. Always and Never enforce the policy and hide the toggle, while Default Yes and Default No show the toggle with that starting position. The toggle is remembered only for the current screen and resets to its default on each page reload.
USPS Dimensional Weight Changes
USPS is changing how it prices dimensional weight for domestic shipments on July 12, 2026, and ShipStream applies the new rules automatically — there's nothing to turn on. Two things change: the divisor used to convert a package's size into billable weight drops from 166 to 139, and each dimension is now rounded up to the next whole inch instead of to the nearest inch. Both raise the dimensional weight of larger, lighter packages, so USPS rates for those shipments will be higher than before.
The cutover is keyed to each order's target ship date, not the moment of deployment. An order created late on July 11 that isn't expected to ship until July 12 is already rated under the new pricing, while anything shipping before the cutoff keeps the current 166-divisor, nearest-inch rates. USPS rated through label providers such as EasyPost is covered automatically; other carriers are unaffected.
Bug Fixes
- Fixed an "An unexpected error occurred" failure when reverting a picked shipment on a multi-shipment order where another shipment at the same warehouse had already been reverted, which left the shipment stuck. These reverts now complete normally, and shipments previously blocked this way can simply be retried.
- Fixed the Amazon shipping carrier submitting a package's width in place of its height when requesting rates and labels for shipments measured in inches, which could produce incorrect Amazon rates or labels. A related error when reading the carrier name was also resolved.
- Fixed an order's destination State (Region) and Country going stale after its shipping address was changed — the order kept its original state and country, so it showed under the wrong destination in the Orders grid filters and columns and in dashboard reporting. Any shipping-address change now re-syncs the order's destination immediately, whether the edit comes from the admin order screen, the client portal, or an automated update, and a one-time update on deploy corrects historical orders whose destination had drifted.
Merchant API Updates
- Added an
include_pcdflag towebhook.create(accepted) andwebhook.list(returned), controlling whether a webhook's payloads include Protected Customer Data. When enabled,order:*andshipment:*events gain ashipping_addressobject matching the Order endpoint address format; all merchant-specific events also gain top-levelmerchant_codeandbrand_codefields.
- Added
retailer_id/retailerandretailer_ship_to_location_id/retailer_ship_to_locationfields toorder.info,order.search,shipment.info, andshipment.search(additive, excluded from default field sets), andretailer_idfiltering on both order and shipment search.