

Retailers
A Retailer is a record that represents a business you fulfill for — typically a big-box store or distributor such as Walmart, Target, or Dick's Sporting Goods — rather than an individual consumer. B2B trading partners like these each have their own identifiers, receiving locations, and packing requirements, and a single Retailer can receive many separate Orders shipped to many different destinations. The Retailer entity gives you one place to capture all of that information so your team can recognize, group, and consistently fulfill a partner's business.
Retailers are a single shared catalog: a Retailer is set up once and is available to every Merchant, so packing requirements, identifiers, and ship-to locations are maintained in one place for all clients that ship to that partner. Where a setting is genuinely merchant-specific — a Trading Partner ID or a Third-Party Billing default — it is layered on top of the shared record (see Identifiers and Merchant Settings). A Retailer can also point to a Parent Retailer, which lets you model a buying group or chain — for example, a single "Walmart" parent above its individual distribution centers — so that related Orders can be grouped under the same top-level partner.
Create a Retailer
- Navigate to Shipping -> Retailers and click Add New Retailer in the top right.
- Fill out the Retailer Information and Defaults sections on the Info tab (each field is described in Retailer Information and Defaults below).
Click Save Retailer.
Choose the Code carefully — it is used to identify the Retailer and cannot be changed after the Retailer is created, so avoid values you may want to rename later.- After saving, the Identifiers, Merchant Settings, Ship-To Locations, Routing Guides, EDI Documents, Orders, and Shipments tabs become available. Use them to add the Retailer's EDI identifiers, per-Merchant billing defaults, receiving addresses, and packing documents, and to review related activity.
Info Tab
Retailer Information
| Field | Description |
|---|---|
| Code | A short identifier for the Retailer (letters, numbers, underscores, and hyphens only). Required, must be unique across all Retailers, and cannot be changed after creation. |
| Name | The Retailer's display name (for example, Walmart). |
| Legal Name | The Retailer's official registered business name, if it differs from the display name. |
| DBA | The "Doing Business As" name, if the Retailer trades under a different name. |
| Status | The Retailer's current status. This is shown for reference and is changed using the status actions rather than edited directly — see Retailer Status. |
| Fulfillment Model | How you fulfill this Retailer's business: Wholesale — bulk shipments to the Retailer's own locationsDrop Ship — individual shipments to the Retailer's end customersMixed — both wholesale and drop-ship |
| Parent Retailer | An optional higher-level Retailer that this one rolls up to, used to model buying groups or chains. |
Defaults
These values capture the Retailer's standing shipping and billing preferences in one place.
| Field | Description |
|---|---|
| Default Duties Payor | The party normally responsible for paying import duties and taxes on international shipments: Shipper, Recipient, or Third Party Billing. When Third Party Billing is chosen, the billing account comes from the per-Merchant Default Duties TPB Group on the Merchant Settings tab. |
| Default Shipping Method | The shipping method normally used for this Retailer. The options include every method enabled for any Merchant; each Order can only use methods available to its own Merchant. |
| Allowed Shipping Methods | Restricts which shipping methods may be used for this Retailer. The methods effectively available on an Order are those allowed here that the Order's Merchant also has enabled. When set, the Default Shipping Method must be one of the allowed methods. |
| Routing Guide Notes | Free-form notes about the Retailer's packing and shipping requirements. For full documents, use the Routing Guides tab. |
Additional Fields
Any Retailer Custom Fields you have configured appear in the Additional Fields section of the Info tab, letting you capture extra information specific to your operation.
Retailer Status
A Retailer is always in one of two statuses:
- Active — the Retailer is in normal use.
- Archived — the Retailer has been retired.
Archive a Retailer from its edit page using the Archive button, or from the Retailer grid using the Archive mass action; restore one the same way with Restore. Archiving retains the Retailer and all of its history rather than permanently deleting it — its records, identifiers, and related Orders remain available for reference and reporting.
Retailer Grid
The Retailer grid at Shipping -> Retailers lists your Retailers with columns for ID, Code, Name, Legal Name, DBA, Status, Fulfillment Model, Parent Retailer, and the Updated At / Created At dates. Any Retailer Custom Fields you have enabled for the grid appear here as well. You can filter and sort on these columns to quickly find a partner, and export the list to CSV or Excel.
Retailer Column on the Order and Shipment Grids
A Retailer column is also available on the Order grid (Shipping -> Orders) and on the Shipment grids (Shipping -> Shipments, including the Parcel and Freight views), showing the Retailer each record is assigned to. The column's filter matches on Retailer Name, Code, or any of the Retailer's EDI Identifier values, so you can pull up a partner's work using whichever value you have on hand.
If your filter matches too many Retailers or combines OR with a negation, the grid will tell you the filter could not be applied. Narrow the filter text or use the Retailer Code instead.
Identifiers Tab
The Identifiers tab stores the EDI identifiers a Retailer is known by, so you can match incoming documents and orders to the correct partner. Click Add New Identifier to add one:
| Field | Description |
|---|---|
| Merchant | Who the identifier applies to. Leave it as Global (all merchants) when every Merchant shares the same identifier, or pick a Merchant when that client has their own Trading Partner ID for this Retailer. |
| Qualifier | The kind of identifier. SPS Trading Partner ID is the kind consumed today; additional kinds will be offered as more EDI integrations adopt Retailers. |
| Value | The identifier itself. |
| Label | An optional friendly name to help your team recognize the identifier. |
| Notes | Optional notes about the identifier. |
A given Qualifier and Value combination must be unique within its scope — once globally, and once per Merchant. When both a global identifier and a Merchant-specific identifier match an incoming document, the Merchant-specific one wins, so a client's own Trading Partner ID can override the shared one. Use the grid's delete action to remove identifiers you no longer need.
Merchant Settings Tab
Some preferences depend on which Merchant is shipping to the Retailer. The Merchant Settings tab holds one row per Merchant with that client's billing defaults for this Retailer. Click Add New Merchant Setting to add one:
| Field | Description |
|---|---|
| Merchant | The Merchant these settings apply to. Each Merchant can have at most one settings row per Retailer, and it cannot be changed after the row is created. |
| Default TPB Group | A Third-Party Billing group to bill this Merchant's shipments for the Retailer to by default — useful when the Retailer pays freight on their own carrier account. |
| Default Duties TPB Group | The Third-Party Billing group used for import duties and taxes when the Retailer's Default Duties Payor is Third Party Billing. |
When an Order is created for the Retailer, ShipStream applies the settings row matching the Order's Merchant; a Merchant without a row simply gets no Third-Party Billing defaults.
Ship-To Locations Tab
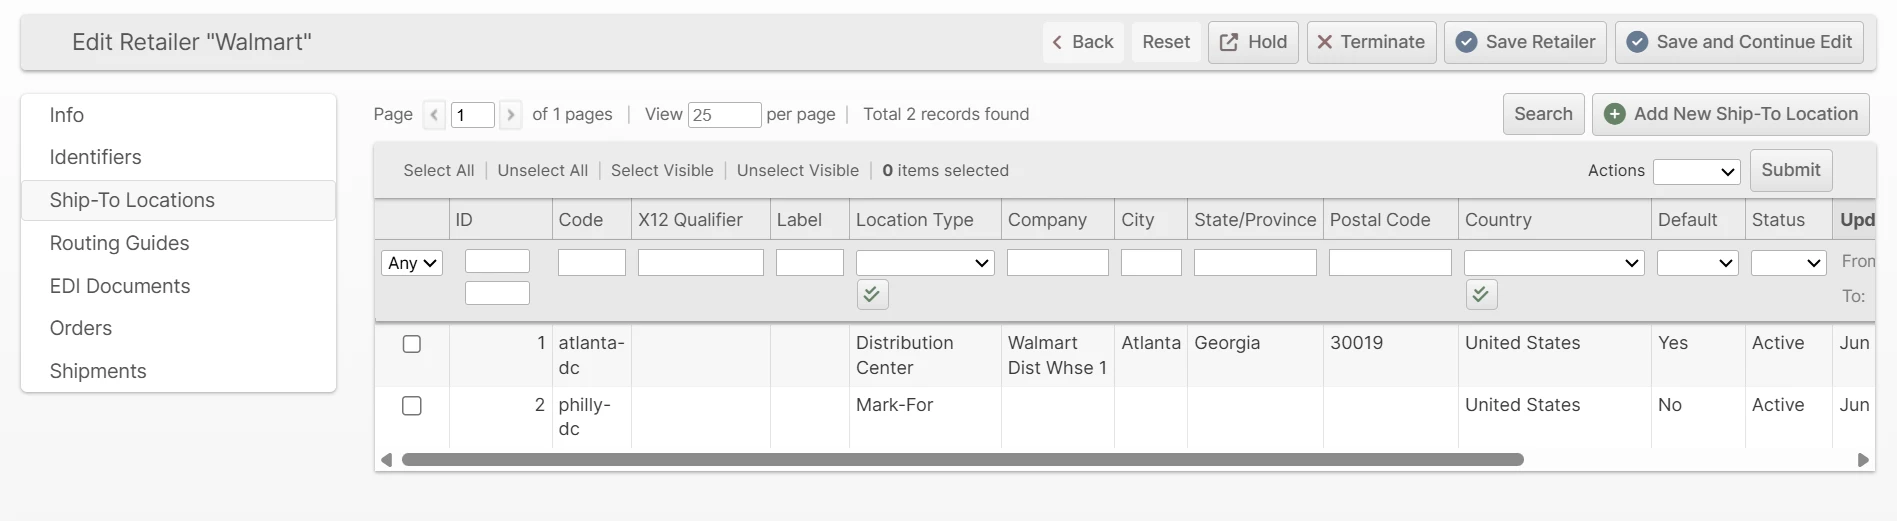
A Retailer usually receives shipments at many addresses — distribution centers, individual stores, or drop-ship points. The Ship-To Locations tab keeps those addresses on the Retailer record so they can be reused and consistently identified. Click Add New Location to add one:
| Field | Description |
|---|---|
| Code | The Retailer-assigned location code, such as a DC or store number. Required and must be unique within the Retailer for the same Qualifier. |
| Qualifier | The kind of code the location is identified by (for example DUNS, GLN, or Buyer Location), matching how the Retailer's EDI documents reference it. |
| Label | An optional friendly name for the location. |
| Location Type | What the address represents: Distribution Center, Store, Drop-Ship, or Other. |
| Company | The business name at the address. |
| Street, City, Country, State/Province, Postal Code | The address. The State/Province field becomes a dropdown for U.S. addresses. |
| Telephone, Email | Contact details for the location. |
| Default Ship-To | Preselects this location as the ship-to when an Order is created for the Retailer. New locations are not made the default automatically. |
| Status | Active to make the location available, or Inactive to retire it. |
Mark-For Locations
In consolidation programs, cartons are shipped to a distribution center but labeled for the store that will finally receive them. That final-destination store is the Order's Mark For location. Mark-For stores come from the same list as ship-to locations, so a Location can be the ship-to on one Order and the Mark-For on another. Rates, address validation, and address classification always use the Order's shipping address, not the Mark-For store.
When you create an Order in the Admin UI, click Select Retailer (or Retailer: name if one is already chosen) to open the Retailer popup, then choose a Mark-For Location after selecting the Retailer and click Save. Mark-For always requires an explicit choice; unlike the ship-to, no location is preselected. Orders can also carry a Mark For store when they are created by Order import, the API, or SPS Commerce EDI.
Once an Order has a Mark-For store, it appears as Mark For (the location's code and label) below the Retailer on the Order and Shipment pages in both the Admin UI and Client UI, and below Address Classification on the Scanner packing screen so packers can verify carton labels at a glance.
To print the store on the packing slip, enable Display Mark-For Store under System > Configuration > Packing Slip Design > Body (see Packing Slip Design).
Routing Guides Tab
Retailers publish routing guides — documents that spell out their packing, labeling, and shipping requirements — and they update them regularly. The Routing Guides tab lets you keep the current files attached to the Retailer so warehouse staff always have them on hand. Click Upload Routing Guide and provide:
- Title — a short name for the document.
- Description — optional notes about the document.
- File — the document to upload.
Uploaded guides are listed with their file type, size, who uploaded them, and the upload date, and each can be downloaded from the grid. Use the delete action to remove an outdated guide.
Retailer Custom Fields
Like Orders and Shipments, Retailers support Custom Fields for capturing information that ShipStream does not track by default. Configure them under System -> Shipping -> Retailer Custom Fields — the setup form works the same way as Custom Fields for Orders. Once created, a Retailer Custom Field appears in the Additional Fields section of the Retailer's Info tab and, if enabled, as a column on the Retailer grid.