

Racks
Summary
ShipStream will allow you to define the Racks used in the warehouse. By default all Locations will be assigned to the "Default" Rack. However, defining your own Racks will allow you to:
- Setup picking paths to help your pickers travel from one location to the next along a predetermined path.
- Assign racks to Zones so that your picking batches may be more optimized and cover a smaller footprint of the warehouse.
From largest to smallest there are Zones > Racks > Locations.
Defining a Rack
- A Rack is specific to a warehouse
- A Rack is where Locations live
You may assign any number of Locations to a Rack, but it is generally best to define one Rack in ShipStream for every physical rack in the warehouse, or well-defined area in case you are not using racks (such as a marked lane on the floor).
The naming pattern you use for your warehouse Racks and Locations is completely up to you, but in order to take advantage of automatic location assignment using Location Patterns it is best if all locations on the same rack share a common prefix or suffix. Typically the Rack's name would appear as part of a Location name.
For example, Rack "A" might contain Locations "A-1", "A-2", etc. In this example the Location Pattern for Rack "A" might be "A-_" or "A-%".
Rack Configurations
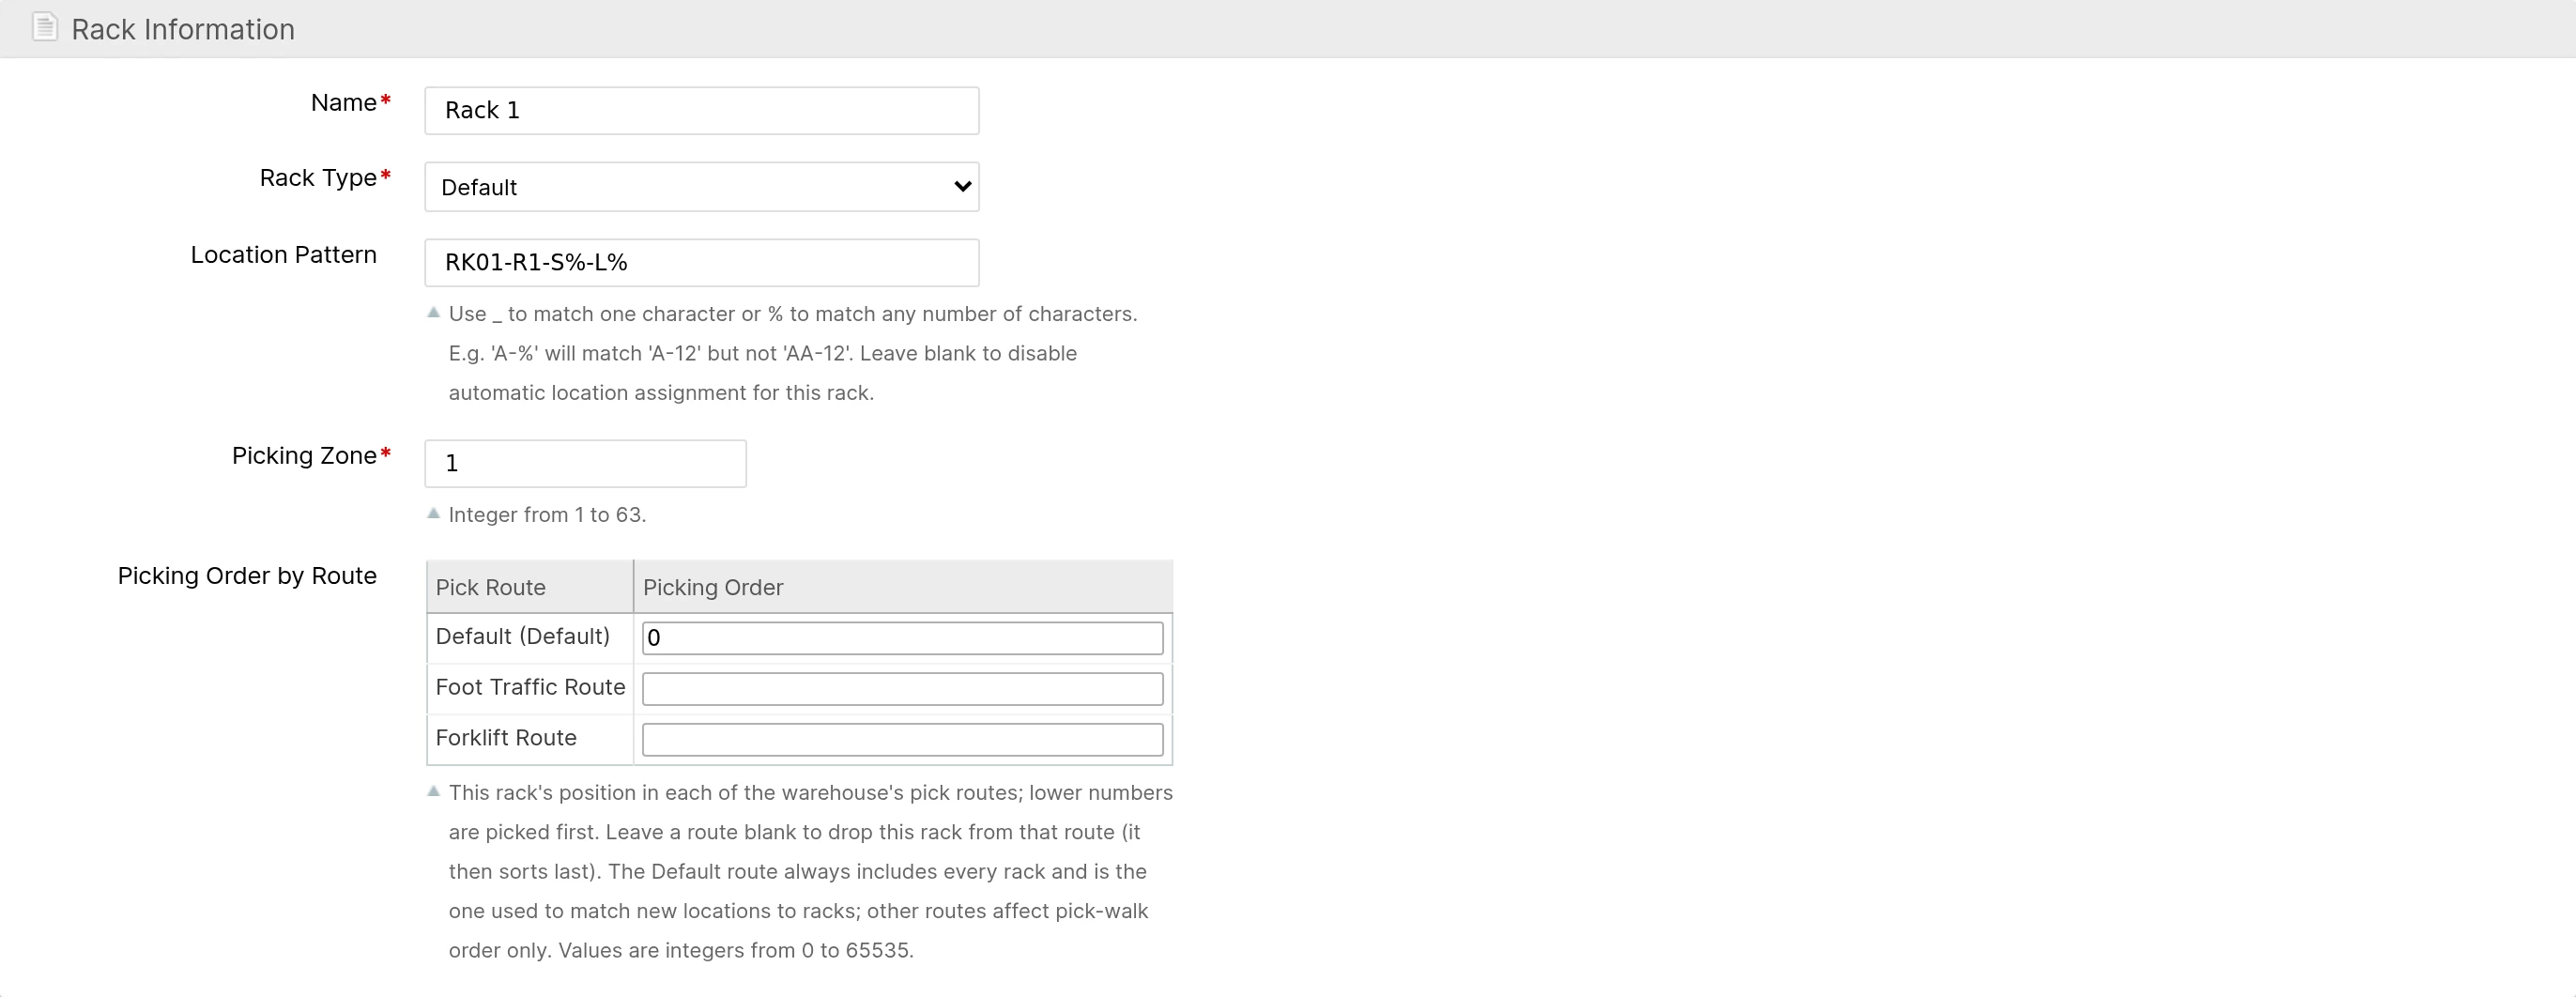
Name
The Name of the Rack. This name is often the first part of a Location's Label.
Location Pattern
This is the pattern that will be used to auto assign matching Locations to this Rack.
The patterns are formed using a simple pattern matching.
- Use
_(underscore) to match one character - Use
%(percent) to match any number of characters
E.g.:
A-%will matchA-12but notAA-12A-_will matchA-1andA-Abut notA-11andA-A1
Picking Zone
The Zone that this Rack will be associated with. This value can be an integer from 1 to 63. Racks in the same Zone are assumed to be in fairly close proximity to one another so a larger warehouse should utilize more zones for greater optimization. See Zones.
Picking Order by Route
Picking order determines the picking path that a user would take if they had to pick an item from every pickable Location. A Rack's order is set per Pick Route, so the same Rack can appear at different points in different pick paths.
On the Rack edit form, Picking Order by Route lists each Pick Route in the Rack's Warehouse. Lower numbers are picked first, and each value can be an integer from 0 to 65535.
Designing your Picking Path
An important part of using Racks is to establish a Picking Path for your warehouse. A picking path should reflect the path you would want a picker to take if they had to visit every rack in a single trip. For these examples the naming pattern will be:
Annfor the Aisle number- A dash separator
Wfor West side racks or anEfor East side- Two digit number
Say you have two pickable aisles that are 6 racks long.
| Rack | Aisle 1 | Rack | Rack | Aisle 2 | Rack |
|---|---|---|---|---|---|
| A01-W01 | A01-E01 | A02-W01 | A02-E01 | ||
| A01-W02 | A01-E02 | A02-W02 | A02-E02 | ||
| A01-W03 | A01-E03 | A02-W03 | A02-E03 | ||
| A01-W04 | A01-E04 | A02-W04 | A02-E04 | ||
| A01-W05 | A01-E05 | A02-W05 | A02-E05 | ||
| A01-W06 | A01-E06 | A02-W06 | A02-E06 |
Once all the Racks are labeled on your warehouse diagram you will then want to draw your Picking Path from Rack to Rack. This path will show the path you would want a Single picker to take if they had to pick a Product from every Rack. For simplicity this diagram's Rack Labels are not padded.
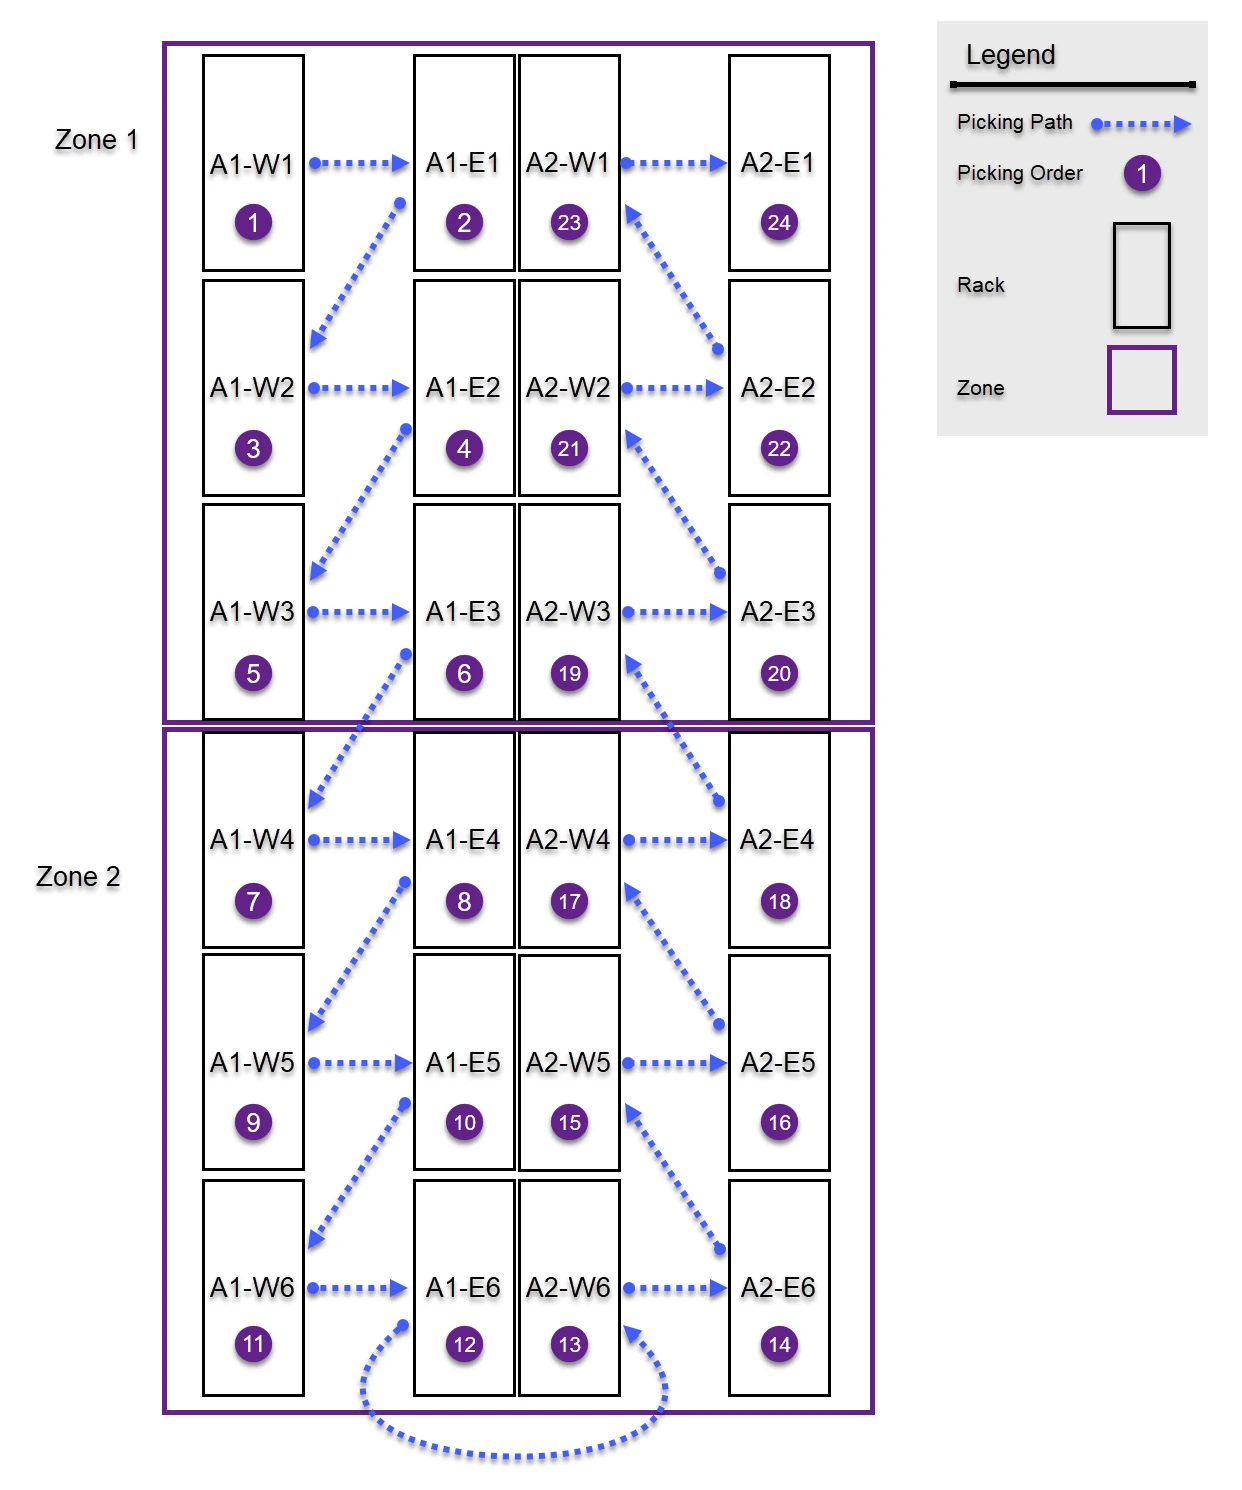
With your Picking Path planned out it is now time to translate that info into spreadsheets. First, import or update the Racks using the same Column names that the grid uses:
- The Warehouse Name
- The Rack Name
- The Rack Type
- The Location Patterns that will be automatically associated with this Rack
- The Picking Zone
You will want to take the first Rack in your picking path and put it in the spreadsheet. Continue down your path until all your Racks have been added to the spreadsheet. As you enter your Racks you will want to be aware of which Zone it is located in so that you can add the rack to the correct Zone.
| Warehouse | Name | Rack Type | Location Pattern | Picking Zone |
|---|---|---|---|---|
| Newark, NJ | A1-W1 | Default | A1-W1-% | 1 |
| Newark, NJ | A1-E1 | Default | A1-E1-% | 1 |
| Newark, NJ | A1-W2 | Default | A1-W2-% | 1 |
| Newark, NJ | A1-E2 | Default | A1-E2-% | 1 |
| Newark, NJ | A1-W3 | Default | A1-W3-% | 1 |
| Newark, NJ | A1-E3 | Default | A1-E3-% | 1 |
| Newark, NJ | A1-W4 | Default | A1-W4-% | 2 |
| Newark, NJ | A1-E4 | Default | A1-E4-% | 2 |
| Newark, NJ | A1-W5 | Default | A1-W5-% | 2 |
| Newark, NJ | A1-E5 | Default | A1-E5-% | 2 |
| Newark, NJ | A1-W6 | Default | A1-W6-% | 2 |
| Newark, NJ | A1-E6 | Default | A1-E6-% | 2 |
Then open the Default Pick Route and import the route order with Rack Name and Picking Order columns. Pad Picking Order numbers, such as 10, 20, and 30, so new racks can be inserted later without renumbering the whole path.
| Rack Name | Picking Order |
|---|---|
| A1-W1 | 10 |
| A1-E1 | 20 |
| A1-W2 | 30 |
| A1-E2 | 40 |
| A1-W3 | 50 |
| A1-E3 | 60 |
| A1-W4 | 70 |
| A1-E4 | 80 |
| A1-W5 | 90 |
| A1-E5 | 100 |
| A1-W6 | 110 |
| A1-E6 | 120 |
| A2-W1 | 130 |
| A2-E1 | 140 |
| A2-W2 | 150 |
| A2-E2 | 160 |
| A2-W3 | 170 |
| A2-E3 | 180 |
| A2-W4 | 190 |
| A2-E4 | 200 |
| A2-W5 | 210 |
| A2-E5 | 220 |
| A2-W6 | 230 |
| A2-E6 | 240 |