

Put-Aways
A Put-Away represents inventory that needs to be put away or stored in your warehouse. Put-Aways are not created directly but rather originate from one of the following actions:
- Processing an ASN, RMA or Other Delivery
- Canceling an Order or reverting a Shipment that has already been picked
- Assembling items from a Work Order
You can find a grid listing all Put-Aways by navigating to Operations > Put-Aways.
Statuses
The statuses for a Put-Away are pretty linear and are as follows:
- Open - Items are still being added to the put-away from the associated entity
- Pending - One or more items are awaiting an approval action (e.g. an ASN shortage exception)
- Ready - No more items will be added, ready to begin the put-away process
- Processing - Processing is currently underway and there are still items that have not yet been put-away
- Complete - All items have been put-away
- Void - The put-away was voided (all unprocessed items have "disappeared")
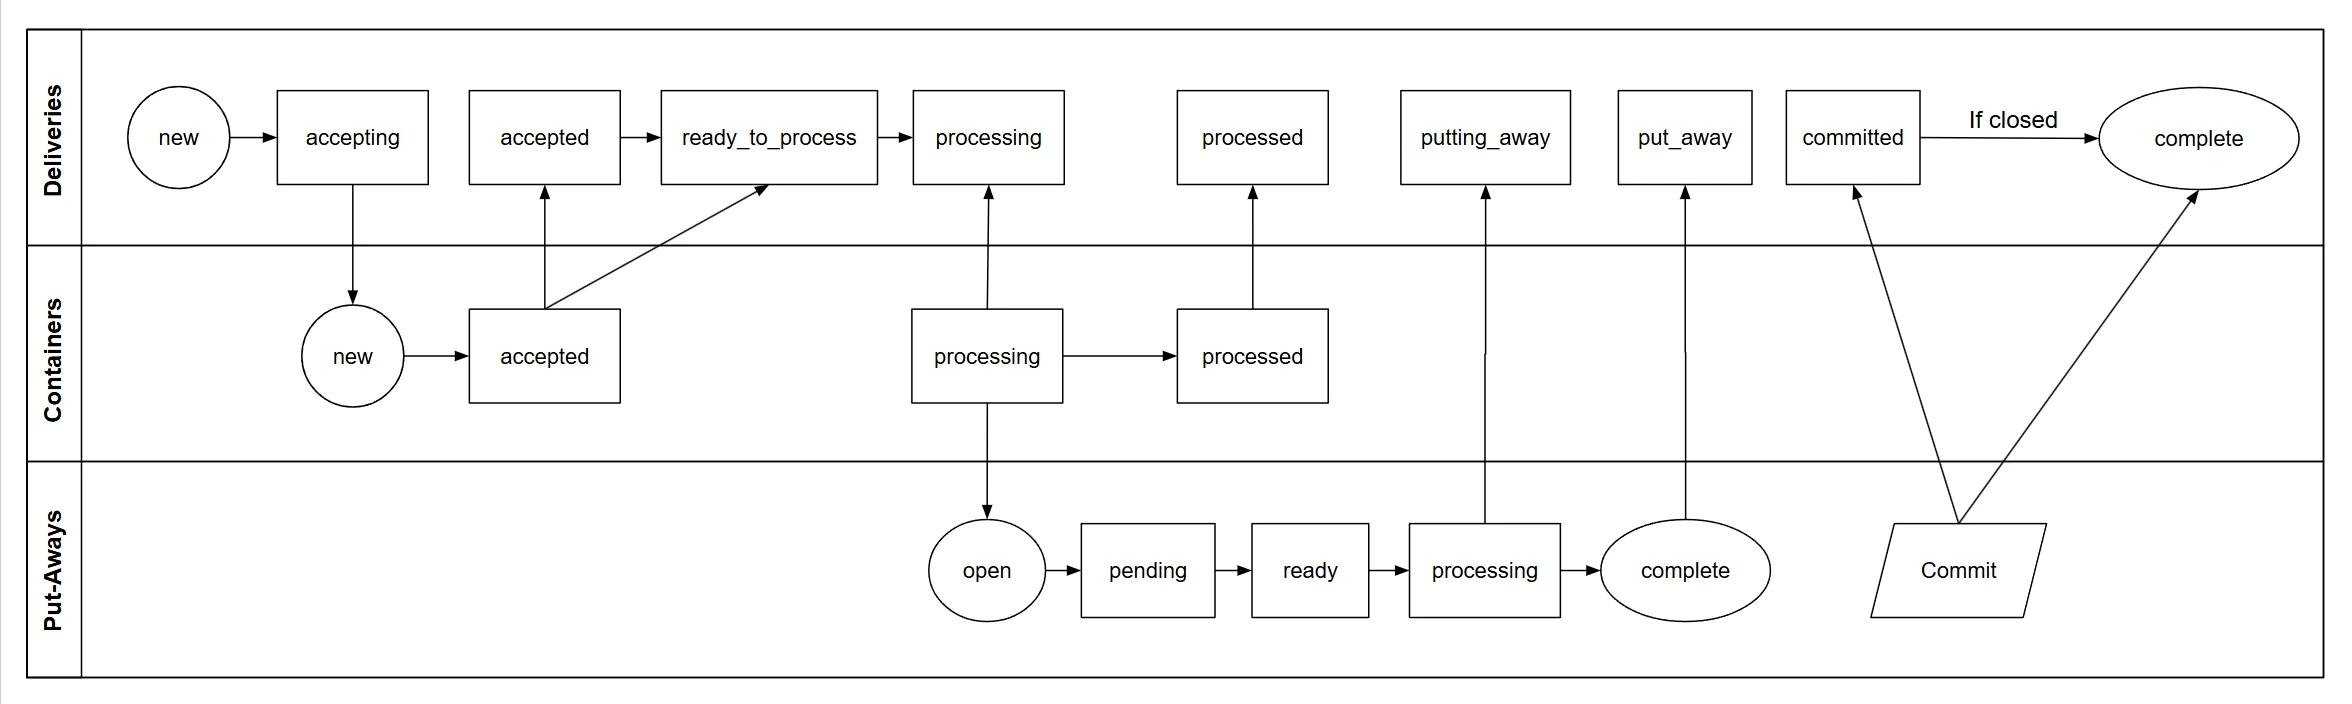
Put-Aways directly impact the status of the ASNs, RMAs and Other Deliveries to which they are associated as depicted in the following diagram:
Admin UI
Navigate to the Put-Away page by:
scanning a barcode associated with the Put-Away
The types of labels that can be scanned include Container Labels, Put-Away Labels, License Plates, Packing Slips, and Tracking Numbers.- navigating to Operations > Put-Aways and using the grid to locate
- navigate to the delivery page (Receiving > ASN, RMA or Other Delivery) and then to the Put-Aways tab on the page of the delivery that you want to put-away, then click the header link titled Put-Away # X.
- If the Put-Away is not yet closed, click Close to advance it to Ready status. If there are unapproved Overage exceptions, these will need to be approved or rejected before the Put-Away can be closed.
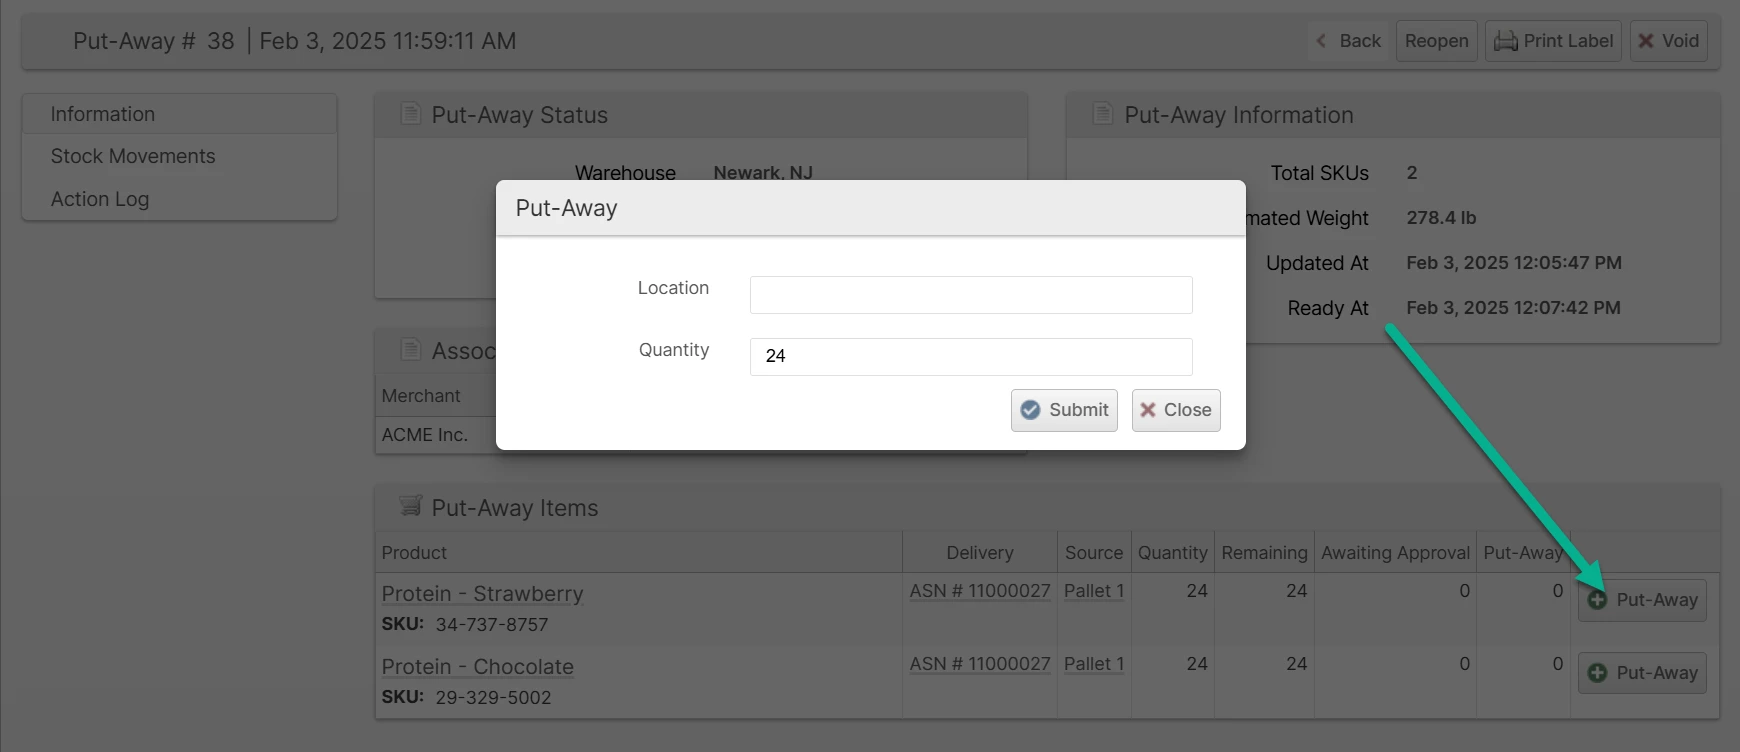
- Click the Put-Away button on your chosen item row.
- Enter the Location and Quantity to put-away and click Submit. If the product has lot tracking enabled, you will also need to select the correct lot to be put-away.
- Repeat until all items are processed.
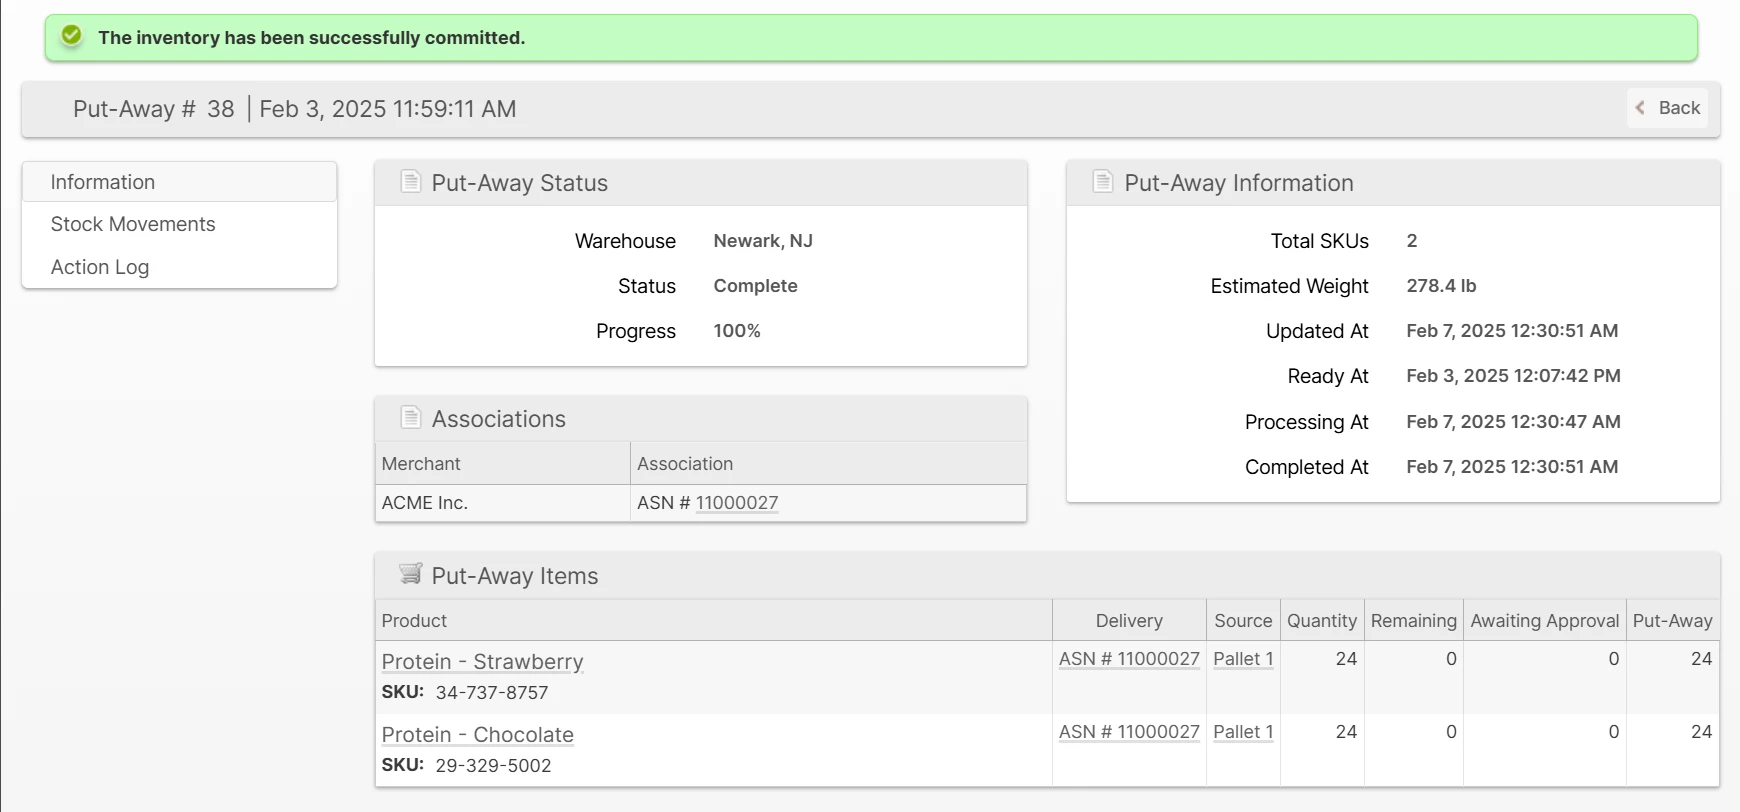
- If the Put-Away is associated with an ASN, RMA or Other Delivery and Auto-Commit is not enabled, click Commit. Inventory at an unheld Location becomes available or can be assigned to backordered Orders. Inventory at a held Location completes the Commit step but remains held and unavailable for allocation.
Scanner UI
Put-Aways can use either a Manual or Directed workflow. Manual is the default. To choose the default for a Warehouse, select it in Current Configuration Scope, then go to System > Configuration > Warehouse > Stock > Directed Put-Away Workflow > Default Put-Away Workflow. A user whose role includes Scanner > Overrides > Override Directed Put-Away Workflow can switch an individual Put-Away between the two workflows before placing inventory.
- From the Scanner main page, tap Put-Away.
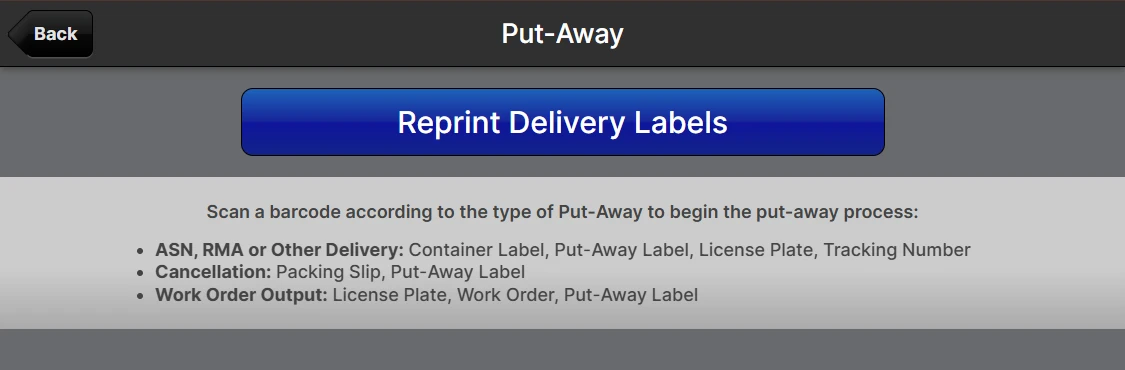
- Scan a barcode according to its type.
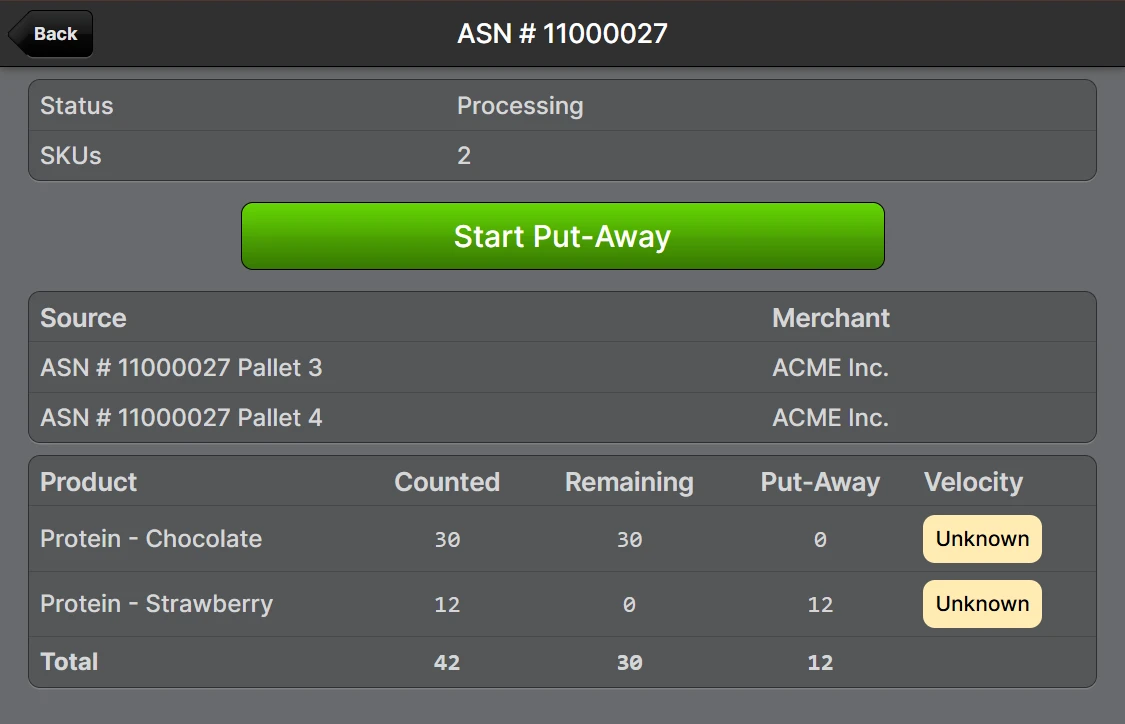
- Tap Start Put-Away to begin processing.
Directed Workflow
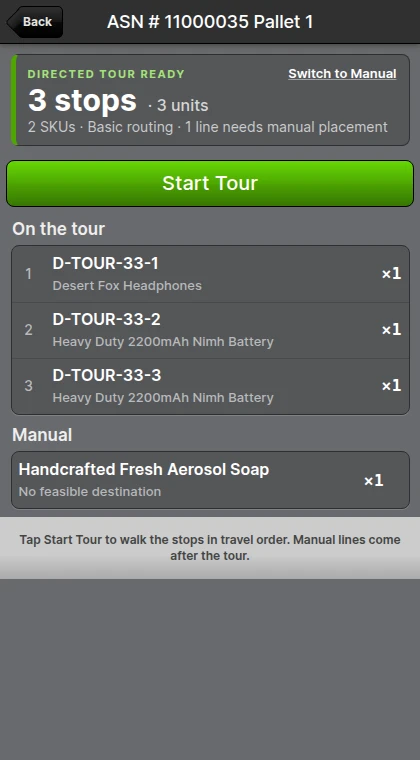
Directed Put-Away plans destinations for the inventory and walks you through them one stop at a time along the Warehouse's default Pick Route. Each stop names one Location, Product, and quantity, and the reason ShipStream selected that destination. A Product split between multiple Locations appears as multiple stops.
The Start screen summarizes the tour: how many stops and units it holds, how many SKUs, the routing method, and whether any lines need manual placement. The stops are listed in travel order under On the tour, and lines without a destination under Manual. If you have override permission, Switch to Manual appears in the card's header. Tap Start Tour.
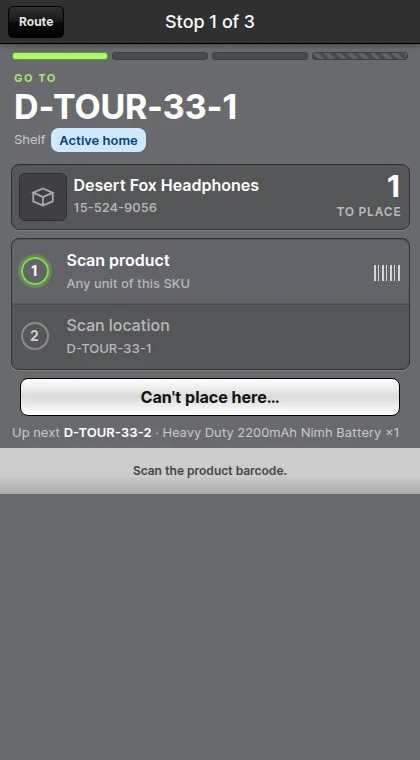
The first stop opens. The destination Location is the headline, with its Slot Type and the reason it was chosen beneath it, then the Product and the quantity to place. The checklist tells you what to scan next, and Up next previews the following stop. Take the Product to the destination.
Scan the Product barcode. Step 1 turns green with the barcode that verified it, and step 2 lights up.
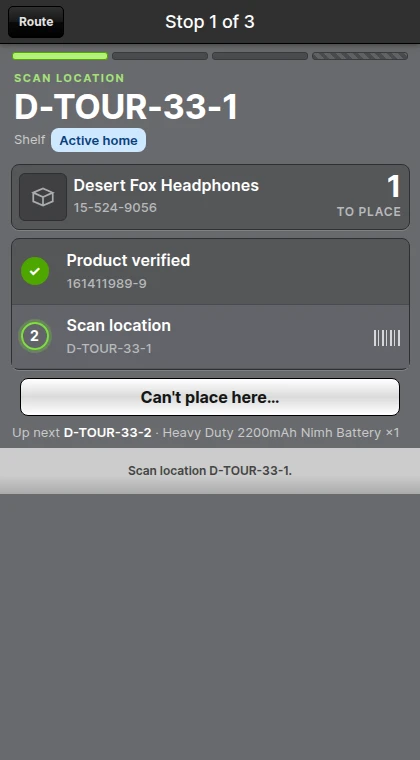
- Scan the Location barcode. Only the destination shown on the stop is accepted, which keeps inventory from being placed against a later stop by mistake.
The counter opens on the planned quantity, so tap Submit to place it. The capacity line and chip appear as they do in the Manual workflow (see Capacity).
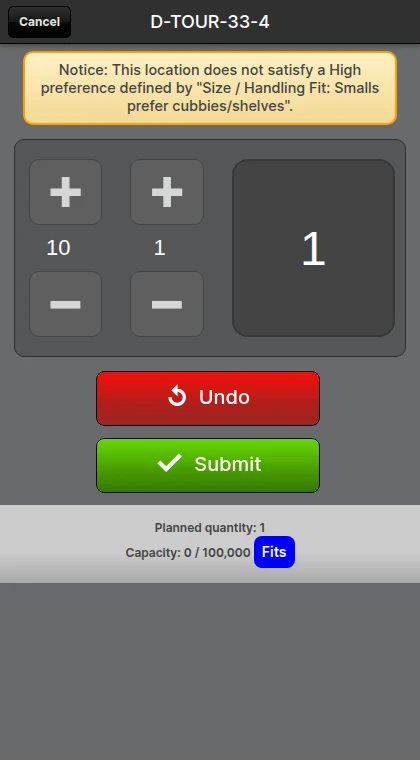
- ShipStream confirms what was placed and opens the next stop. Stops are numbered across the whole tour, so the title reads Stop 2 of 3 once the first stop is done. Repeat the scans for each remaining stop.
Tap Route in the toolbar at any time to review the whole tour: placed stops with the Location they went to, the current stop, the stops still ahead, and any manual lines at the end. Tap Continue or the current stop to return to it.
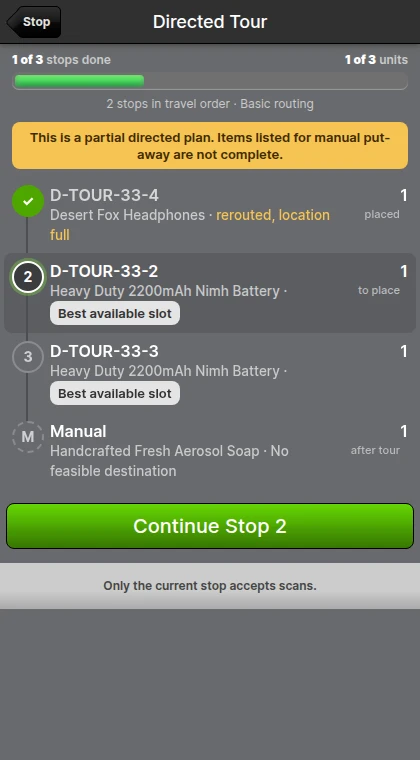
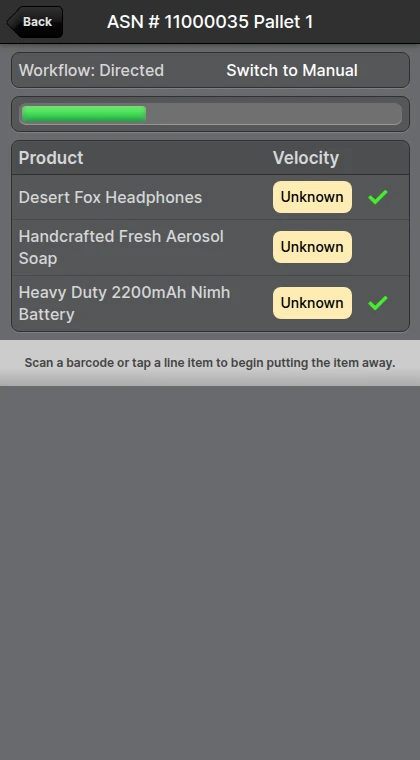
After the last stop, the Start screen returns with The directed tour is complete. Put the remaining lines away manually. Placed Products are checked off. Put any remaining lines away as described in the Manual workflow below.
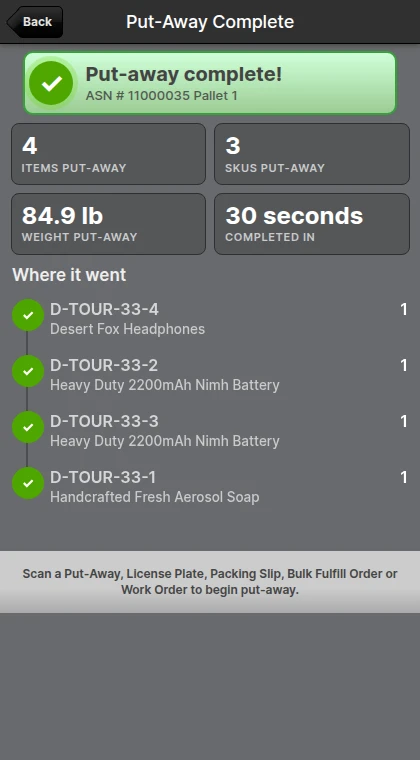
When every line is placed, verify the Put-Away Complete summary. Where it went lists each Location and what was placed there. If Auto-Commit is enabled, ShipStream also commits the associated Delivery automatically.
For lot-tracked Products, each stop and the Route show the Lot Number Input, Expiration, and Origination when recorded. Use units matching those details. Scanning the Product barcode confirms the SKU; it does not distinguish two lots of the same Product.
When a Planned Destination Cannot Be Used
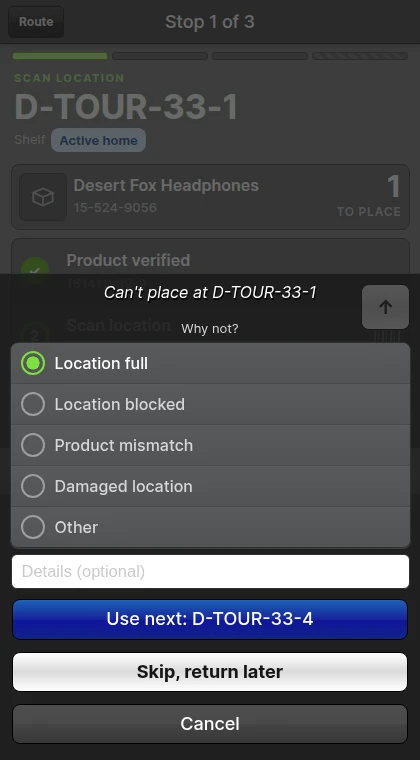
If the current destination is full, blocked, damaged, or otherwise unsuitable, tap Can't place here… on the stop. Choose the reason, add details if you like, and pick one of the actions:
- Use next names the next Location ShipStream saved as an alternative when the tour was planned and replaces the current destination with it. When no saved alternative is left, the button reads Put away manually and moves the line to the manual portion of the Put-Away.
- Skip, return later moves the stop to the end of the tour once. If it still cannot be completed when it returns, ShipStream moves that line to the manual portion of the Put-Away.
- Cancel closes the sheet without changing the stop.
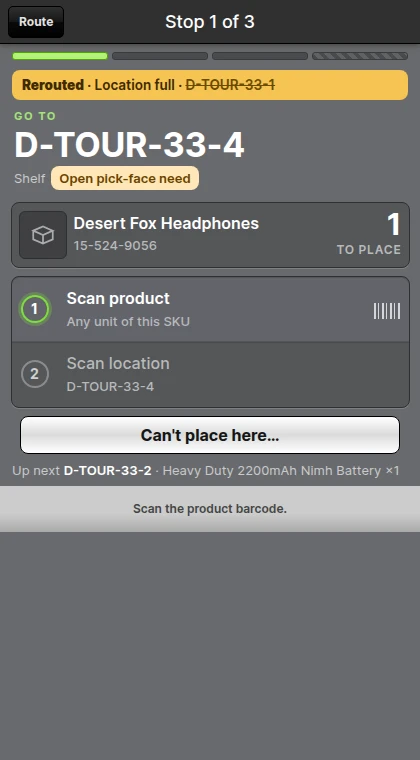
A rerouted stop reopens on its new destination with a banner naming the reason and the Location it left, so you can confirm the change before you scan.
Lines for which ShipStream cannot assign a destination appear under Manual on the Start screen and at the end of the Route. Process those lines by selecting the Product and scanning a Location as described in the Manual workflow below. When the last directed stop is placed and manual lines remain, the Scanner returns to the Start screen for them.
Products missing a required Lot Number or Expiration appear under Manual with Lot Info required. Finish the directed stops, then select the Product, tap Unassigned Items, and assign its Lot Info before placing it. If all lines require manual handling, you can begin assigning Lot Info immediately; no workflow override is needed.
ShipStream rechecks the current destination and its reserved capacity when inventory is placed. If a safe tour cannot be built or its destination capacity cannot be reserved at the start, the Scanner displays Directed put-away is not yet available and continues as a Manual session.
Manual Workflow
- Scan a Product barcode or tap a row if the Product does not have a barcode.
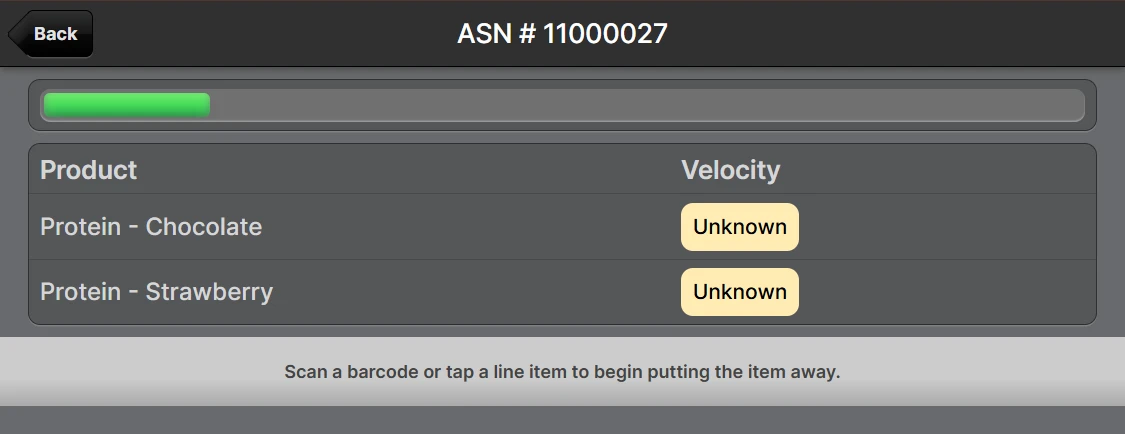
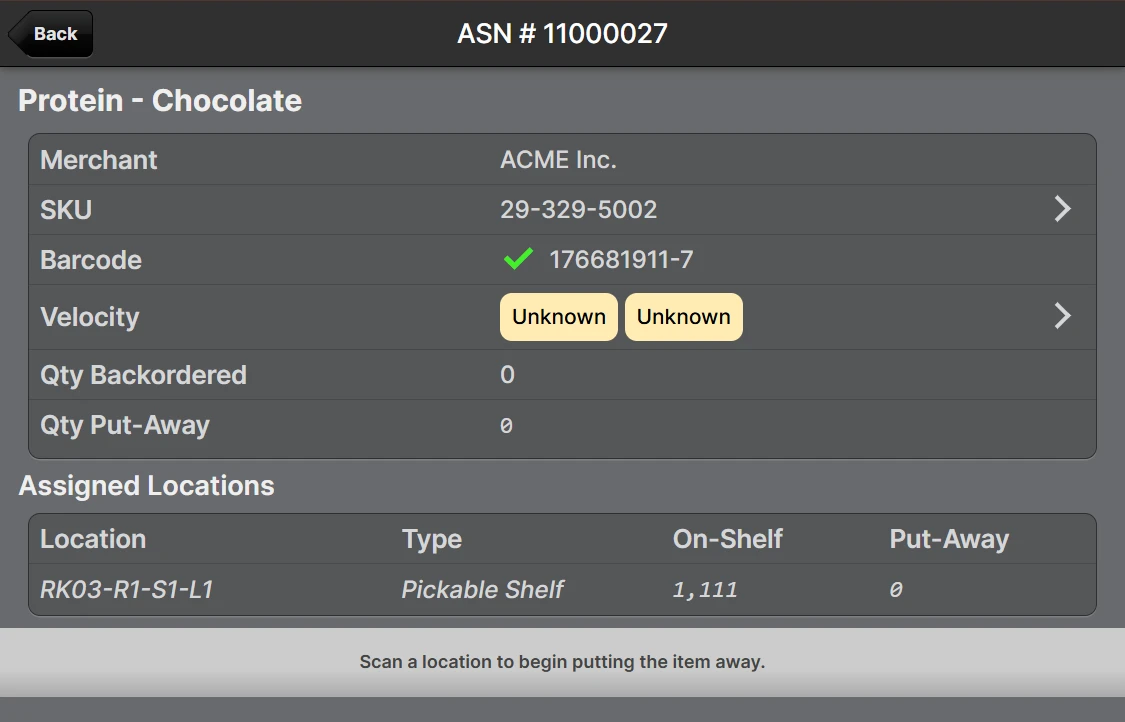
Scan a Location barcode. You may scan an assigned Location, a new Location, or one that is not in use by another Product.
If the Location has an active Inventory Hold and still contains inventory, the Scanner asks you to confirm before adding more inventory. If the Location has drained completely, ShipStream treats the remaining hold as stale and releases it automatically when you submit the quantity, without asking for confirmation.
If the Location's Slot Type defines how much of the Product the slot should hold, the list of Locations shows a Capacity column with a colored chip for each Location. The chip tells you whether the amount you are putting away will fit. See Capacity below.
Tap the Velocity row to view more information about the recent velocity of the Product, so you are better informed about its demand. See Product Velocity for more information. Then tap Back to return to the previous screen.- Use the counter to enter the amount to put in the current Location. When the Location has a known capacity, the counter shows a capacity line for the destination, for example Capacity: 12 / 20, with the capacity chip beside it.
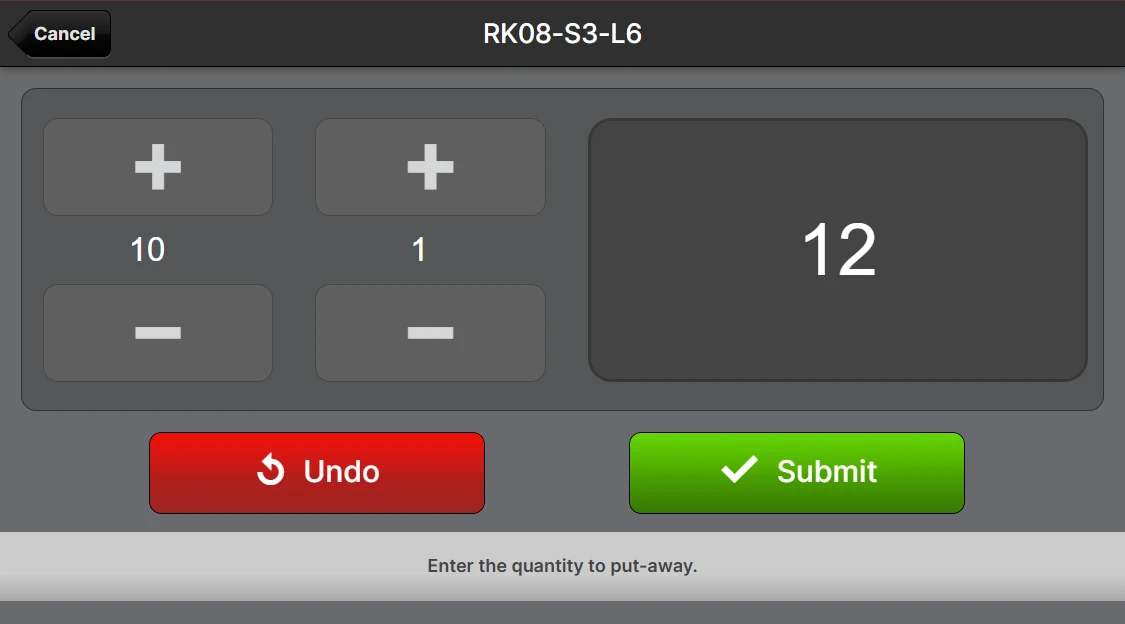
- Repeat the Product, Location, and quantity steps until all items have been processed. The Put-Away Complete summary then lists the totals and, under Where it went, each Location and what was placed there.
Capacity
A Location's Slot Type can define how much of a given Product the slot is meant to hold. When it does, the Scanner shows a capacity chip in the Capacity column of the Location list and on the counter.
The chip compares the amount you are putting away against the room left in that slot:
| Chip | Meaning |
|---|---|
| Fits | The amount fits. The remaining quantity is omitted to preserve the blind count. |
| Tight | The amount fits exactly and fills the slot. This is informational only and never warns. |
| Over by N | The amount would exceed the slot's capacity by N units. |
| Prohibited | The Product is not allowed to be stored in this type of slot. |
| — (dash) | The capacity is unknown, has not been calculated yet, or does not apply to this Slot Type. |
In the Manual workflow, the chip is advisory by default. Over by N and Prohibited raise a warning that you can acknowledge and then continue, so an operator holding the inventory is never stranded by a capacity figure that does not match the shelf. The other chips never warn.
To make capacity binding instead, set System > Configuration > Warehouse > Scanner > Put-Away > Enforce Capacity to Yes. A Prohibited Location is then refused as soon as you scan it, as is a Location that is already full. An amount that would go over the slot's capacity is refused when you confirm the count, so you can still put away a smaller amount that fits and take the rest to another Location. The default is No.
Manual Sources in Directed Put-Away
When several Items of the same Product and Lot require manual placement, scan the destination Location and enter the combined quantity. ShipStream distributes that quantity across the eligible manual Items automatically. Items reserved for the active directed tour are excluded; a quantity exceeding the manual remainder is rejected.
Directed Destination Reasons
The Reason column tells you why a destination was chosen:
| Reason | Meaning |
|---|---|
| Active home | The Product already has an assigned home Location, so the stock goes back there. |
| Open pick-face need | The Product's pick face is below its target, so this receipt tops it up instead of opening a new slot. |
| Best available slot | The Product has no home and no open need, so ShipStream picked the best-ranked slot for its demand and pick convenience. |
| Preference tie-break | Several slots were equally good and a configured preference decided between them. |
| No feasible destination | No Location in the Warehouse can accept this line right now. Put it away manually. |
| Too many candidates | There were too many possible Locations to evaluate, so the line is left for manual put-away. |
| Alternatives exhausted | Every planned destination for this line has already been used, so the line is left for manual put-away. |
How Directed Destinations Are Chosen
ShipStream plans each Put-Away in a fixed order, so a lower rule never outweighs a higher one:
- Only workable Locations are considered. A destination must pass every check a manual put-away would: Slotting Rules, Slot Capacity, lot and expiration compatibility, Inventory Holds, and a Location not already occupied by another Product.
- An existing home wins. If the Product already has an assigned Location, the stock goes back there.
- A pick face that needs stock is topped up next. If the Product's pick face is below its replenishment target, the receipt fills it before a new Location is opened.
- Faster movers get the better spots. Among the remaining candidates, Products with a higher Slotting Density Rank are placed in more convenient Locations, judged by the Warehouse's Pick Route order and shelf height, before slower movers are placed. A Product with no rank is treated as neutral.
- Ties are broken by your settings. Locations that tie on travel order and fit are separated by the Soft Tiebreakers you configure, or by Location ID when none are set.
One received line for one Product. ShipStream starts from every Location in the Warehouse that could hold it, in Pick Route order.
Configure the planner per Warehouse under System > Configuration > Warehouse > Stock:
| Group and field | Description |
|---|---|
| Directed Put-Away Enumeration > Ordinary Candidates per Line | How many best-fit Locations outside a line's own zones the planner considers, in addition to the line's home, open-need, and local Locations. The default is 10; a larger value widens the search when the Put-Away starts. |
| Directed Put-Away Enumeration > Hard Candidate Limit per Line | The most Locations one line may carry into ranking. Home and open-need Locations are never dropped to fit; a line whose required Locations exceed this limit is handed to manual put-away. The default is 40. |
| Directed Put-Away Ranking > Ranking Method | How destinations are chosen. Basic routing runs inside ShipStream and is the only method in this release. |
| Directed Put-Away Ranking > Alternatives per Destination | How many next-best Locations are kept for each planned destination, from 1 to 10. The default is 3. |
| Directed Put-Away Ranking > Soft Tiebreakers | A comma-separated list of attribute and weight pairs, for example unit_weight_band:-10,order_affinity:5, applied only between Locations that tie on travel order and fit. Positive weights prefer higher values and negative weights prefer lower ones. Leave empty to break ties by Location ID. |
Reserved Room at Destinations
Directed Put-Away recommends Locations with fixed-capacity checking enabled and a known capacity or an explicit Unlimited allowance for the Product. Locations without fixed-capacity checking, or with capacity that is unknown or awaiting calculation, are excluded. If no eligible destination remains, the line falls back to manual placement.
Directed Put-Away can reuse an empty Location assigned to another Product, provided the normal placement checks allow it. The Location is reassigned when the directed destination is reserved, before any quantity is put away. Cancelling the tour leaves this assignment in place. An active destination reservation for another Product blocks reuse until that reservation is released or expires.
When a directed plan sends stock to a Location, ShipStream reserves that much room there so another Put-Away starting a minute later is not sent to the same empty space. The reservation is released when the stock is placed or the session ends. While a Location is reserved by an active tour, it cannot be deleted or reassigned to a different Product.
If a session is abandoned, for example because a device dies, the reservation expires on its own. Set System > Configuration > Warehouse > Stock > Directed Put-Away Leases > Lease TTL Seconds to control how long an idle reservation is kept. The default is 300 seconds and the allowed range is 30–3600 seconds. A shorter timeout returns room from abandoned work sooner but tolerates shorter interruptions; a longer timeout tolerates longer interruptions but keeps the room reserved for longer.