

Batching Priorities
A Batching Priority is a number from 0 to 9 assigned to every Shipment that controls the order in which Shipments are pulled into Picking Batches. When ShipStream composes a batch, eligible Shipments are taken lowest number first, so a Shipment at priority 1 is exhausted before a Shipment at priority 3 is considered. This lets you push rush, expedited, or otherwise time-sensitive shipments to the front of the line without changing how your operators create batches.
Each priority value can be given a label and a color so it reads clearly wherever it appears — the Shipments grid, the Order View, and the Shipment page all show a colored badge for the Shipment's priority.
Every Shipment is assigned a priority automatically as it becomes ready, and operators with the appropriate permission can also set it manually. You configure the labels, colors, defaults, and automatic rules on the Priorities page.
The Priorities Page
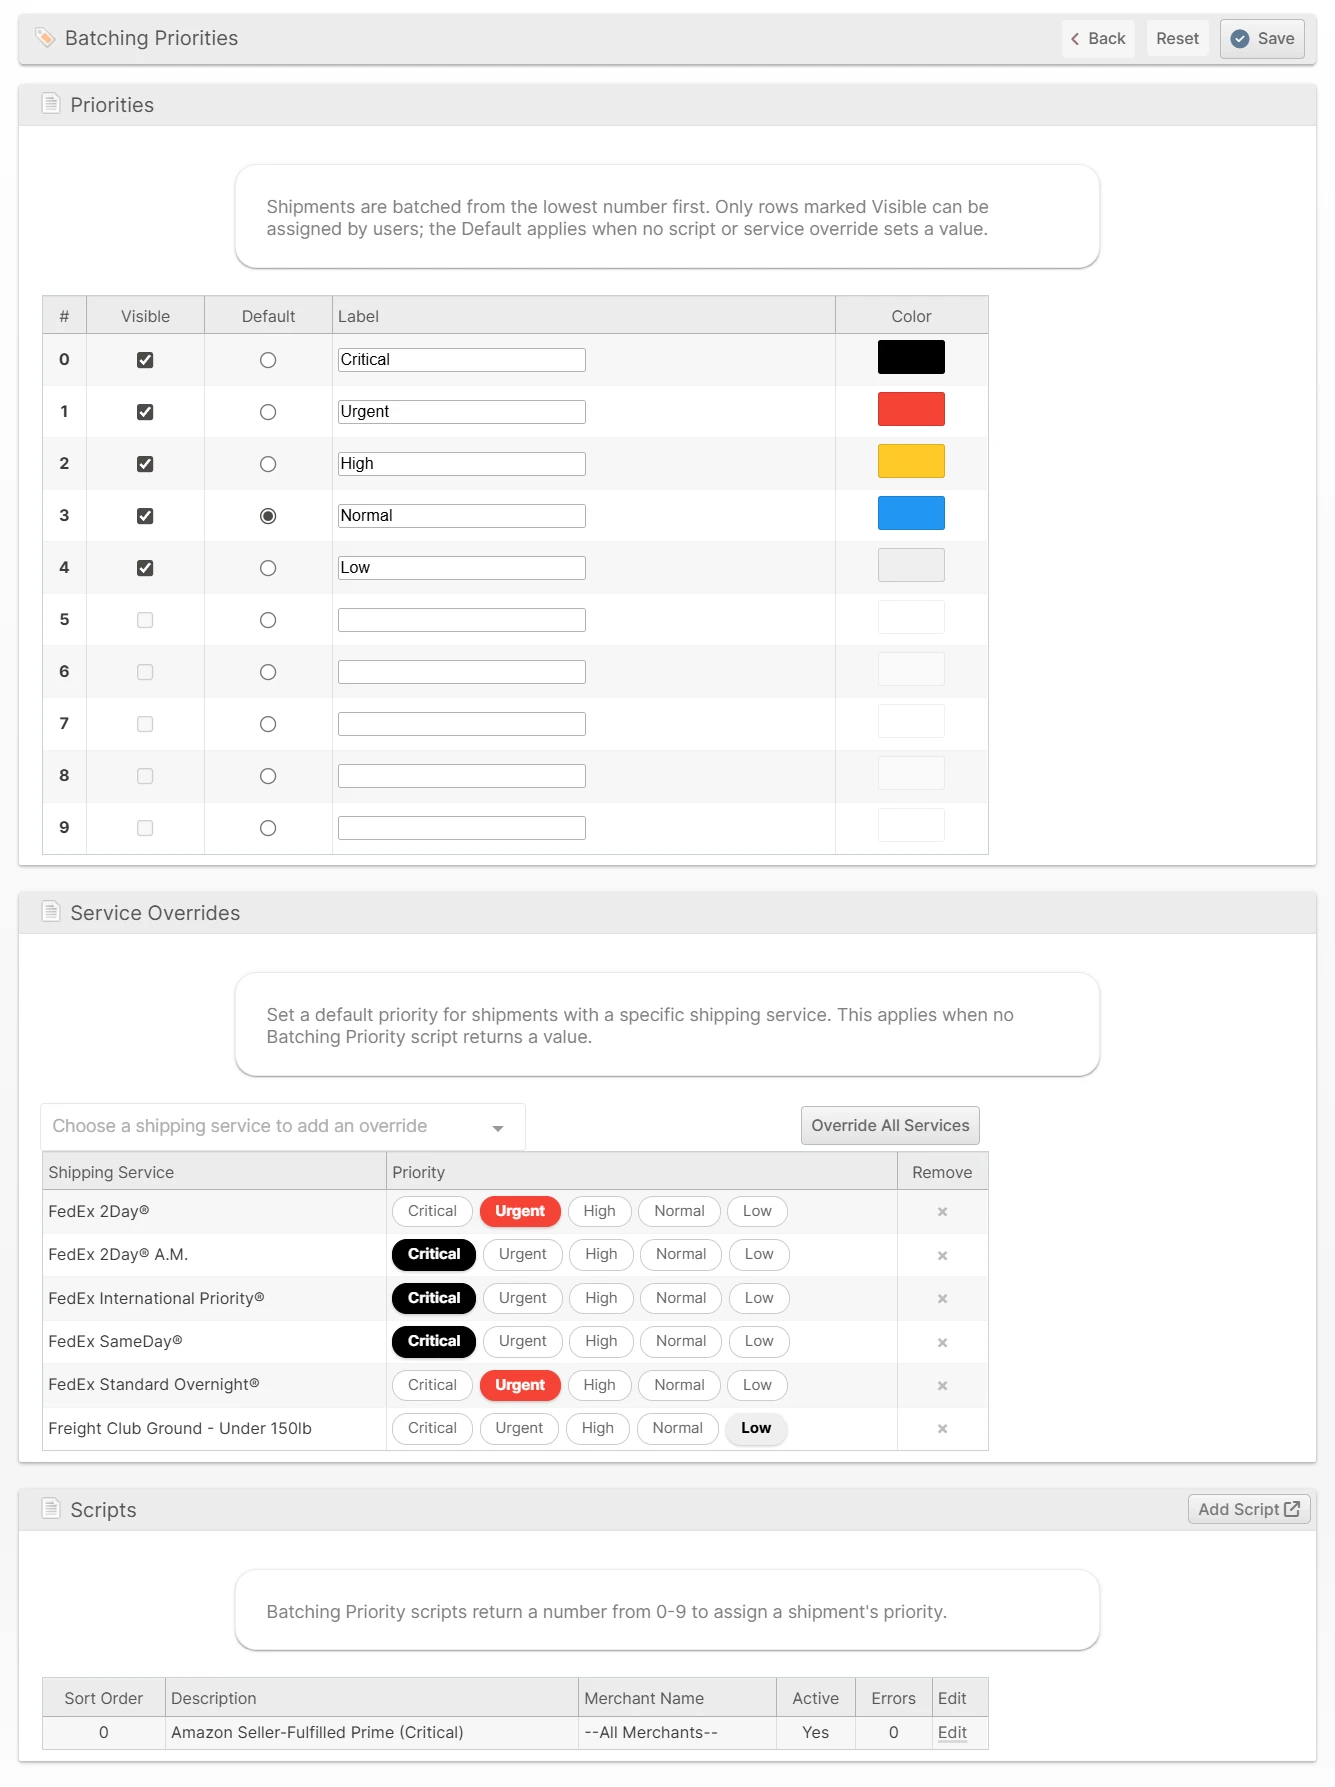
Navigate to Operations -> Picking Batches -> Priorities to configure your priorities. The page has three sections: Priorities, Service Overrides, and Scripts.
Use Save in the page header to persist your changes, Reset to discard unsaved edits and return the form to its last-saved state, or Back to return to the Picking Batches grid.
Priorities
The Priorities section lists all ten values (0–9). For each one you can set:
- Visible - whether operators can choose this priority when setting it manually (for example via the Shipments grid mass action). A priority must have a label before it can be made visible.
- Default - exactly one priority is the system default, applied when nothing else assigns a value (see How a Priority Is Assigned below).
- Label - the name shown on badges and in dropdowns. A value with no label is treated as a bare number everywhere it appears.
- Color - a swatch from the standard tier color palette, used for the badge background. A label is required before a color can be chosen.
ShipStream ships with four labeled priorities out of the box: Urgent (1), High (2), Normal (3), and Low (4), with Normal set as the default.
Service Overrides
A Service Override sets a default priority for every Shipment using a particular shipping service. This is the simplest way to, for example, push all overnight shipments to a higher priority without writing a Script.
To add one, choose a service from the Choose a shipping service search box — it is added immediately at the current default priority. Then click a colored priority chip on that row to change it. To override every available service at once, click Override All Services, then adjust individual rows as needed. Click the ✕ in the Remove column to delete an override.
A Service Override only applies when no Script returns a value for the Shipment.
Scripts
A Batching Priority Script lets you assign a priority with custom logic — based on the Order, the Shipment, or any combination of their fields. A script returns a number from 0 to 9; the first active script that returns a valid value wins, and the value takes precedence over Service Overrides and the default.
The Scripts section lists your Batching Priority Scripts with their Sort Order, Description, Merchant Name, Active status, and a count of recent Errors. Click Add Script to create a new one (it opens in a new tab), or Edit to modify an existing script. See Scripting Basics for how to write and activate scripts.
How a Priority Is Assigned
When a Shipment becomes ready, ShipStream resolves its Batching Priority automatically in this order:
- The first active Batching Priority Script that returns a valid 0–9 value.
- The Service Override configured for the Shipment's shipping service, if any.
- The system Default priority.
Setting a Priority Manually
You can override the priority on specific Shipments directly from the Shipments grid:
- Navigate to Shipping -> Shipments.
- Select the Shipments you want to change.
- Choose Set Batch Priority from the mass-action menu and pick a priority.
- Click Submit.
Only Visible priorities are offered in the mass action. A manually set priority is pinned and won't be changed by the automatic rules.
Where Priorities Appear
The Shipment's priority is shown as a colored badge in several places:
- The Batch Priority column on the Shipments grid (and in CSV/Excel exports).
- The Order View Shipments tab.
- The Batch Priority field on the Shipment page.
A priority with a visible label and color renders as a colored badge; an unlabeled value renders as its plain number.