Bullet Points proving ground
ShipStream's robust process for receiving and processing inbound inventory helps you ensure that the inventory you receive matches what you expected and is counted accurately, yet efficiently. The data captured during this process is detailed for maximum accountability. There are three types of "deliveries" that behave very similarly with the minor differences being mainly the ancillary data fields.
- ASN—Advanced Shipment Notices (new inventory from a supplier)
- RMA—Return Merchandise Authorizations (returns from a customer)
- Other Delivery—Any other user-created delivery that isn't an ASN or RMA
These deliveries can all be managed under the Receiving menu in ShipStream. They also all use the same API methods under the "delivery" namespace.
Configuration
Receiving Workflow
At a high level, the workflow to receive an ASN, RMA or Other Delivery is as follows:
- Accept by specifying a count of the number of containers received (typically either the number of pallets for ASNs, the number of packages for RMAs, or just one for a floor-loaded trailer)
- Process the containers by counting the actual inventory received (and collect lot numbers and serial numbers as needed)
- Put-away the processed inventory making it available for sale upon "commit"
The following diagram depicts how this process works, starting with a New delivery and ending with a Complete delivery.
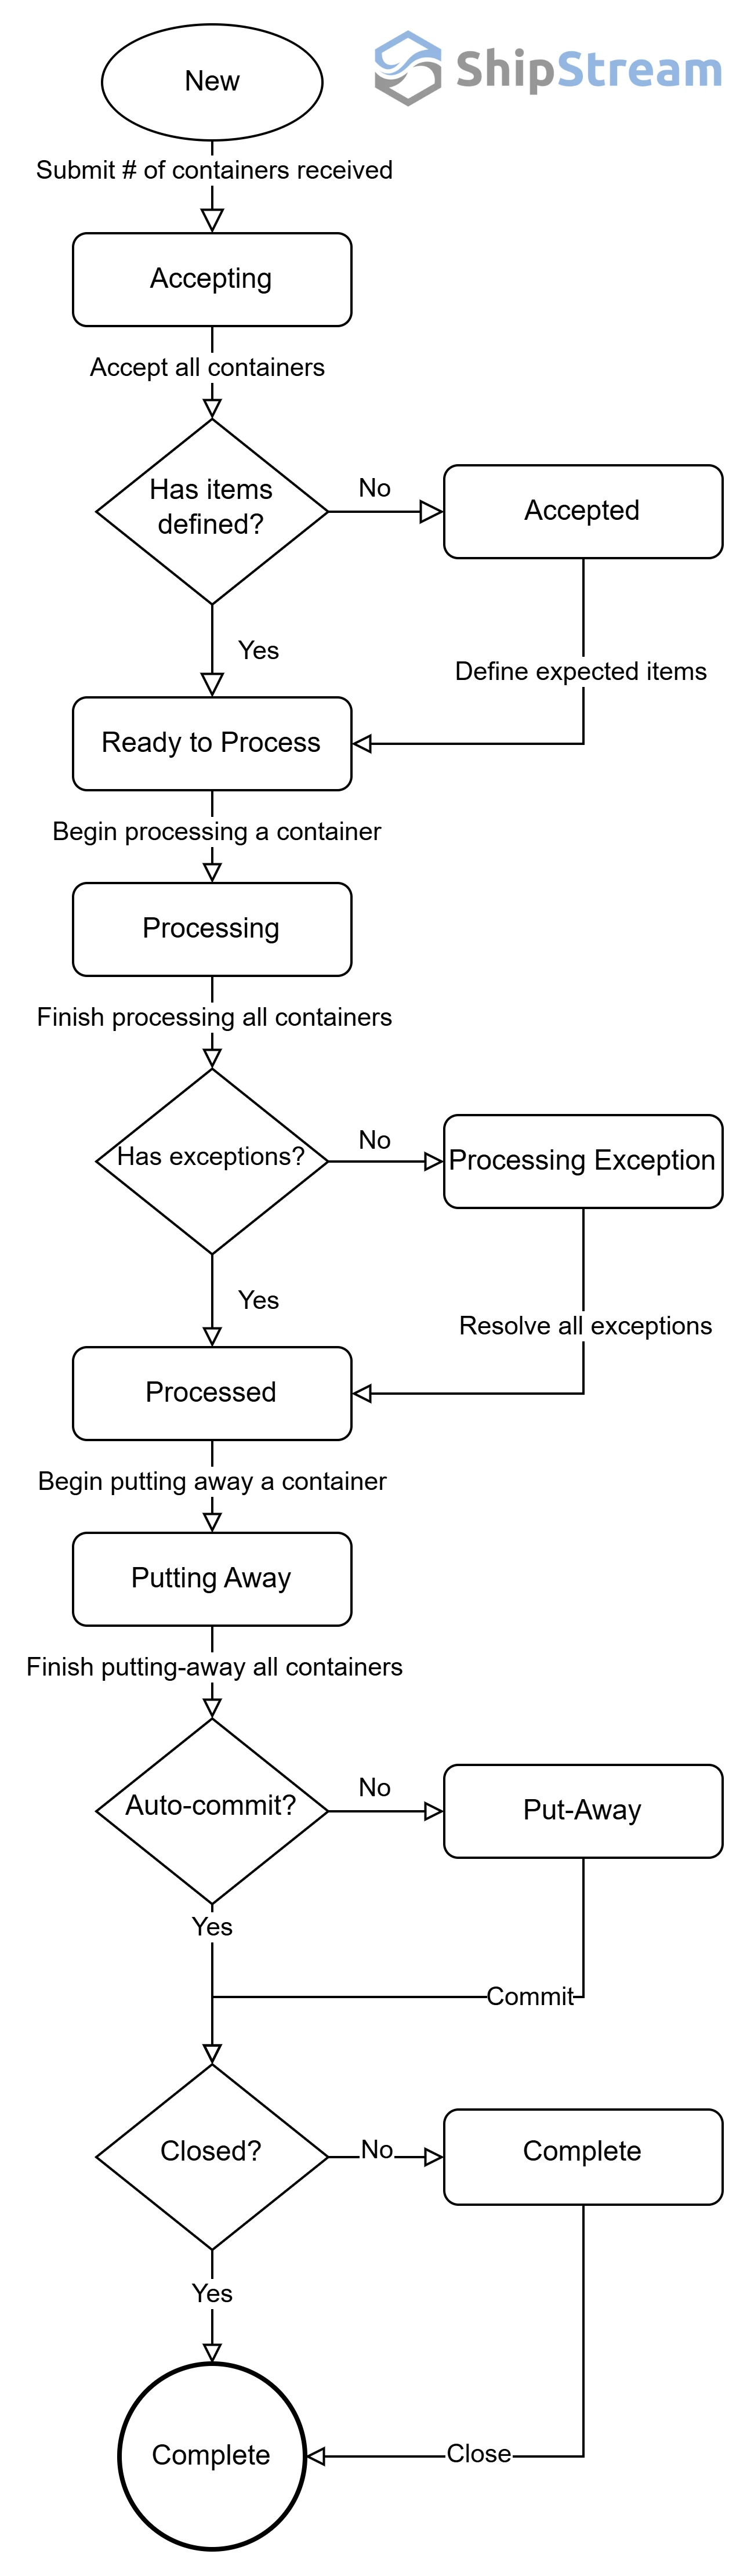
The above diagram is slightly over-simplified because each "container" can be processed independently and has its own status. So, for example, the contents of one container could be already counted, put-away and available for sale, while another container from the same delivery would have just been accepted or may not even be known to exist yet.
Additionally, a container can be processed into one or more put-aways, and any number of containers of the same delivery type can be processed to the same put-away. For example, one could process a large batch of RMAs at once and then put them all away in one pass, or one floor-loaded trailer could be processed to multiple put-aways, so one portion can be put-away and committed while the other portion is still being processed.
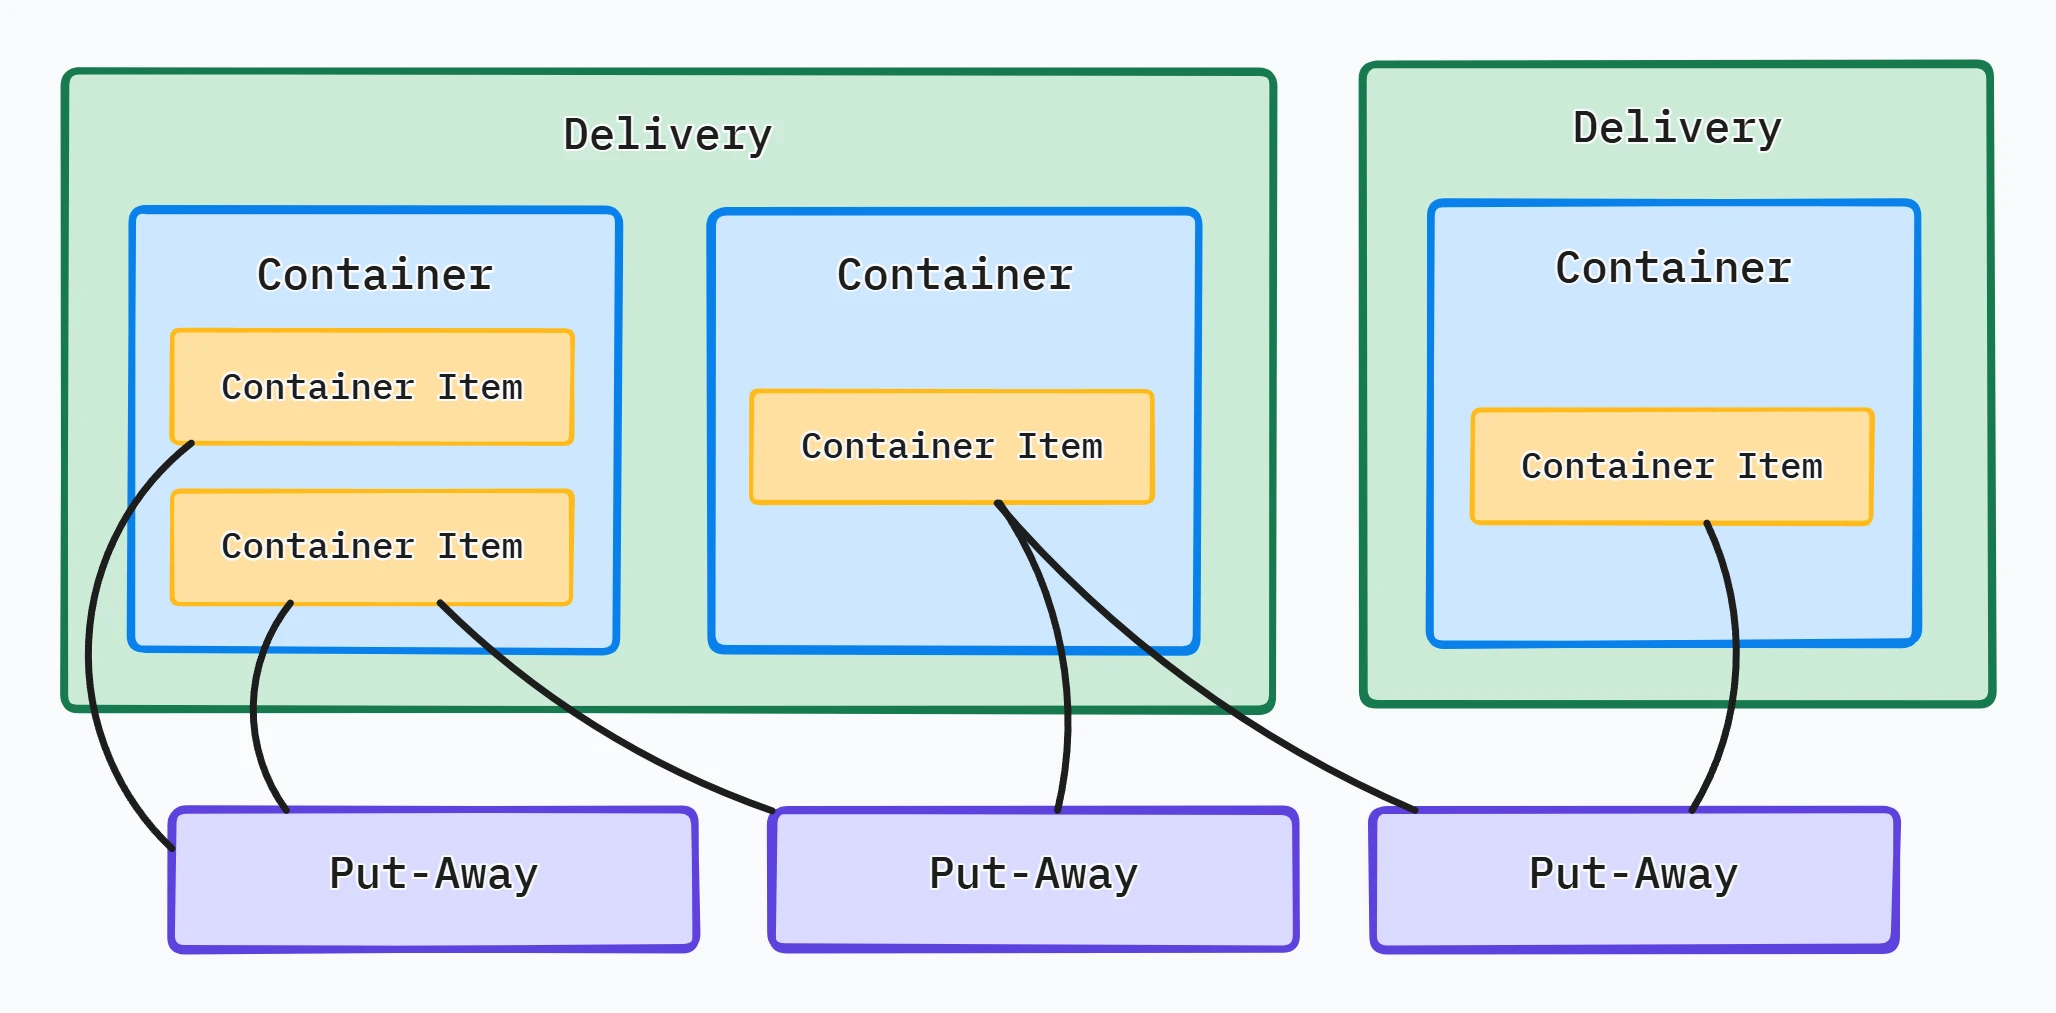
How these container items are distributed is determined by the user during processing.
Create a Delivery
Ideally, a delivery is created before it arrives on site, although it is also possible to create an empty delivery on the fly. Deliveries can be created via the user interface or API.
To create a new delivery from the user interface, the steps are the same for Admin and Client users, in this example we'll create an ASN:
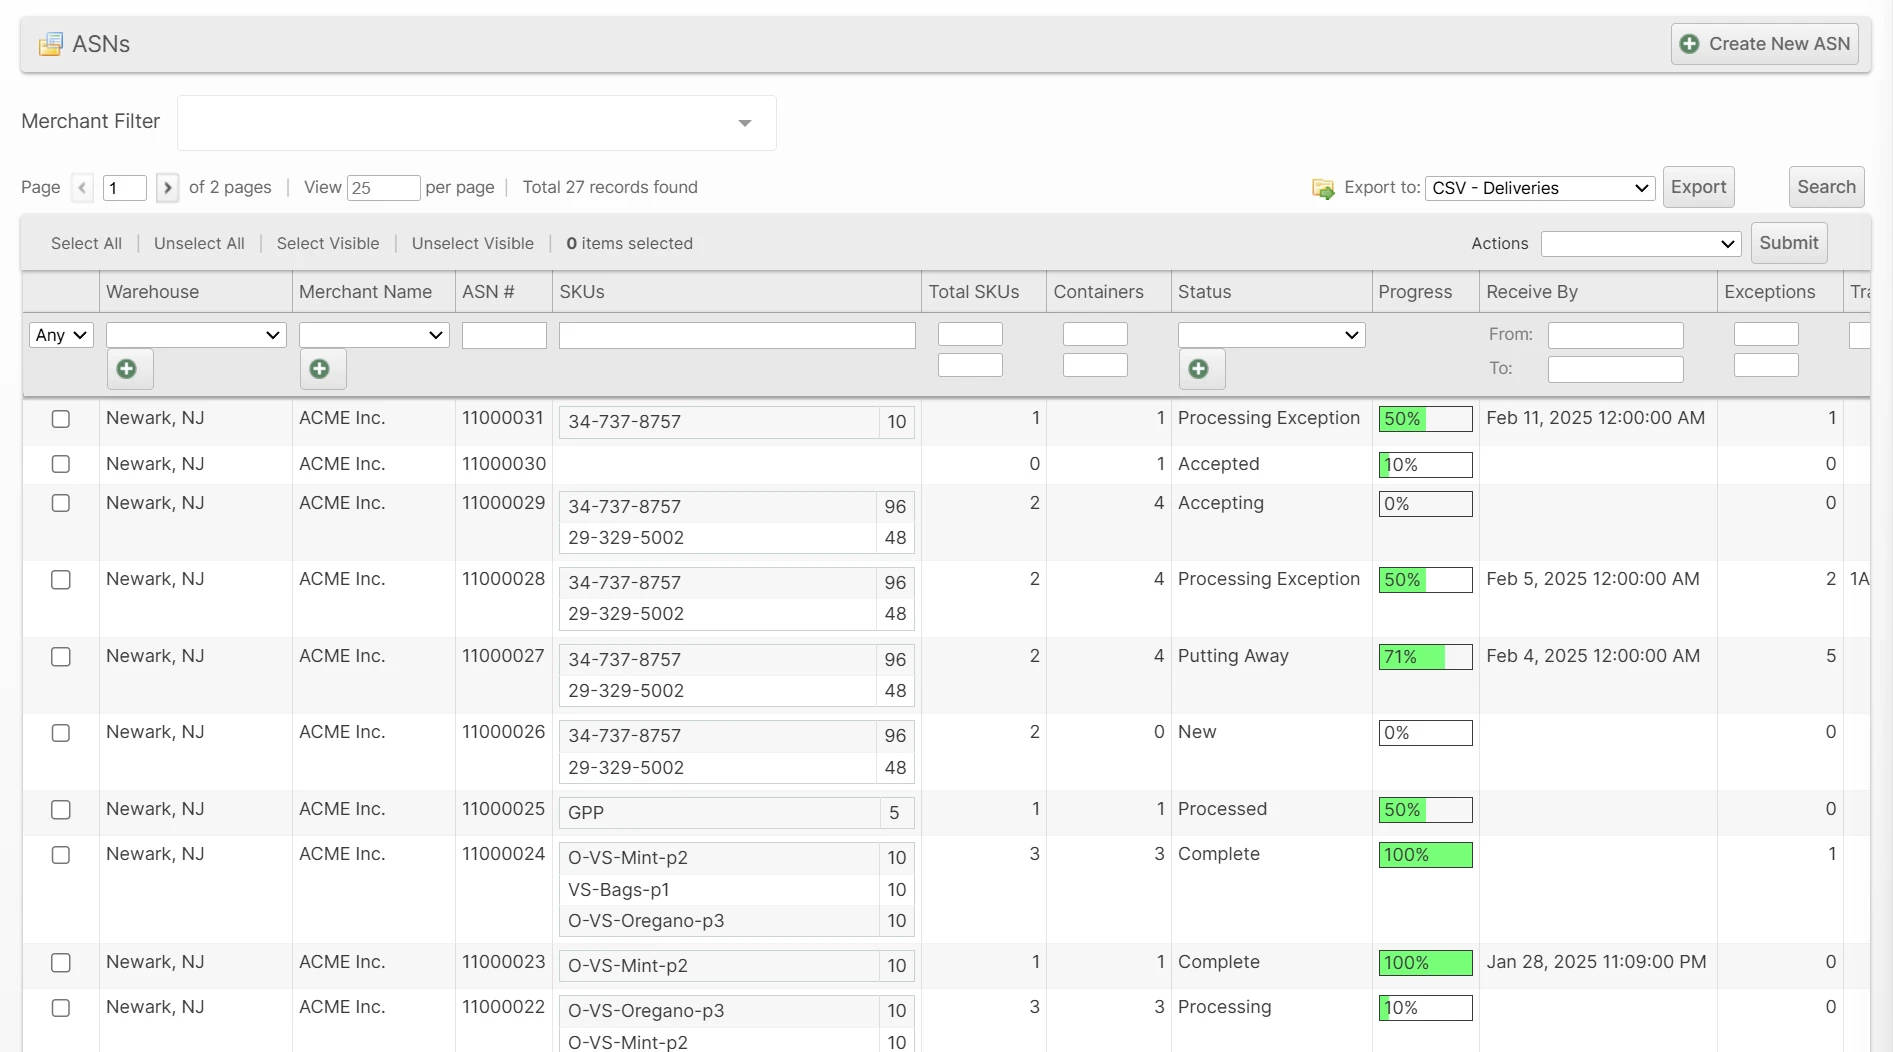
- Navigate to the grid corresponding to the type of delivery you want to create: Receiving > ASNs.
- Click Create New ASN.
- Select a Merchant and Warehouse.
- Click Add Products and select the products and quantity for each expected to be received and then click Add Selected Product(s) to ASN. This step can be repeated as many times as needed.
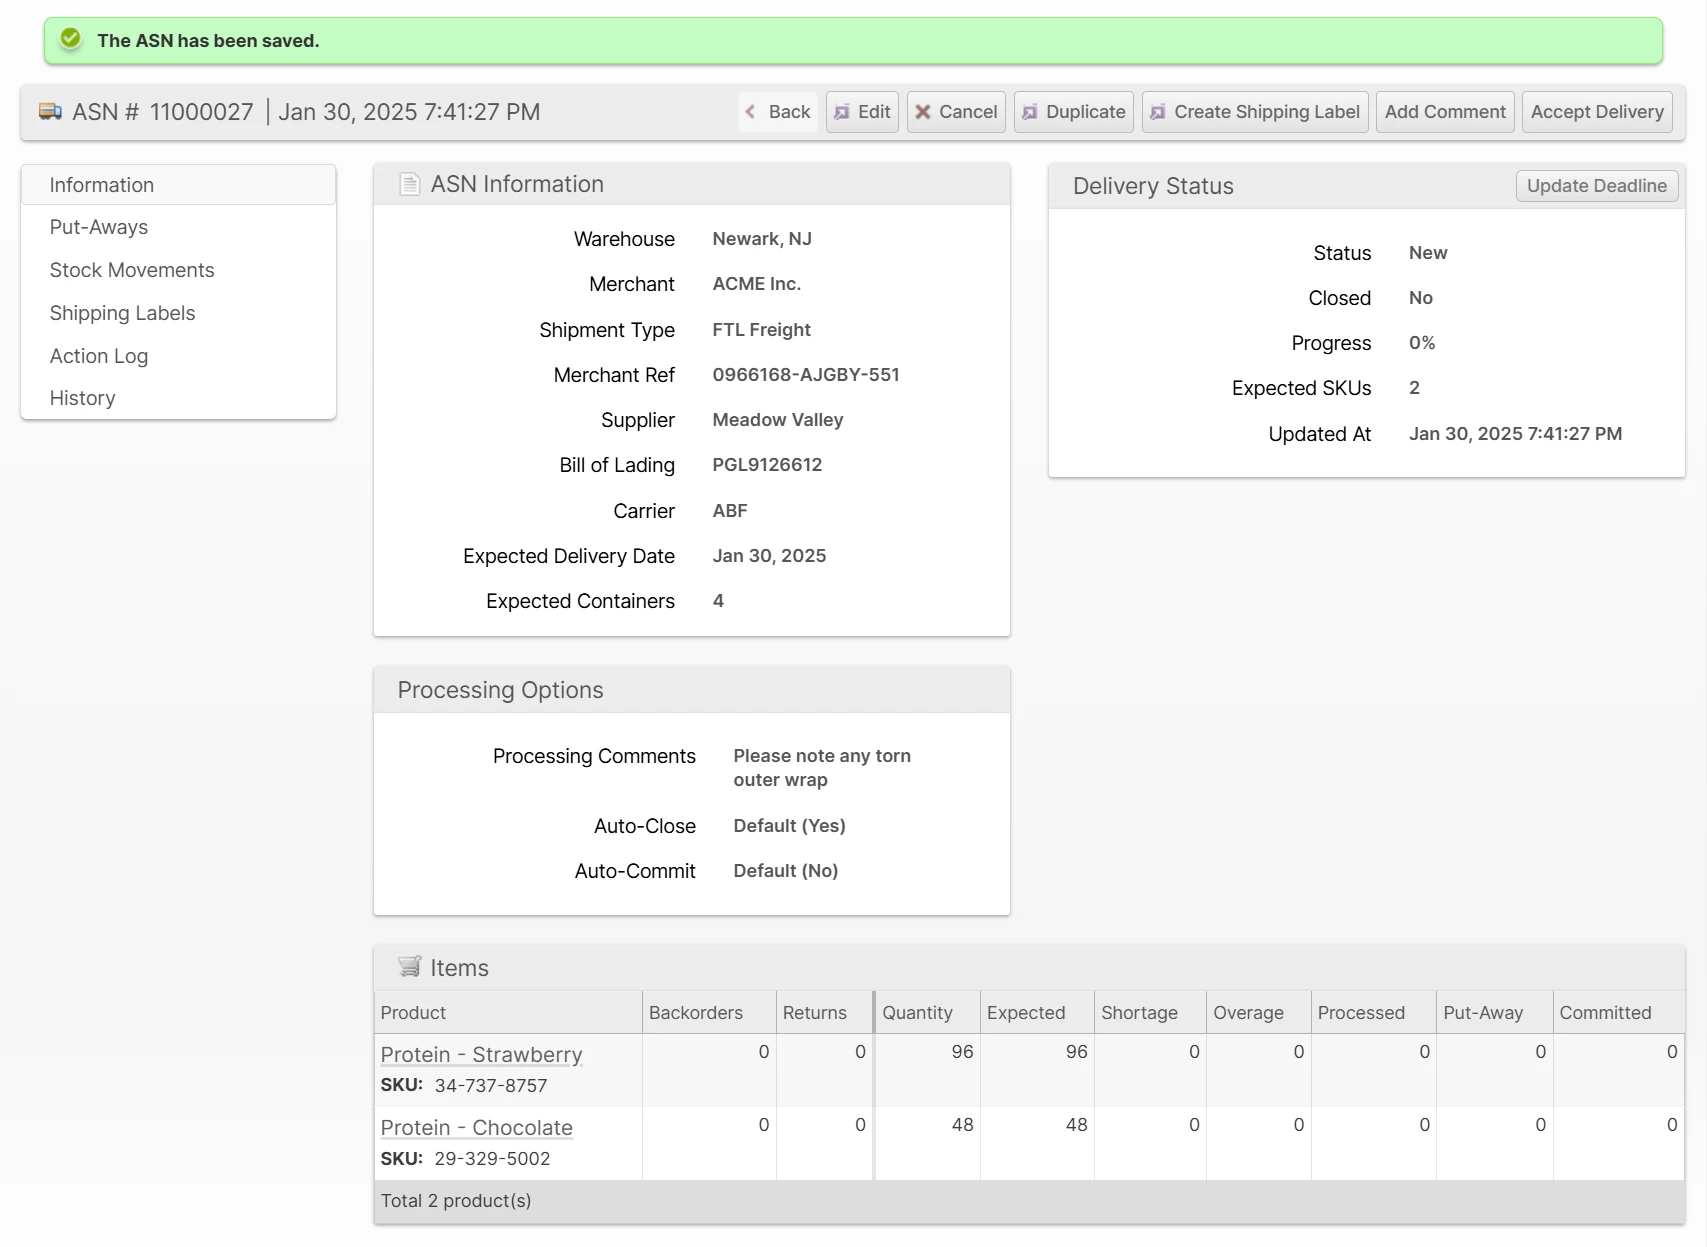
- Fill out the remaining form fields. Providing details about the delivery will help ensure that it is properly identified upon receipt.
- Click Submit ASN
ASN Special Fields
ASNs have three additional fields: Shipment Type, BOL, and SCAC. The latter two may be configured at System > Configuration > Warehouse > ASNs > General to be either Disabled, Optional or Required depending on your preferences.
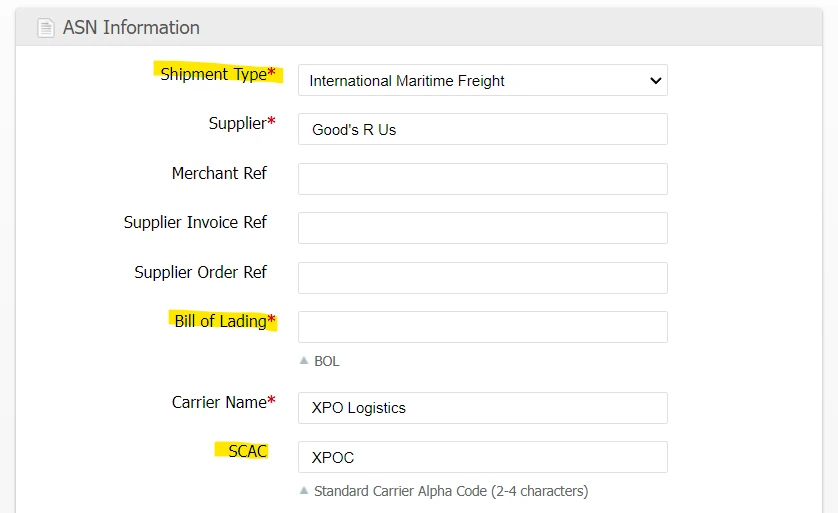
Shipment Type
The Shipment Type helps determine which other fields should be optional or required. The options are:
- International Maritime Freight
- International Air Freight
- FTL Freight
- LTL Freight
- Parcel
- Other/Unknown
Bill of Lading
The Bill of Lading is a legal document commonly used in freight shipping and issued by the carrier to detail the goods being shipped and the destination. This field is not displayed for Parcel or Other/Unknown shipment types.
SCAC
The SCAC (Standard Carrier Alpha Code) is typically clearly marked on a shipper's containers and can be useful for identifying the carrier for International Maritime Freight type shipments. This field accepts 2 to 4 characters as these codes are assigned by a central authority. A list of common SCACs is provided, but the user may provide any 2-4 character code.
Accept a Delivery
Accepting a delivery indicates that it has physically arrived at the correct warehouse. This step involves submitting the number of "containers" (used in a general sense, not necessarily a standard metal shipping container) that were received.
You may use the Admin UI or the Scanner UI to accept a delivery. Each process is described below.
Admin UI
- If the delivery has a tracking number, scan it to navigate directly to the delivery page. Otherwise, use the Global Search or search the appropriate grid from the Receiving menu until you find the correct delivery.
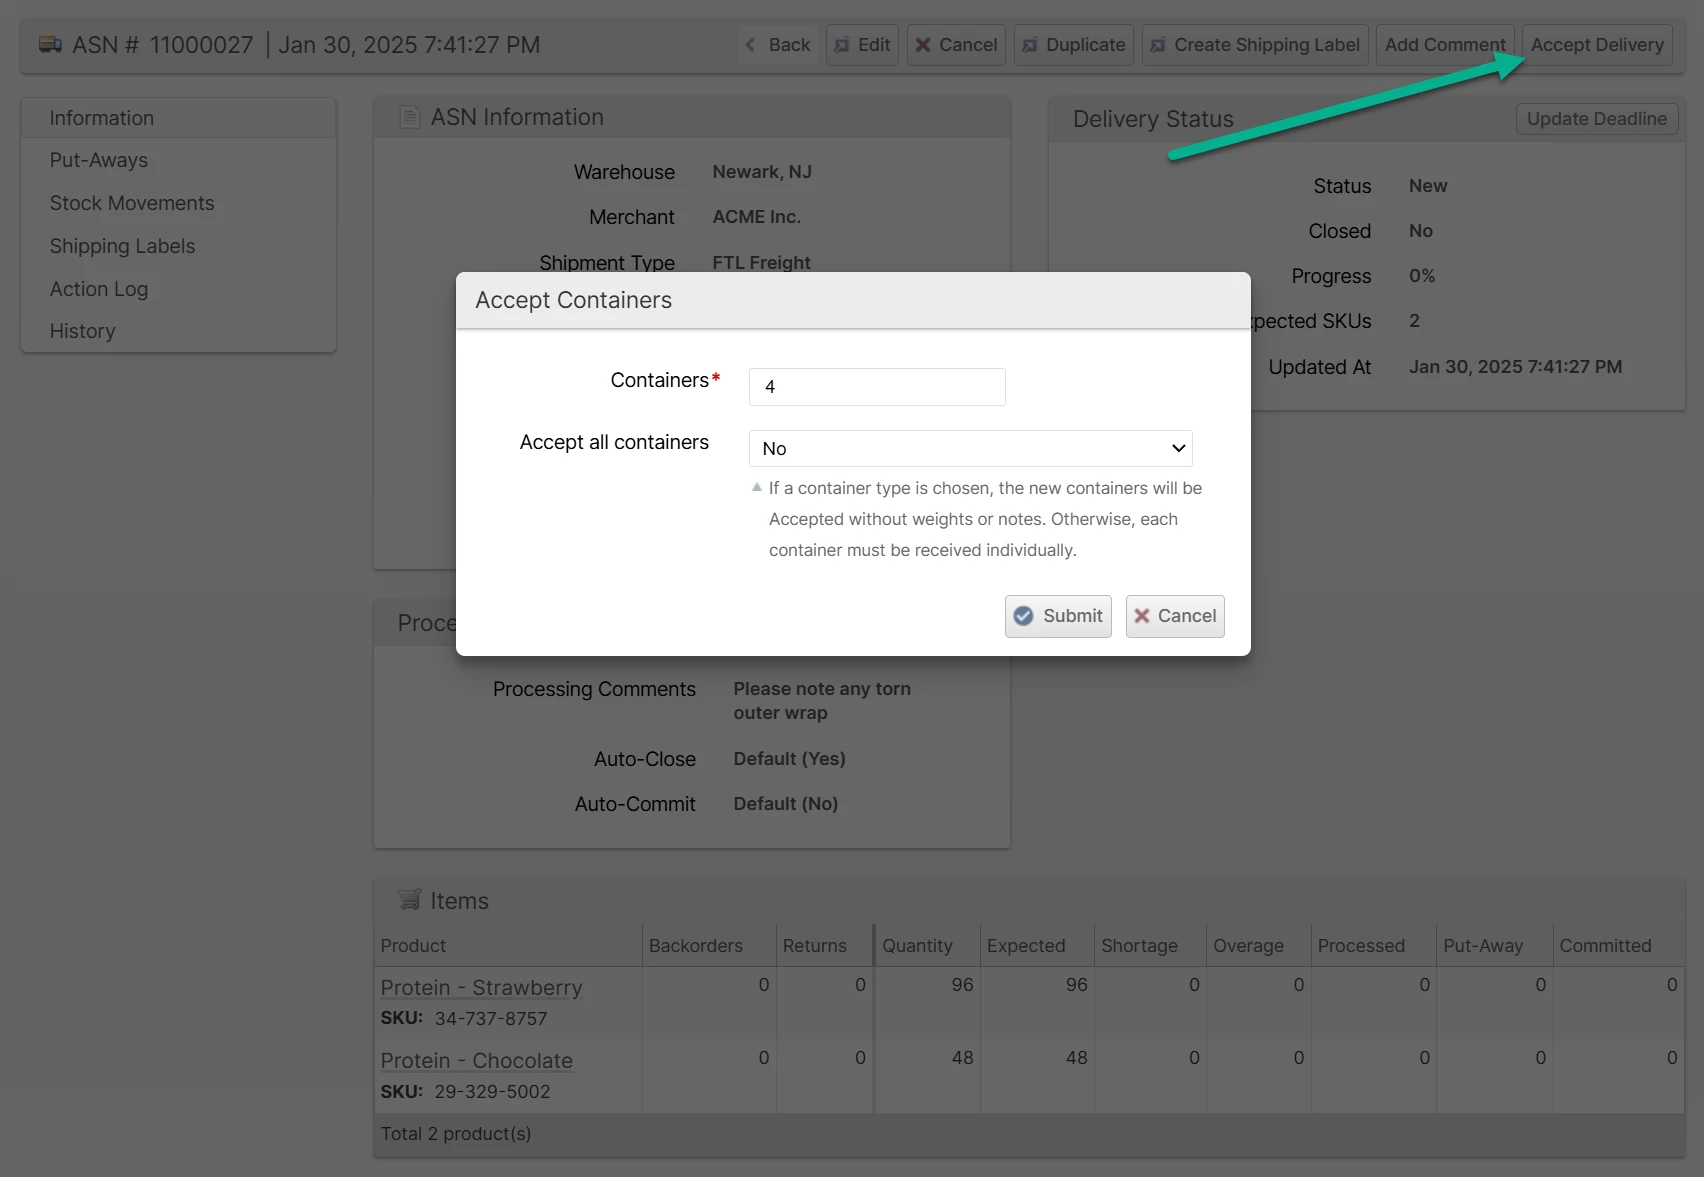
Click Accept Delivery and submit the dialog. Here you may enter a different number of containers than what was "expected" depending on your observations and desired processes.
Example: If you have a truck full of pallets and each one is complex and will take some time to process, you will benefit from accepting each one individually. However, if the entire truck contains all the same SKU and they are easy to count (i.e. no lot or serial numbers, no teardown required), accepting the delivery as one "container" may make for faster processing.Choosing to Accept all containers allows you to receive all containers as the same type and bypass the next step in case you are not interested in capturing weights or notes.
If you chose Accept all containers, you can skip this step. Upon submitting the dialog in step 3, you will be automatically navigated to the Containers tab. Click Receive Next and provide the details for the container.
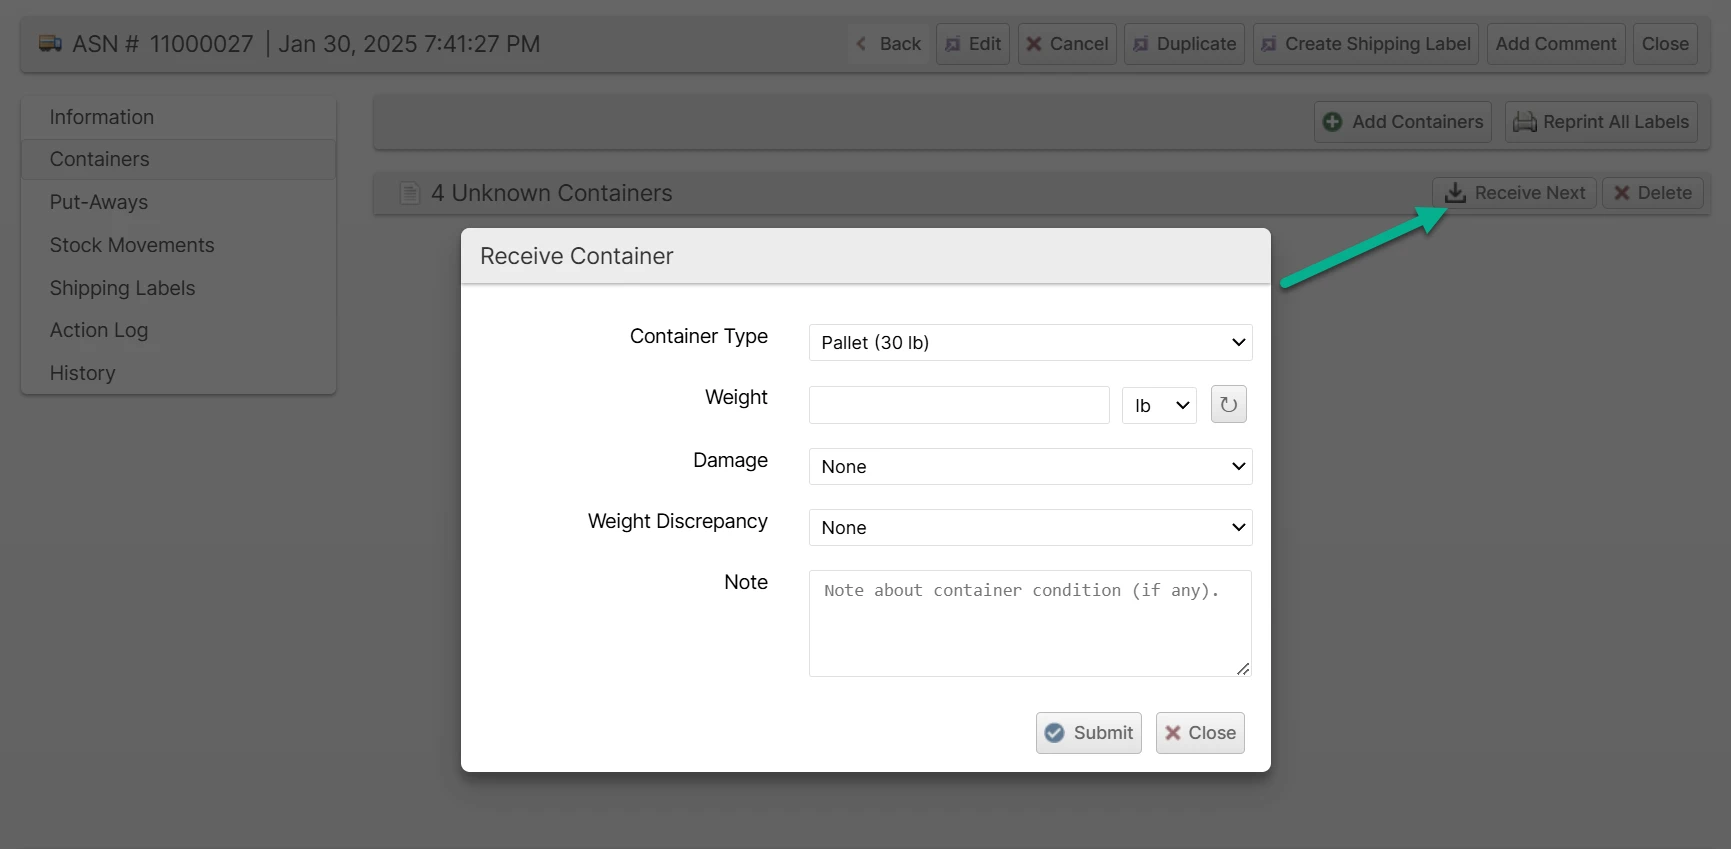 The Weight can be pulled directly from a scale if it is connected to the Device Hub by clicking the ↻ button beside the Weight field.
- Repeat step 3 until all containers are received.
Once all containers are received, the delivery status will be Ready To Process, and you are ready to begin processing!
Scanner UI
- From the Scanner home page, tap Delivery.
- Scan a tracking number, BOL or other identifier, enter a value to search by, or use the drill-down menus to locate the correct delivery.
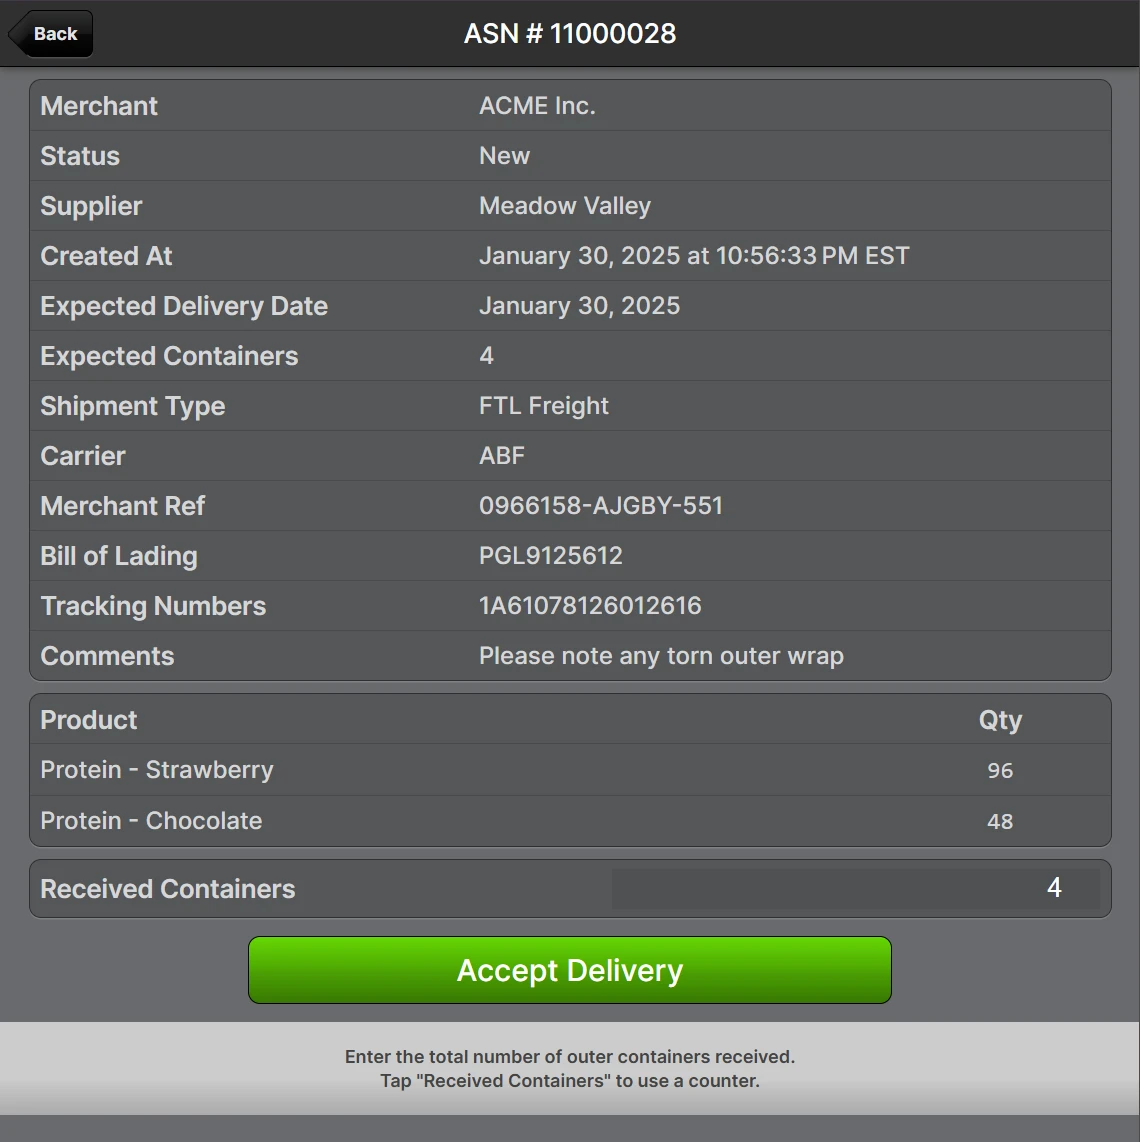
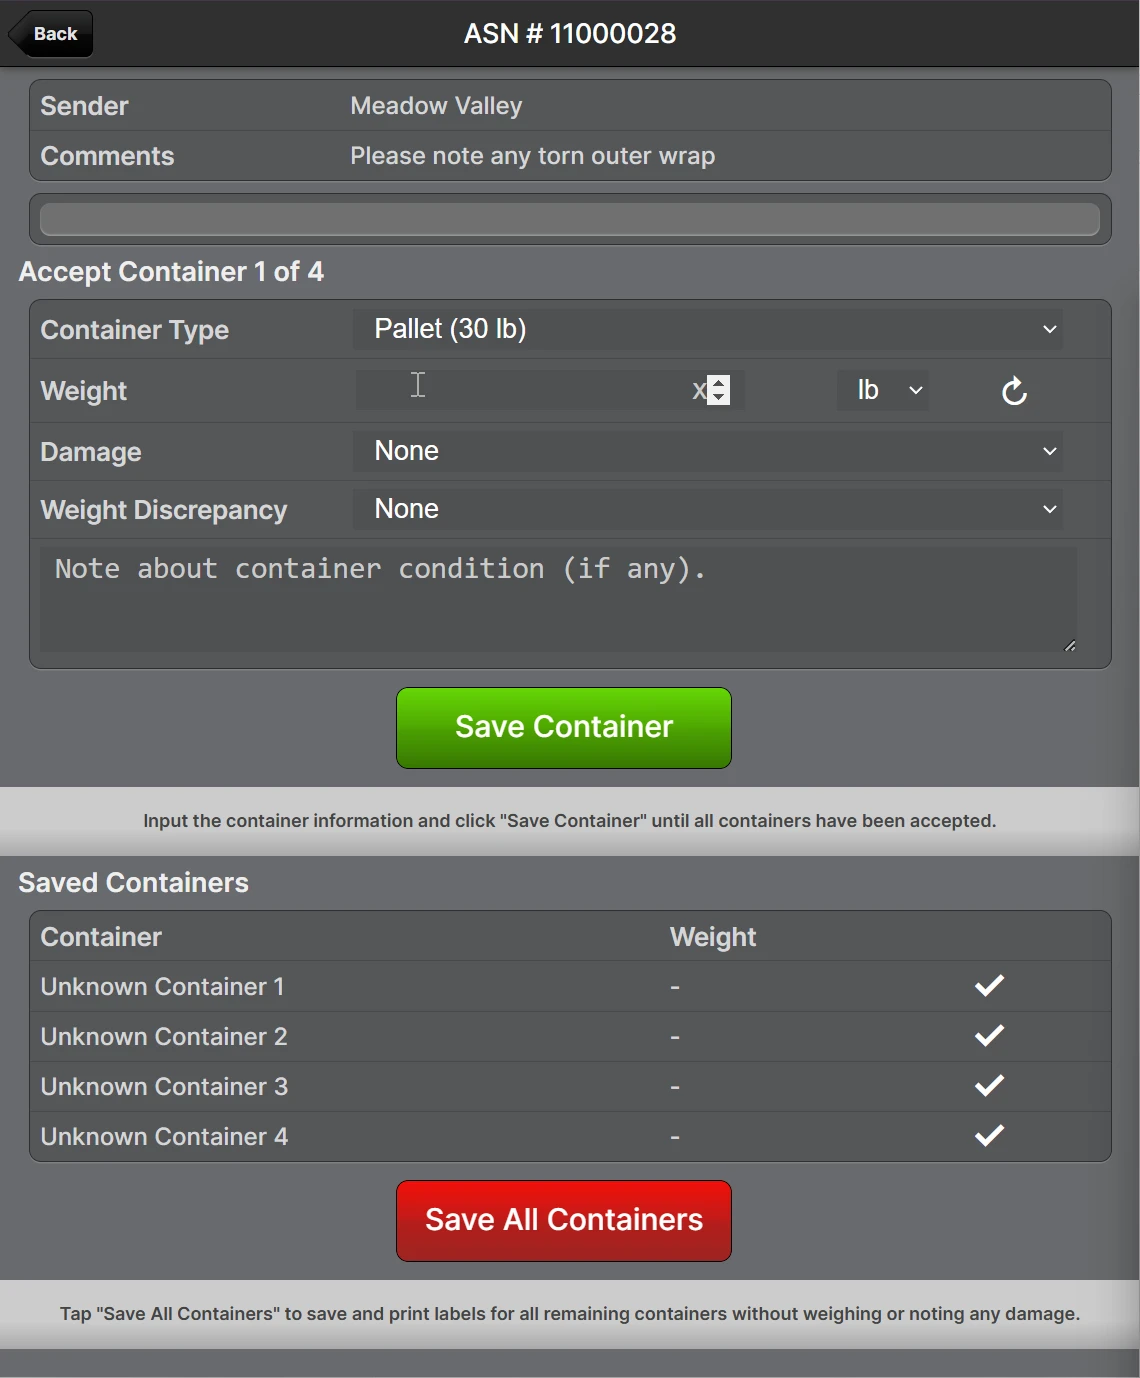
Confirm that the details of the delivery are correct, adjust the Received Containers field, and tap Accept Delivery. The "Unknown containers" will be created in the amount entered, and the status will advance to Accepting.
 You may repeat this step and change the number of Received Containers if needed. New containers may be added, or unknown containers may be removed to match the new number entered, but accepted containers will not be deleted.
Enter the container details and tap Save Container for each container until all containers have been accepted.
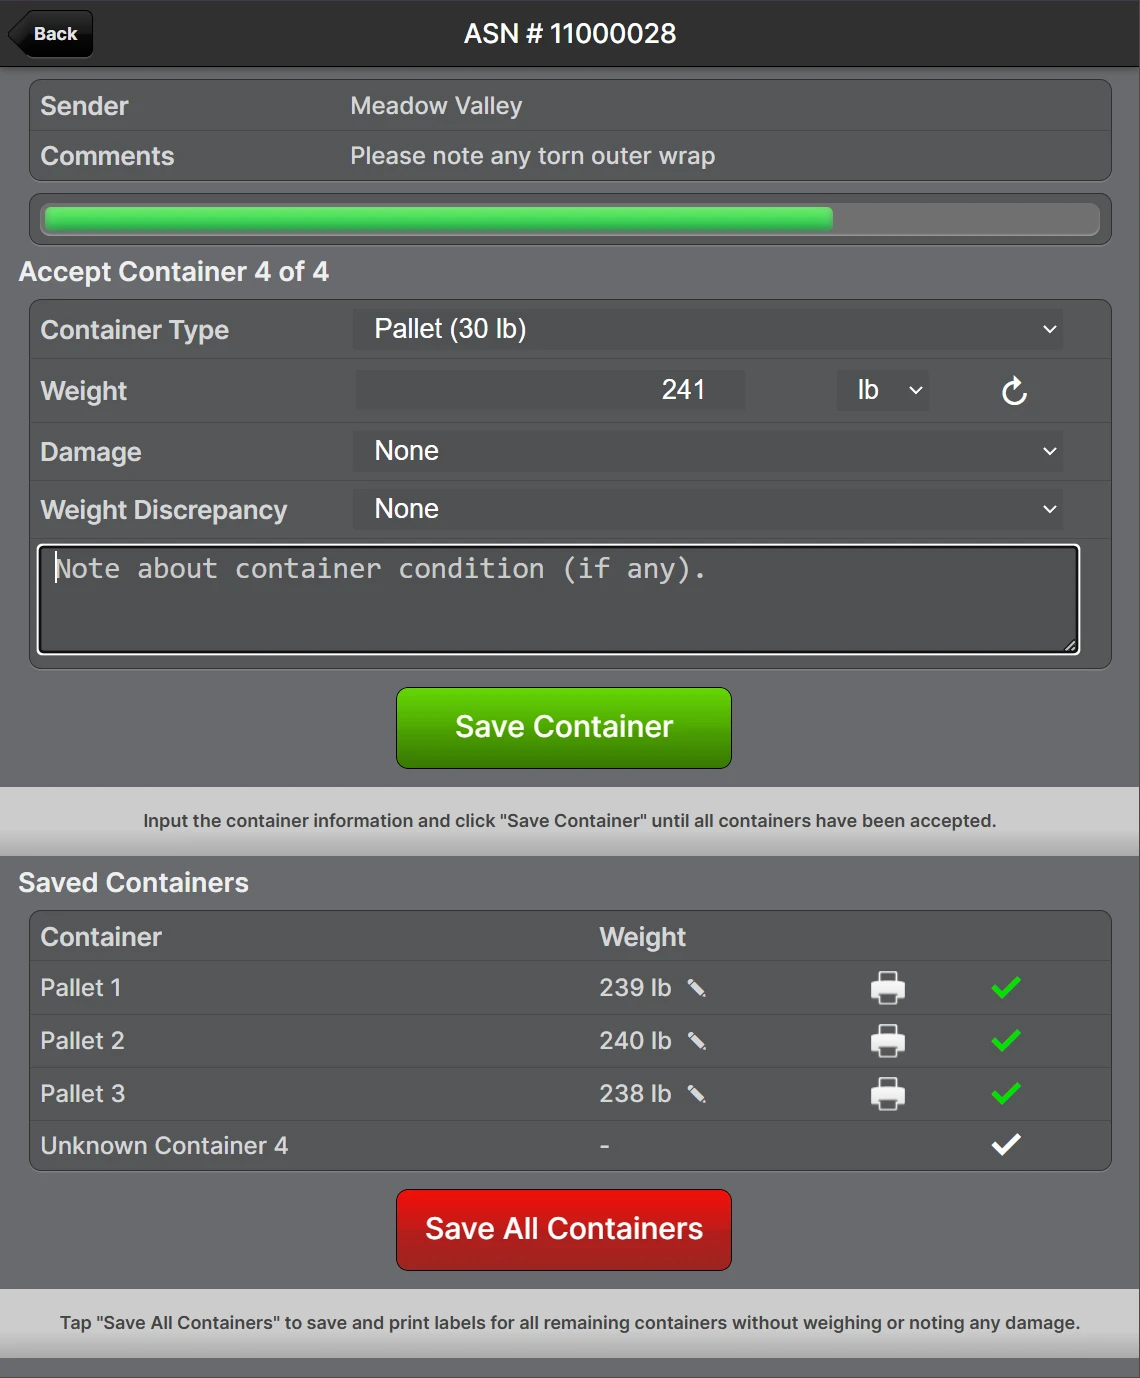 The Weight can be pulled directly from a scale if it is connected to the Device Hub by tapping the ↻ button beside the Weight field.As each container is added, a label will be sent to the selected label printer. This label should be affixed securely to the container as it will identify it uniquely and be required for the processing step.
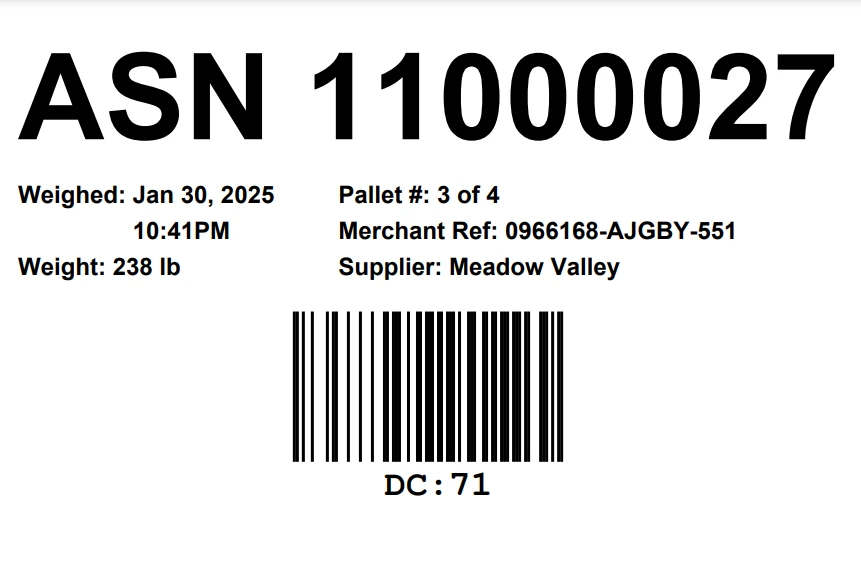
Example container label:
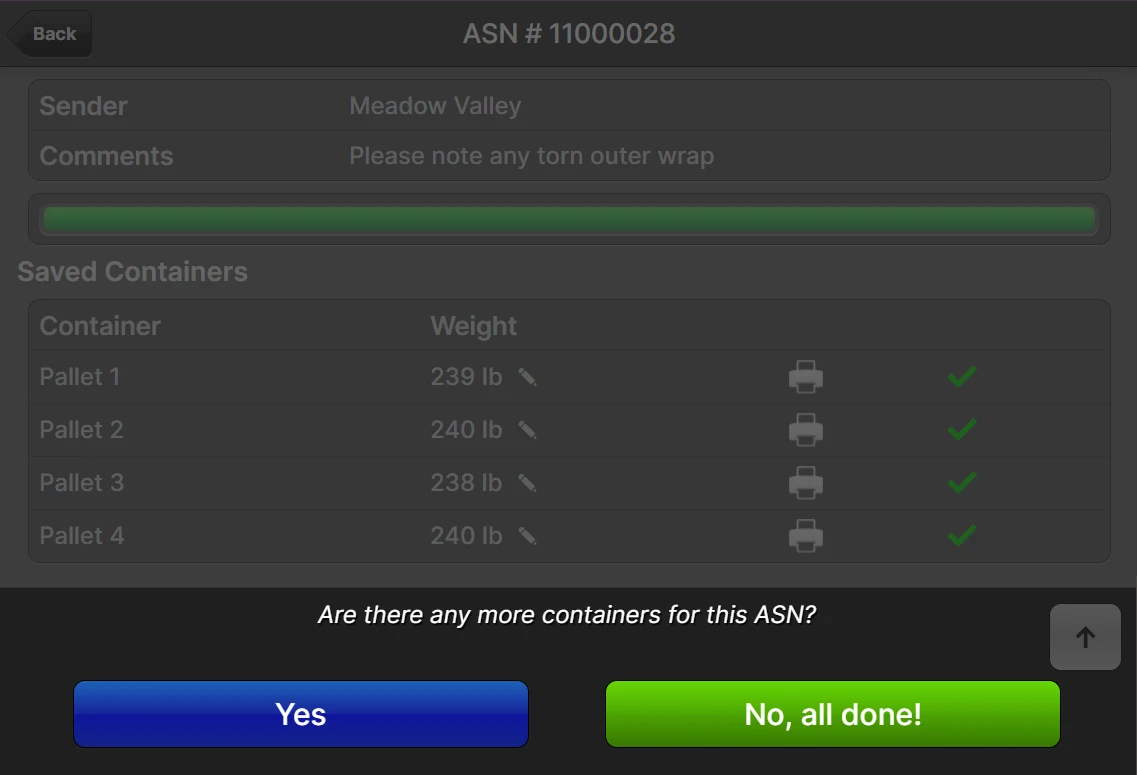
- After the last container has been submitted, you will have an opportunity to review your work and make adjustments if needed. Tap Yes to add another container or No, all done! to finalize the acceptance.
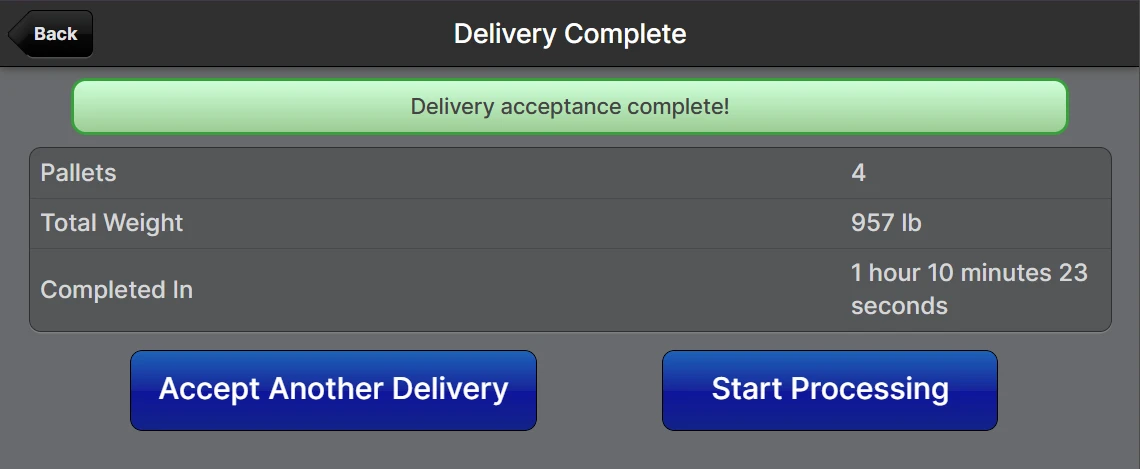
The delivery status will now be Ready To Process, and you are ready to begin processing!
Closing a Delivery
ASNs and Other Deliveries have an Open or Closed status that indicates whether more containers can be accepted. Typically, the only reason to leave a delivery open would be when you are waiting for the remainder of the shipment to arrive. Closing deliveries keeps them organized so they don't clutter your list of expected deliveries and allows integrations to know when a delivery is truly completed.
The Auto-Close feature causes a delivery to be closed automatically upon receipt of the last container. For example, if you indicate there are four containers upon initial receipt, when the fourth container is accepted, the delivery will transition from Open to Closed.
Once closed, the delivery can still be re-opened until the delivery is Complete by clicking Re-Open on the delivery page.
Processing
The processing step consists of the following components:
- identifying items received and matching them to line items on the delivery
- counting the quantity of items received
- noting any damaged or missing items (shortages)
- noting any unexpected items or quantities (overages)
- capturing lot and expiration data
- capturing serial numbers
Admin UI
You can fully process the delivery through the Admin UI, although it is recommended to perform the counting steps in the Scanner UI for the best accuracy and efficiency.
Navigate to the delivery page by:
scanning a barcode associated with the delivery
The types of labels that can be scanned include Container Labels and Tracking Numbers.- navigating to Receiving > ASNs, Receiving > RMAs or Receiving > Other Deliveries and using the grid to locate
- Click Process to load the Processing page
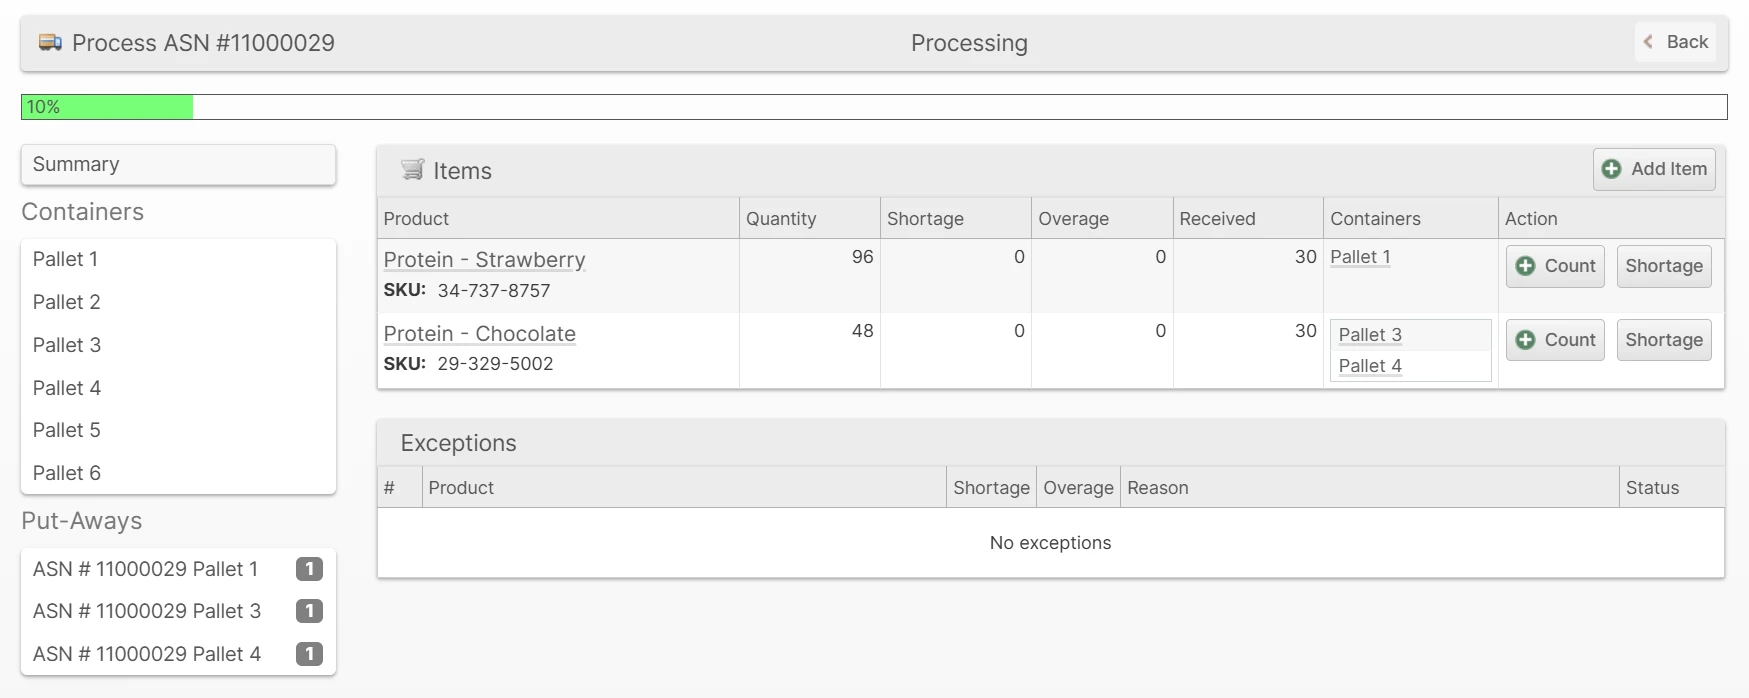
Click Count to open the Count dialog and submit the count value
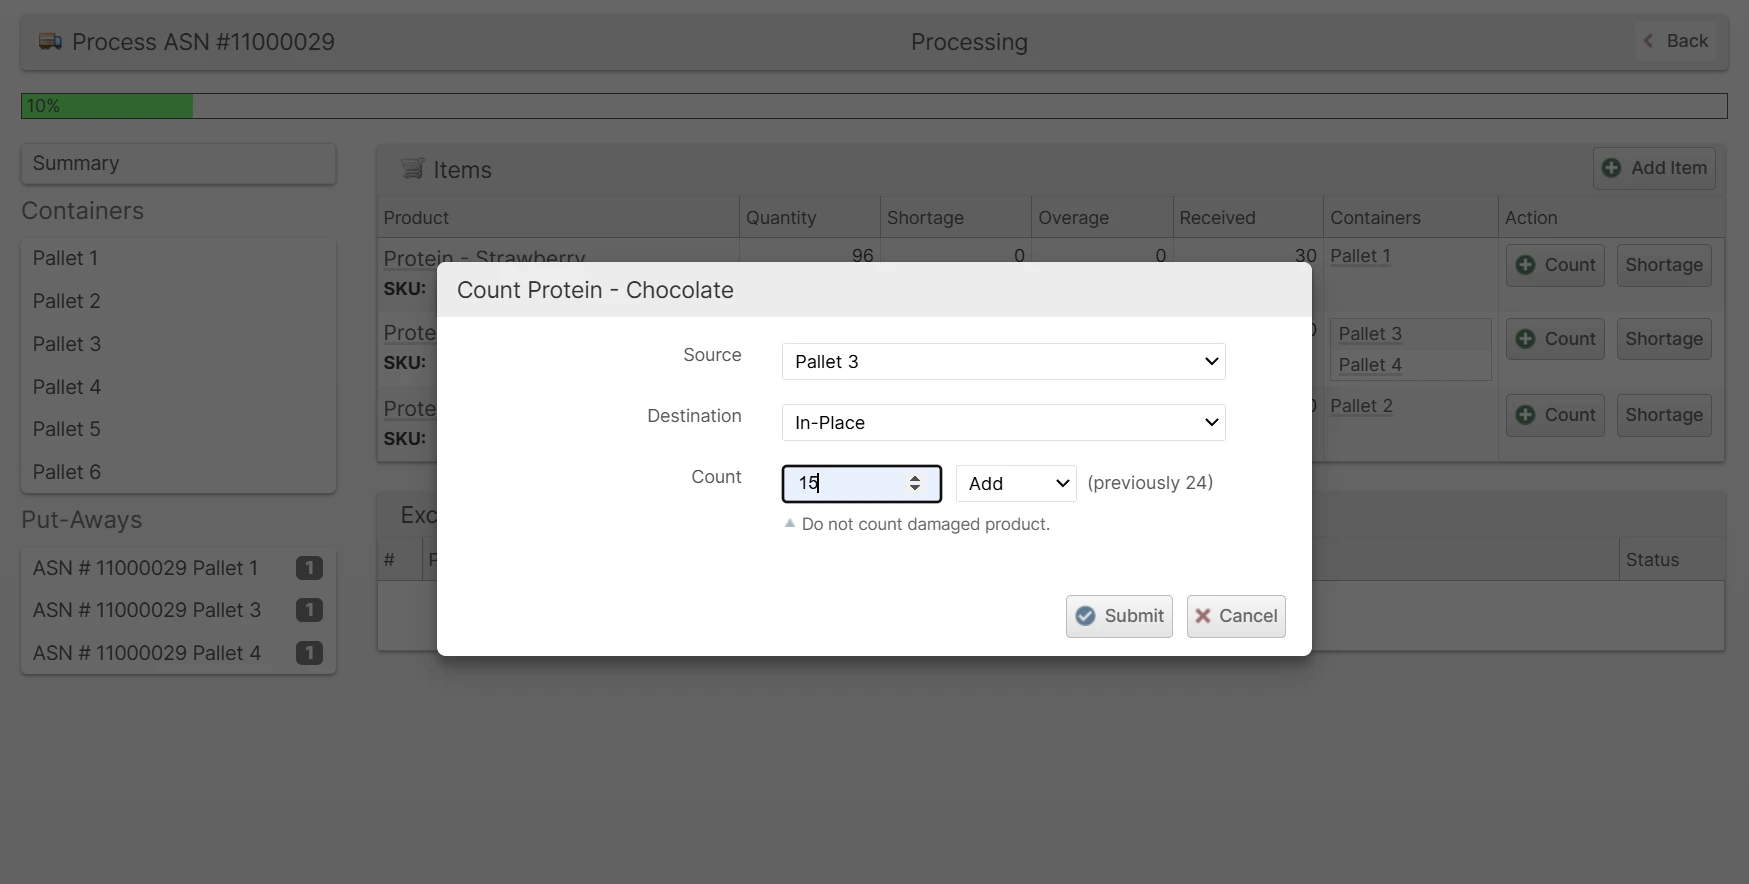
- Select the correct Source according to which container you are counting from
- Select the correct Destination according to the target you are counting to
- If you choose "Create new Put-Away", be sure to print the Put-Away Label and keep it with the counted inventory for later for the Put-Away step.
- Enter an amount and choose Add, Subtract or Update according to how you want to change the current count.
- When you select the Count field, the previous amount will be shown to the right.
- Click Submit to apply the count change
Repeat step 3 until all items have been counted
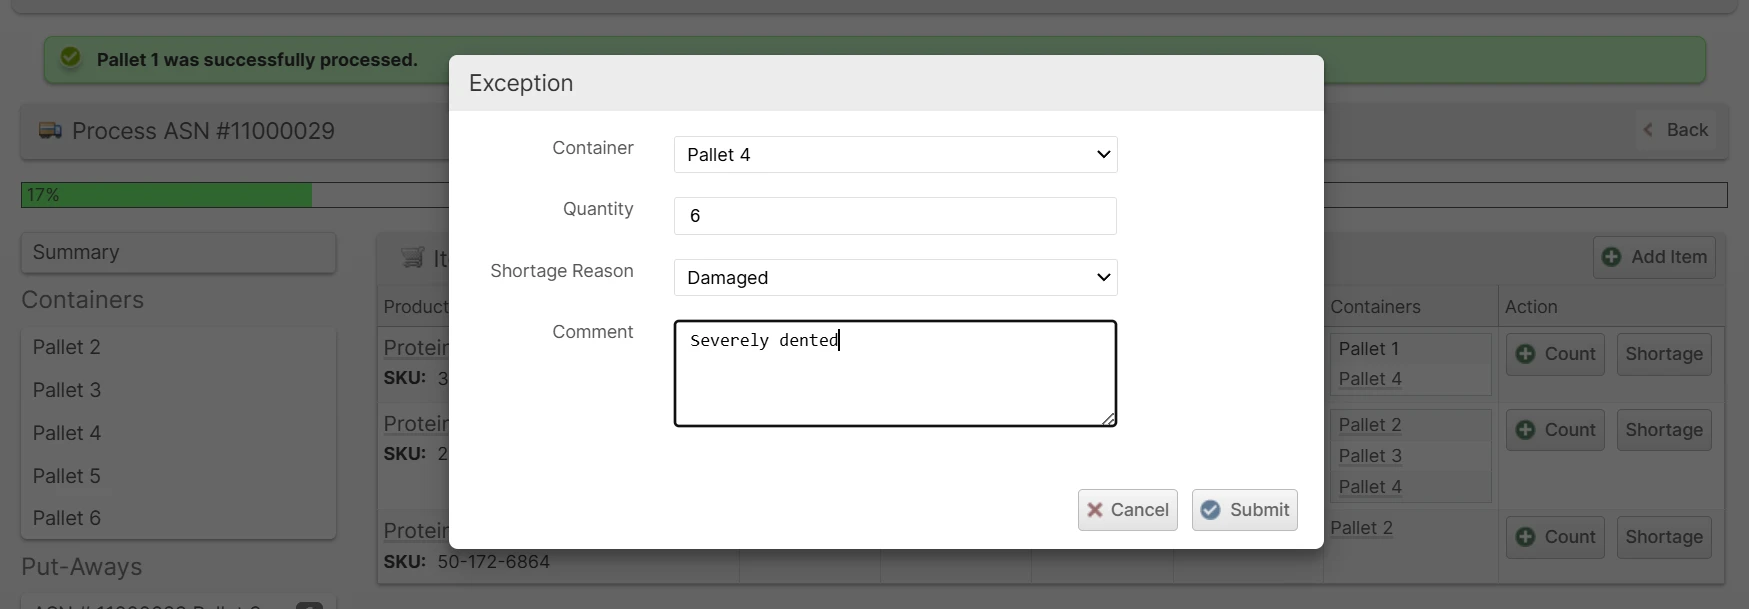
You can click Add Item to add items to the delivery that are missing from the items list.- Report any damaged goods by clicking Shortage and submitting the dialog.
- When you are finished processing a container, click the container in the left sidebar and click Finish Processing. This will allow any in-place Put-Aways to become Ready for put-away.
If you have any Put-Aways that are not yet closed but ready to be closed, click on it in the sidebar and click Close.
Leave the put-away open if you want to process multiple deliveries of the same type to a single put-away.- Upon finishing the last container and approving all exceptions, the processing is finished!
Scanner UI
- From the Scanner home page, tap Processing.
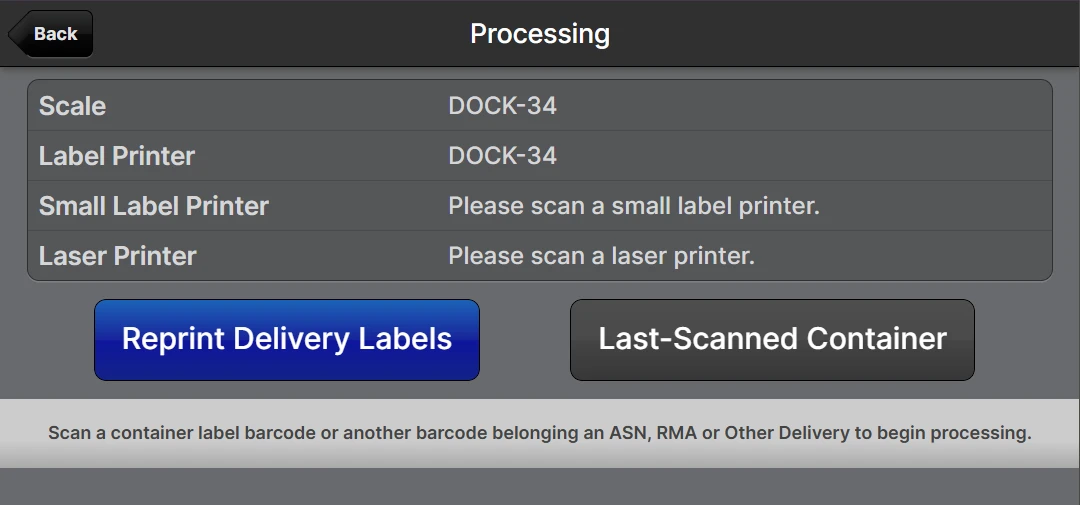
- Scan the container label for the delivery you would like to process.
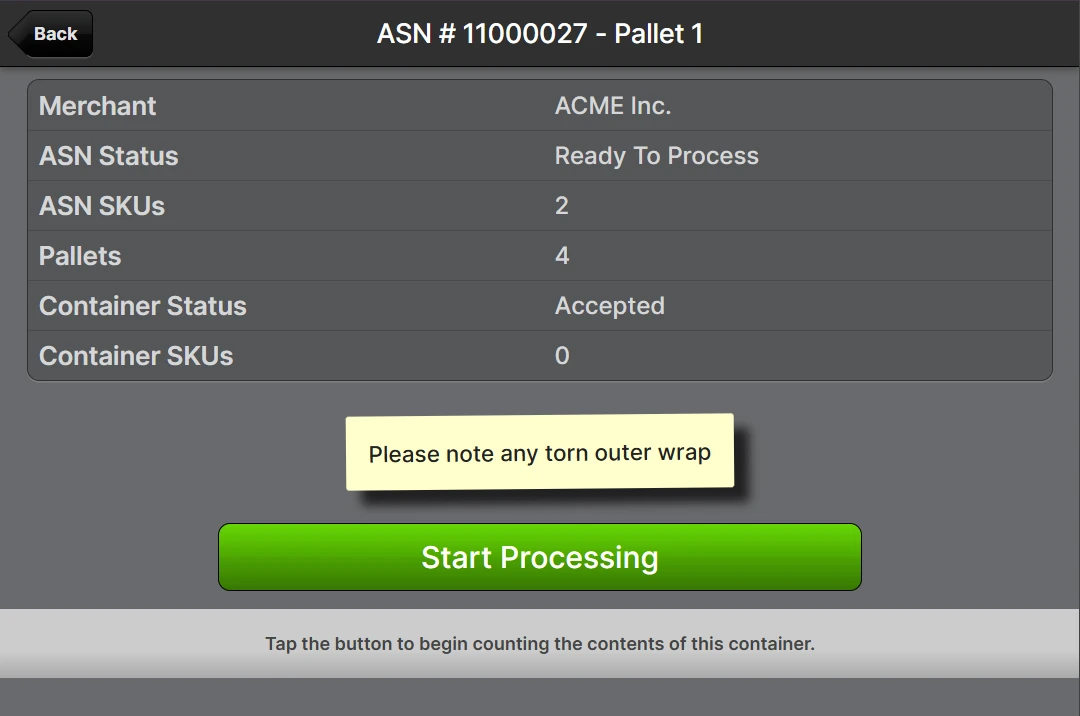
Tap Start Processing to enter the main processing page where you can see the progress and begin collecting the information about the received inventory.
 Main processing page:
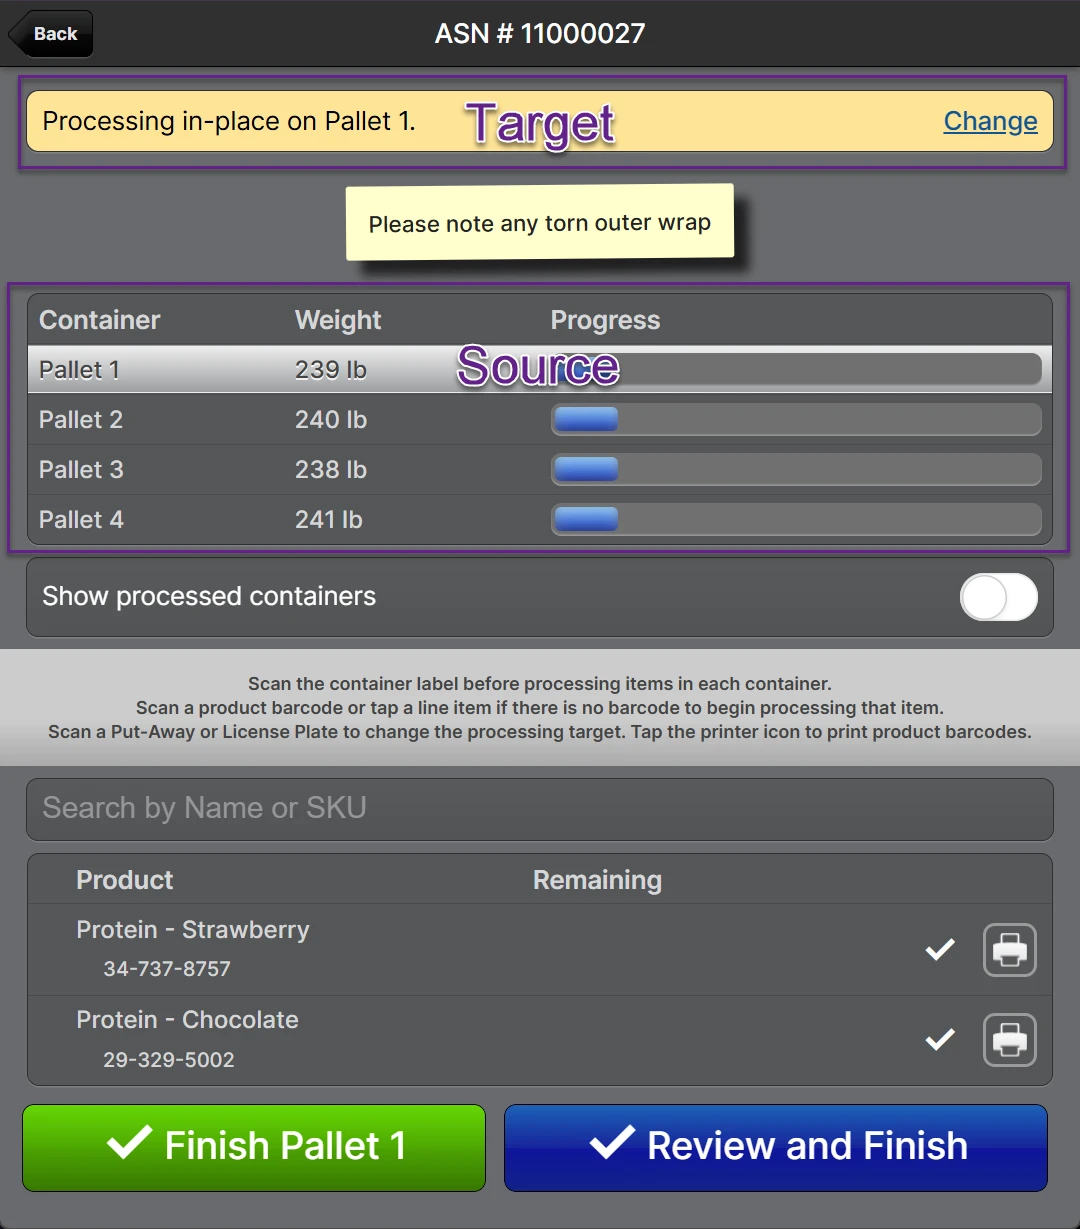
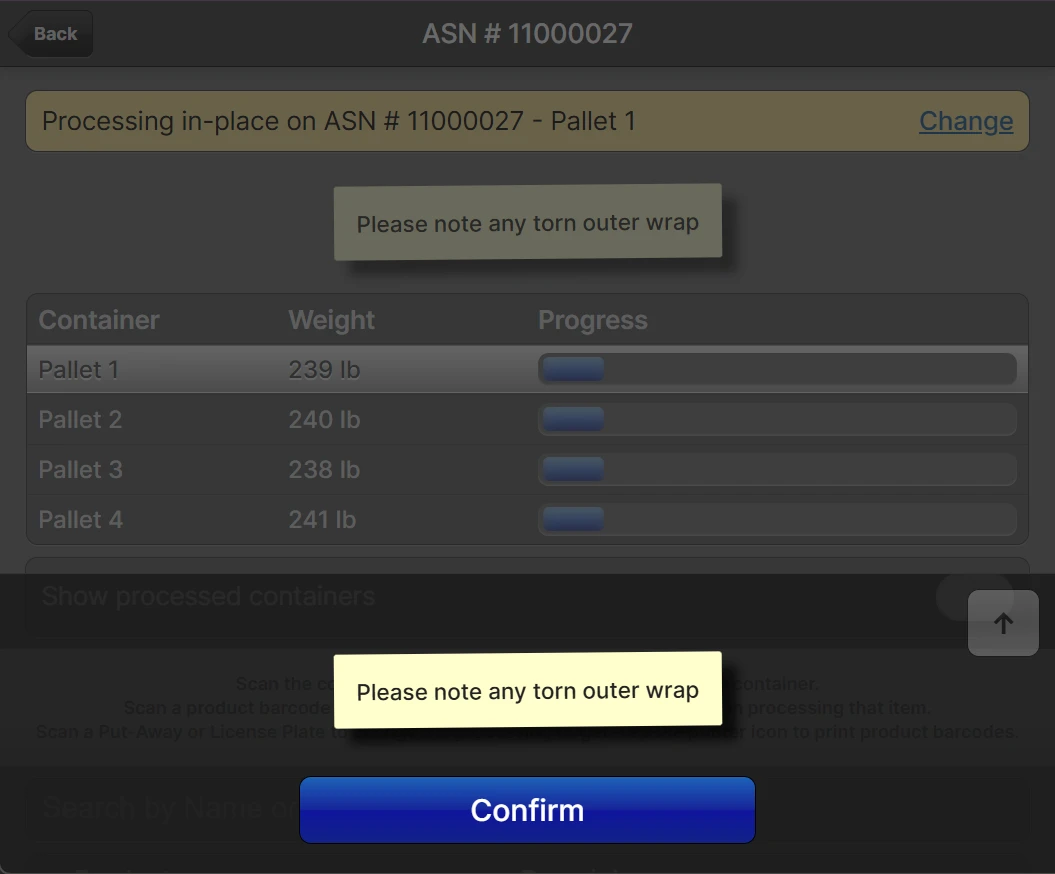
- If there are Processing Comments for the delivery, they will be shown with a modal dialog to ensure they are brought to the attention of the user as well as displayed at the top of the page throughout the process. Tap Confirm to dismiss the modal.
Change the Put-Away Target
Depending on the circumstances and your defined processes, you may wish to "process" each container to different types of "Put-Away Targets". Tap Change at the top right of the screen to change the target.
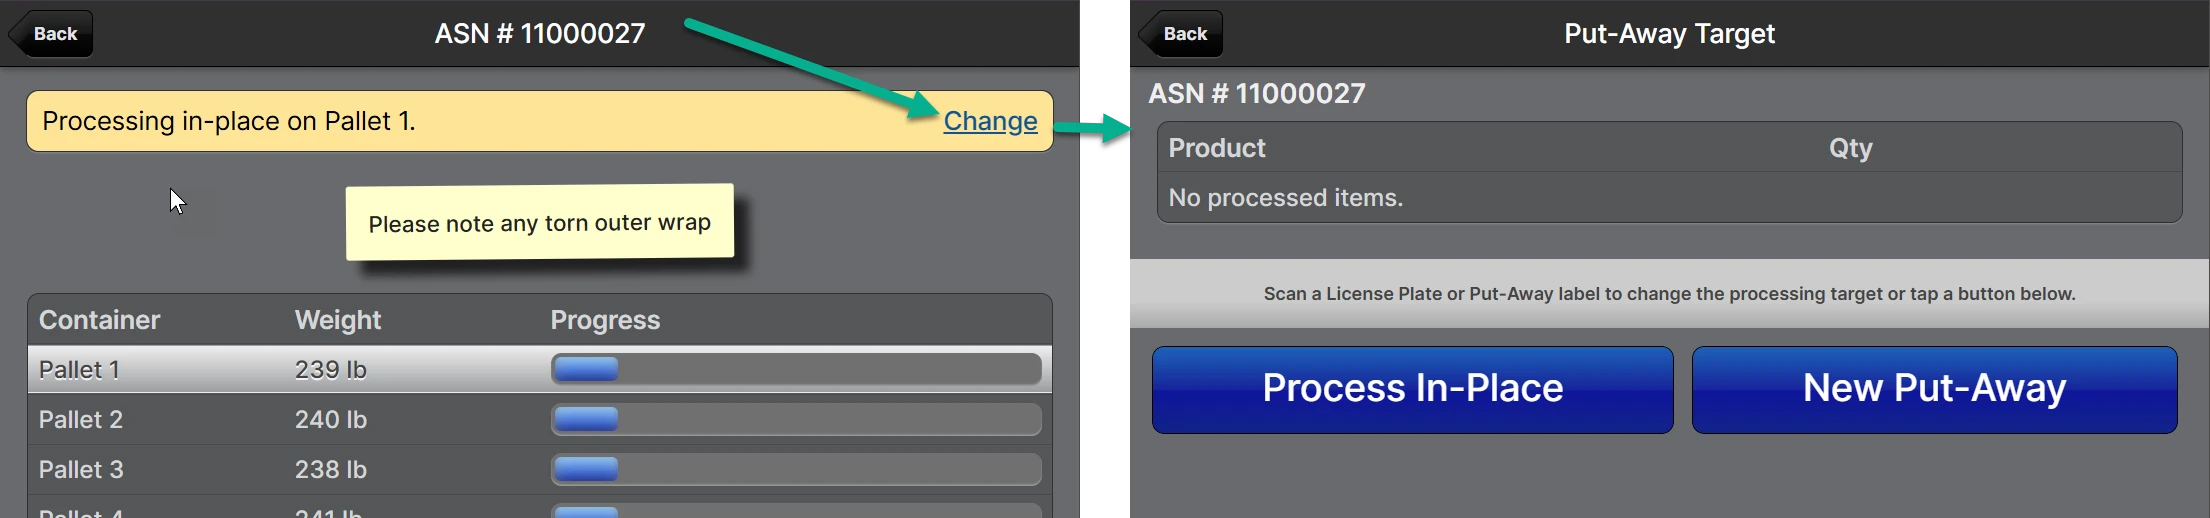
- Process In-Place - This is the default behaviour whereby the container label will be re-used for put-away. In-place works well when there is a one-to-one relationship between received containers and the put-away process. Be sure to keep your container label printed during the Delivery step in-tact for the put-away process.
- New Put-Away - This creates a new put-away and immediately prints a Put-Away Label. This allows you to either combine multiple deliveries or containers into a single Put-Away, or split a container into multiple smaller Put-Aways or any combination thereof.
- Existing Put-Away - There is not a button for this option, rather you just scan the existing Put-Away Label to select it.
- License Plate - Similar to a Put-Away Label, this allows you to split and combine containers. The License Plate is meant to be a pre-generated label that is either disposable or re-usable and affixed to an inventory control cone or similar device.
Change the Source Container
From the main processing page, the container highlighted in the list of containers indicates which container you are counting from. You can scan a delivery container label or tap on its row in the list of containers to change the source.
Process Item
With the correct target and source selected you are ready to process each item. Scan an item's barcode to navigate to the Process Item page.
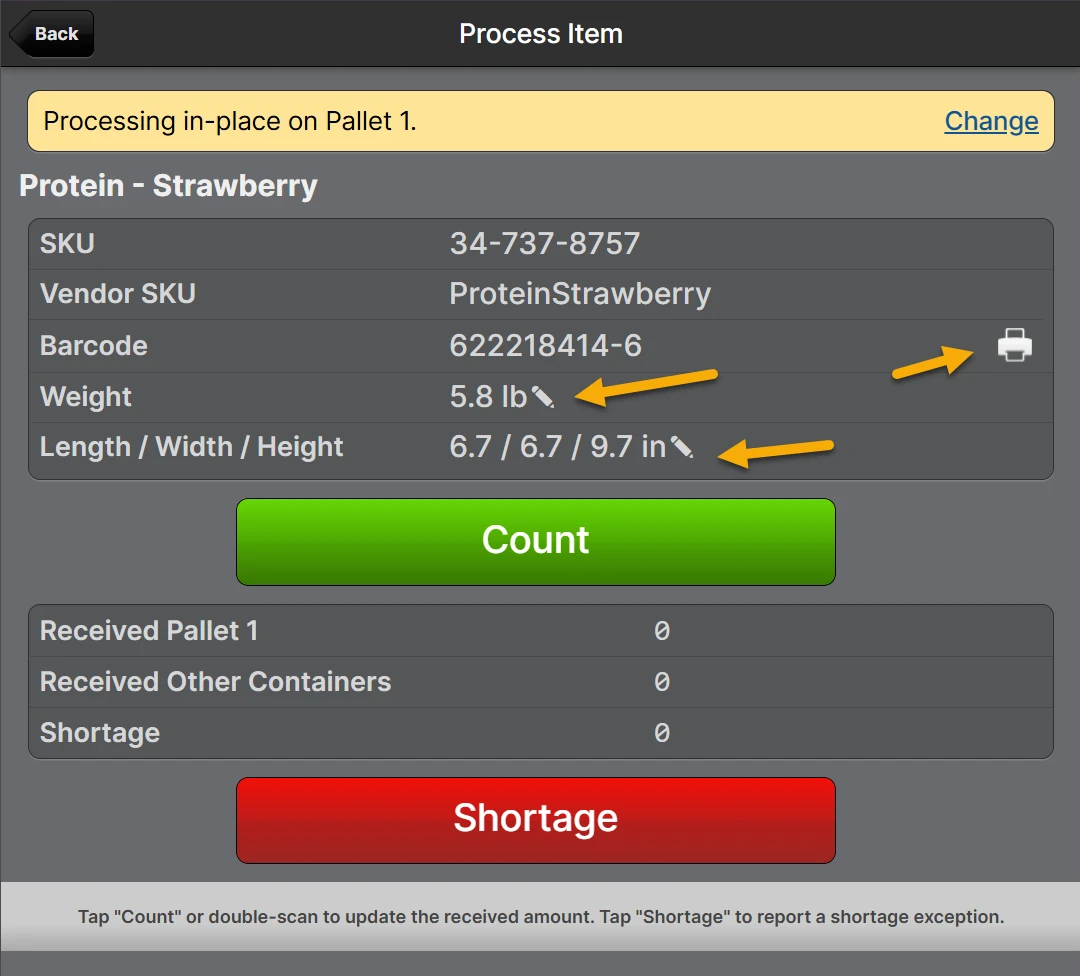
As the note at the bottom of the screen says, tap Count or double-scan the product barcode to enter the counting step.
 Use the count dialog to obtain and submit an accurate count of the number of units of the item on the source container. This amount must only include the items on the source container and not any other containers.
Upon submitting the count, you will be returned to the main processing page.
Use the count dialog to obtain and submit an accurate count of the number of units of the item on the source container. This amount must only include the items on the source container and not any other containers.
Upon submitting the count, you will be returned to the main processing page.
 Repeat steps 4 and 5 for all items on the source containerTap the green Finish {Container} and answer Yes to "Are you sure?".Scan a different source container and perform steps 4 through 6 until all containers are fully processed.
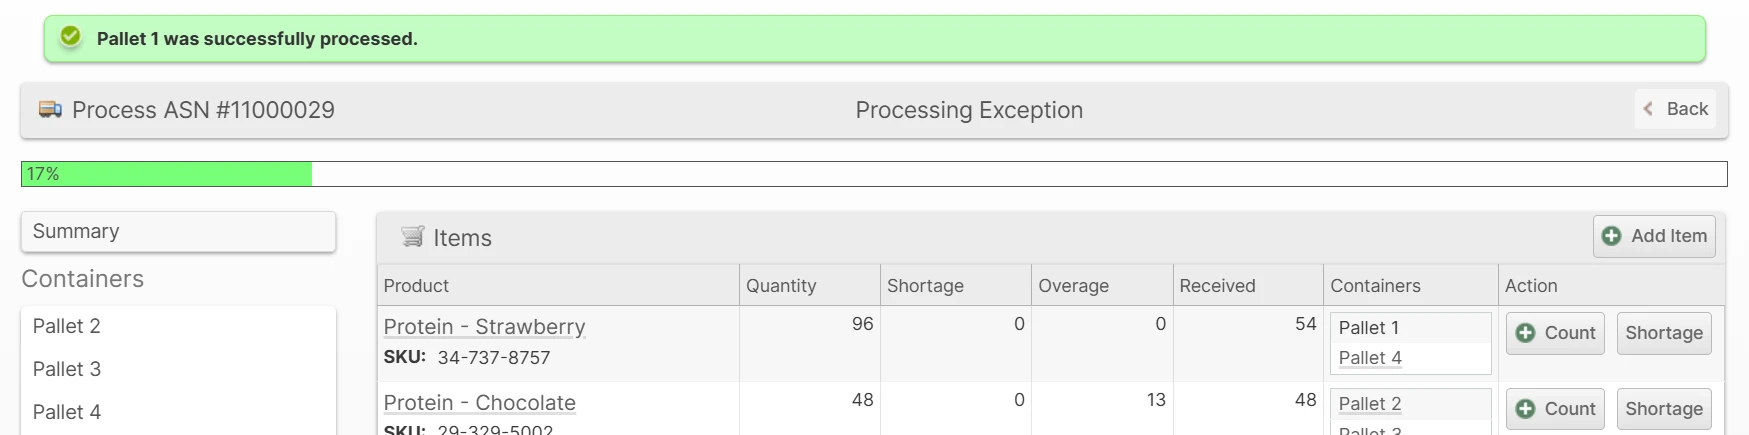
Processing Exceptions
A processing exception indicates that an unexpected condition occurred that may need additional eyes on and review. There are three types of exceptions that may occur:
- Overage - More was counted than was expected.
- Shortage/Damaged - Units were damaged and unsellable.
- Shortage/Missing - Less was counted than was expected.
- Attributes Missing - The product was missing one of the Required Attributes.
Overages and Attributes Missing are created automatically after a container is "finished".
Shortages are created by the user by tapping the Shortage button and providing some details:
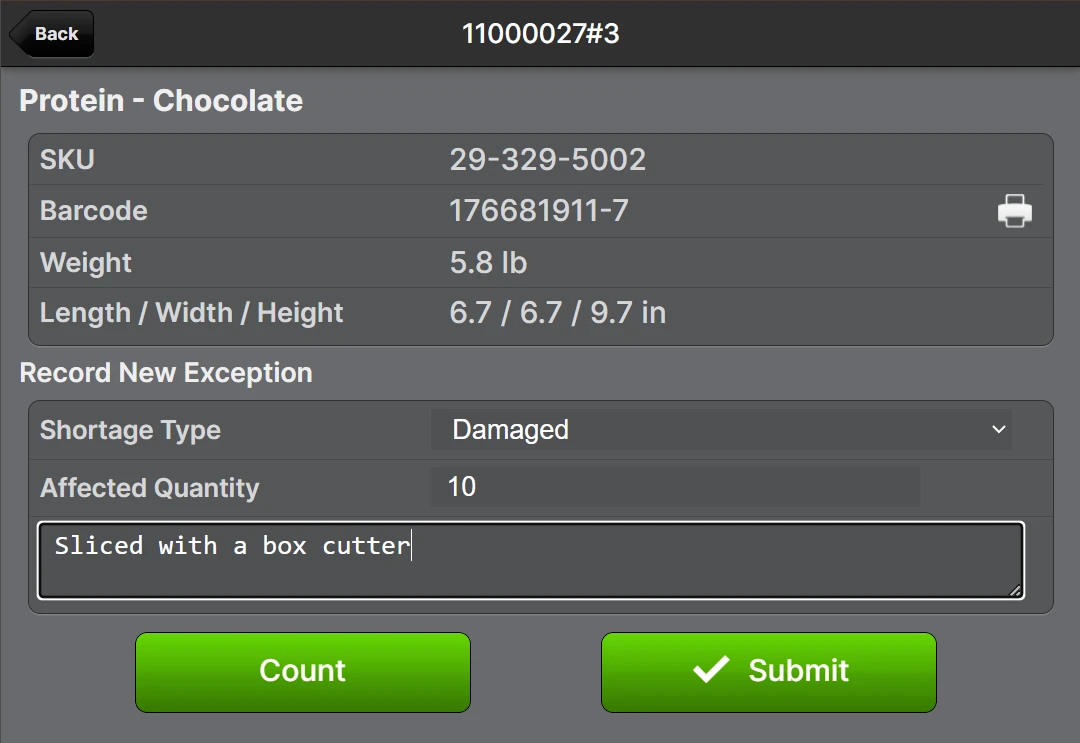
After submitting the shortage:

Closed Exceptions
When a delivery is closed after all containers have been processed, there is not an opportunity for any more items to be counted to a new container, so a Shortage exception for any items that were counted short will be created in a Closed status. This is effectively the same as the exception having been Approved, but it was not directly approved by a user, only indirectly by the delivery being closed with no open containers.
Approving and Rejecting
When a delivery has exceptions after processing, the status will not advance to Processed, but rather it will be Processing Exception. The Exceptions can be seen at the bottom of the main page:
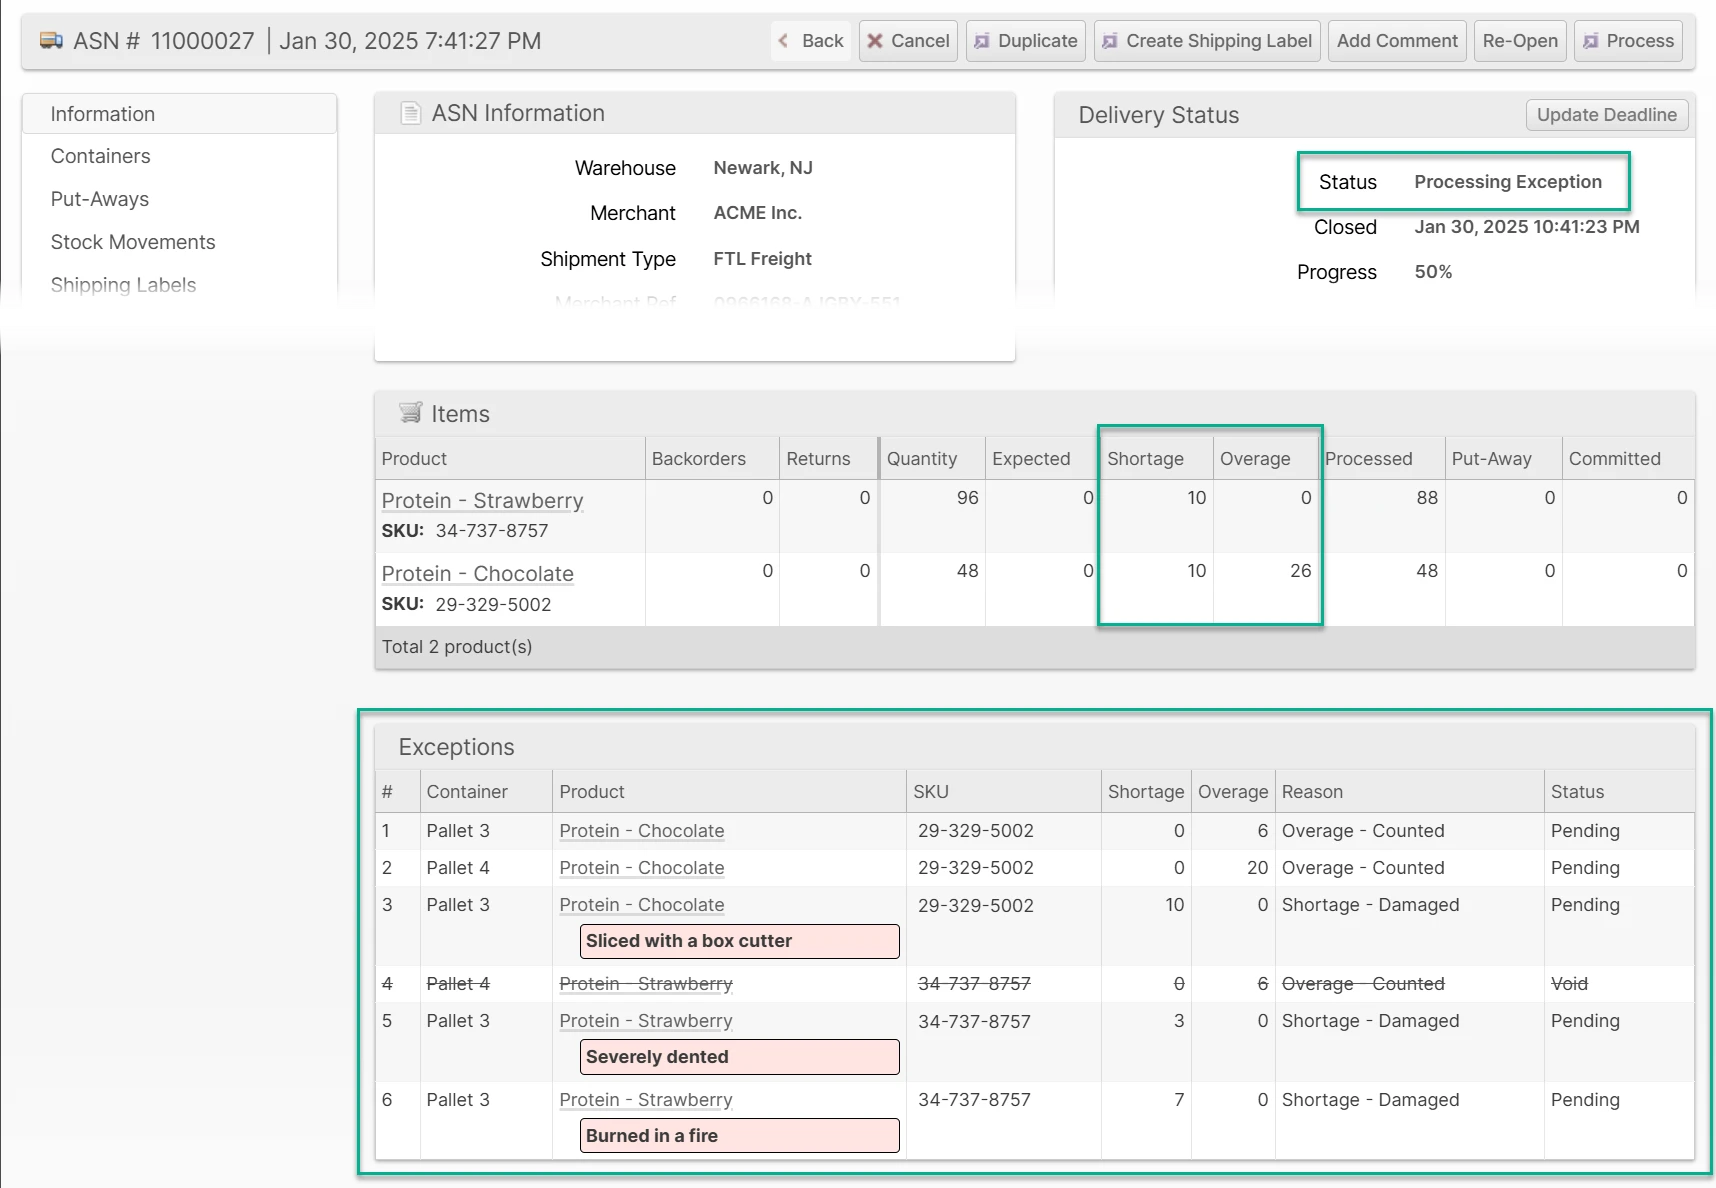
To address the exceptions, click Process to open the Processing page. You can then choose to Accept or Reject each exception based on its merits.
- Approve - The submitted count will be accepted as the correct number.
- Reject - The submitted count will be returned to the amount excluding the excepted amount. You should then update the count as appropriate.
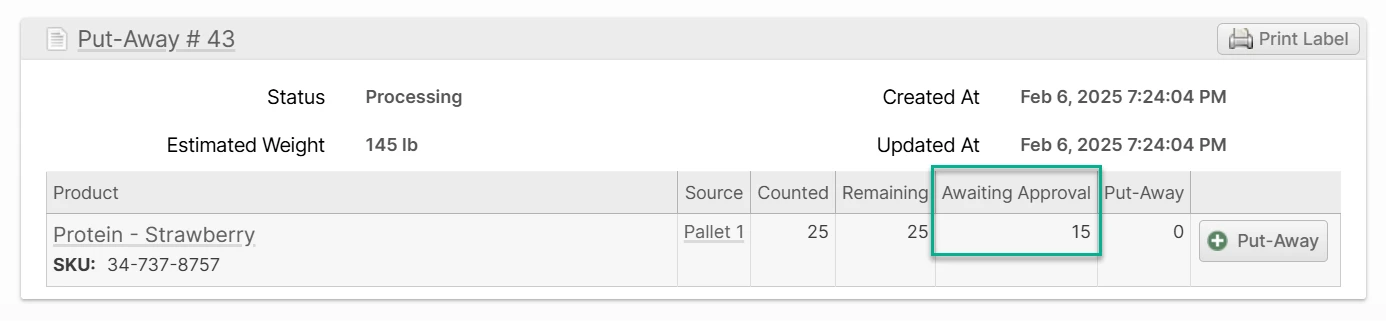
Any unapproved overages will appear on the Put-Away under Awaiting Approval and will not be possible to put-away until the overage is approved.
Once all exceptions have been finalized, the delivery status may advance to Processed (if there are no other containers being processed). If any exceptions were rejected, the delivery will remain in Processing status until a user finishes the processing, allowing for recounts as necessary.
The steps to process the exceptions are as follows:
- Navigate to the delivery page in the Admin UI by scanning a barcode or use the Global Search or search the appropriate grid from the Receiving menu until you find the correct delivery.
- Click Process.
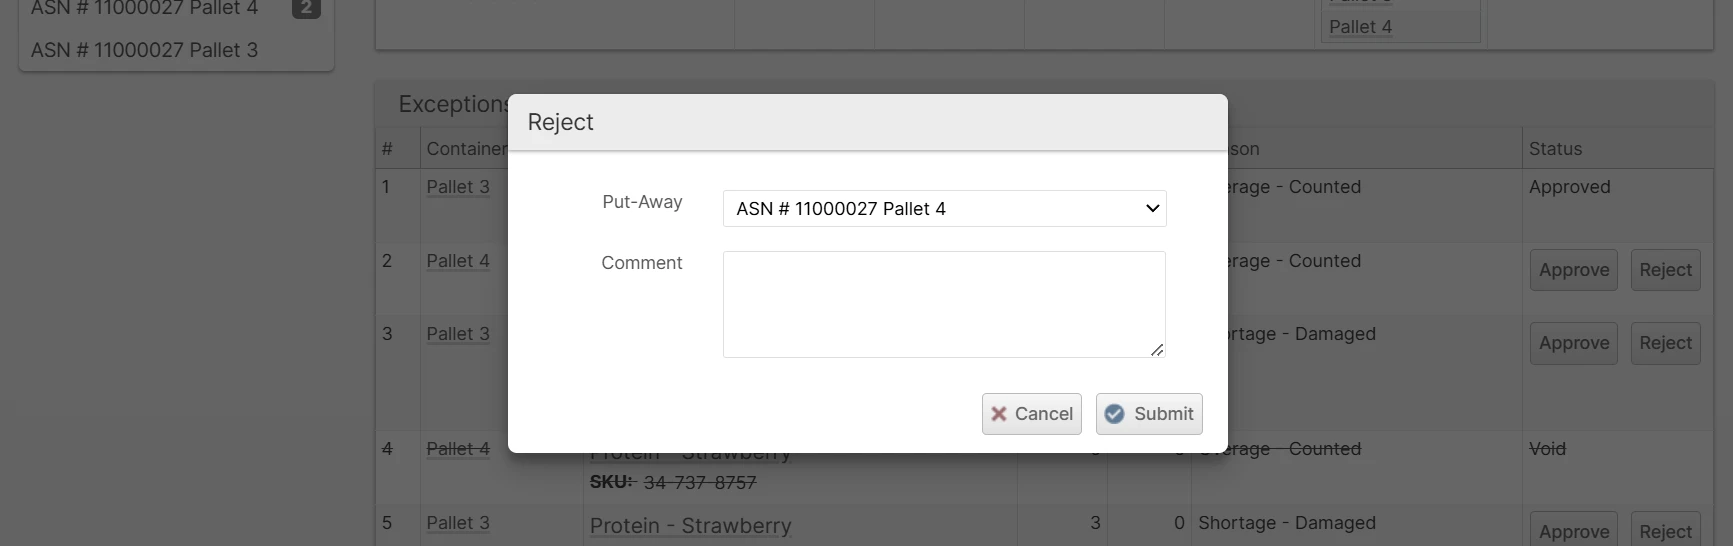
- Click Accept or Reject for each exception and Submit the dialog with an optional comment. When rejecting overages, you may need to specify which Put-Away the inventory belongs to.
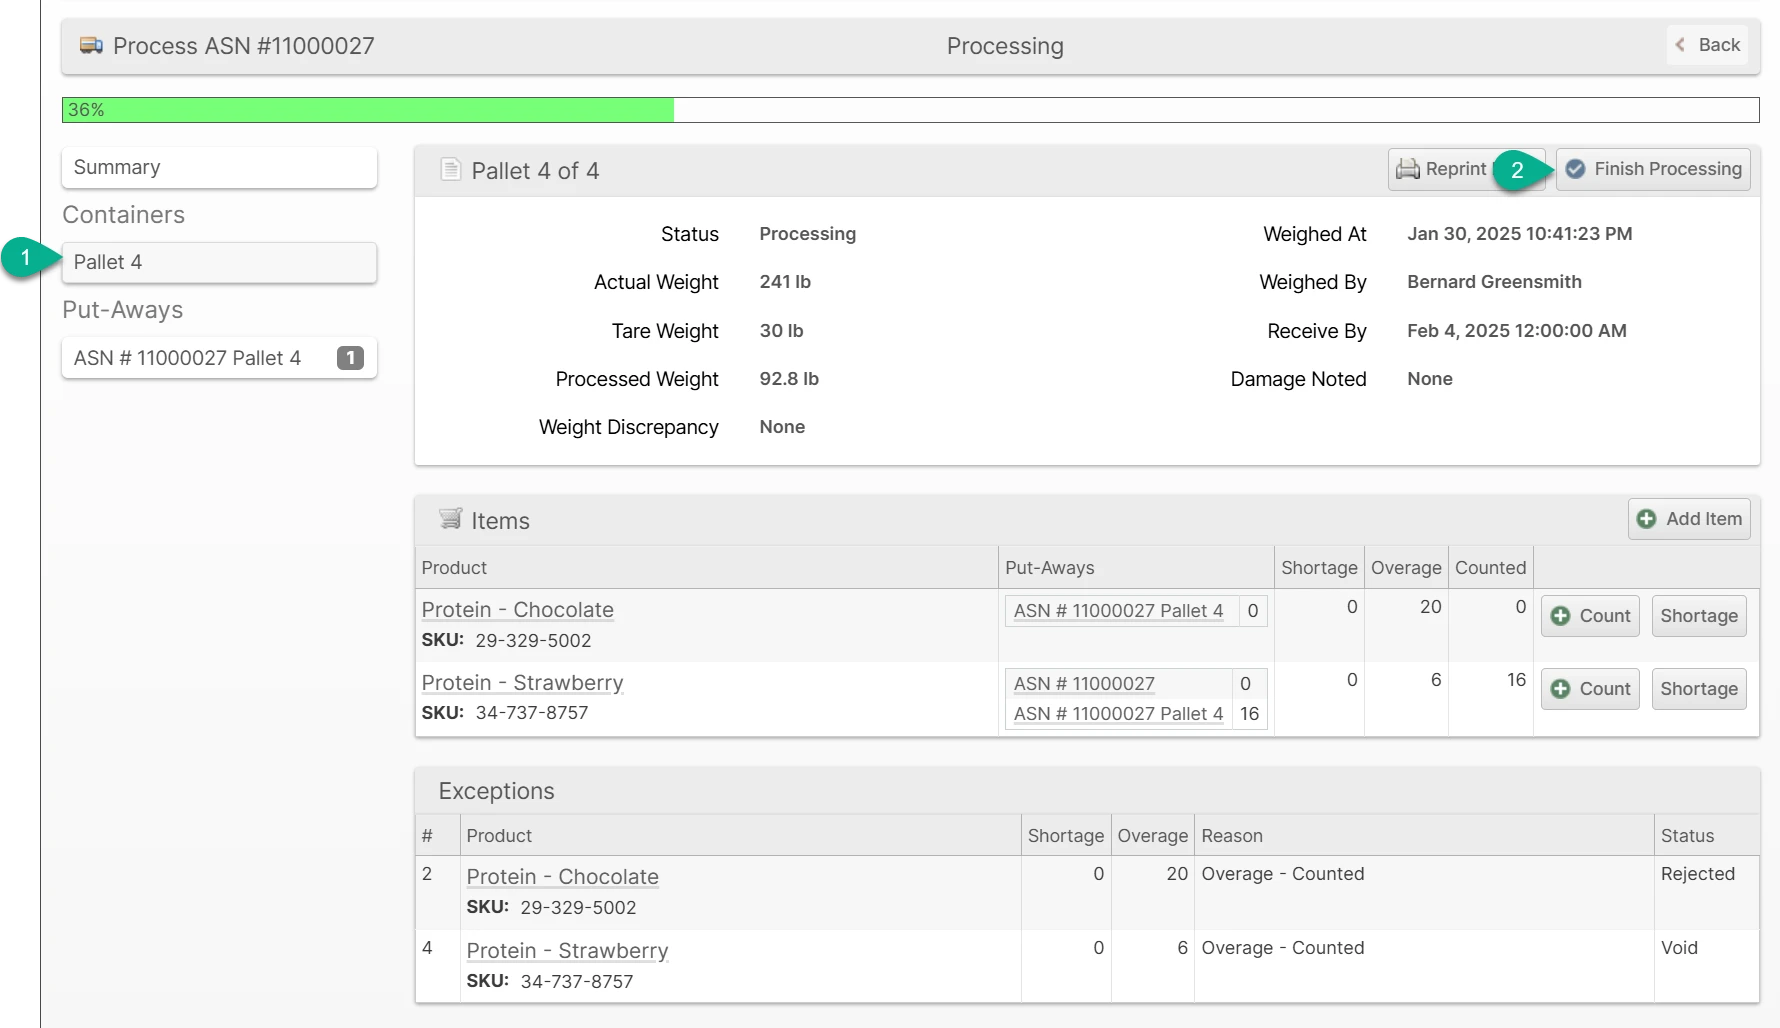
- If you rejected one or more exceptions, click to Container in the left sidebar (1) and click Finish Processing (2) to finalize the container again after making any corrections needed.
Photos
You can easily capture and upload photos with a smartphone camera in the Scanner UI and upload photos in the Admin UI. Each photo can optionally be given a caption which will appear as a note on the photo. Photos are associated with one of the following parts of the delivery in order of heirachy from top to bottom:
- General photos (the truck as it's arriving, Bill of Lading, opening the door)
- Containers (SSCC labels, outer packing damage, containers on a scale, broken seals)
- Items on a container (similar to above when it relates to a specific SKU)
- Exceptions (similar to above when it relates to a specific shortage or overage report)
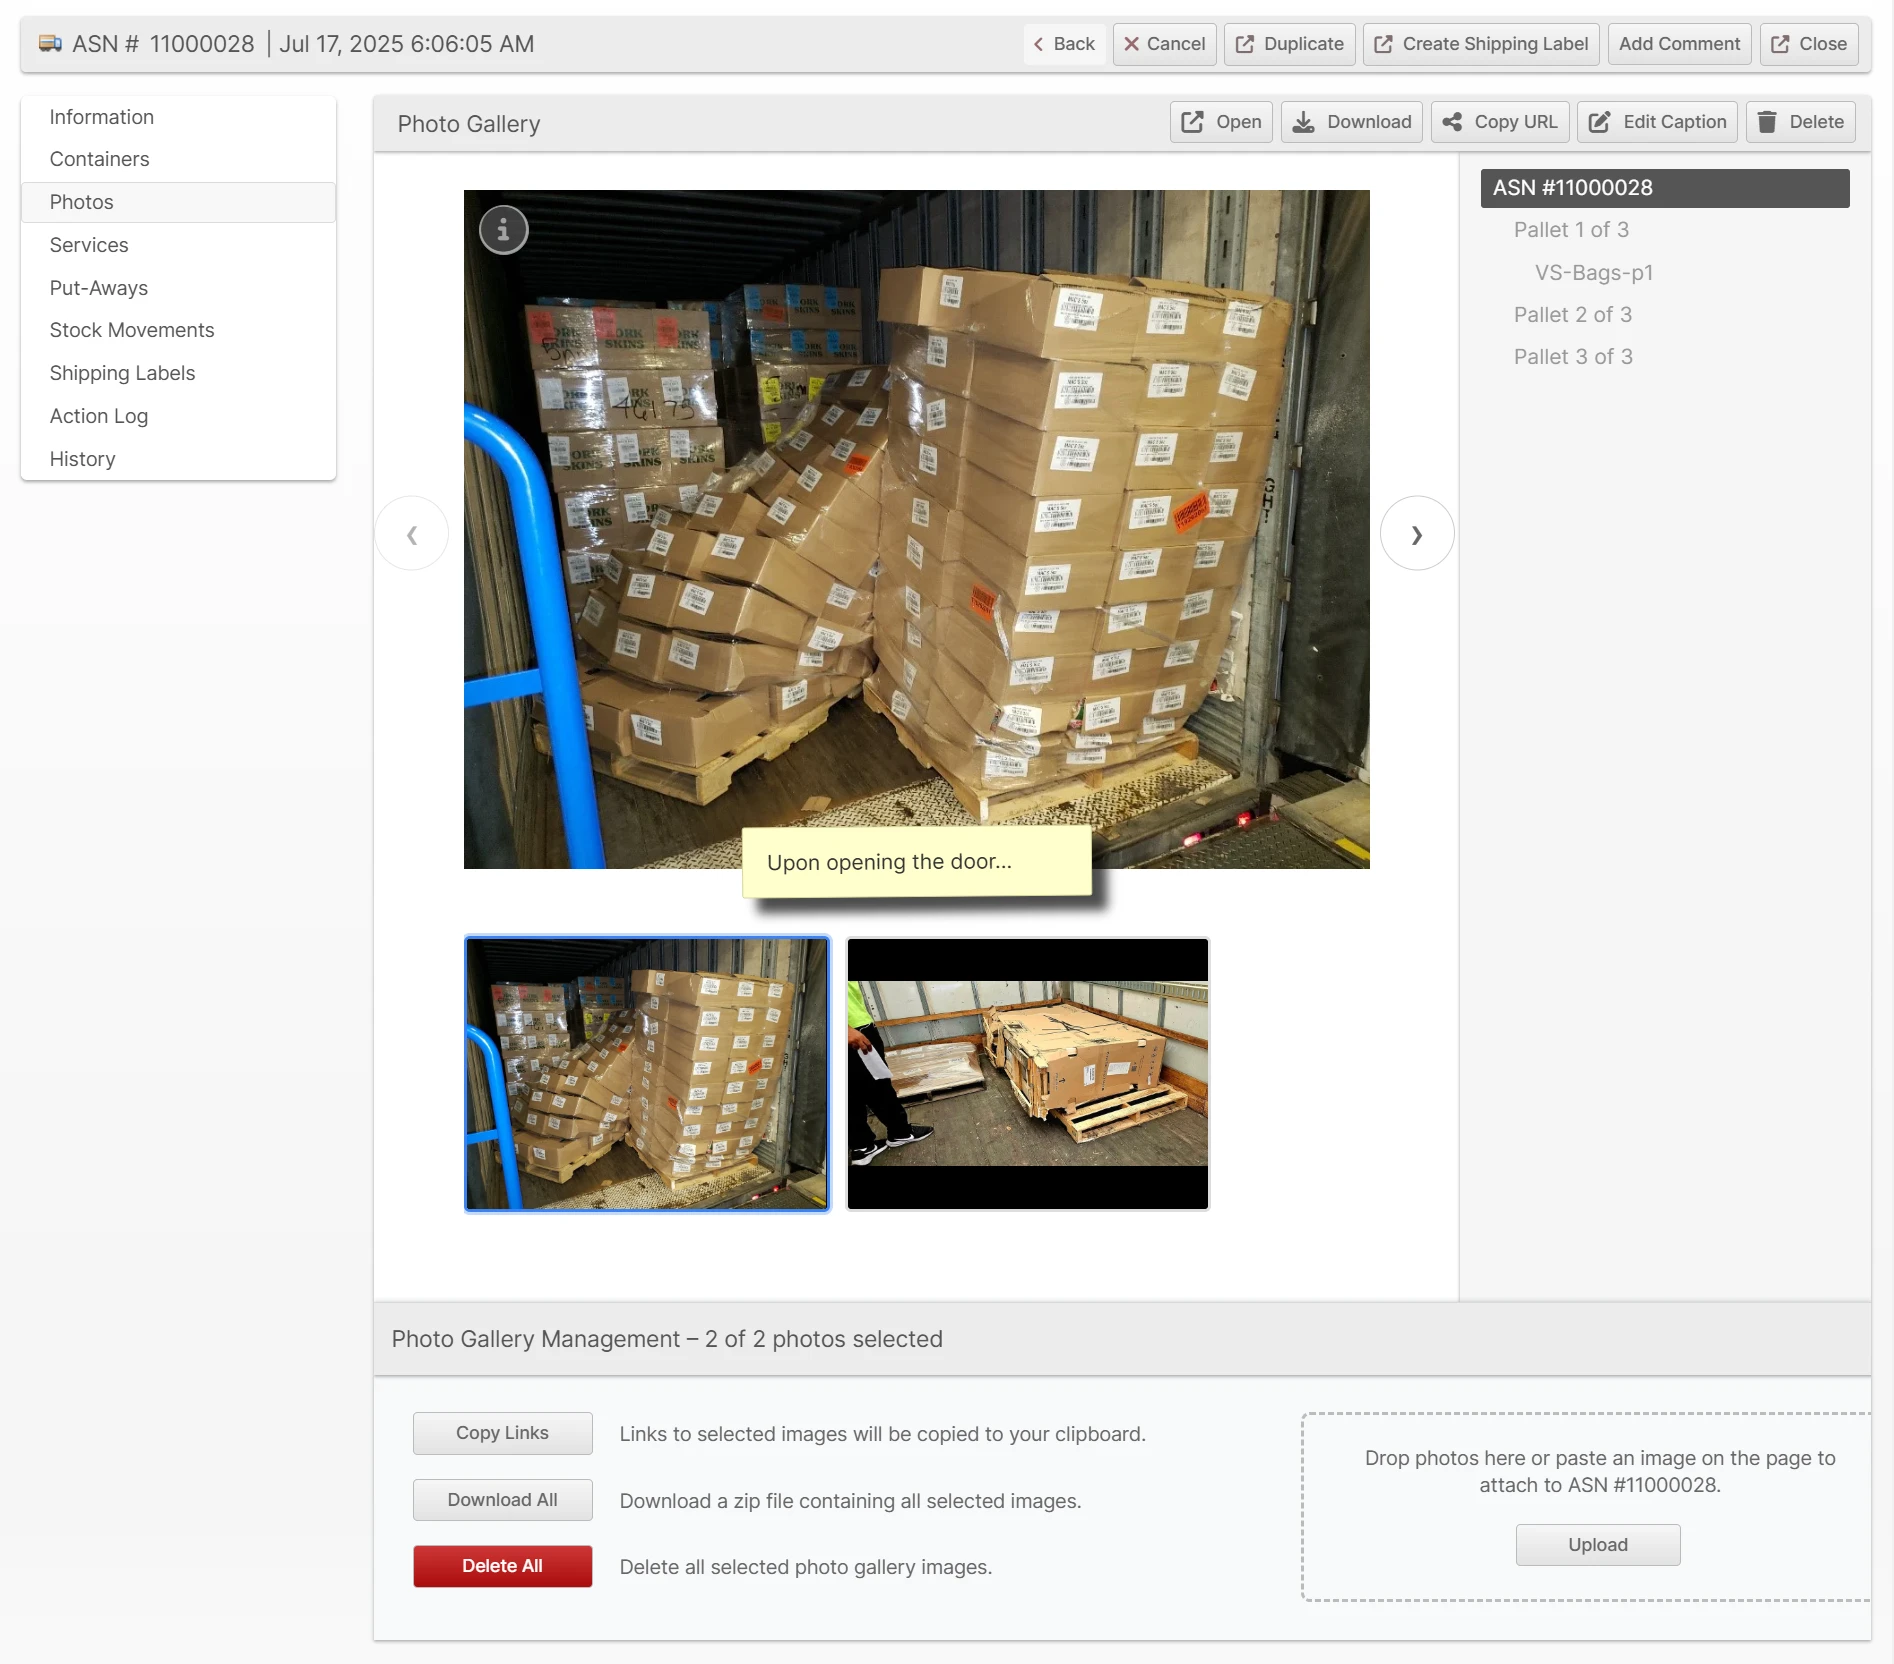
The photos displayed are organized and filtered by the selection in the right sidebar, so you can quickly drill down to a specific container, etc.
Uploading Photos
Photos may be uploaded any time once the delivery has been accepted in the Admin UI and during Processing in the Scanner UI.
Uploading via Admin UI
- From a delivery page, click the Photos tab
- Drag and drop photos into the dotted line box or click Upload to select photos from your system
- Add captions as needed (optional)
- Click Save
Uploading via Scanner UI
TODO
Put-Away
The inventory received must be "put-away" before it can be made available. Please see the Put-Aways page for more detailed information about processing Put-Aways.
Committing Inventory
Inventory put on the shelf using a Put-Away is not immediately made available for sale. The Put-Away or the associated delivery must be committed for the inventory to transfer from Put-Away to Available.
Depending on the merchant's preferences, they may wish to "gatekeep" the commit process. For example, the merchant may wish to update their product pricing before inventory "goes live". To this end, there is an Auto-Commit option on the ASN or Other Delivery.
If a delivery has Auto-Commit enabled, either through the default configuration or the override on the individual delivery, each Put-Away will be automatically committed as the Put-Away is completed and once the final one is committed, the delivery will advance to either Committed or Complete (if it is still open).
Receive By Deadline
If enabled, the Receive By Deadline feature will help you track when an ASN, RMA or Other Delivery container should be received, by setting a Receive By Deadline time on the delivery. This value is set when the delivery is accepted according to the configuration.
The configuration is located in a separate section for each delivery type at System > Configuration > Warehouse > {ASNs, RMAs or Other Deliveries} > Receive By Deadline and consists of four values used in the formula to derive the correct Receive By Deadline.
- Receive By Deadline - The number of business days in the future to set the deadline. If empty, the Receive By Deadline feature will be disabled.
- Receive By Cutoff Time - The time after which the current day is considered to be "over" such that the next business day will be considered the first day it was received.
- Receive By Rollover Time - When the cutoff time is passed, the deadline will be set to this time of day.
- Holidays - The days that are not counted as business days.
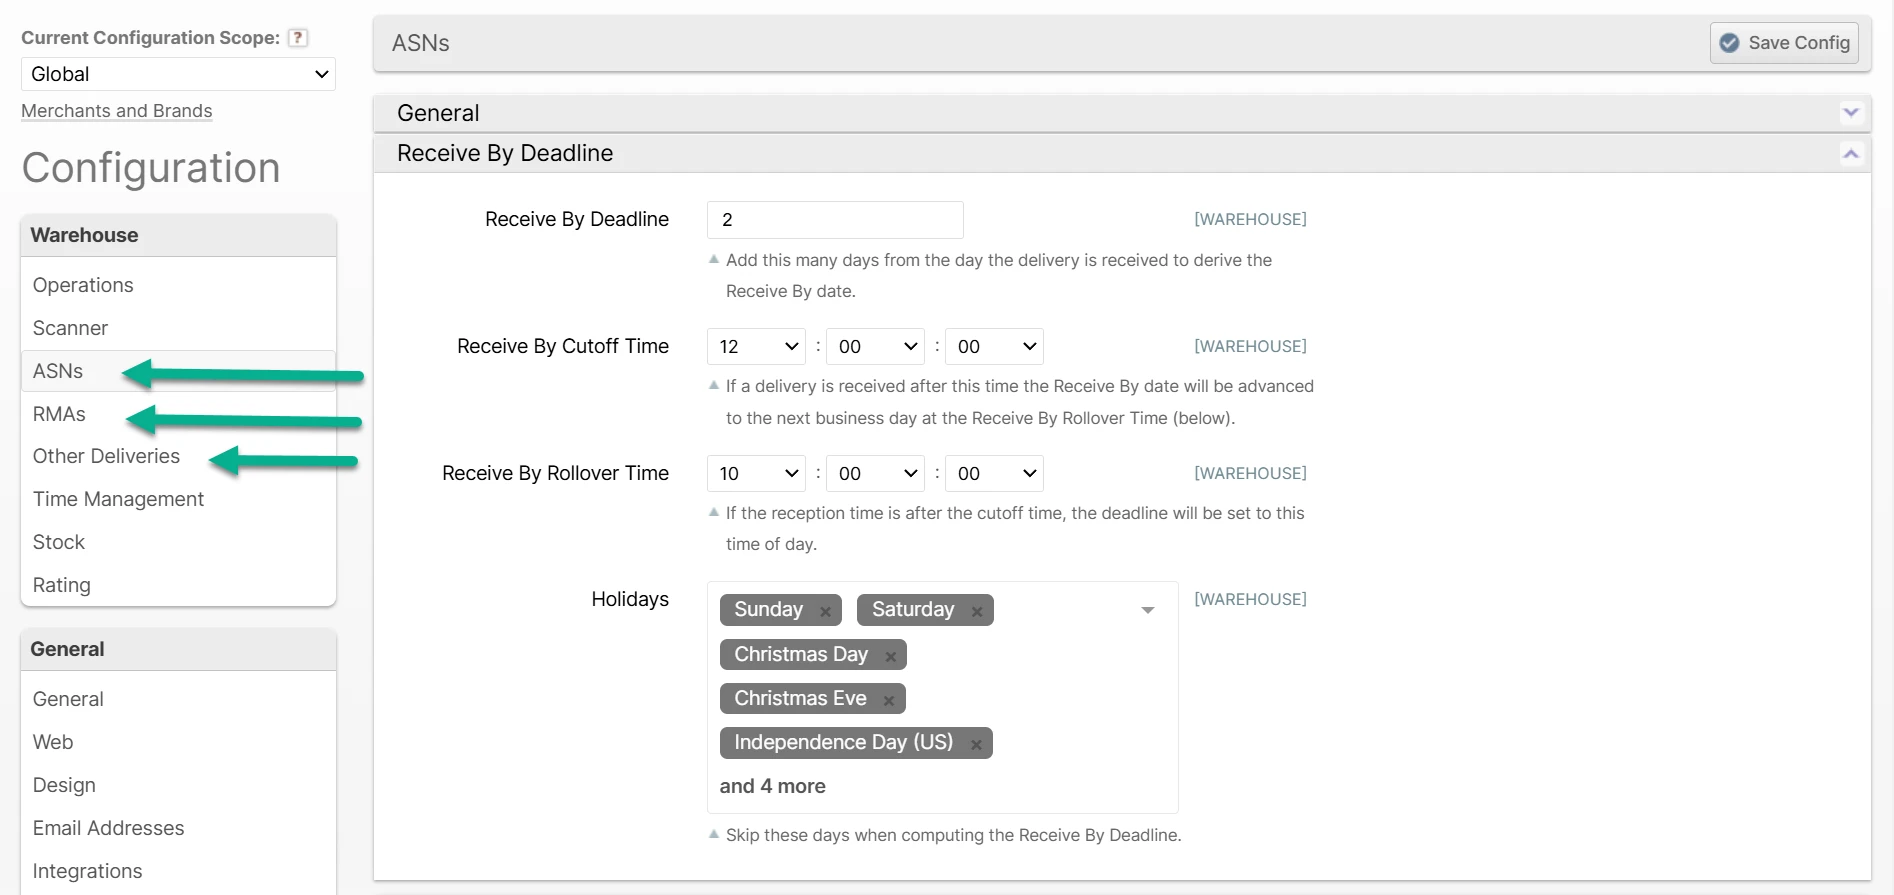
Example: If the Deadline is 2 days, the Cutoff Time is noon and the Rollover Time is 10am:
- A delivery received on Monday at 9am would have a Receive By Deadline of Wednesday at 9am (48 hours).
- A delivery received on Monday at 1pm would have a Receive By Deadline of Thursday at 10am (69 hours).
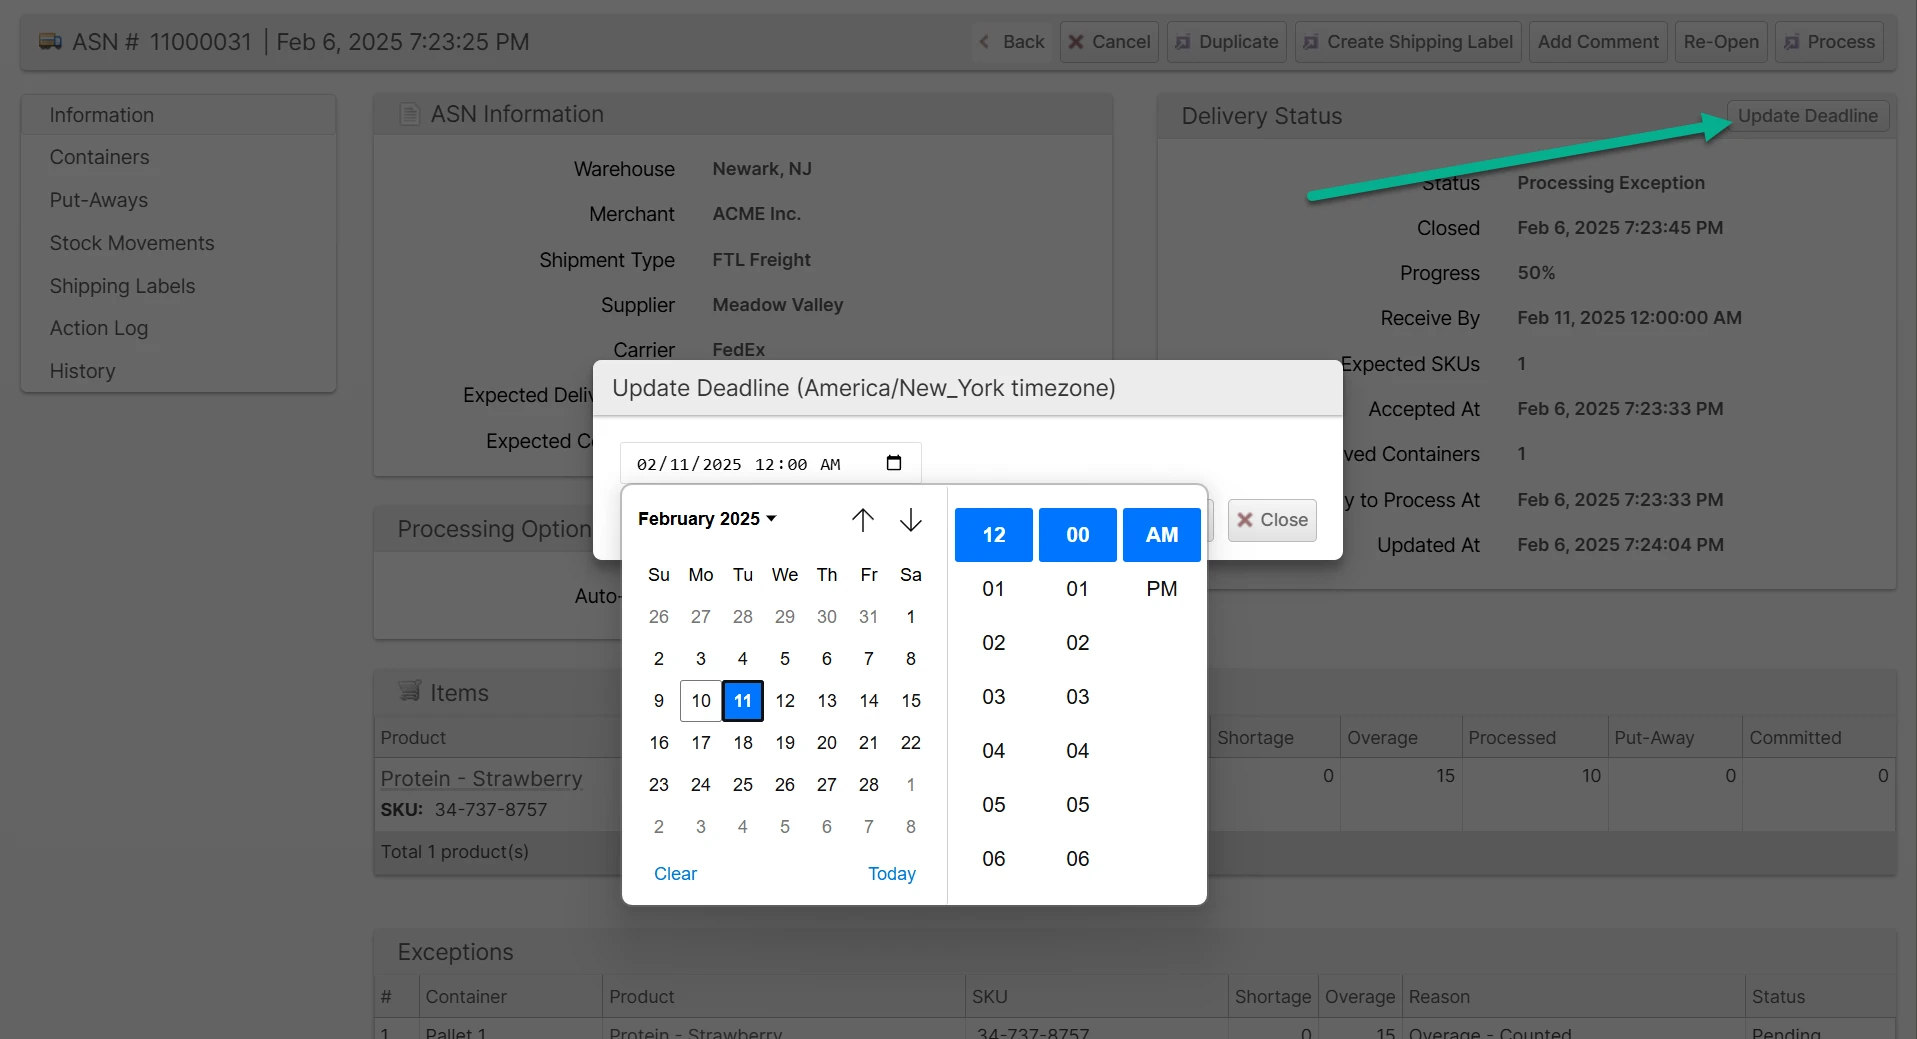
You may also manually override the Receive By Deadline by clicking Update Deadline on the delivery page. A message will be added to the delivery's History noting the old and new deadline.
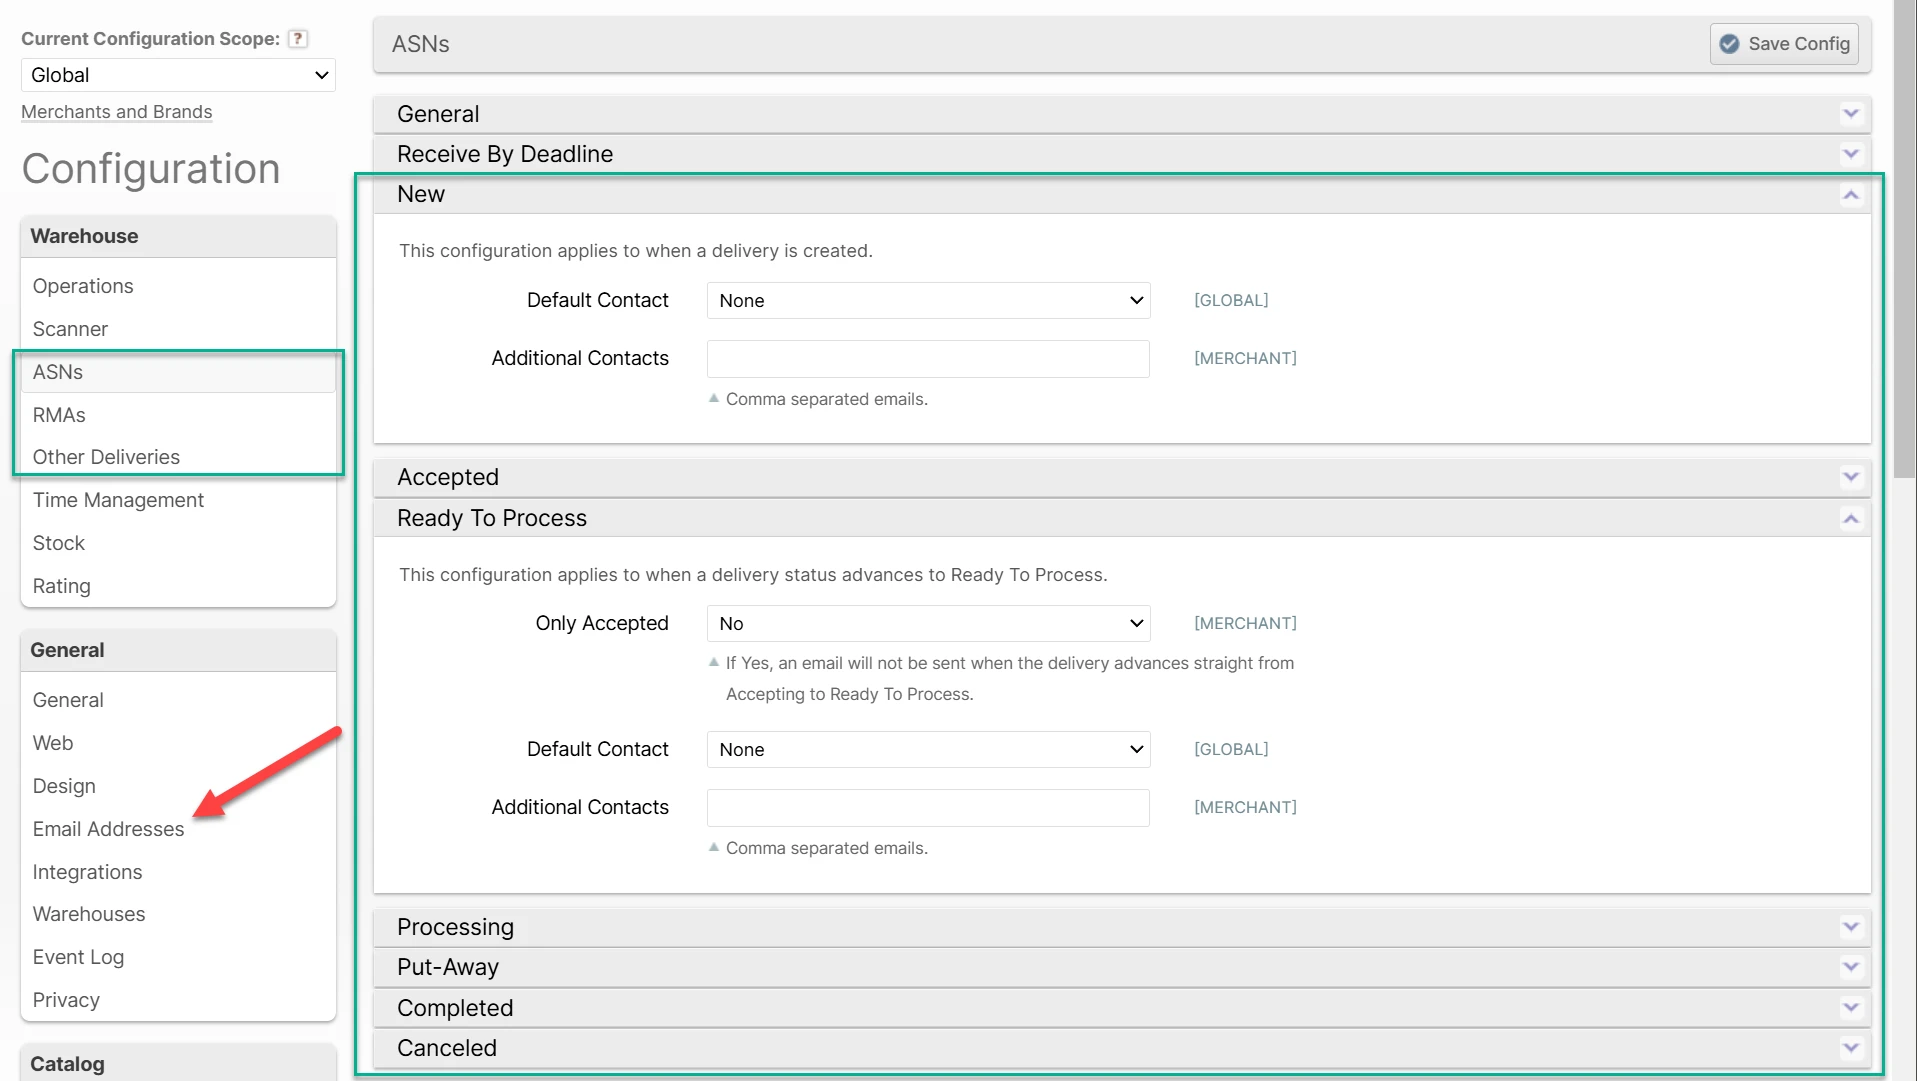
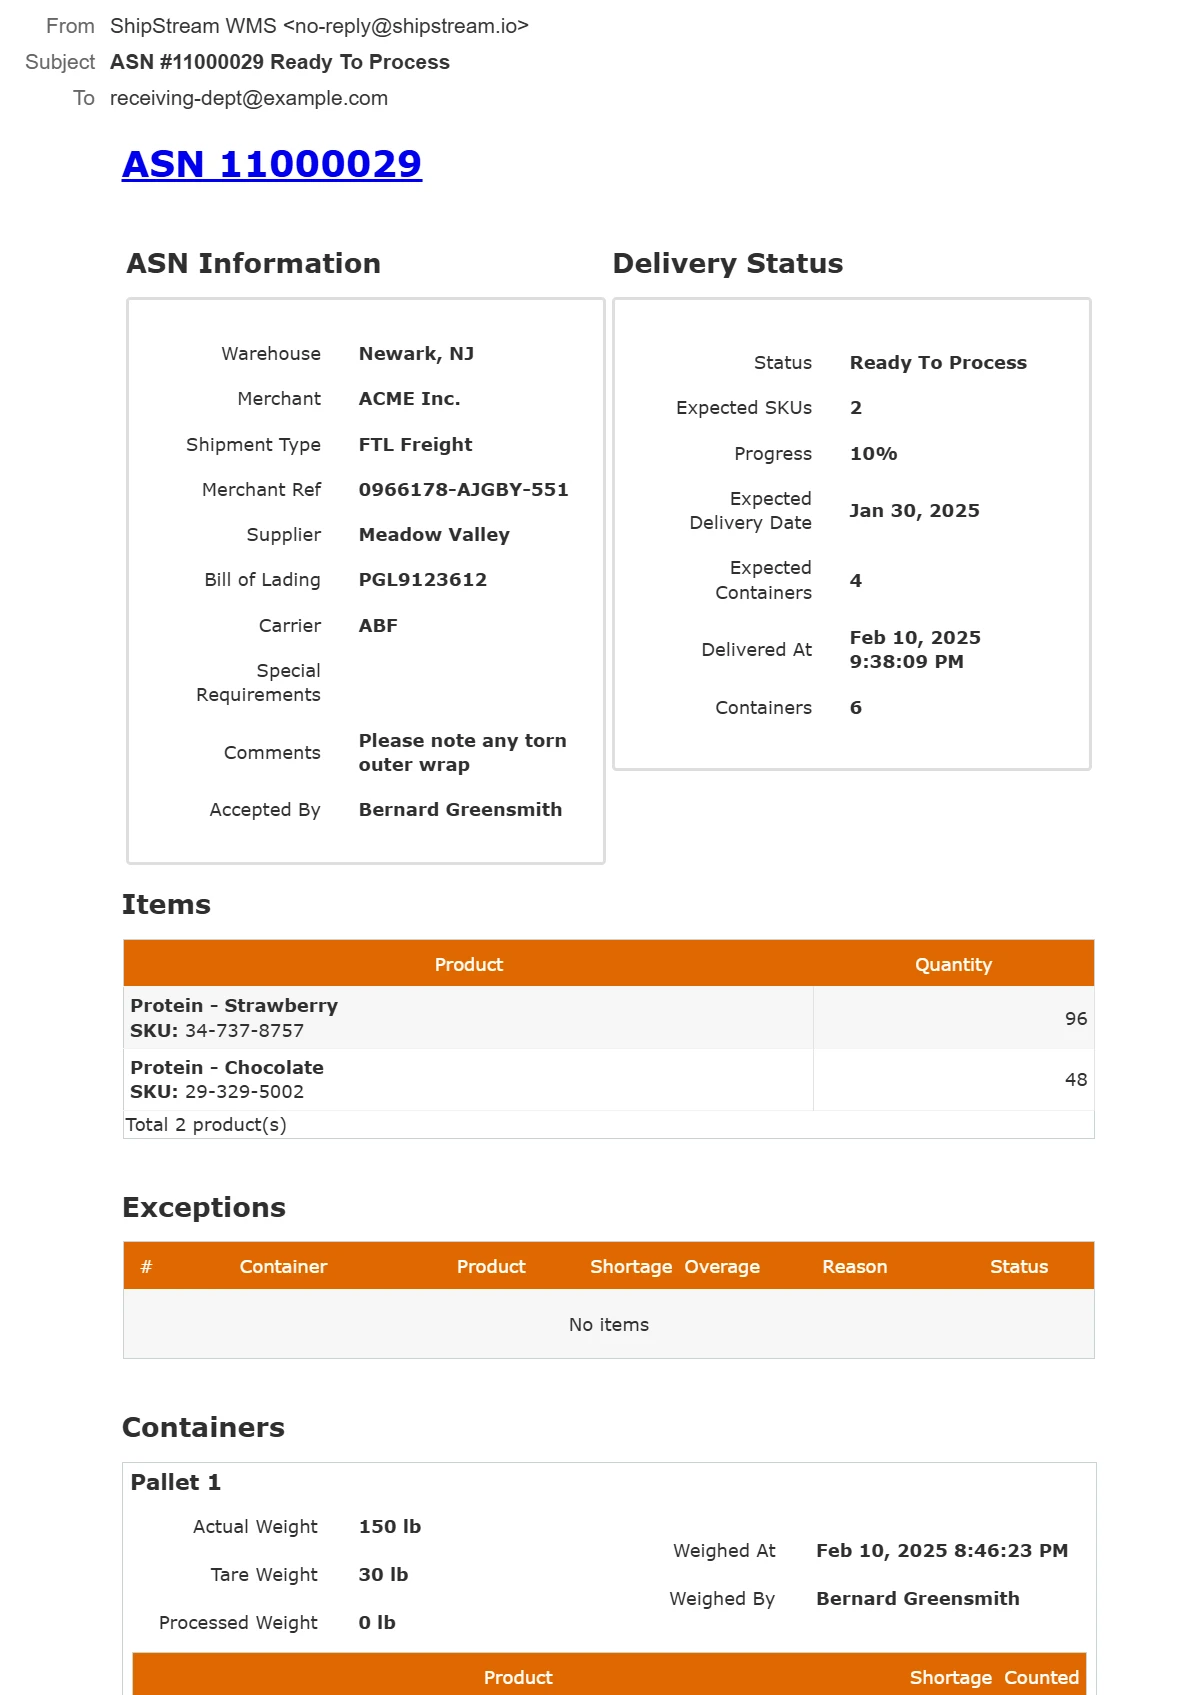
Email Notifications
You may elect to send email notifications at specific moments in the lifecycle of an ASN, RMA or Other Delivery. The email will be sent to a Default Contact which is a reference to one of the configured Email Addresses (red arrow), and/or any Additional Contacts which may be a comma-separated list of email addresses.
See System > Configuration > Warehouse > {ASNs, RMAs, Other Deliveries} > {Status} where {Status} is one of:
- New - a delivery is created
- Accepted - a delivery advances to Accepted (created on-the-fly or with zero SKUs)
- Ready to Process - a delivery status advances to Ready To Process
- The Only Accepted option allows you to specify that the email is only sent if the status was previously Accepted. That is, only if the delivery was accepted while it was empty and then a user added items to it after it was accepted.
- Processing - events occuring during and on completion of processing
- Put-Away - when a delivery is put-away
- Completed - when a delivery is committed to inventory or otherwise completed
- Canceled - when a delivery is canceled or voided
Example email:
Actionable Reports
Actionable Reports are email notices sent once a day at 8am in the morning to provide merchants with a quick snapshot of their deliveries.
Order processing in ShipStream is an automatic process that happens in real-time, and is constantly working to optimize labor and shipping costs. There are many decision points that factor into the final outcome and understanding how ShipStream factors in these decisions is not necessary to use ShipStream but may provide insight and clarity about how to get the most out of ShipStream. Some of these factors at a high level include:
- Which warehouses have the needed inventory in stock?
- What specific containers does the allocated inventory fit into?
- What is the cheapest shipping method that will hit the desired delivery date?

Actions that will cause this process to be re-evaluated include:
- An order with allocated inventory was canceled
- A manual inventory adjustment or relocation transfer
- An ASN, RMA, Work Order or Cancellation was committed to inventory
- The "Reallocate Orders" mass-action on the Products grid
- The "Reprocess Shipments" mass-action on the Orders grid and Shipments grid
Processing Stages
- New order created or inventory updated. Unless an order is fully backordered, it will proceed to the next stage. Orders that are partially backordered or on-hold will still be allocated to inventory to help hold their "spot" in line, despite not being Ready to Ship.
- Generate multi-warehouse inventory permutation. If you have inventory in multiple warehouses, this will generate all of the plausible ways of dividing inventory between them. This process can be affected by the Order Allocation configuration options or order properties.
- Generate Packing Solutions. At this stage the Packing Solutions are generated for each of the inventory permutations discovered in the previous step.
- Run Order through "Preprocess" script. This allows early adjustments to how items are separated into shipments, which shipping methods each shipment gets assigned to, the final picking class of each shipment, and infill for each package. See Preprocess Packing Solution Scripts.
- Resolve Packing Solutions for all providers. Depending on which Packing Solution providers are enabled, the items will be evaluated by each provider and a Packing Solution created. Packing Solutions may also be simply disabled in the previous step.
- Choose the best Packing Solution. From all available Packing Solutions, the best will be chosen taking into consideration if one is marked as a "Preferred" solution and if any solutions are disabled.
- Shop rate quotes. If virtual shipping methods are used, rate quotes will be calculated for each applicable real method and the best one chosen depending on the specific merchant and warehouse-level configuration. See Rate Shopping.
- Allocate Order to inventory. Given that the optimal inventory allocation has now been determined, the inventory will be allocated to this order in the chosen warehouses, maintaining a first-come-first-serve fairness but taking into account the Order Priority.
- Generate Packing Solutions. Now that the warehouse allocations are finalized the packing solutions are determined once again using the same process as in stage 3.
- Create Shipment for each container. Based on the results of the previous step, a new shipment is created for each subset of items. The inventory at this stage is allocated to the warehouse inventory but not yet reserved to specific shelf locations.
- Resolve Target Ship Date and Shipping Method. The shipping method, if not already set to a "real" shipping method, will be determined based on rate quotes for each individual shipment, and based on the shipping method and warehouse configuration and Service Levels, a Target Ship Date is set for the shipment.
- Assign Shipment to Picking Class. Now that all other information is set, the Picking Classes defined will be evaluated in order to classify each Shipment to the appropriate Picking Class which aids in generating Picking Batches.
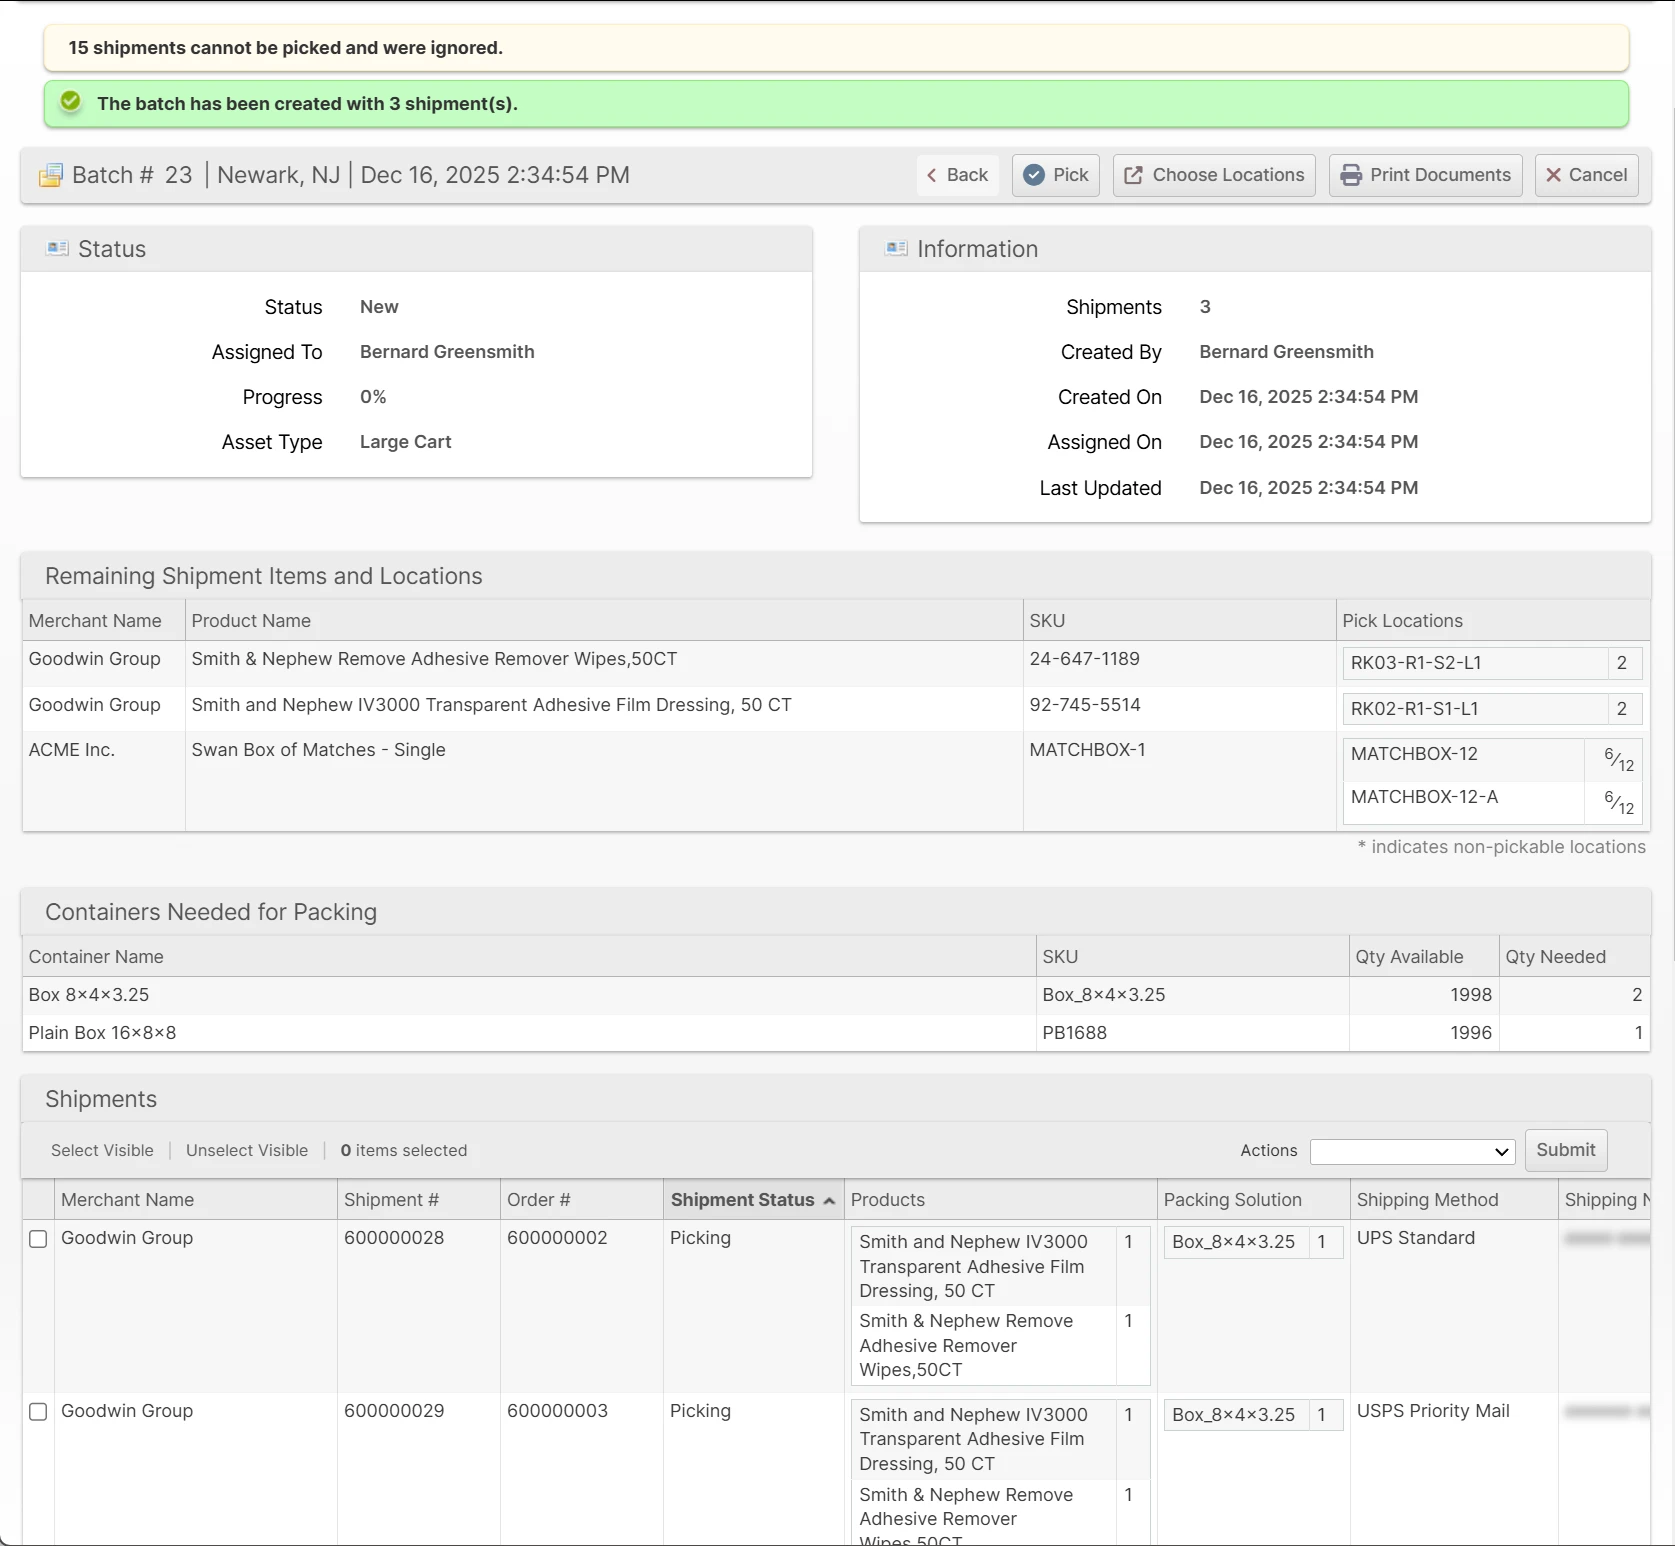
A Picking Batch represents one or more Shipments that belong to the same warehouse (and usually the same Picking Class) which are grouped together so they can be picked as one unit. ShipStream optimizes the selection of shipments and the pick locations of the items based on your inventory locations and the Racks and Zones defined for the warehouse to reduce overall travel time.
Although batches can be "force composed" using any shipments belonging to the same warehouse via a mass action on the Orders or Shipments grids, the recommended method (Compose Batch mass action or Create new Picking Batch dialog) allows ShipStream to compose the batch considering all shipments in your warehouse (segregated by Picking Class and usually Target Ship Date but possibly many other criteria) to optimize the picks into clusters of the same or nearby pick locations.
Creating a Batch
There are quite a few methods for creating batches:
Create by Admin UI
- Shipping -> Orders page
- Click Start New Picking Batch
- Use the Compose Picking Batch mass action
- Use the Force Compose Picking Batch mass action
- Shipping -> Shipments
- Click Start New Picking Batch
- Use the Compose Picking Batch mass action
- Use the Force Compose Picking Batch mass action
- Operations -> Picking Batches
- Click Start New Picking Batch
Start New Picking Batch
You can generate a new batch in the Admin UI by clicking the Start New Picking Batch button on any of these pages:
- Shipping -> Orders
- Shipping -> Shipments
- Operations -> Picking Batches
These will all result in the same dialog which allows you to easily define the criteria for the batch you want to create.
Upon clicking Submit the batch will be generated and if a printer has been selected the packing slips will be automatically sent straight to the printer, otherwise a single PDF will be downloaded which contains all of the packing slips.
The dialog contains a section at the top for drilling down to your shipments using a combination of Batch Preset, Picking Class and Asset Type.
The Workflow option allows you to pre-assign a workflow to the newly created batch.
Additionally, you can specify further constraints using the multi-select fields as follows:
- Shipping Methods
- Merchants
- Service Levels
Apply a Batch Tag filter to include only orders with the specified Batch Tag. The Batch Tag can be assigned using the Orders grid and Scripts and is useful for isolating a subset of orders with complex criteria without having to repeat those filtering criteria.
The Target Ship Dates field allows you to narrow your operational focus based on Service Levels.
The Accessibility field allows you to temporarily override your Asset Policies as follows:
- Strict - no override, shipments will be excluded if they are not pickable according to the Asset Policies which are active according to the Preset and Asset Type chosen
- Resolve Burn Order Conflicts - exceptions to the Asset Policies will be allowed only if required to allow a shipment to be pickable due the the burn order of one or more SKUs on the shipment
- Disregard - all Asset Policies are disregarded
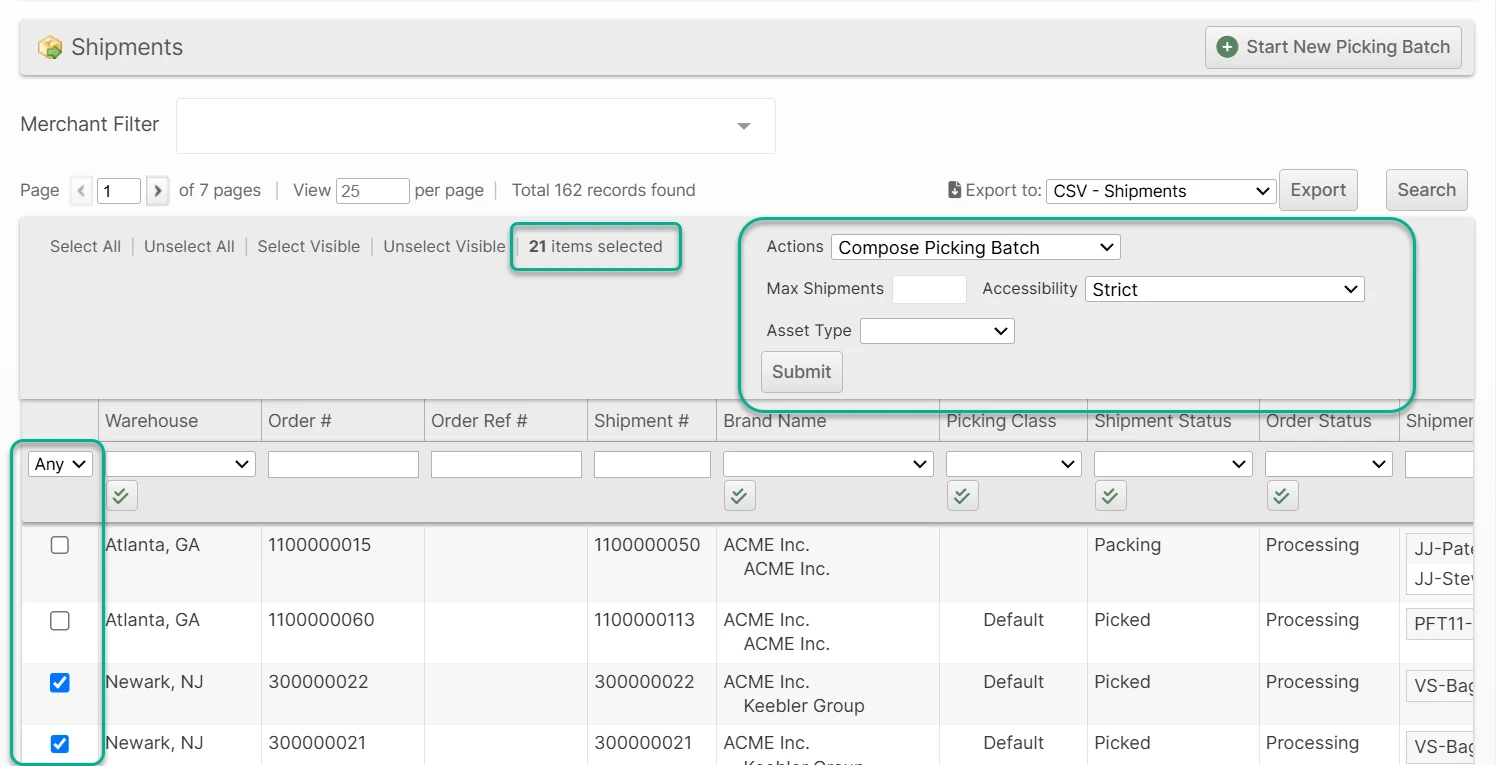
Compose Picking Batch
If you need to be more surgical with your batches you can use the grids with the Compose Picking Batch mass action. The system will still try to apply the proximity optimizations, but will not be able to apply the additional criteria imposed by Presets, Picking Classes or Asset Policies.
- Max Shipments - specify an upper limit for how many shipments to include.
- Accessibility - choose the degree to which the Asset Policies will be enforced (see above for details).
- Asset Type - this will assign the batch to the selected Asset Type and determine which Asset Policies are applicable (if any).
Create by Scanner UI
From the home screen tap Picking, then you have four choices:
Next Up
Tap Next Up and either an existing batch will be assigned to you, your oldest batch will be selected, or a new batch matching will be created for you. In all cases, the batch will match the Preset and Asset Type you've chosen.
Quick Batch
Select a preset from the list at the top of the page, or scan a Batch Preset barcode (those with a BP: prefix) and an Asset Type barcode (those with an AT: prefix). This selection will be remembered until it is cleared (by clicking the red "x" button) or changed.
Tap Quick Batch and then proceed to either Create Now or drill down farther by choosing a Picking Class, Merchant or Carrier.
Precise Batch
Tap Precise Batch and then drill down to the subset of shipments you wish to pick, clicking Create Now when you are satisfied with the criteria.
Compose New Batch
In this case the shipments must already be processed and you have a packing slip already with a barcode to scan for each. You simply scan all of the shipments and tap Create Batch. The shipments will be removed from any batch they may currently belong to and be added to the new batch.
Print Packing Instructions
If Print Packing Instructions is selected, any Packing Instructions attached to the orders of the shipments belonging to the new batch will be automatically sent to the appropriate printer if a printer is selected and if the Target Printer is the same type as is used by the Packing Slip. Using this feature allows you to print documents before picking rather than during packing which may increase your packing efficiency and allow you to maintain fewer printers at the packing stations.
The packing instructions for each shipment will be interleaved with the packing slips so that the corresponding documents always come after the packing slip to which they belong.
Pick by Paper
Navigate to the batch page in the admin UI by either clicking Operations -> Picking Batches and locating the appropriate batch in the grid, or by scanning any packing slip (which automatically navigates you to the Shipment page) and then clicking the Batch # on the shipment page.
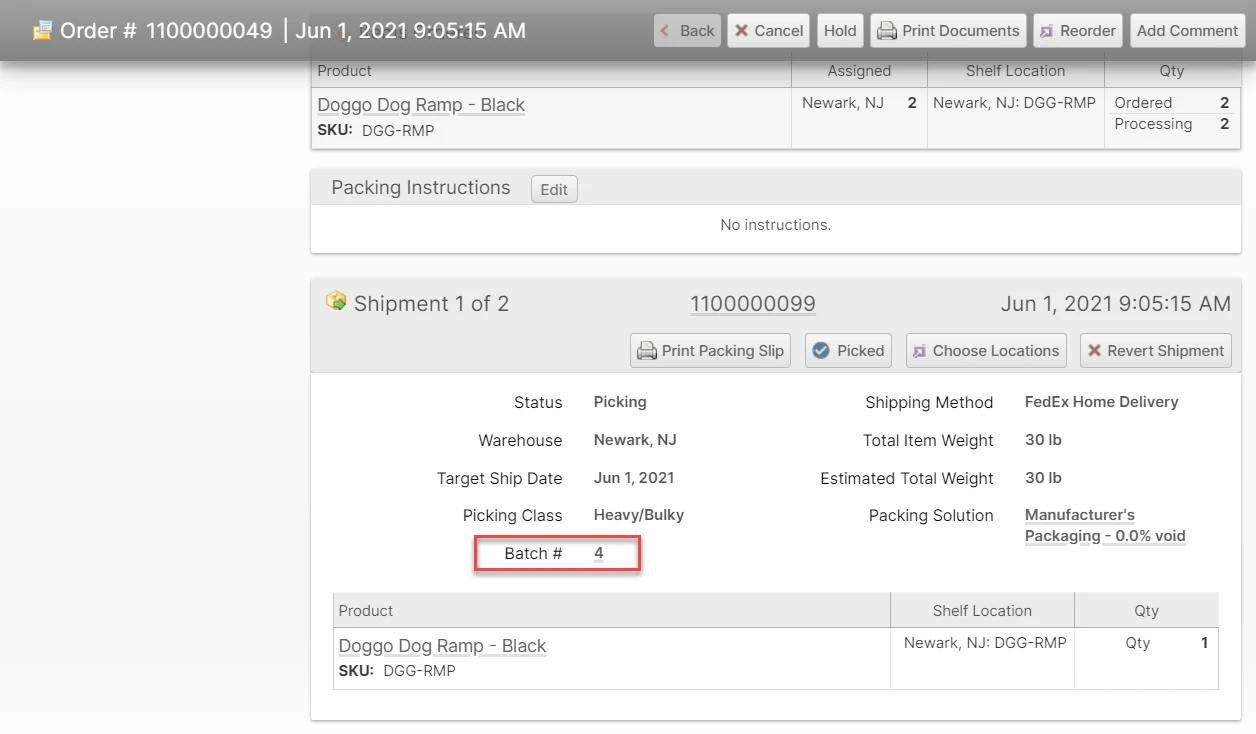
On the batch page simply click Pick in the header bar and all picks will be registered moving the inventory out of the designated pick location and into Picked status.
Pick by Scanner
For the greatest accuracy we recommend using the Scanner Interface to pick your batches using barcodes. This process ensures that the correct items are picked from the correct locations to prevent inventory inaccuracies and packing errors. It also guides the user along the designated pick path based on the Picking Order of the Racks to reduce wasted travel.
Configuration
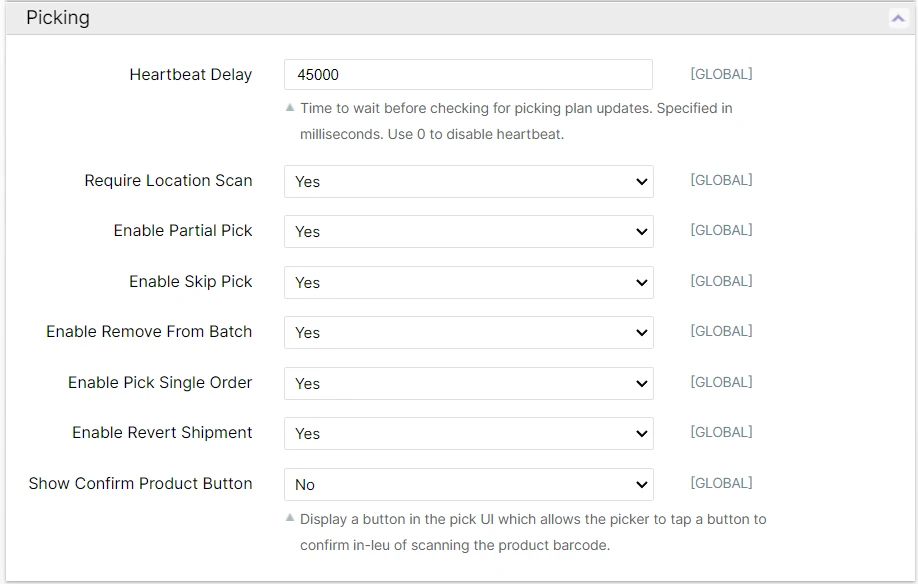
Many features of the Picking UI are configurable to your liking at System -> Configuration -> Warehouse -> Scanner -> Picking.
Cart Location Barcodes
To pick by scanner you first need to have barcoded "Cart Locations". These barcodes do not necessarily need to be affixed to a cart, they could be on the picking bins or attached to an accessible location of a fork lift as well, for example. The only requirement is that for a given batch each barcode is unique for that batch. So, if you have barcoded bins you would want to make sure each bin gets a unique barcode to avoid conflcits, but if you have barcoded carts then you can use the same set of barcodes for each cart so they are familiar to users.
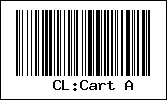
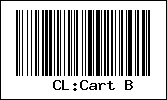
This barcode must encode any arbitrary characers prefixed with "CL:". Here are some examples for cart locations named "Cart A" and "Cart B":
Picking Process
To pick by scanner:
- Tap Scanner to open the scanner home screen and then tap Picking
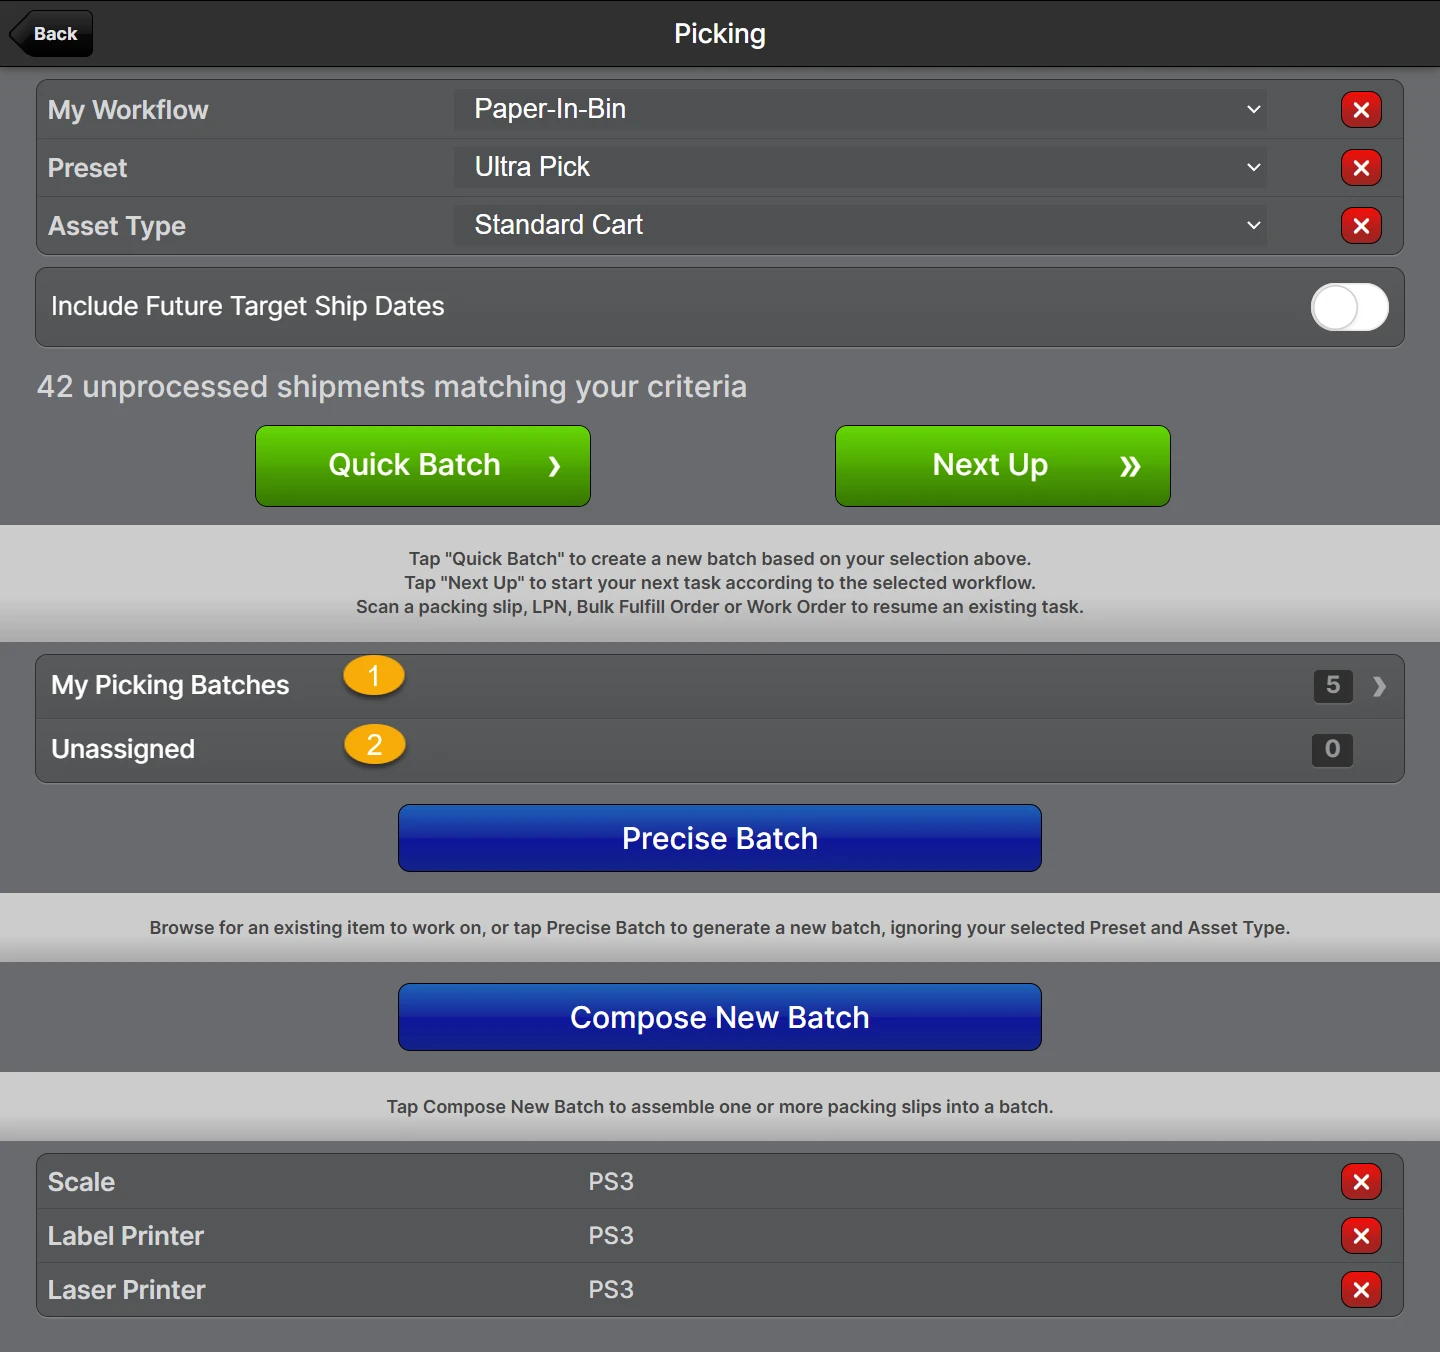
- Scan any packing slip that is part of the batch you wish to pick or choose My Picking Batches (1), Unassigned (2), or create a new batch using one of the methods described above.
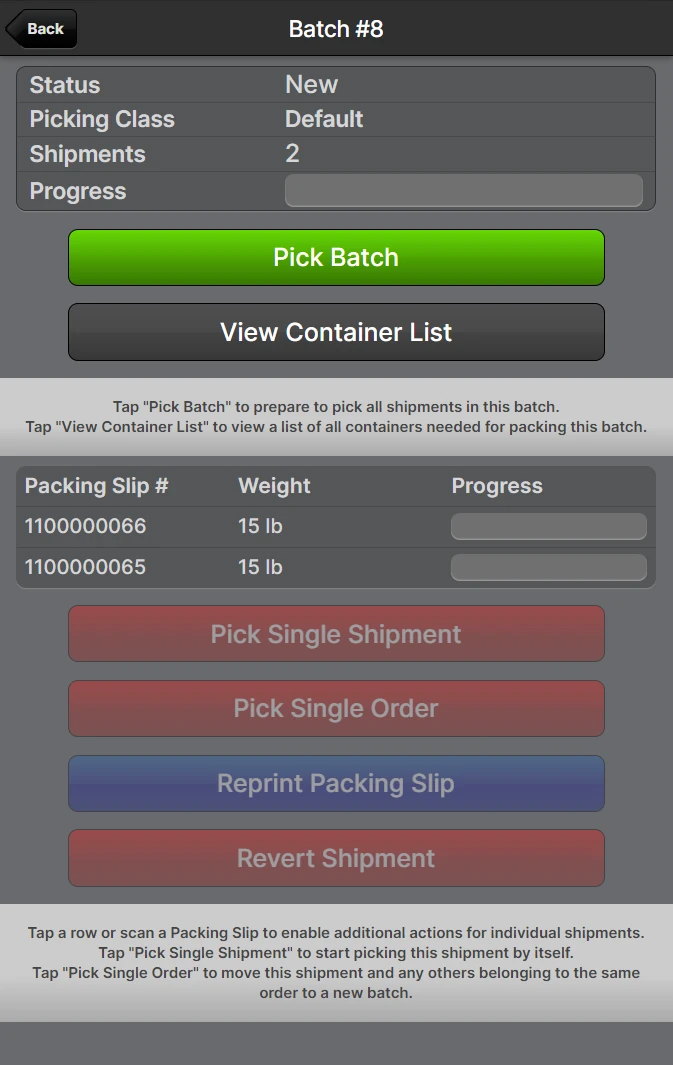
- Tap Pick Batch to start the picking preparation step, if required.
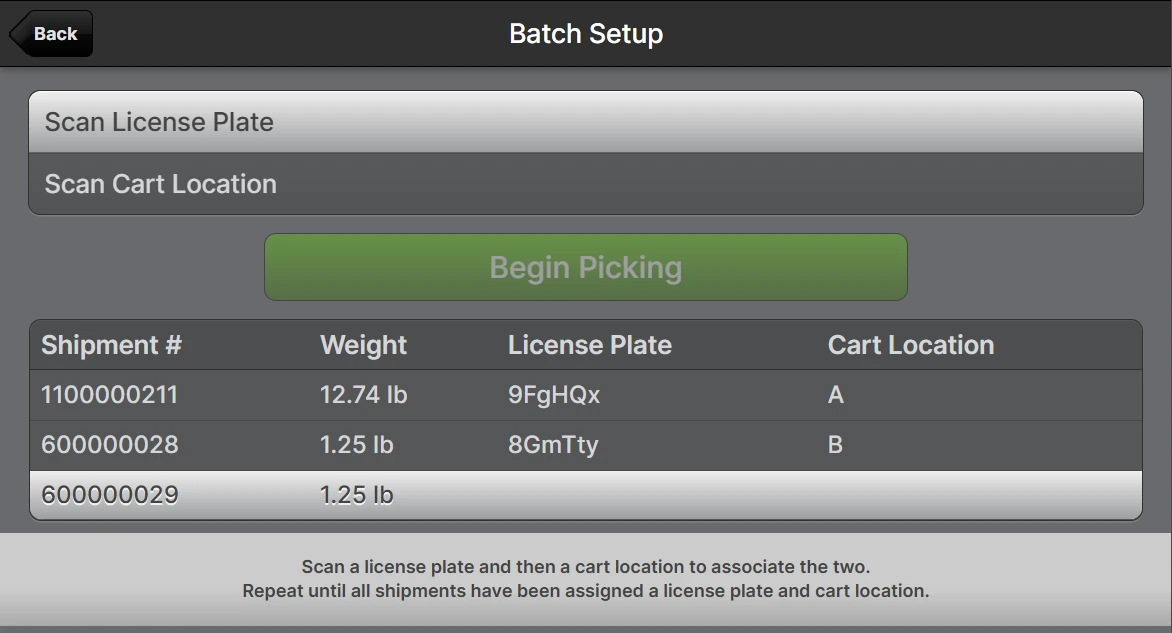
Scan a packing slip and then scan a cart location - this pairs the packing slip to the cart location for future reference.
A setup step may not be required for some picking workflows such as Paperless with the Assigned Just-In-Time or Numbered cart location strategies. See System -> Configuration -> Warehouse -> Scanner -> Picking -> Default Paperless Cart Location Strategy.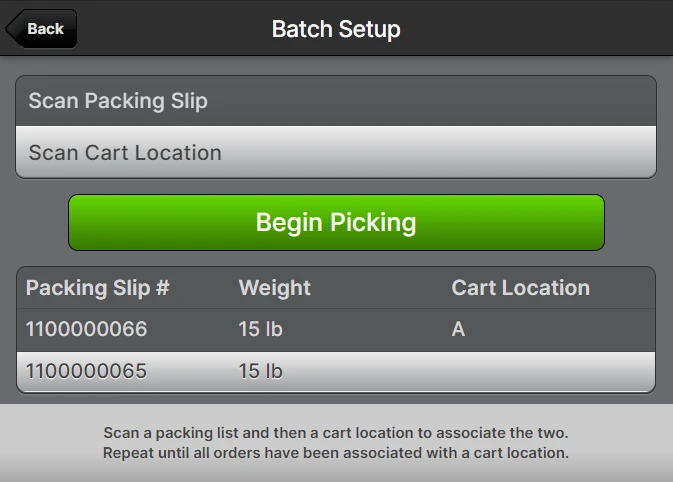 This step can be repeated in rapid succession, as fast as you are able to scan, so it is usually most efficient to place the packing slips in each location first and then rapidly scan each pair after.
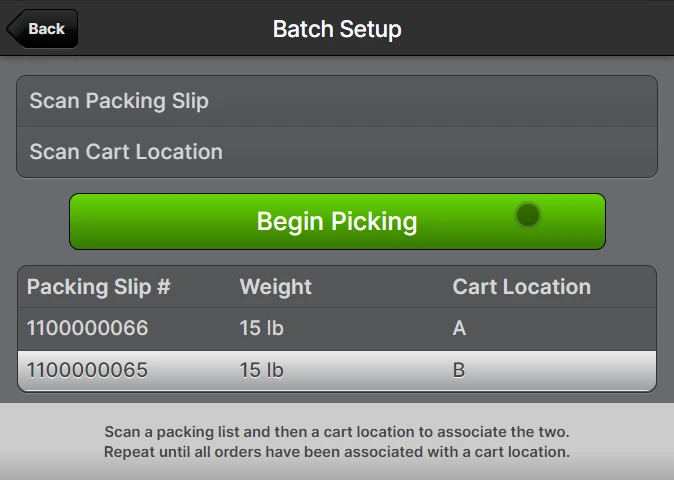
- When all packing slips have been assigned to a cart location you are ready to tap Begin Picking.
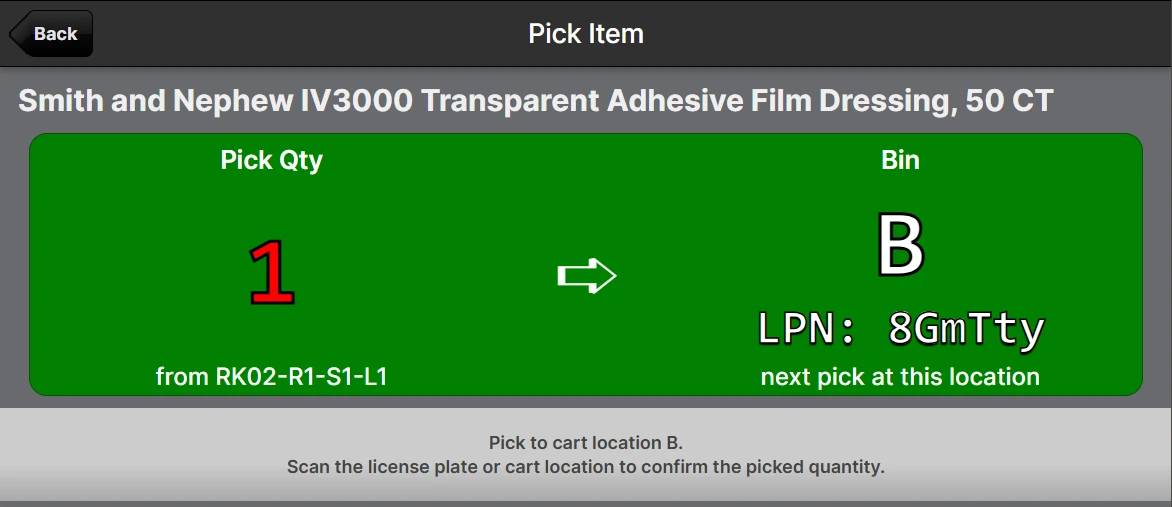
Scan the shelf location label and the product barcode (if one is set) to confirm the pick location. The check boxes will turn green when the barcodes are confirmed.
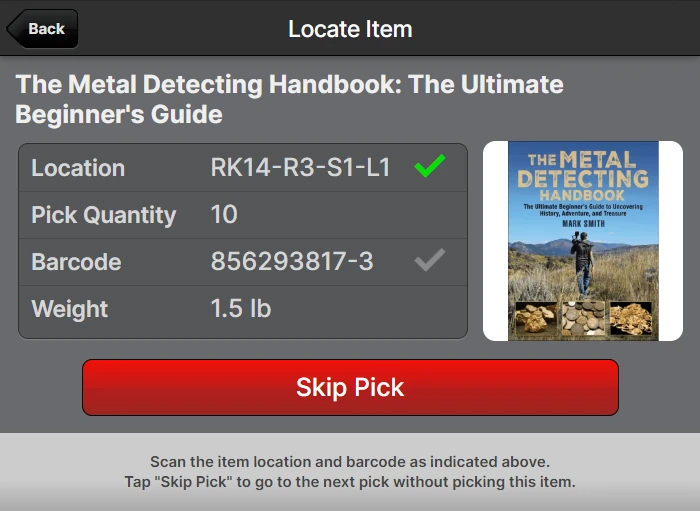 If an image was added to the product it will be visible on the page above.
- After physically picking the correct amount as indicated, scan the Cart Location barcode to confirm the pick was placed in the correct bin.
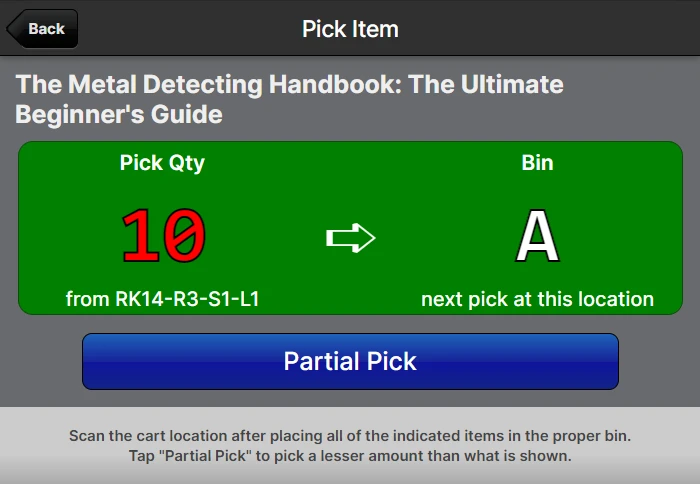
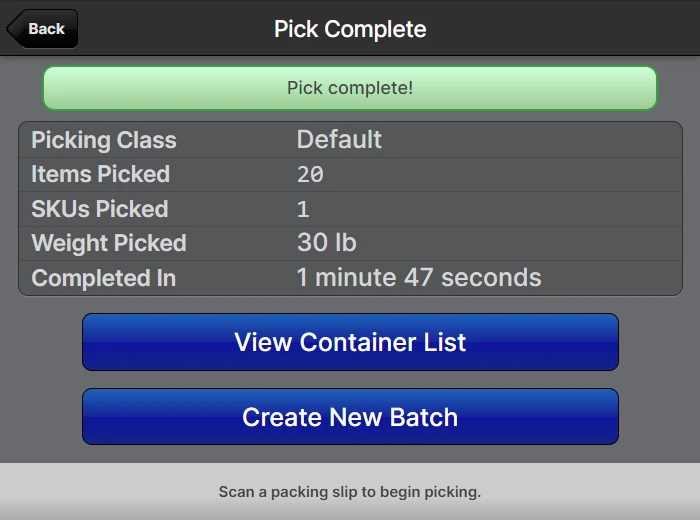
- Repeat steps 6 and 7 until all items are picked and the batch is complete!
Picking Workflows
Allowed Workflows and Default Workflows may be set at both the Warehouse-level configuration and the Batching Preset level. They can also be overridden by users at the time of starting a batch as long as the workflow chosen is one of the Allowed Workflows.
Paper-In-Bin
This workflow is the one depicted above. The system prints one packing slip per sheet of paper and then the user distributes the packing slips to different "bins" or "cart locations" and then pairs each packing slip to a bin/cart location before starting the first pick. This gives the picker crystal clear instructions while picking to ensure that the right items get picked to the right bin.
Paperless
The Paperless workflow, as the name implies, eliminates the need for paper packing slips in favor of unique License Plates (LPNs). License Plates could be either re-usable or single-use, but the gist is that the license plate barcode takes place of the packing slip. Therefore, there are three "Cart Location Strategies" with the Paperless workflow.
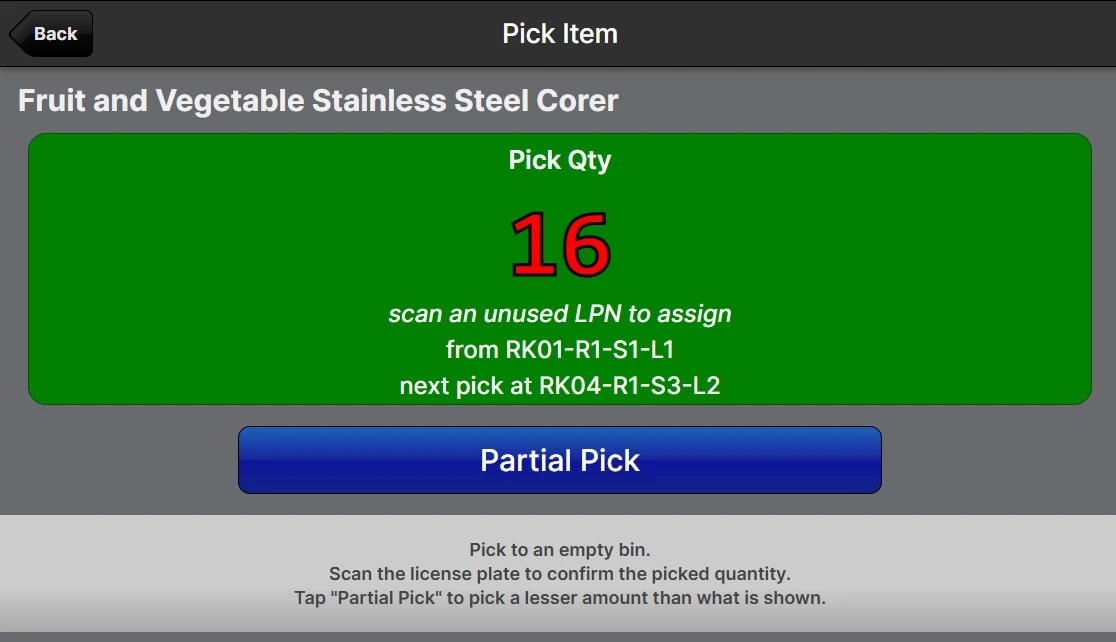
Assigned Just-in-Time
Setup is skipped initially, and as each shipment gets the first item picked, the user will choose an empty bin/LPN to associate to the shipment.
Assigned Upfront
The setup step is performed similarly to the Paper-In-Bin method, whereby the user scans pairs of License Plate (LP:) and Cart Location (CL:) barcodes. In this case the picking steps will prompt the user to scan cart locations when picking. This is the most similar to the Paper-In-Bin workflow.
Setup:
Pick to pre-assigned bin with LPN:
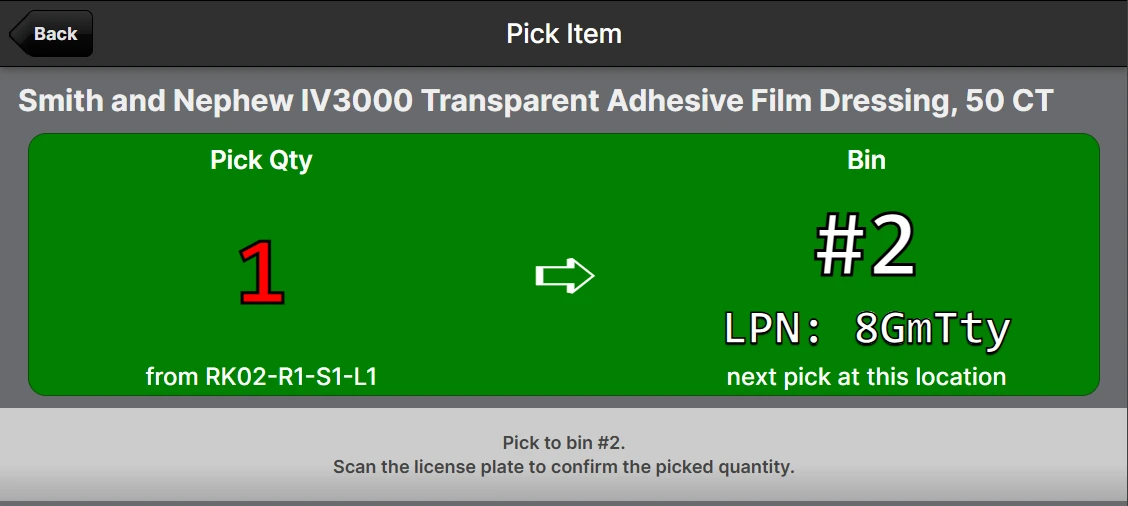
Numbered
This can work well when there are a small number of shipments on a batch. The first shipment gets number 1, the second shipment gets number 2, and so on. The user still must scan the LP barcodes, but this strategy eliminates the need for Cart Locations.
Batch Assignment
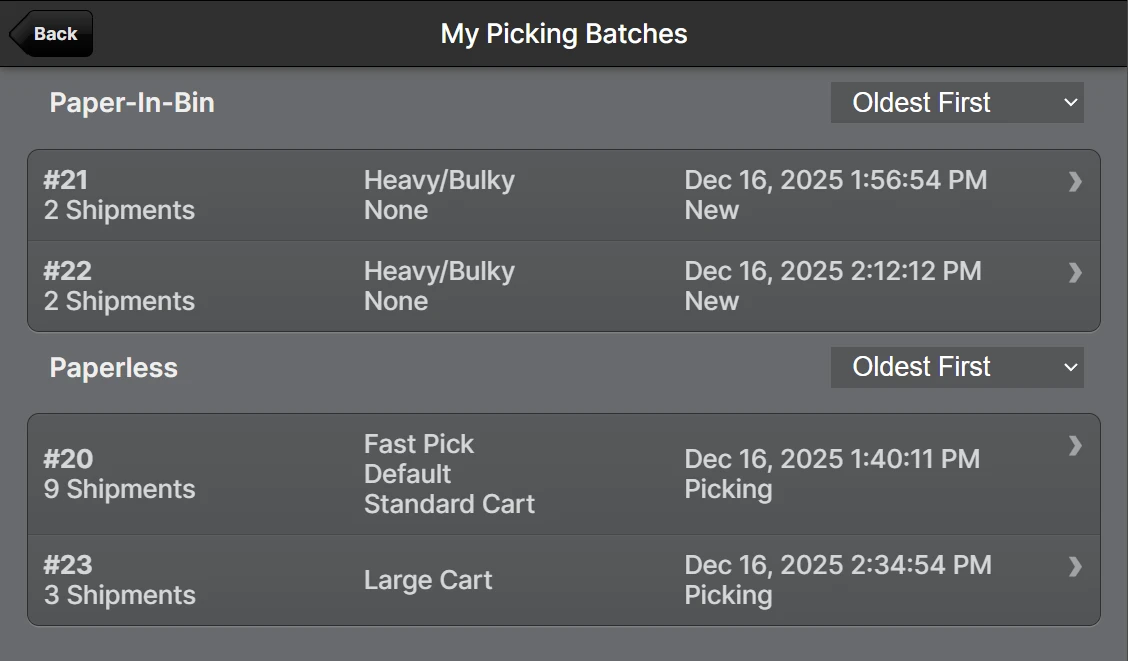
Particularly in the case of Paperless batches, one needs a way to "reach" their batches without a physical barcode to scan. A user will be assigned to any batch they create by default, making it easy to find them in the Picking UI by tapping My Picking Batches.
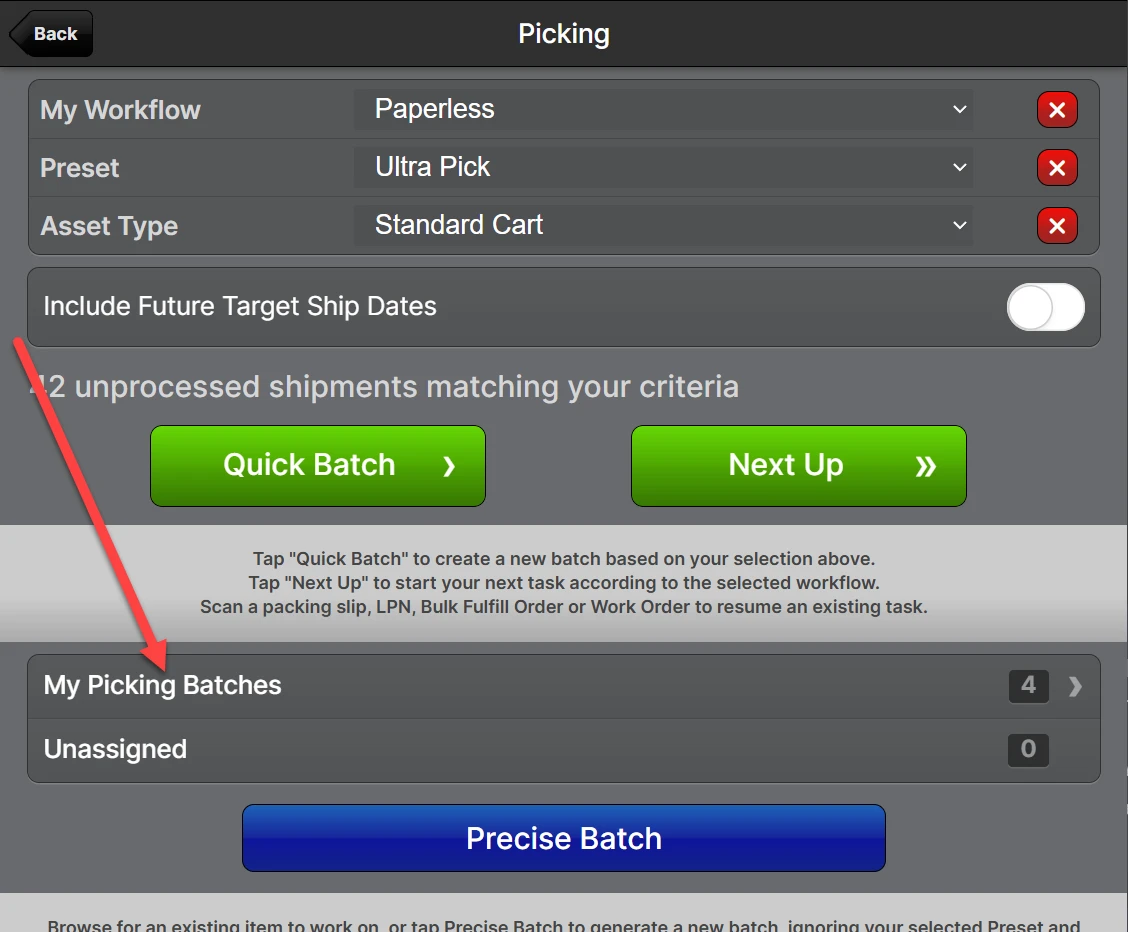
The list of the user's assigned batches:
If a user needs to transfer their batch to another user, they can first Unassign themselves, then the other user can find the batch in the Unassigned list.
Alternatively, a user with the Operations -> Picking Batches -> Change Assignments permission can use mass actions on the Picking Batches grid to Change Assignments to a new user.
Any user may also use the Unassign Self mass action to unassign all of their batches at once.
Picking Exceptions
When using the "Remove From Batch" button on the pick screen or the mass action on the Shipments grid on the Batch or Bulk Fulfill Order page, the shipment will be removed and recorded as a "Removed Shipment" along with the user's provided text explanation. The status of the removed shipment will be changed from Picking to Picking Exception.
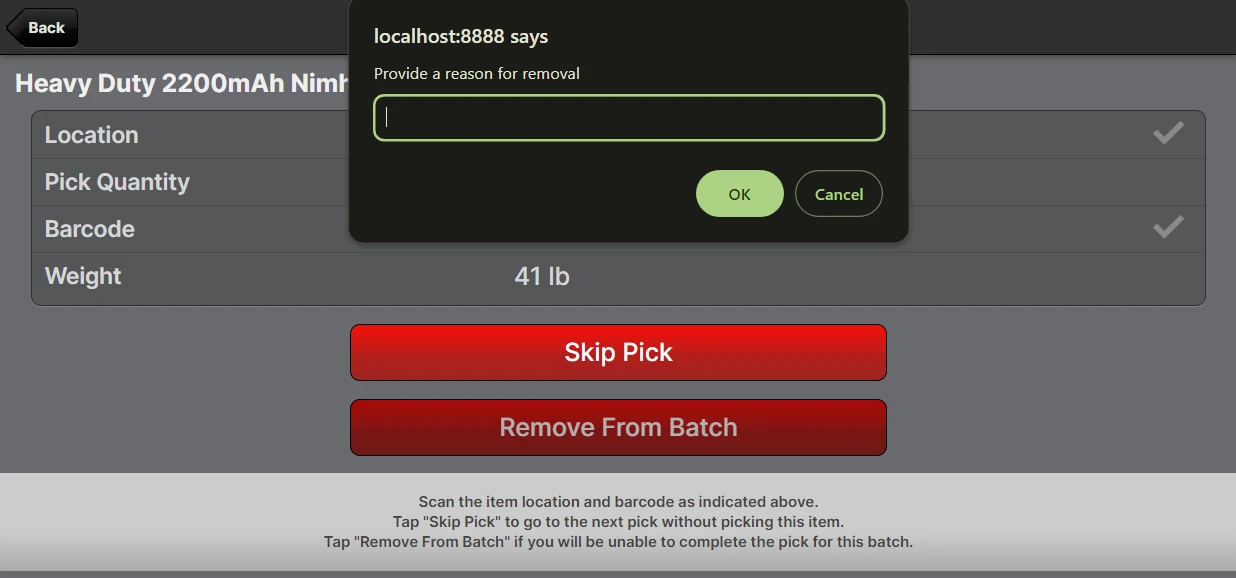
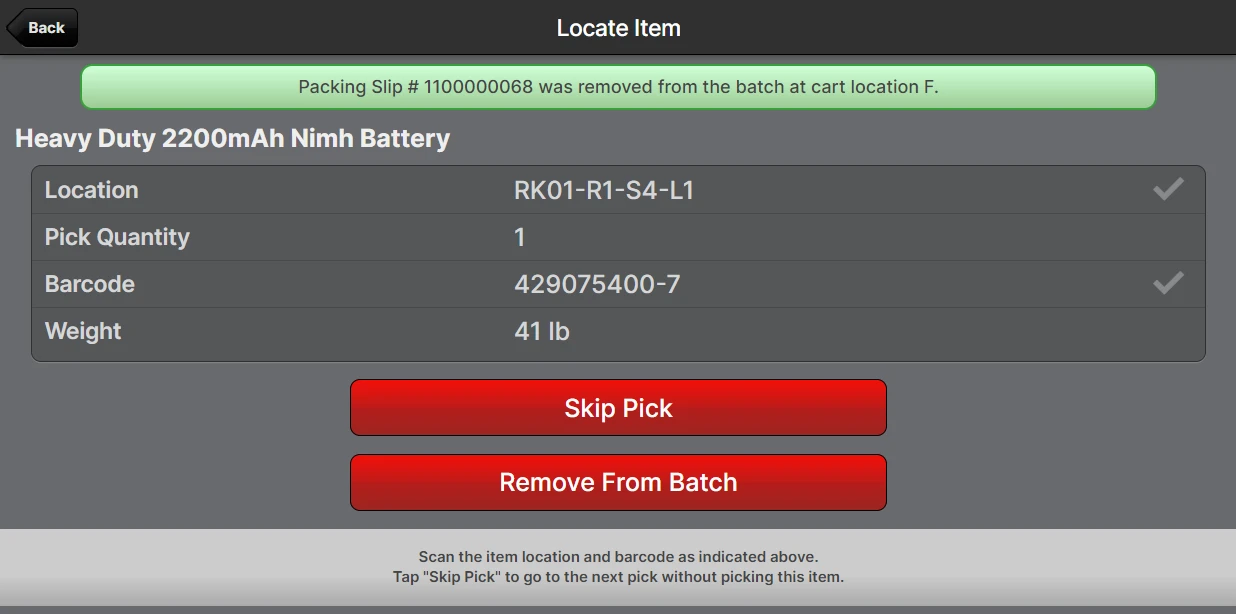
Upon clicking OK, the user will be advanced to the next pick if there are any remaining shipments:
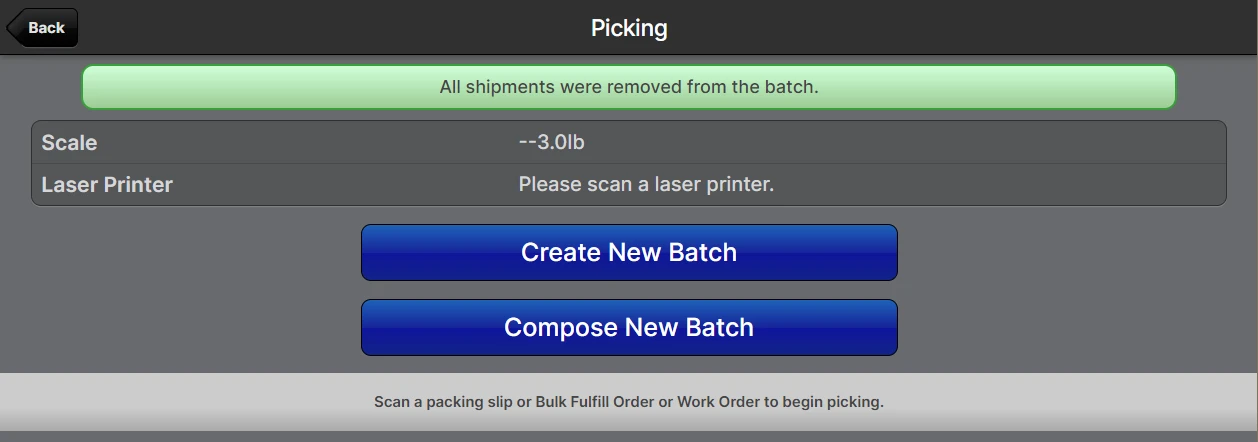
If there are no remaining shipments the user will be returned to the Picking screen:
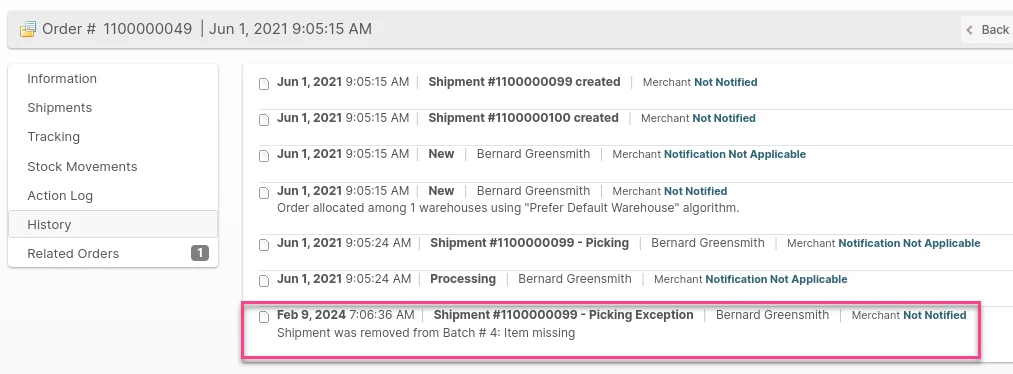
When a comment is provided via either the Picking UI or the mass action, it will be copied to the order status history:
Print Documents
In addition to Packing Slips there are 6 other types of documents that can be associated with a shipment:
- Packing Slip Promos
- Shipping Labels
- Bills of Lading
- Customs Documents
- HazMat Shipping Papers
- Packing Instructions
- SSCC Labels
These can all be printed from the Print Documents dialog by clicking Print Documents on the batch page, or from most grids containing shipments using a mass action also called Print Documents.
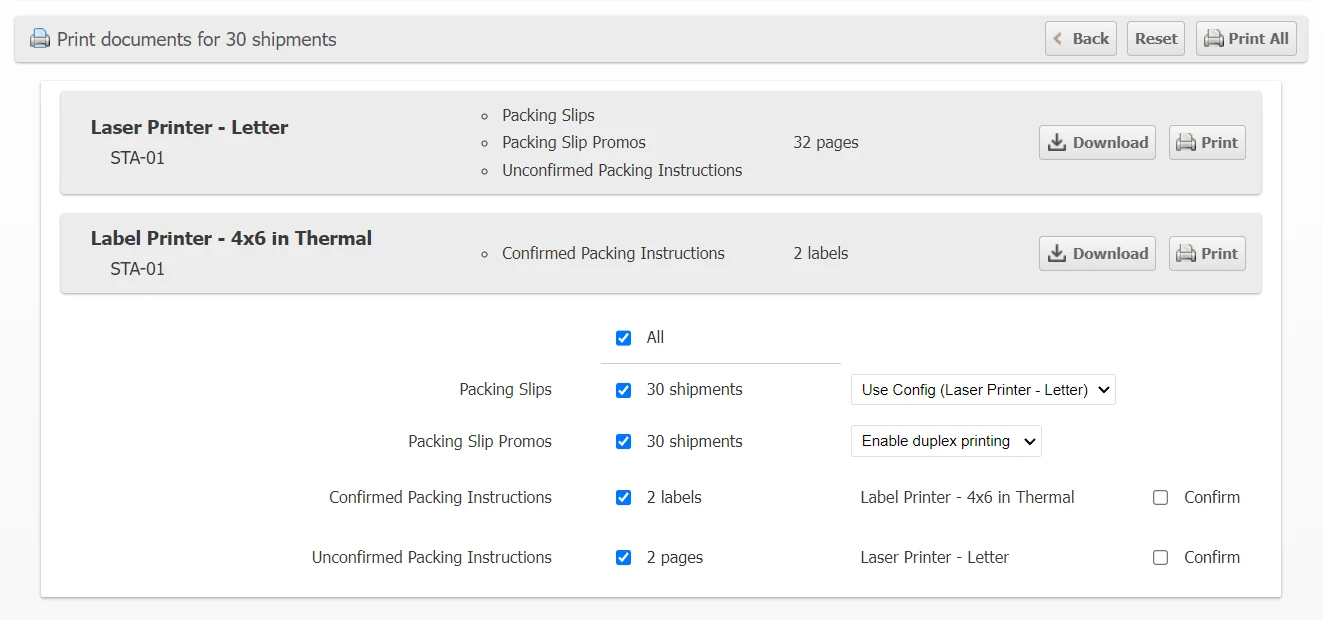
Only applicable document types will be listed in the dialog, each with a checkbox to indicate if you want to print them and a summary of how many pages will be consumed.
A grey box will appear for each printer type which has documents to be printed. Uncheck the document types which you do not want to print and the summary will be updated with the document types and page count.
Click Print All to send all of the selected documents to the appropriate printer(s) or click Print for a given printer type to only print the documents for that printer type.
Clicking Download will download a PDF file containing the documents instead of sending them to the printer (only available when a printer is selected by scanning the device barcode).
Choose Locations
ShipStream determines the pick locations for shipments at the time they are "processed" (which is when a shipment is added to a batch or when a user clicks Process) based on the Reservation Options > Pick Source option of the Picking Class to which the shipment is assigned.
Barring any Burn Order requirements, when using the Prefer Pickable or Prefer Non-Pickable options, ShipStream will reserve the locations that are closest in proximity to the rest of the batch picks to optimize travel time.
If, for any reason, you want to pick one or more items from a location other than the ones chosen automatically, click Choose Locations on the batch page (or on an individual shipment's page) to load the Choose Locations page. Check the boxes for the SKUs you want to modify the pick locations for and then enter new quantities to be picked for each location. The numbers must add up to the original amount.
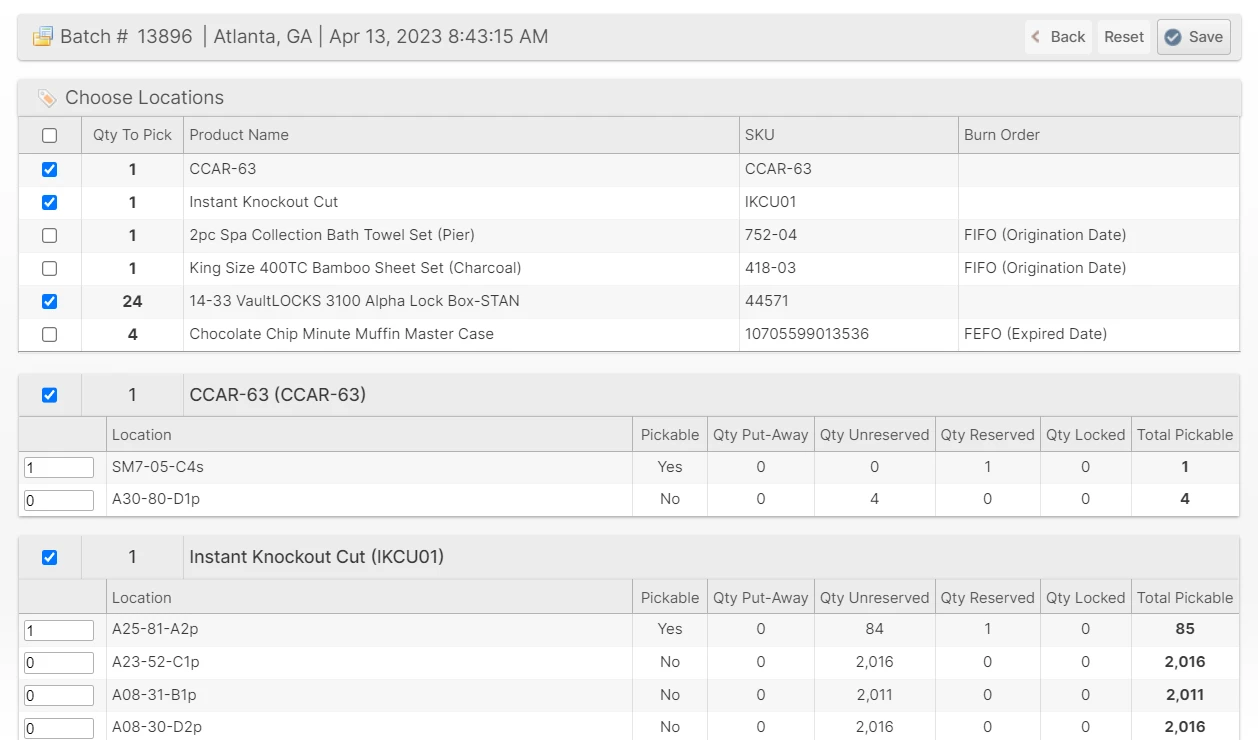
Upon clicking Save, the shipments will be re-reserved to the chosen pick locations, which will now be "locked" to avoid getting re-optimized as relocations occur.