Work Orders
A Work Order is an order to pick one or more products from inventory, assemble or disassemble or otherwise transform it into another product or set of products, then produce a Put-Away to return it to inventory. Work Orders are driven by the product-to-product relationships defined by Bill of Materials (BOMs).
In the definition of a BOM, you can define whether Kit To Stock and De-Kit To Stock are enabled, which determines whether users will be able to create a Work Order for that BOM and in which "direction" (Kit or De-Kit).
Examples of Kitting type Work Orders include:
- Create a bundle of various products (i.e. "starter kits", "combos", etc.)
- Creating cases from singles or other quantity variations or singles from cases
- Repackaging products into new packages
- Inserting promotional materials into original packaging
Examples of De-Kitting type Work Orders include:
- Recovering parts from an assembly
- Undoing bundles to sell components individually
The Work Order flow progresses as follows:
- Work Order creation (creates inventory reservation)
- Picking
- Assembling (creates a Work Order Output)
- Put-Away
Assembly Line
Assembly of a Work Order can be performed by multiple users simultaneously, where each user can be perform a full assebmly one at a time, or just a specific subset of the assembly for a multi-stage assembly line system.
Additionally, the put-away process can be performed while assembly is still in progress by closing Put-Aways as you go.
Finally, the resulting inventory of multiple Work Orders can be collected simultaneously for Put-Away by scanning a License Plate during assembly.
Permissions
The following permissions must be assigned to users to allow them to perform the following functions:
- Perform Kitting via the Scanner UI — Scanner -> Kitting
- View existing Work Orders — Catalog -> Work Orders
- Create new Work Orders — Catalog -> Work Orders -> Create
- Edit existing Work Orders — Catalog -> Work Orders -> Edit
Statuses
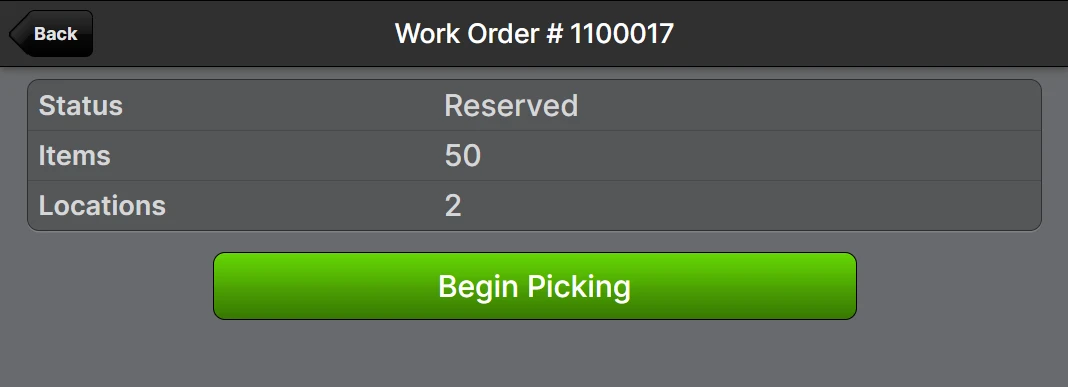
A Work Order will always have one of the following statuses:
- Reserved — Source items are reserved and ready to be picked
- Picking — Picking has started
- Picked — Picking has been completed, assembly has not yet started
- Assembling — Assembly has started (for Direction: Kit only)
- Assembled — Assembly has finished (for Direction: Kit only)
- Disassembling — Disassembly has started (for Direction: De-Kit only)
- Disassembled — Disassembly has finished (for Direction: De-Kit only)
- Complete — All associated Work Order Outputs have been Put-Away and Committed.
- Canceled — The work order was closed without being completed.
Creating a Work Order
Creating a Work Order will define which Bill of Materials serve as the blueprint for the operations and the quantity of inventory to consume/produce. Upon successful creation, the inventory for the Work Order is immediately reserved for the Work Order (made unavailable for sale) and then needs to be picked, assembled/disassembled, and returned to stock.
You can begin creating a new Work Order from two different locations:
- Navigate to Operations -> Work Orders and click Start New Work Order

- OR Navigate to the Catalog -> Product page of the BOM parent product and click Start New Work Order

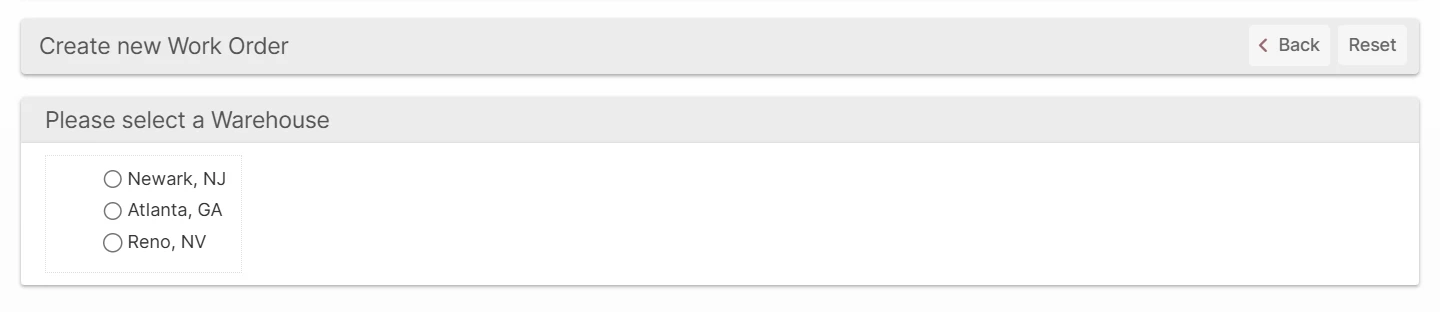
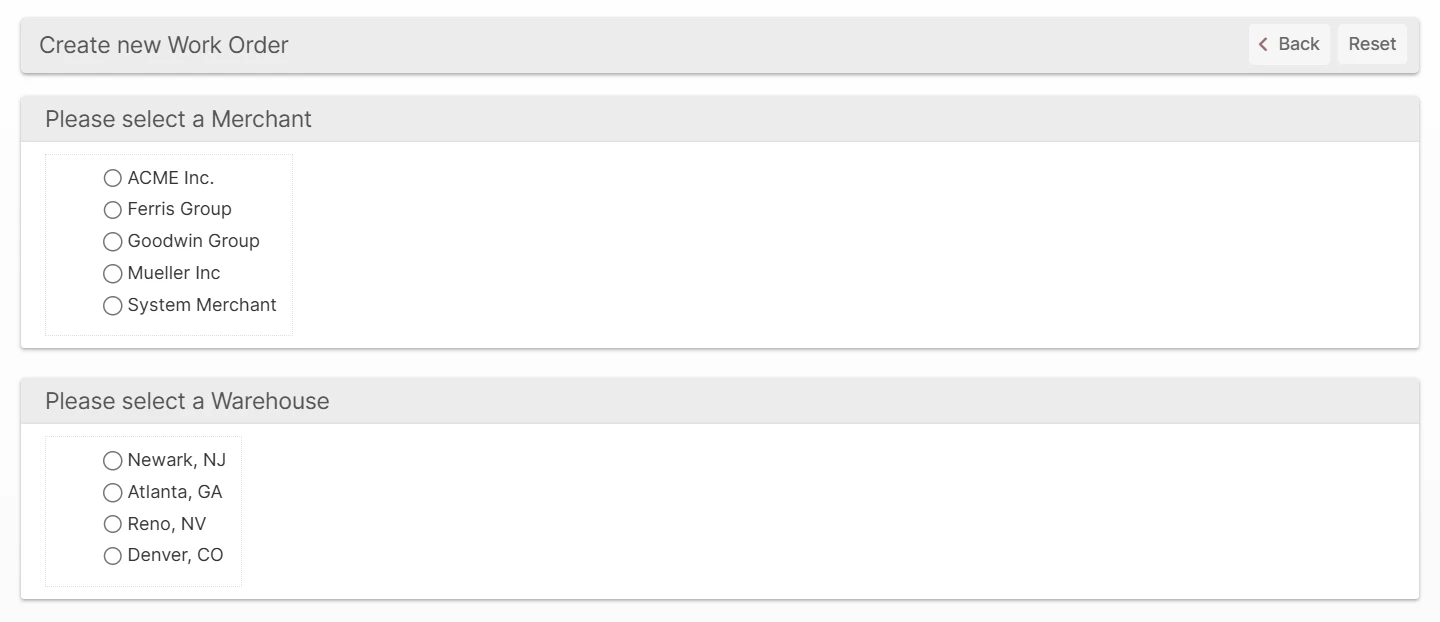
If you have multiple warehouses, your next step will be to select the Warehouse where the picking and kitting operations will occur.
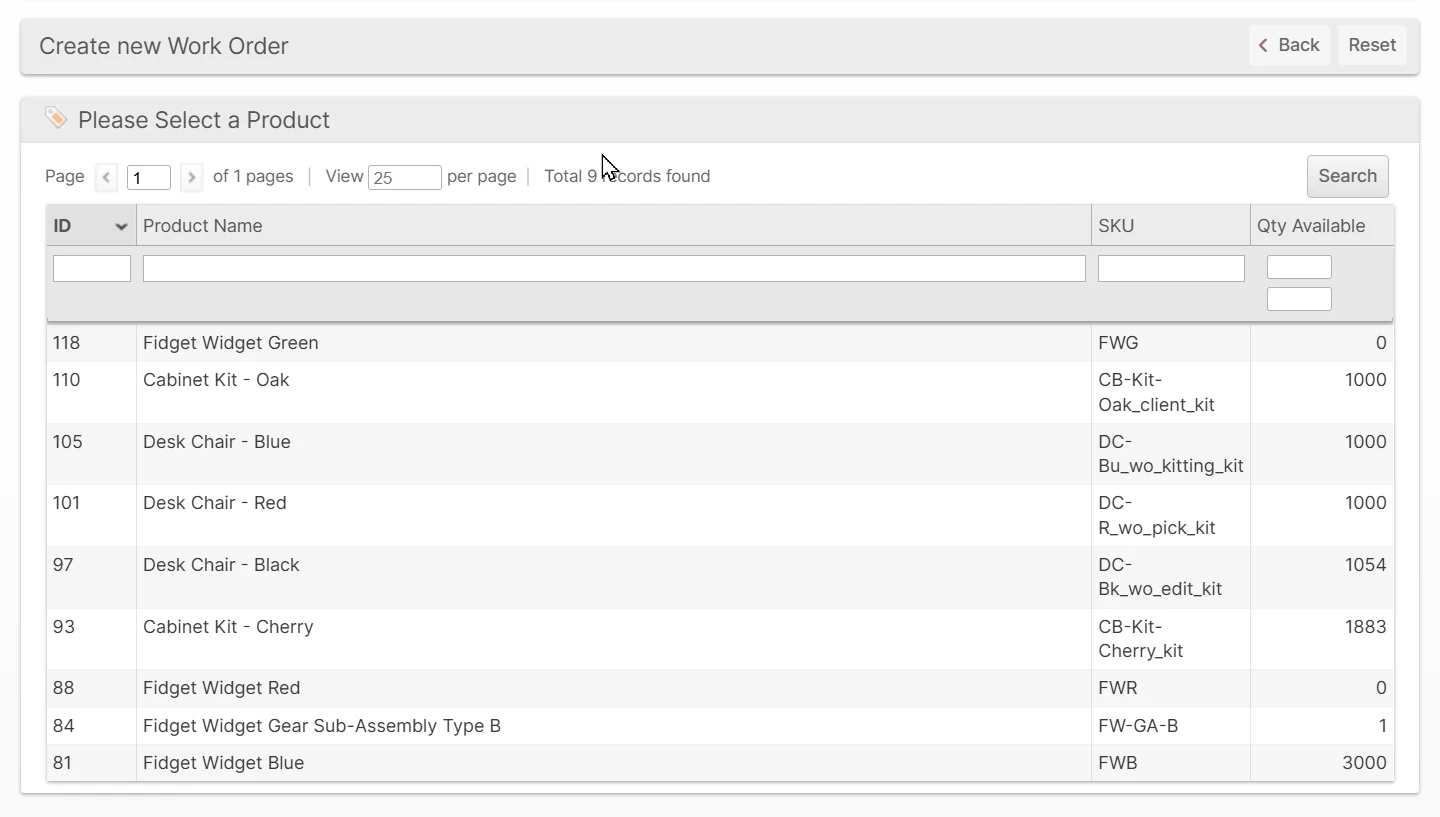
If you used the first route and have multiple Merchants, you will also need to select a Merchant and Product
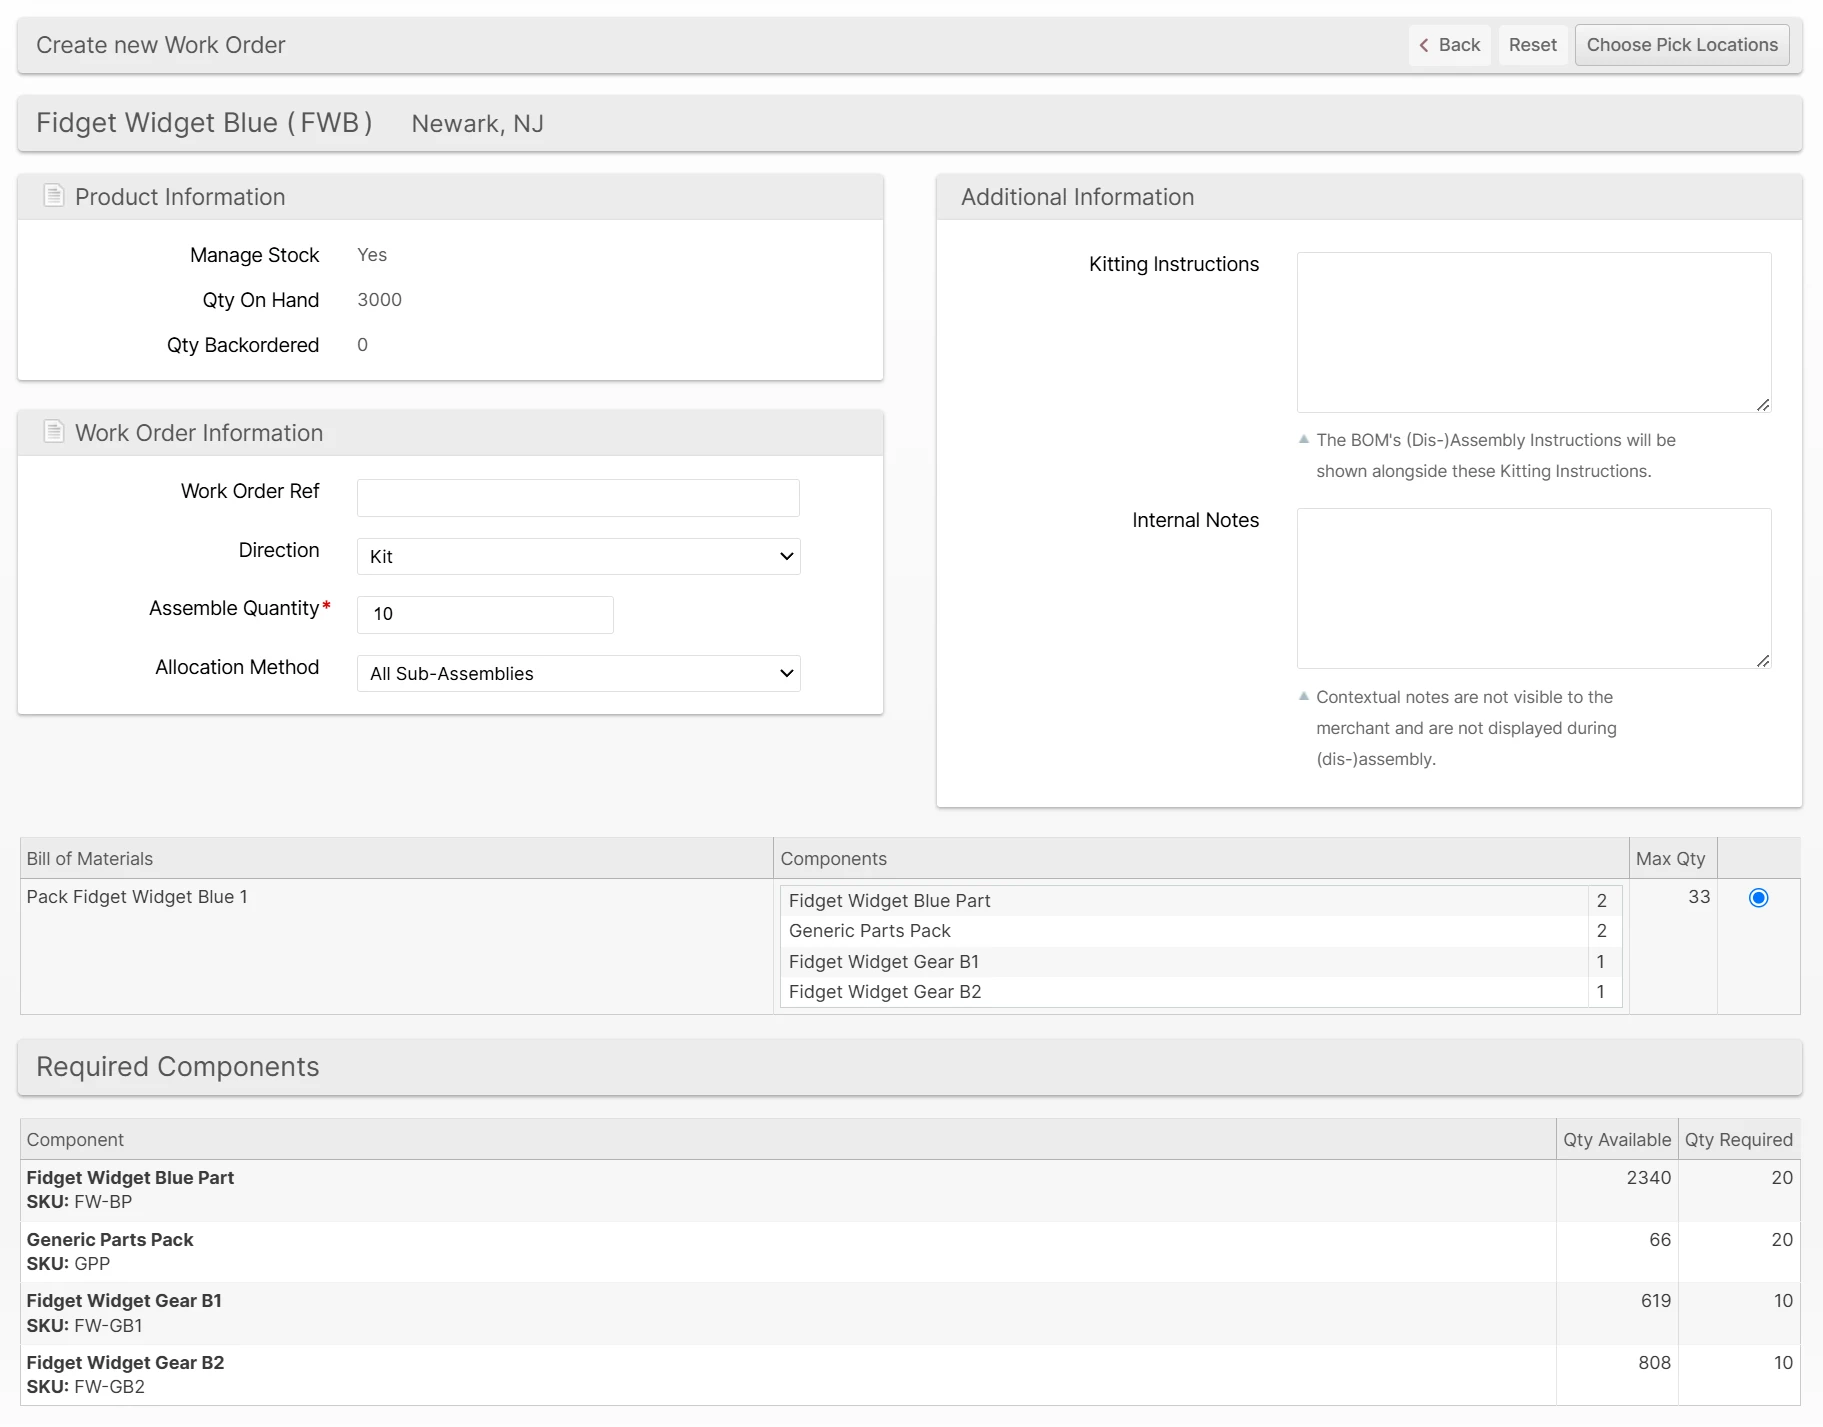
You will now be on the next to last page showing the following sections:
Product Information
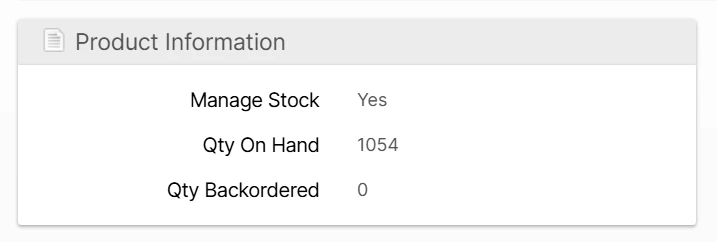
Manage Stock
Whether this Product's stock is managed by ShipStream.
Qty On Hand
The quantity of stock that is on hand at the selected Warehouse.
Qty Backordered
The quantity of this Product that is currently backordered.
Work Order Information

Work Order Ref
This field is simply a custom reference for internal or external identification purposes.
Direction
The remaining field in this section depend on the Direction selected which can be Kit (assemble the product from the BOM components) or De-Kit (disassemble the product into its BOM components).
Assemble Quantity (Kit Only)
This is the number of units of the product selected which you wish to end up with after assembly is completed.
Allocation Method (Kit Only)
As each Product can have multiple Bill of Materials and component Products can also have one or more Bill of Materials there can be many ways to assemble a Product from the stock on hand. The allocation method will help you choose the way that fits your needs best.
Automatic
This will use nested BOMs only as much as required to build the specified Assemble Quantity.
First-Level Only
This option excludes the use of sub-assemblies (nested BOMS).
All Sub-Assemblies
This option uses all available sub-assemblies (nested BOMs) so that you will be assembling from the smallest components.
Disassemble Quantity (De-Kit Only)
This is the number of units of the product selected which you intend to be picked and disassembled.
Additional Information
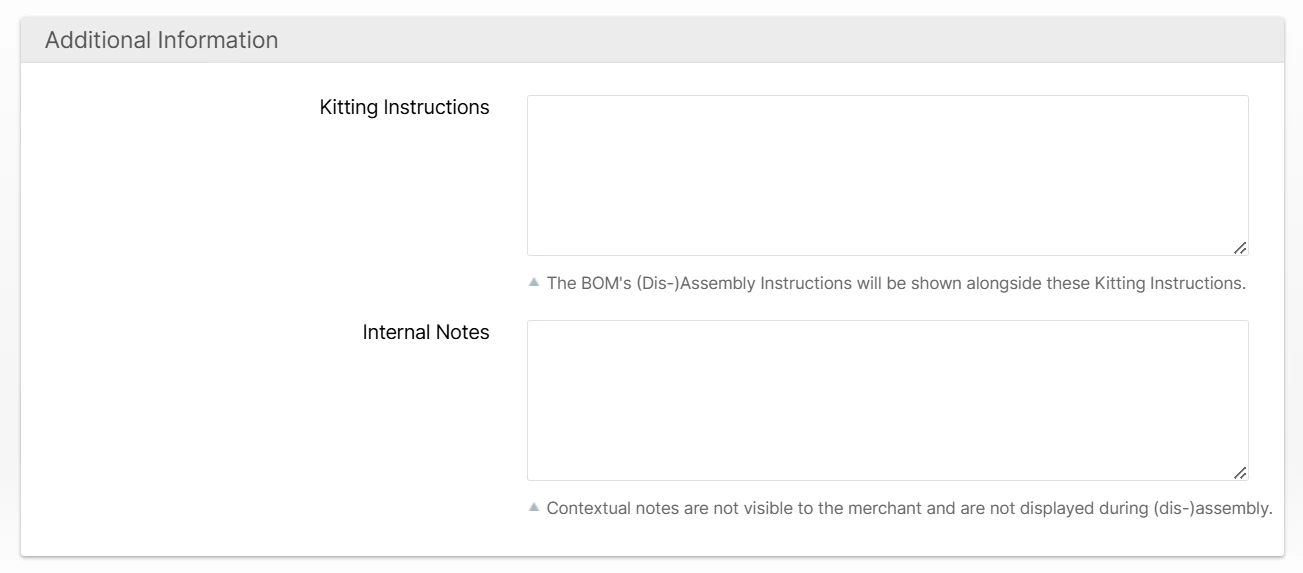
Kitting Instructions
This is an optional field allowing instructions to be given when kitting this specific Work Order. The BOM's Assembly Instructions or Disassembly Instructions (depending on the Direction selected) will be shown alongside these Kitting Instructions so you want to avoid duplicating them and instead give instructions that pertain only to this particular work order.
Examples:
- Product SKU:Little-Part needs to be placed in last, on top of all other products.
- Use up the rest of the 16x16x16 boxes then use the new 12x16x16 boxes.
Internal Notes
The internal notes are not for assembly instructions and can only be viewed by Organization users.
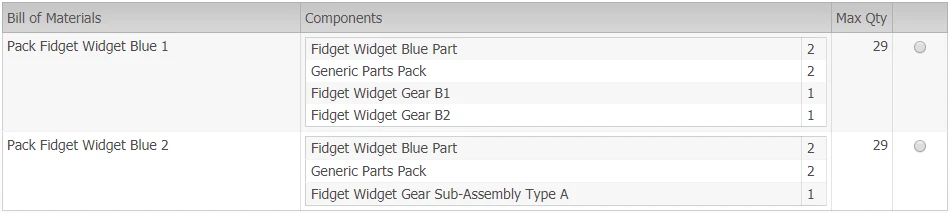
Bill of Materials Selection - Kitting
This grid will show all the BOMs with the ability to be kitted or de-kitted to stock that are defined for the selected Product. For example, setting a BOM to "Kit To Stock: No" will prevent the BOM from appearing here when Direction: Kit is selected.
Kitting
Select which BOM the Work Order should use as the blueprint for assembling this Product. Each BOM will also show the maximum quantity that can be assembled for each BOM combination given the current inventory levels and the Allocation Method.
The table contains:
- Bill of Material name
- Components' names and quantity needed of each Component to create the Yields Quantity of the product (typically 1 unit).
- Max Quantity that can be assembled using this BOM as the blueprint
- Selection indicator (click to select)

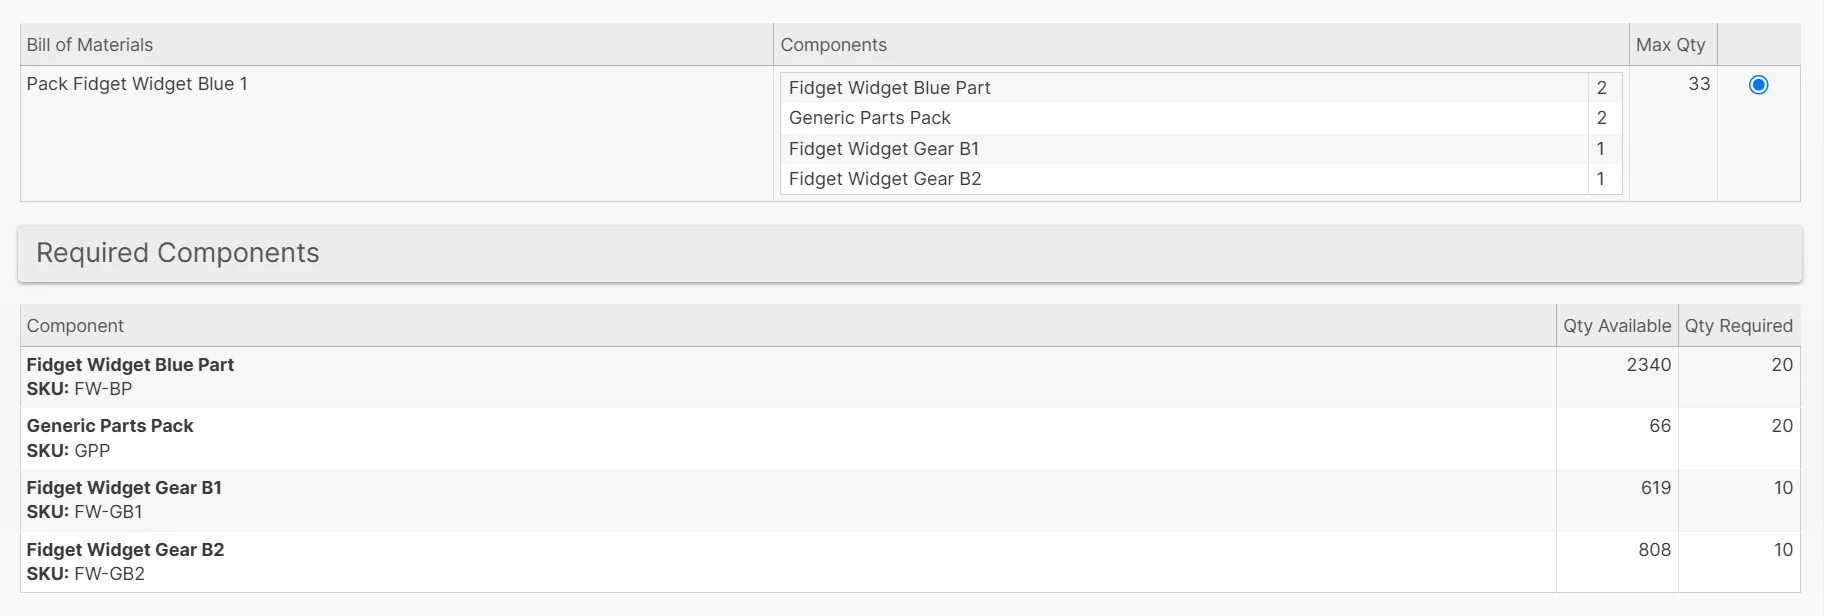
With Order Sub-Assemblies Checked:
Once a BOM is selected, the Required Components grid will be displayed below.
Required Components
This grid will show all the Products used to assemble the selected BOM tree and how much inventory is required and available at this warehouse.
After this selection, you are ready to advance to the Choose Pick Locations step.
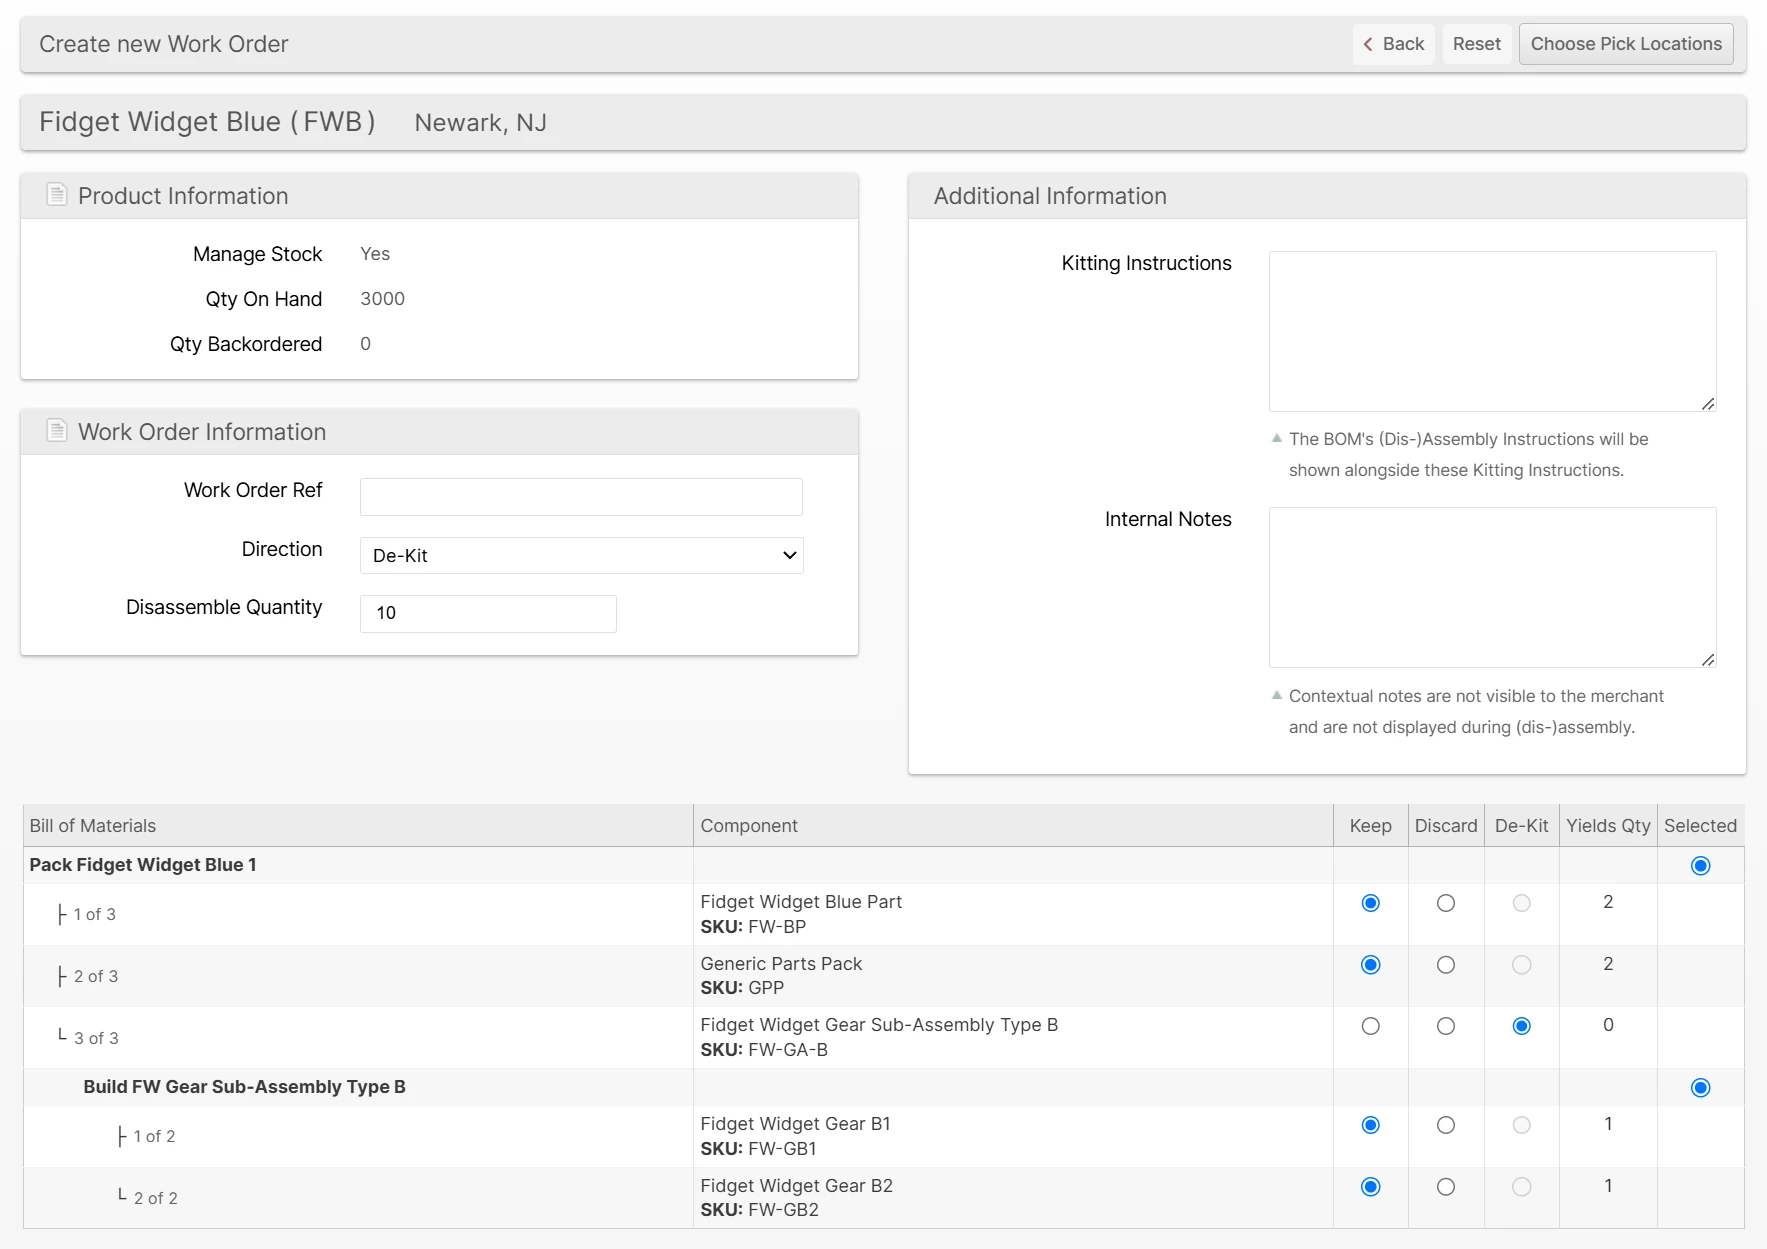
Bill of Materials Selection - De-Kitting
When de-kitting, you choose the Bill of Materials to use as the blueprint by selecting the radio button in the Selected column. Each component will then be displayed so you can chose one of three options:
- Keep - This component will be fully recovered during disassembly (the quantity to be recovered per unit of the disassembled Work Order product is displayed in the Yields Qty column.
- Discard - This component will not be recovered when disassembling
- De-Kit - Do not recover this component but rather disassemble it futher into the sub-components that make up the component. Choose the Selected BOM in case there are multiple choices.
Choose Pick Locations
The Choose Pick Locations page is auto-populated with the first available locations to respect relative priorities and Lot Burn Order. However, you can override the default by adjusting the numbers in the first column. The numbers must all equal the expected amount based on the Assemble Quantity and the number of units required by the BOM.
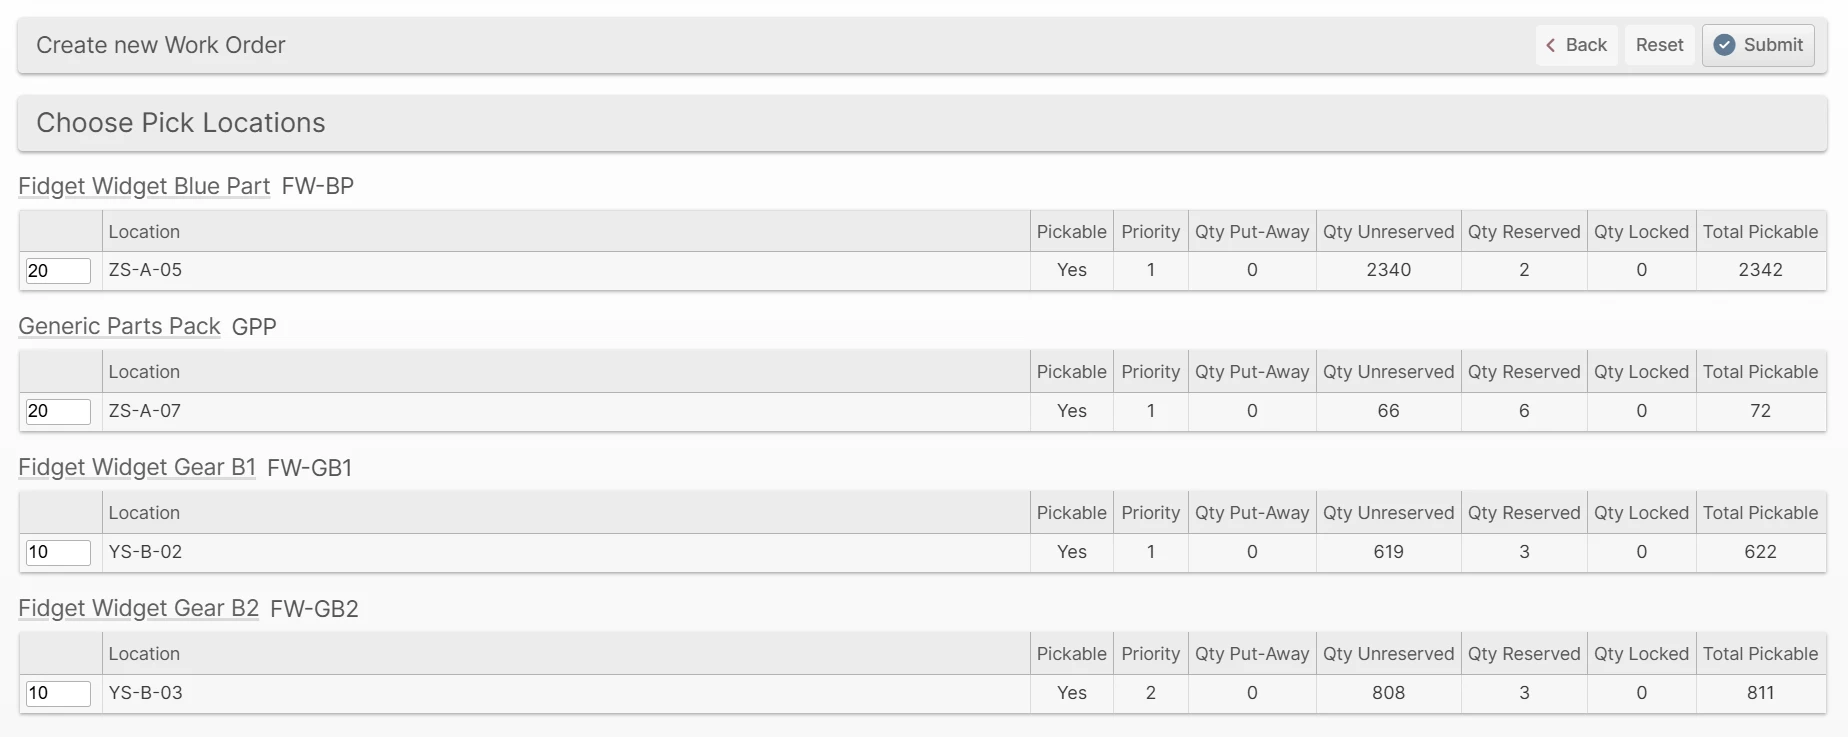
When satisfied, you can now click Submit and your Work Order source inventory will be reserved and is ready to pick!
Work Order View
Navigate to Operations -> Work Orders to list and search existing Work Orders. Click one to view the Work Order page. From here, you can view the details and perform the following actions:
- Choose Pick Locations - Change the reserved pick location - this is only possible before the Pick is started.
- Picked - Complete all of the picks at the current reservation locations.
- Assembled - Will assemble all remaining items and create a new Work Order Output for all the items that need to still be in a WOO.
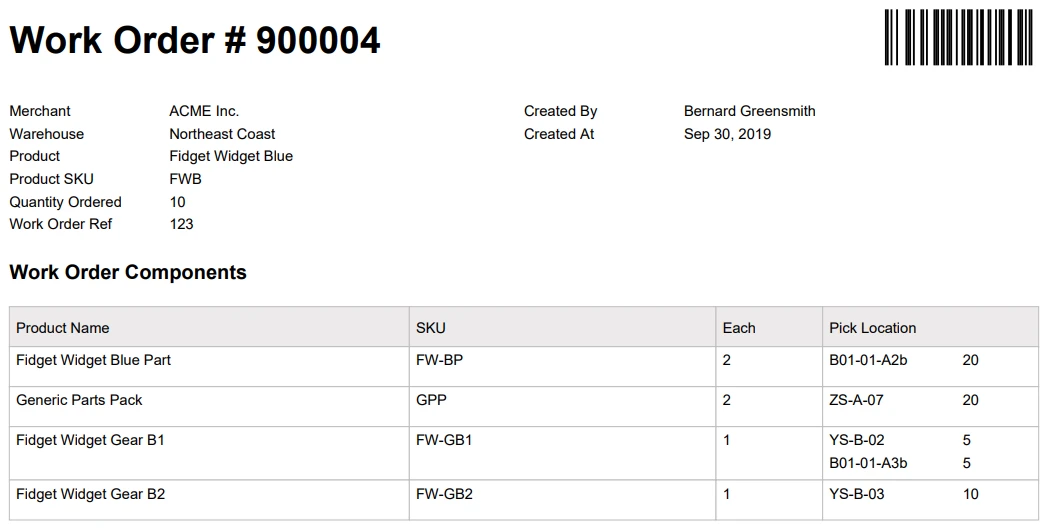
- Print Pick Sheet - The pick sheet is a letter-size document with a barcode which is used to initiate the pick in the Scanner UI. It will contain the pick locations in case you want to pick by paper.
Example Work Order Pick Sheet:
- Cancel - Any items that have been picked but not yet assembled will be placed in a new Work Order Output.
- Edit - The edit button will open a view that will allow you to edit every part of the Work Order in one place, including Warehouse and Pick Locations.
Product Grid
Displays:
- The name and SKU of the Product that is being assembled
- Quantity Ordered
- Quantity Assembled
- Quantity Put-Away
- Quantity Committed

Component Grid
Displays:
- The name of the Components used to assemble the Product
- Each — the quantity needed of this component to create the Product
- Quantity Ordered
- Quantity Reserved
- Quantity Picked
- Quantity Consumed
- Quantity Returned — only used if the Work Order is canceled
- Quantity Canceled

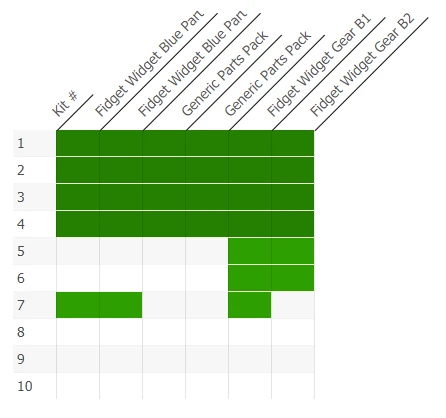
Kit Progress
This tab provides a visualization of the total progress of the Work Order at a granular level. Each row represents one unit to assemble/disassemble and the columns represent the components.
Each cell will be:
- Blank when untouched
- Light green when completed
- Dark green when the entire unit is complete
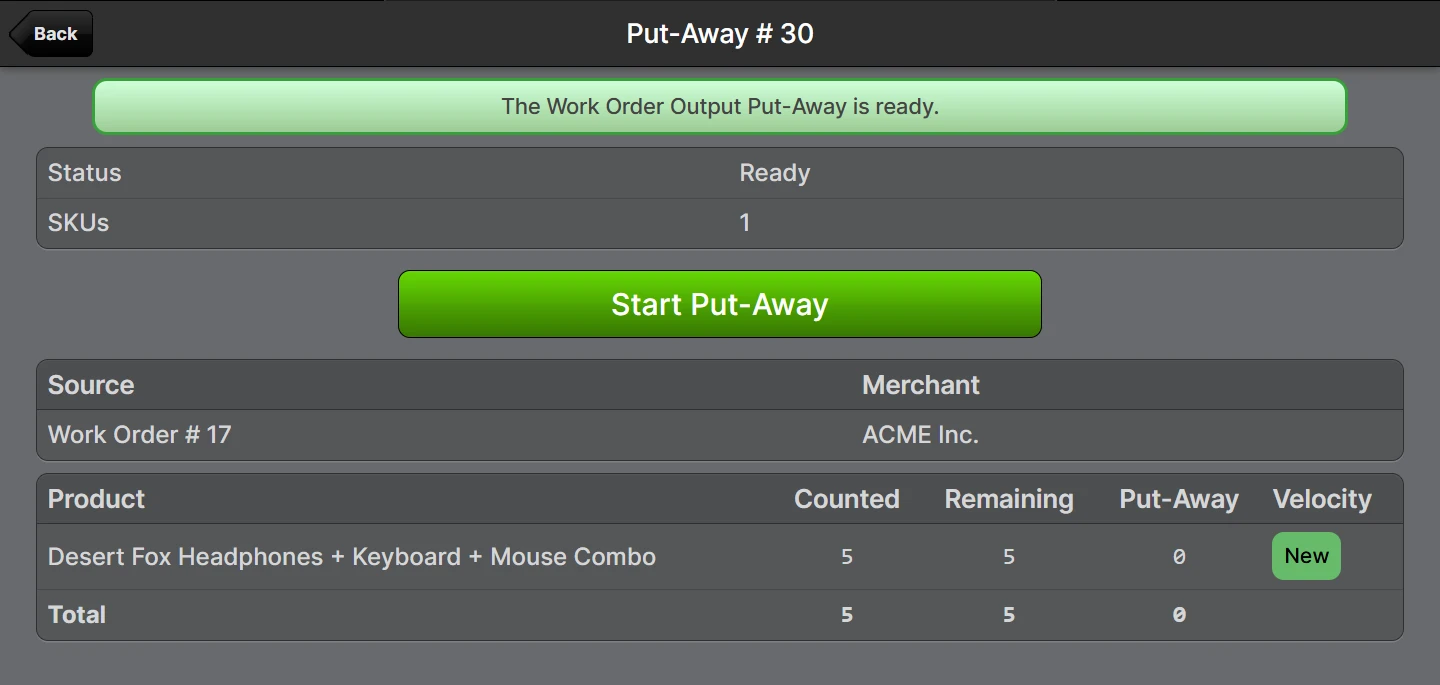
Work Order Outputs
This tab displays all the Work Order Outputs that have been associated with this Work Order. A Work Order Output is a grouping of the finished items which are ready to be put-away.
Displays columns:
- Put-Away # — A link to the Put-Away
- Status
- SKUs
- License Plate
- Output At - The time at which the output was created and the first unit assigned to it

Common Tabs
The page also has Stock Movements, Action Log, and History tabs which will behave like they do in other areas of the ShipStream system.
Picking a Work Order
Admin UI Picking
Clicking Picked from the Work Order view page will complete the inventory updates to the items at the reserved locations, removing them from that location and logging them as Picked. This inventory now is tied only to the Work Order and if the Work Order is canceled, a Put-Away will be created to facilitate returning the inventory to stock.
Scanner UI Picking
Picking a Work Order is similar to picking a Shipment.
- Print the pick sheet by clicking Print Pick Sheet
- Navigate to Scanner -> Picking
- Scan the barcode on the pick sheet
- Tap Begin Picking
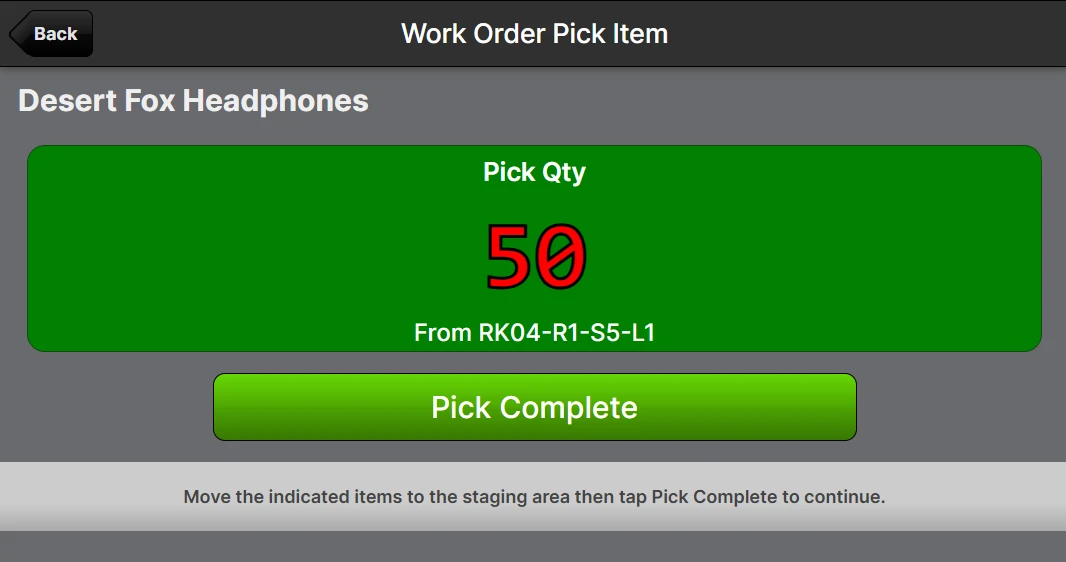
- You will be directed to the next pick location. Scan the location and product barcode.

- Perform the pick using the quantity indicated and tap Pick Complete to confirm
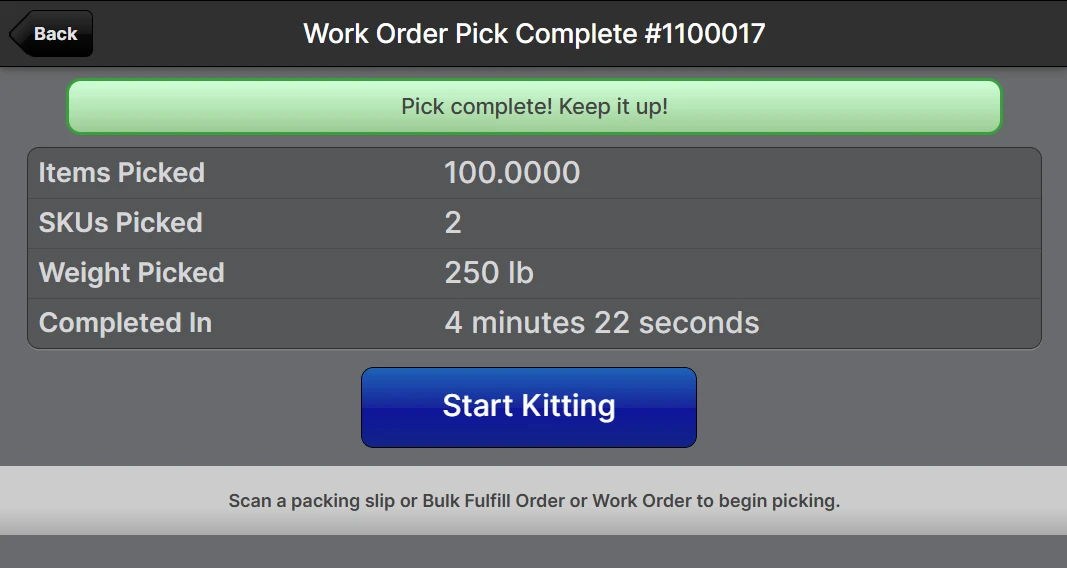
- Repeat steps 5 and 6 until all items have been picked
Completing a Work Order
Once picked, there are two ways to perform the work for a Work Order:
- Admin UI buttons:
- Assemble — All source items are consumed and all produced items are added to a single Work Order Output
- Disassemble — This opens a page which facilitates the entire process, suitable for bulk operations
- Scanner UI -> Kitting — This process is intended for processing one unit at a time in an assembly line fashion
Admin UI Disassembly
- Click Disassemble from the Work Order view page
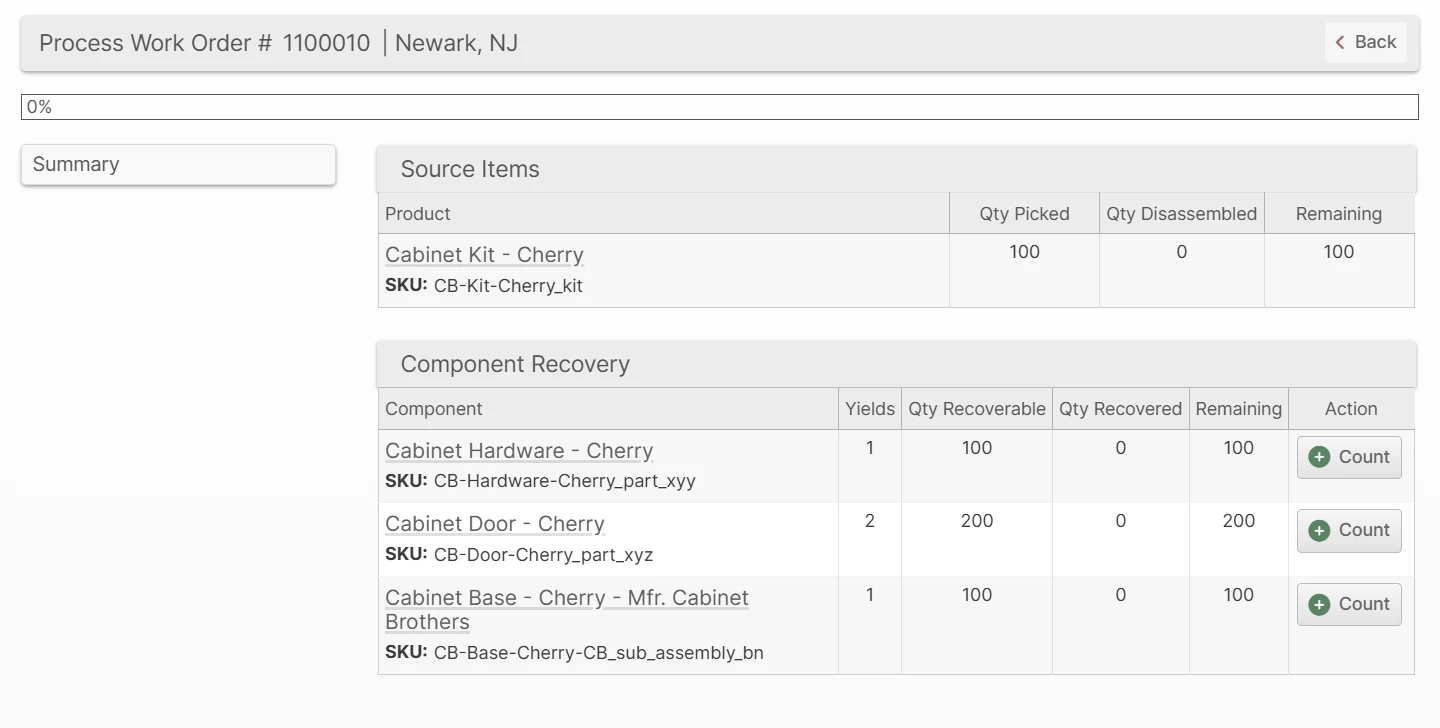
- Click the Count button on the row of the component which you wish to record as having been disassembled
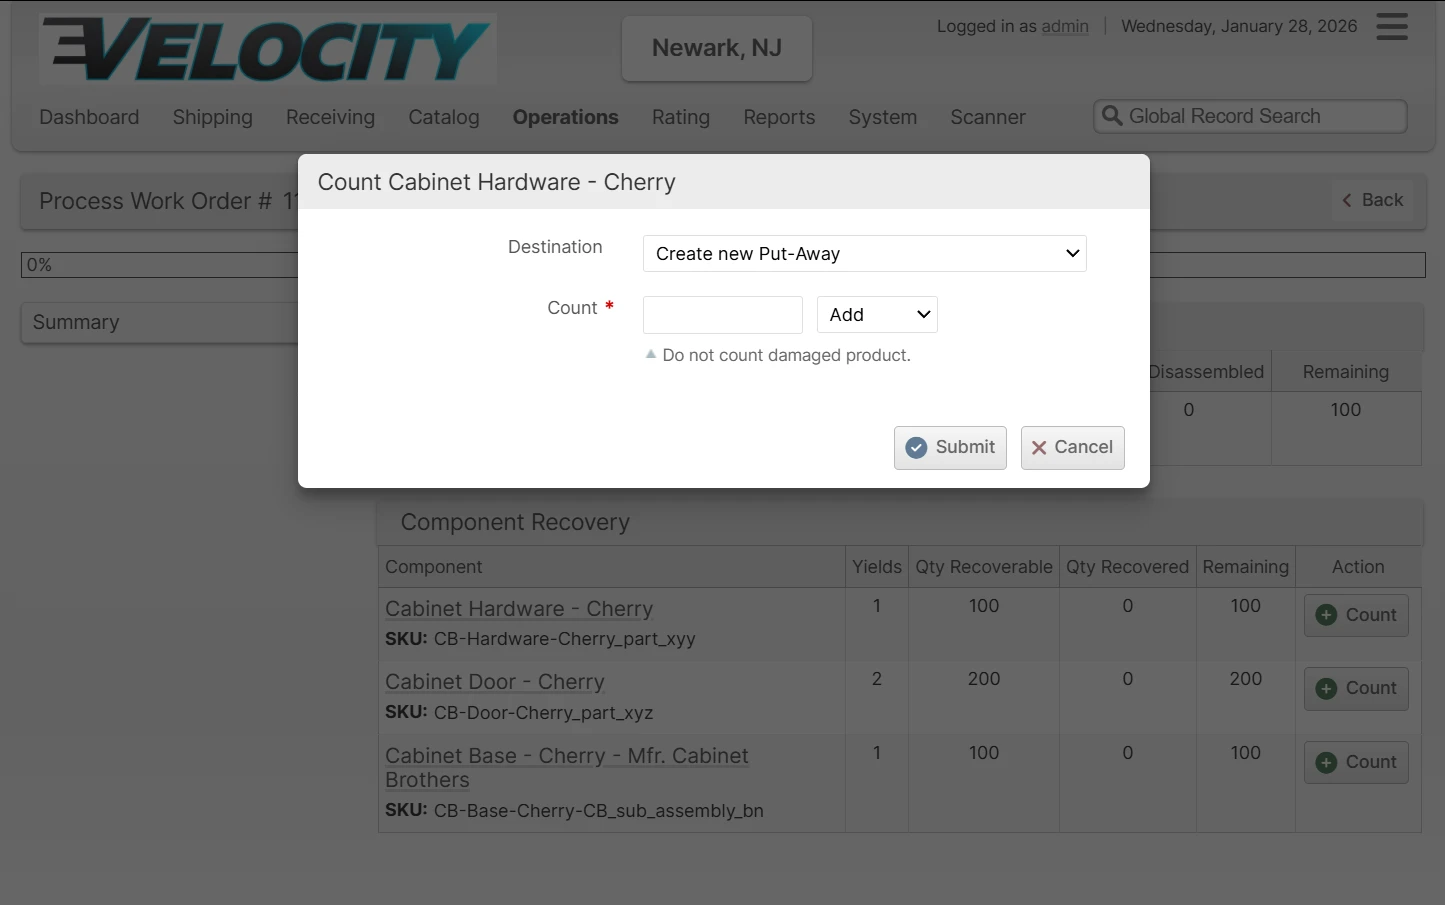
- Choose a Destination. The Destination defaults to "Create a new Put-Away" initially and then will default to the most recently created Put-Away on subsequent steps. Or, you can choose "Use new or existing License Plate" to assign a License Plate to the output.
- Provide a Count value and operation (Add, Subtract or Update)
- Repeat steps 2 through 4 until all items are processed - However, you can close outputs early to help improve work parallelization.
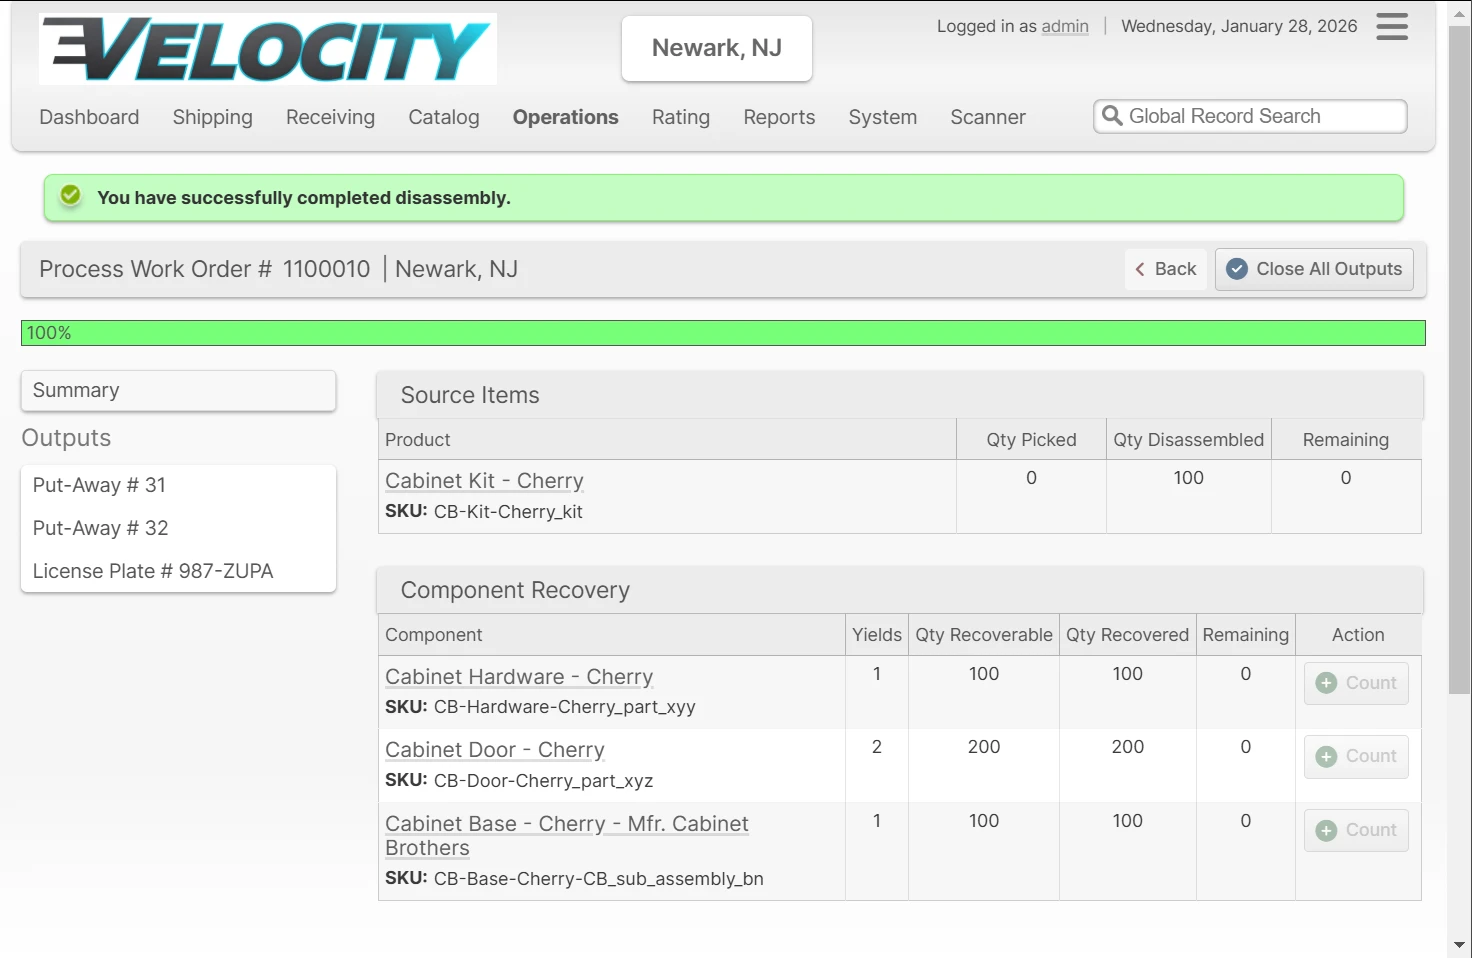
- Close one or more outputs. Click Close All Outputs to close all outputs at once, or tap one of the Outputs in the left sidebar and then click Close to close just that one output.
You ar enow ready to use the Put-Aways system to return the newly disassembled items to stock.
Scanner UI Kitting
Both assembly and disassembly are performed through the Scanner -> Kitting page.
- Navigate to Scanner -> Kitting
- Scan the pick sheet for your Work Order or tap the appropriate merchant to see a list, then tap the appropriate Work Order from the list to arrive at the start page:
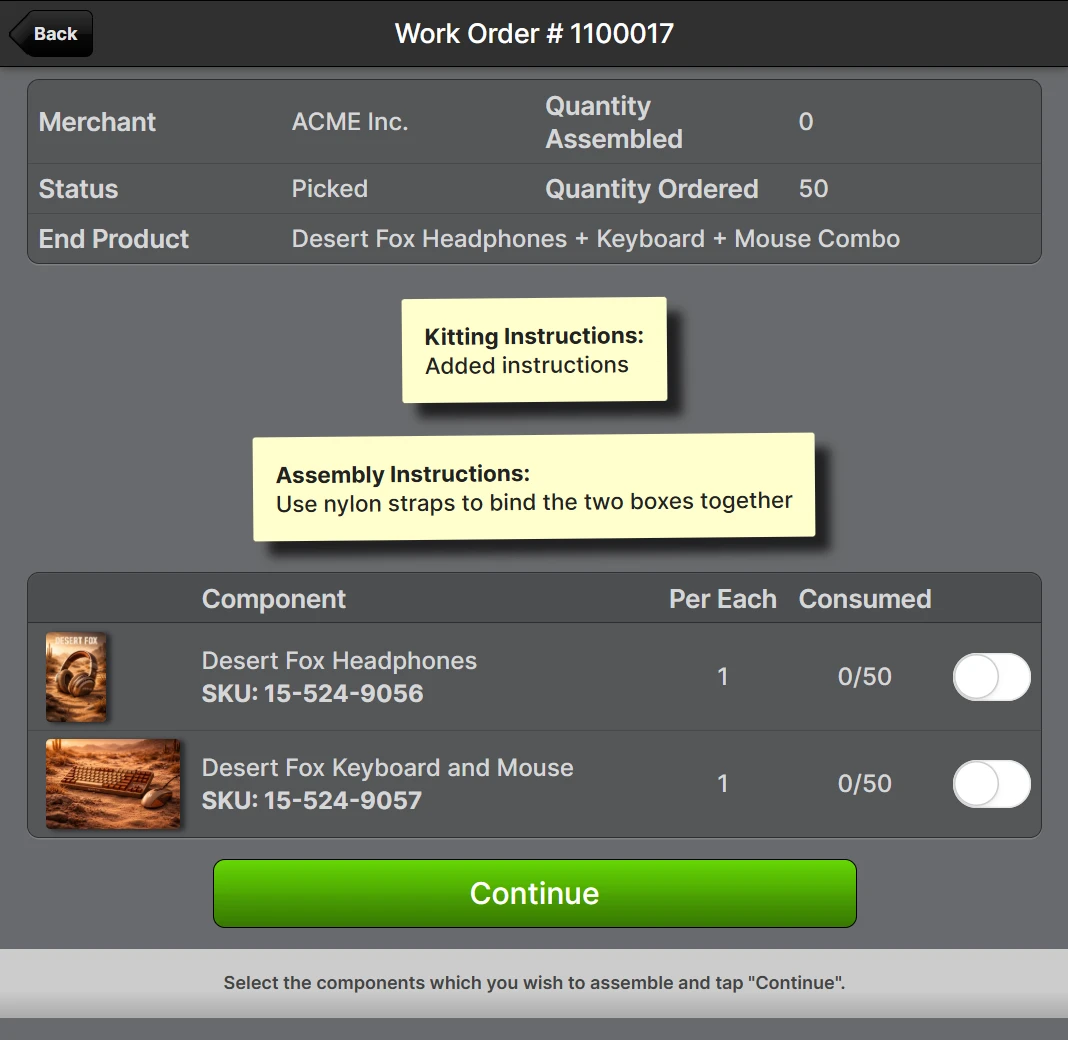
- Toggle the items which you are ready to start working on. Leaving any items unselected will cause the units to be only partially assembled/disassembled and another pass will be required to complete the remaining work. These other items can be completed in parallel by another user.
- Tap Continue
- Scan the component product barcodes or tap + to increment the count of items completed for one unit of work.
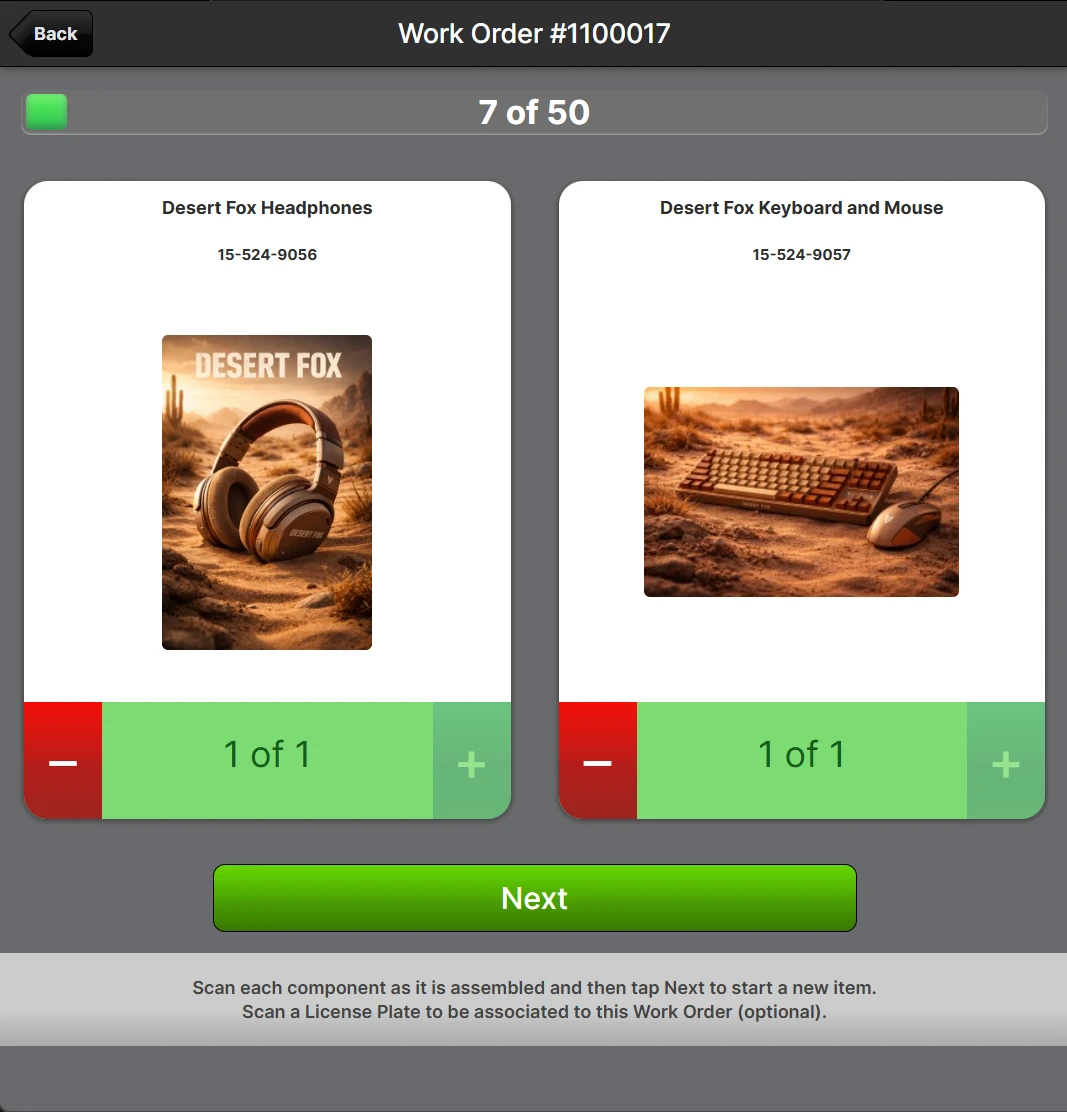
- Once step 5 is completed for each item, tap Next to mark that unit complete and advance to the next unit.
Repeat steps 5 and 6 untill all units are complete. Your progess is displayed on the progress bar.
The progress bar does not fill in green if the user is only working on a subset of the steps unless they are working on the final steps.Your progress is tracked each time you tap Next, so it is safe to back out of the assembly process and resume it at any time. View the Kit Progress tab in the Admin UI to see specifically which units still need to be worked on.- When all the units have been assembled, the user will be re-directed back to the Kitting start page where the user can select another group of components to assemble if needed.
Outputs - License Plates
As items are completed, they are associated to a Work Order Output which is simply a collection of the completed items. By default, these are not associated to any barcode yet, so it is recommended to use a License Plate. This License Plate will be used when performing the Put-Away step.
Simply scan a License Plate to begin associating completed items with that number. The currently active License Plate target will be displayed at the top of the screen.
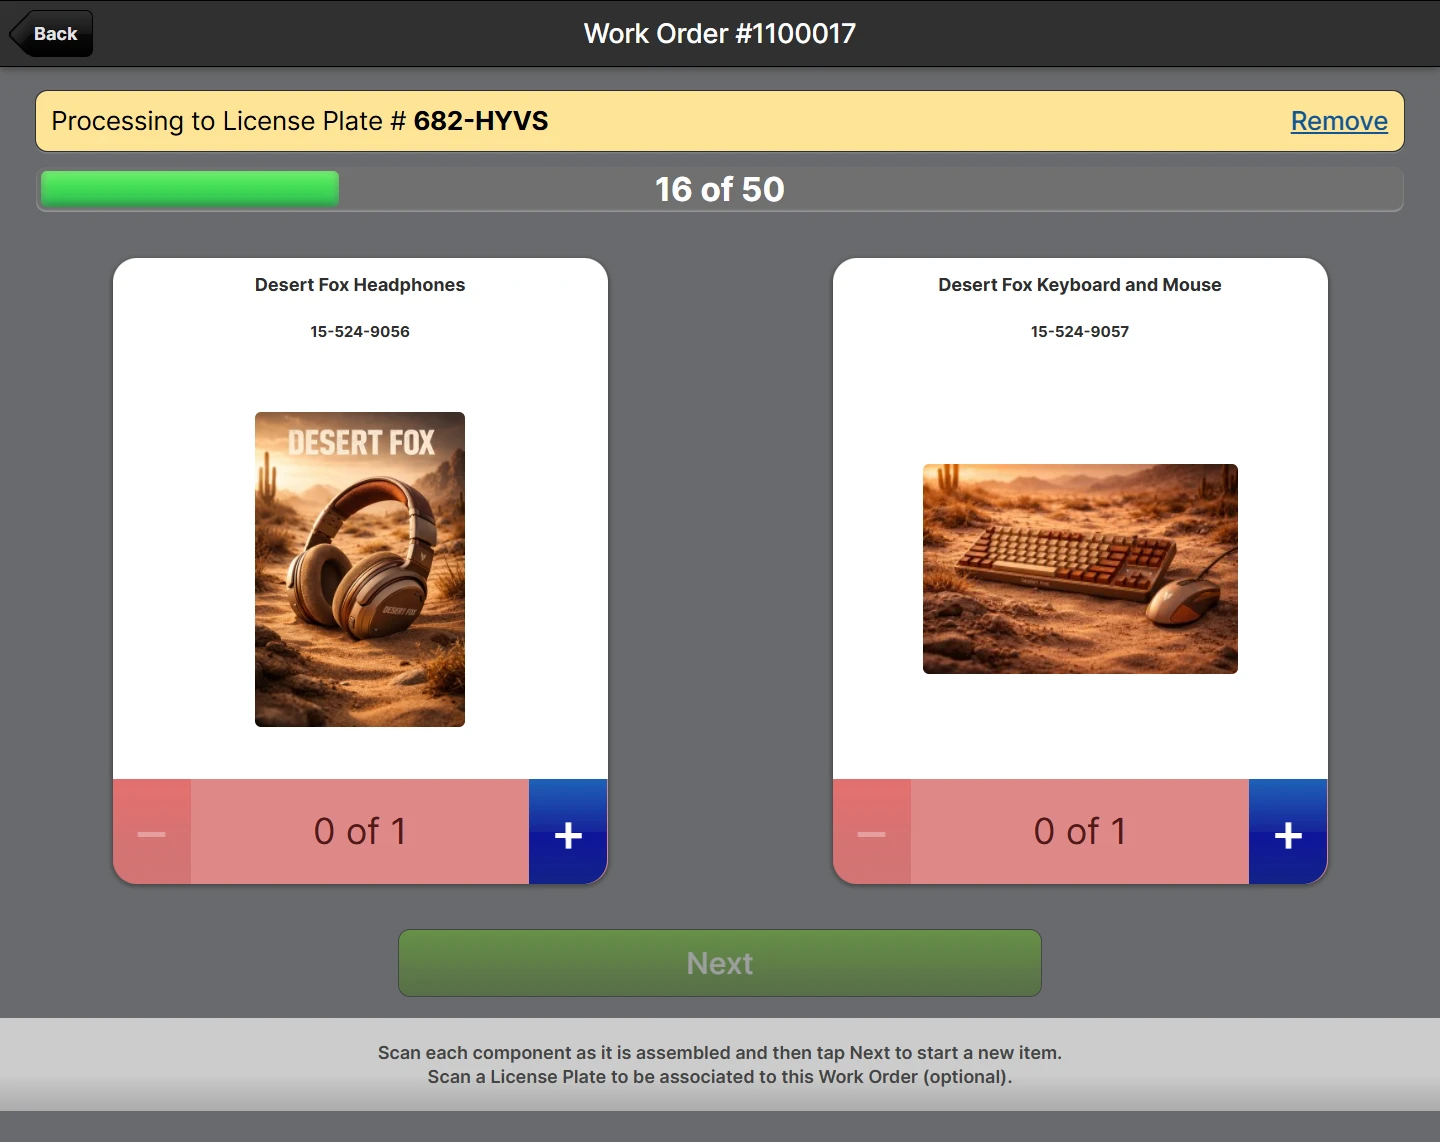
Once one or more items are completed, a new section on the main Work Order page will show a list of open Work Order Outputs.
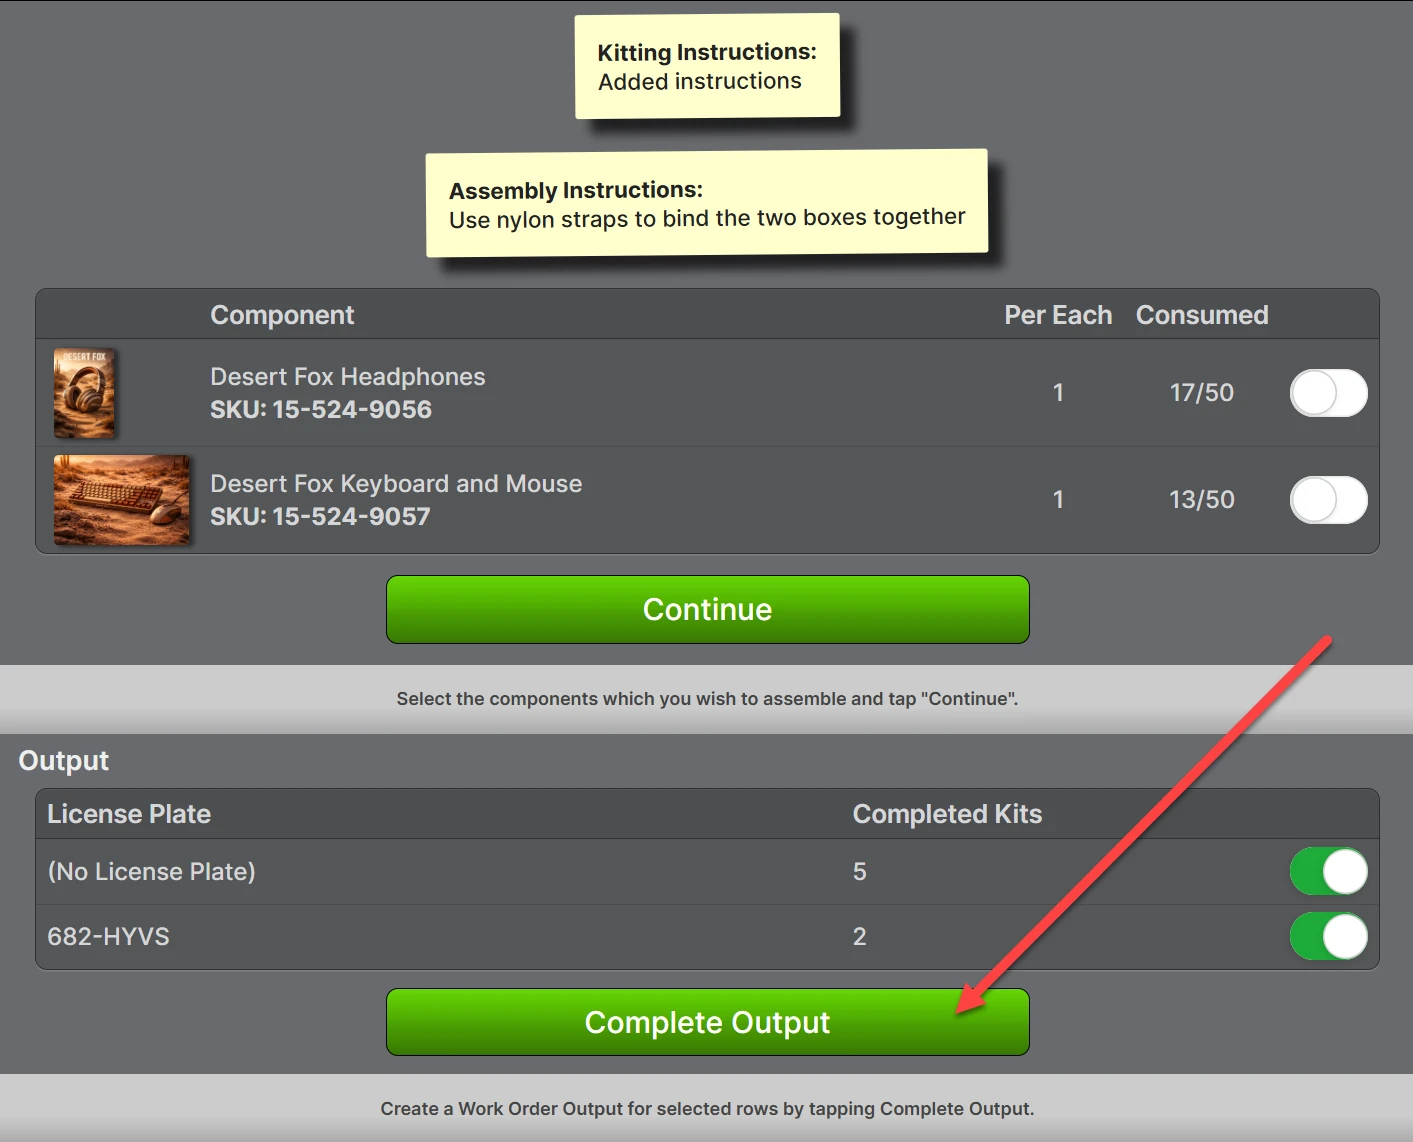
Tap Complete Output to transfer the processed items to a new Put-Away for the selected outputs.
Upon clicking Complete Output the user will be taken to the Put-Away start page and may begin the Put-Away process.