Receiving Configuration
There are many configurable features related to ASNs, RMAs and Other Deliveries. They behave the same for each delviery type unless otherwise noted. Each delivery type is separately configurable as y…

There are many configurable features related to ASNs, RMAs and Other Deliveries. They behave the same for each delviery type unless otherwise noted.
Each delivery type is separately configurable as you may want different workflows for each type. The configuration sections are:
- System -> Configuration -> Receiving -> ASNs
- System -> Configuration -> Receiving -> ASNs
- System -> Configuration -> Receiving -> Other Deliveries
General
Container Weight Input
Determine if the user should provide the container weight when accepting the containers.
- Required - The weight input will be a required field.
- Optional - The weight input will be visible but optional.
- Disabled - The weight input will not be visible.
BOL Input
When creating a delivery, BOL Input determines the form and API validation behavior for the Bill of Lading field. See Bill of Lading.
- Required - The input will be a required field.
- Optional - The input will be visible but optional.
- Disabled - The input will not be visible.
SCAC Input
The Standard Carrier Alpha Code is commonly used for freight and particularly for "International Maritime Freight". See SCAC.
- Required - The input will be a required field.
- Optional - The input will be visible but optional.
- Disabled - The input will not be visible.
This field is mostly informational, but it may be critical for some EDI trading partners.
Auto-Close Default
The ASN will be closed (no more containers may be added) when all containers have been received if "Yes" is selected. See Closing a Delivery.
Auto-Commit Default
The put-away inventory will be committed (become available or be assigned to backorders) as each Put-Away is completed if "Yes" is selected. See Committing Inventory.
Receive By Deadline
See Receive By Deadline for more information about these fields.
Default Contact and Additional Contacts
Each status transition has two fields: Default Contact and Additional Contacts. These are both related to a system-generated email that may be sent when a delivery transitions into the given status. Default Contact lets you specify the email address of a ShipStream user by selecting their name from a list, and Additional Contacts lets you specify one or more arbitrary email addresses separated by commas. These fields are present in the configuration sections:
- New
- Accepted
- Ready To Process
- Processing
- Put-Away
- Completed
- Canceled
Ready To Process -> Only Accepted
If Yes, an email will not be sent when the delivery advances straight from Accepting to Ready To Process.
When a delivery is empty at the time of being received (this is the case if it is created on the fly), it will transition first from Accepting to Accepted. You would then want the merchant to add the expected items to the delivery before you proceed with processing, so by selecting Yes, you can be notified when the delivery transitions from Accepted -> Ready To Process, but not Accepting -> Ready To Process.
Processing
In addition to the Default Contact and Additional Contacts, you have these options:
Use Blind Count
If Yes, the green checkmark will not be shown when the expected amount is counted during Processing, thereby preventing the user from easily knowing the expected amount without actually counting it.
Required Attributes
The product attributes selected for this option include Weight and Dimensions. Whichever options are selected will cause an "Attributes Missing" exception to be recorded for the first delivery container which contains an item that is lacking non-empty values for these attributes. This ensures that the values are captured before the item is put-away or made available for sale.
Scanner UI showing warning of missing product attributes during Processing:

Admin UI showing an Attributes Missing exception which has already been Approved and a warning for a product that is still missing attributes:
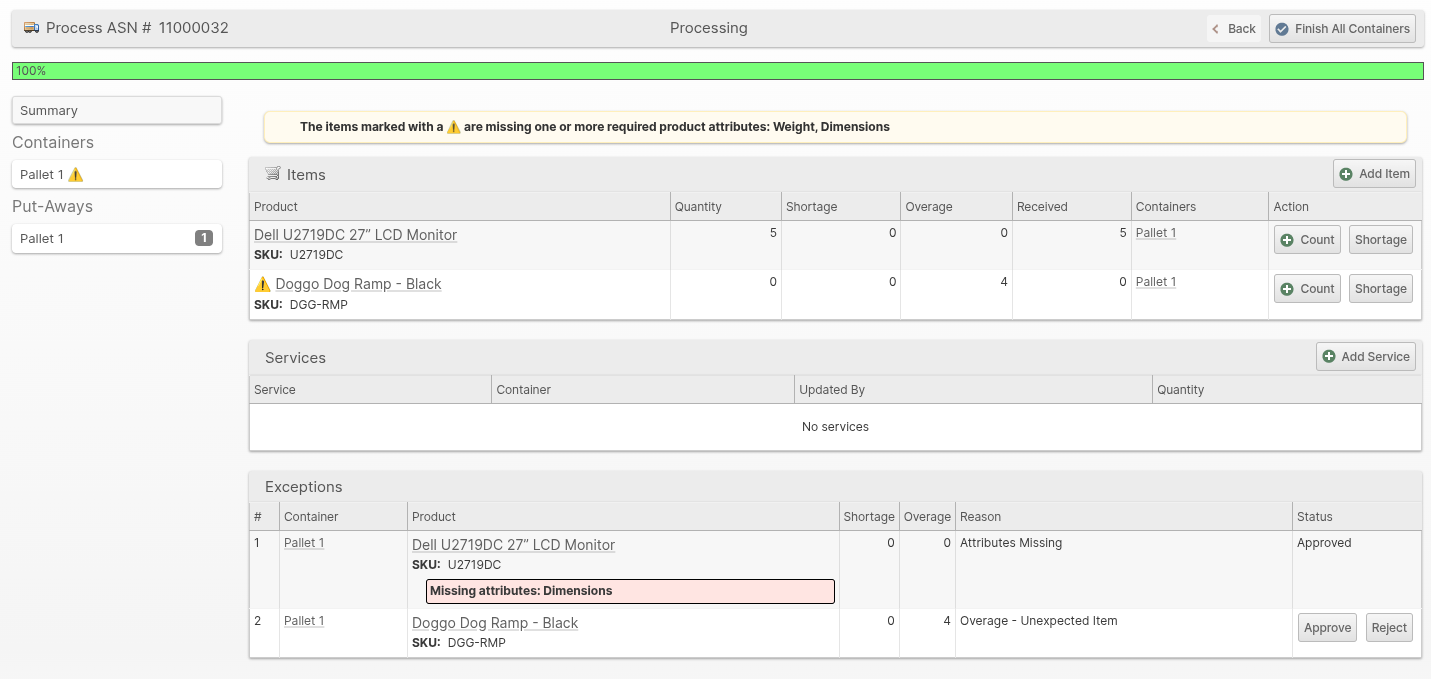
Allow Rejecting Missing Attributes
If this option is "Yes", it will be possible for a user to Reject the Attributes Missing exceptions and complete put-away without updating the product attributes selected in the Required Attributes configuration field. Otherwise, the Reject option will not be allowed and only Approve is allowed. However, Approve will only succeed if the required product attributes have since been set.
How did we do?
Actionable Reports
Receiving Services