Time Tracking for Administrators
In most 3PL environments, it is often useful to not only track who is logged in and in the warehouse, but also the task they are currently engaged in. Users with an administrator account can view these reports and keep track of who is still logged in to the system. Staff users can choose from a number of preset tasks. Some of the tasks will automatically be assigned as the user interacts with the Scanner UI, such as Packing, Picking, etc. Other tasks may also be assigned that are note Scanner-initiated actions, such as training, troubleshooting, etc.
Here you will learn how to manage time tracking for administrators by:
- Enabling time tracking for staff users.
- Designating a time manager user and role for a kiosk system.
- Assigning staff roles with time tracking permissions.
- Viewing Time Reports
- Viewing and Editing Time Entry Logs
Time Management for Staff
If the Time Management feature is enabled for your ShipStream installation, the next step is to create staff user roles with that allow for Time Management features.
- Navigate to System > Users and click User Roles.
- Select an existing User Role, or create a New User Role.
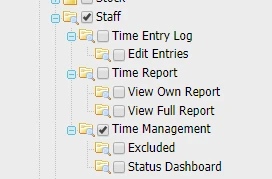
- Select Role Resources from the left side menu and find Time Management from the resource tree under Operations > Staff > Time Management and make sure to un-check the "Excluded" option beneath it. A role that is excluded from Time Management essentially indicates a "Staff" role.
- Click Save Role.
The users who are assigned the role mentioned above will have their time logged and the task status displayed in the admin's Status Dashboard page.
Additionally, the user's current task will also be displayed on their Mobile Scanner UI.
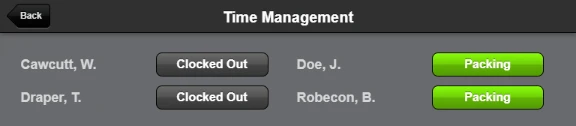
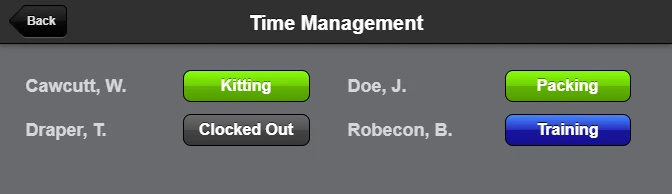
Status Dashboard
The Status Dashboard allows users to find their name, enter a PIN, and current status in order to clock in/out or select another current task or status.
Setup a Time Management Kiosk
It is sometimes useful to designate a computer or tablet as the main time management kiosk for clocking-in and out from the Status Dashboard. To do this, a specific user and user role should be created that exclusively handles this task.
For the Time Management User, you should enable the Status Dashboard feature only. This will give users the ability to modify their work status or task after entering their 4-digit PIN number and will disallow all other screens.
Follow these steps to set up the Status Dashboard for a designated time management kiosk:
- Navigate to System > Users and go to User Roles and click Add New Role.
Choose a name for the role such as "Time Manager" then go to Role Resources in the left side menu. Then check the box for Scanner and Time Management and save the role.
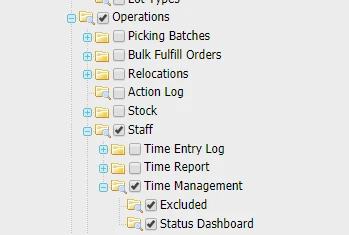 Leave the "Excluded" option checked in this case because the designated time management user should be excluded from all time management logging.
- Now create a new user to designate for time keeping and assign the new Time Manager role to the user.
Now when the time manager user is logged-in to a computer or tablet, it will only have access to the Time Management Status Dashboard for clocking users in and out.
User Task/Status Options
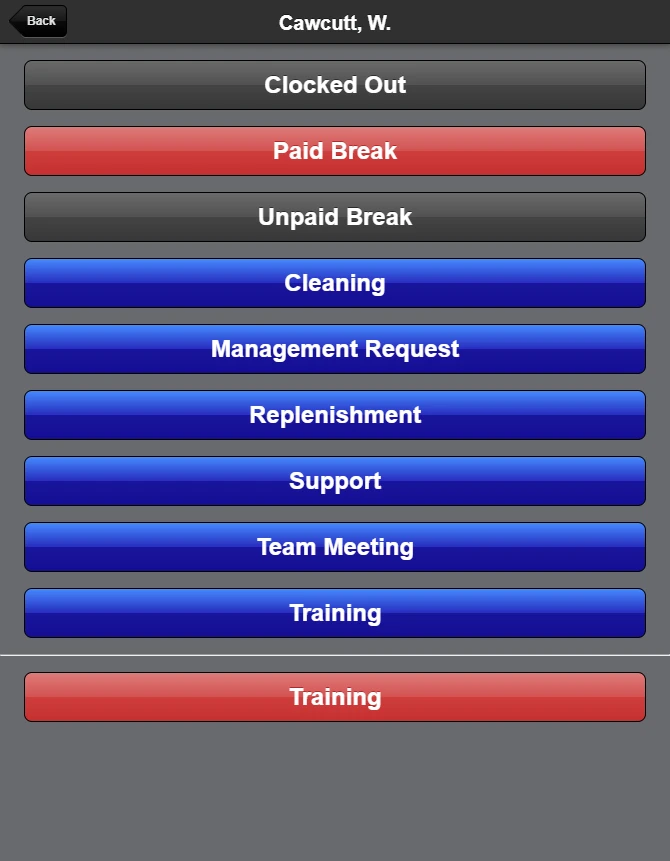
Users will typically clock-in from their own Mobile Scanner UI, but in some cases they may need to clock in or out from the kiosk. Once the user selects Clocked Out next to their name the following screen appears with tasks that can only be manually selected.
Users should become familiar with all of the different task/status options available using the table below.
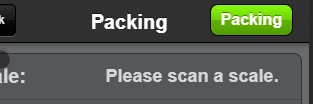
The green (automatic) options are typically assigned to a user when they choose a task from the main Scanner UI dashboard. For example, when a user enters the Packing screen, their status will automatically be set and will be displayed on both the status dashboard and on their mobile Scanner UI. This status will remain the same until a new task has been chosen from the Scanner UI dashboard.
By choosing one of the blue (manual) options, the user will be logged out, but will still be clocked-in and their status will have been updated. This is to avoid leaving a Scanner UI logged in and unattended for long periods of time.
The red options (or modifiers) can be used in addition to another status. For instance, if a user is currently Picking, they can choose either Troubleshooting, Training, or Special Project as a sub-status of Picking.
The Change Type column indicates how this status will be changed. Automatic means the status will change when the staff user enters the task screen, such as Picking or Packing, and are usually green. Manual types can only be changed from the options list and they are usually blue.
The Billable column shows whether or not the task is able to be billed. Currently only "Clocked Out" and "Unpaid Break" are not billed.
The Logout User column indicates that selecting the task will or will not log the user out when it is selected. Generally, the manual blue tasks will log the user out.
| Modifier | Modifier | Modifier | |||||
|---|---|---|---|---|---|---|---|
| Task Name | Color | Change Type | Billable? | Logout User? | Troubleshooting | Training | Special Project |
| Delivery | green | automatic | yes | no | x | x | |
| Processing | green | automatic | yes | no | x | x | |
| Put-Away | green | automatic | yes | no | x | x | |
| Picking | green | automatic | yes | no | x | x | x |
| Packing | green | automatic | yes | no | x | x | x |
| Cycle Count | green | automatic | yes | no | x | x | |
| Relocation | green | automatic | yes | no | x | x | |
| Loading | green | automatic | yes | no | x | x | |
| Kitting | green | manual | yes | yes | x | ||
| Clocked Out | gray | manual | no | yes | |||
| Paid Break | red | manual | yes | yes | |||
| Unpaid Break | gray | manual | no | yes | |||
| Cleaning | blue | manual | yes | yes | x | ||
| Management Request | blue | manual | yes | yes | x | ||
| Replenishment | blue | manual | yes | yes | x | ||
| Support | blue | manual | yes | yes | |||
| Team Meeting | blue | manual | yes | yes | x | ||
| Training | blue | manual | yes | yes |
Time Entry Log
If a user role is given only the Staff > Time Management resource from the role resources tree, then their time will still be logged, but they will be unable to view the Time Entry Log.
If you wish to let the user see their Time Entry Log, follow these steps:
- Navigate to System > Users and go to User Roles and select which role you wish to enable the Time Report feature.
- In the User Role view, select Role Resources from the left side menu.
- Scroll down until you find Operations > Staff > Time Entry Log and check the box next to Time Entry Log.
- You may not want the user to edit their time log. To disable this, un-check "Edit Entries".
This feature allows staff user reports to show up in Operations > Staff > Time Entry Log

If an administrative user wishes to make changes to the user's Time Entry Log, this can only be done by first allowing the "Edit Entries" permission under Time Entry Log.
Time Reports
Time Reports allow an administrative user to see a snapshot of time logs from a specific date range. Furthermore, a filter can be applied to only display staff members of a specific group, status, or modifier. This feature allows staff user reports to show up in Operations > Staff > Time Reports
Enable Time Report for the user role using the following steps:
- Navigate to System > Users and go to User Roles and select which role you wish to enable the Time Report feature.
- In the User Role view, select Role Resources from the left side menu.
- Scroll down until you find Operations > Staff > Time Report and check the box next to Time Report.
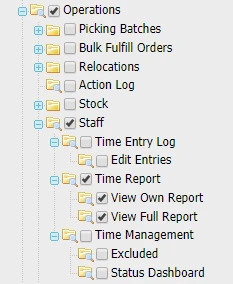
Administrators can choose whether or not staff users can View Own Report or other user time reports using View Full Report.
To view the reports, follow these steps:
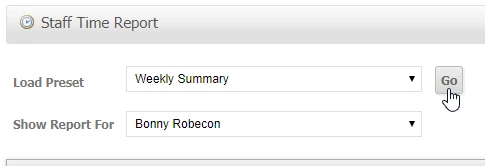
- Navigate to Operations > Staff > Time Reports.
- Specify the criteria for the time report you wish to view.
- Click Show Reportto apply any filters you may have set.
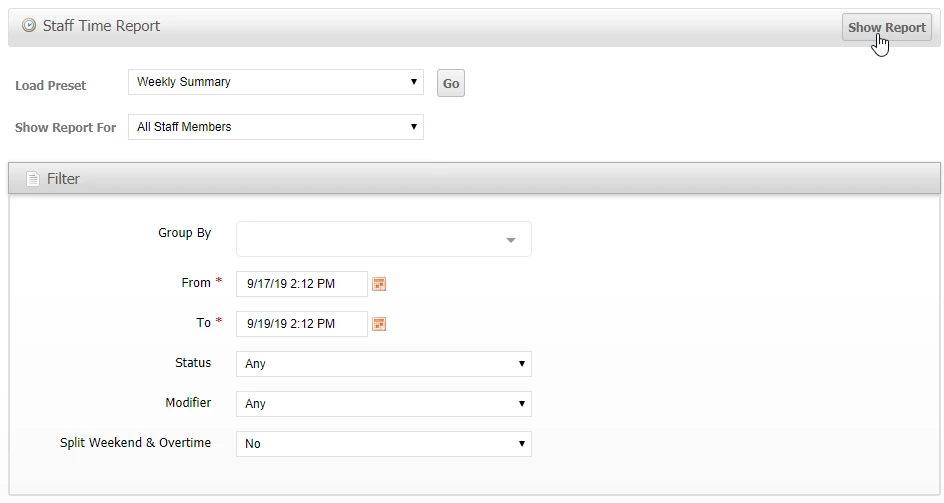
If you wish to display a report without the Filter form, then clicking Go will generate a weekly summary of the last completed work week from 12:00:00 AM Monday to 11:59:59 PM Sunday.