Table of Contents
Import Locations, Lots and Inventory
Summary. The Locations Import tool can be used to facilitate adding/updating data contained at a Location. Common uses are: Setting up a new warehouse. Onboarding a warehouse currently in use. Moving…

Summary
The Locations Import tool can be used to facilitate adding/updating data contained at a Location.
Common uses are:
- Setting up a new warehouse
- Onboarding a warehouse currently in use
- Moving out of one warehouse and into a new warehouse
- Updating/adding Lot Info to specific Locations containing Products that have a Lot Type
- Assigning Location Types to Locations directly when not using Auto Assignment
Import Locations
The Import Locations tool is located in Operations > Warehouse > Locations. This will display the Locations grid. The Import tool is in the upper right. Using the Import button will display a new view which has a form to select a warehouse and upload a file containing the data for the import.
The Warehouse selection is used to set the warehouse to which the import file data will be applied, or you may choose "-- Specified in import file --" to use a column named Warehouse in the import file to specify the warehouse. This technique can be used to transfer inventory from one warehouse to another in a single transaction to avoid temporarily overstating or understating inventory.
Use the Location Import tool to update/create one or more of:
- Location Label
- Assigned Product (by SKU or Barcode)
- Quantity on hand
- Location Type
- Lot/Expiration Info
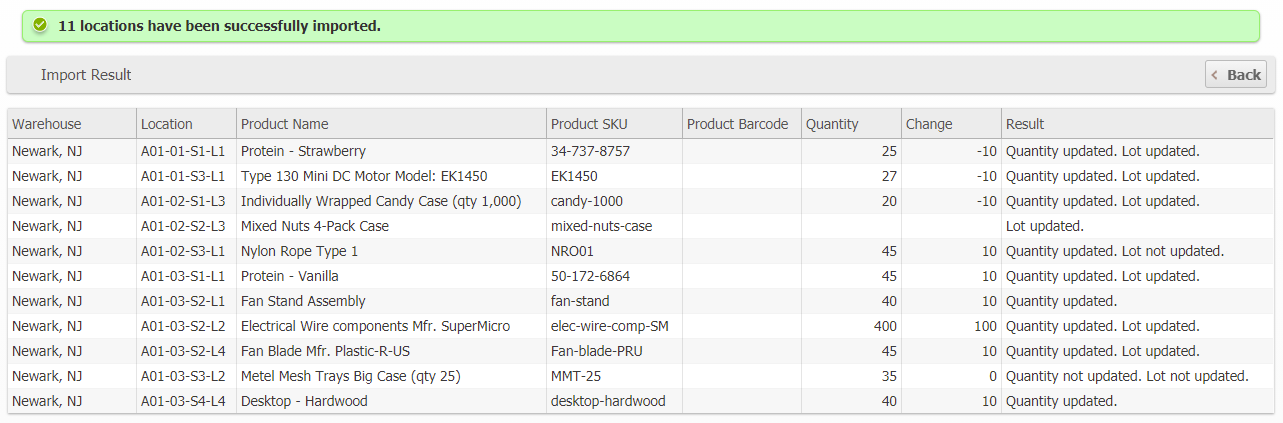
Importing will provide info on each Location, providing result info on whether there were issues, updates, or no changes.
The Import Locations file
The Import Locations file type can be: CSV (.csv), Microsoft Excel XML (.xml), or Microsoft Excel (.xlsx). The supported column names are described below.
Warehouse
The name or ID of the warehouse. This should only be specified if the '-- Specified in import file --' option was chosen for the Warehouse field when importing.
Location
The Location's Label. This field is always required. The same label can only be specified once per Warehouse.
SKU
The Product's SKU.
Barcode
The Product's Barcode
Quantity
The quantity on hand at the location. Required when updating the quantity at a Location.
Location Type
The name or ID of the Location Type to which the location should be assigned.
Use "0" or "Automatic" to use Auto-Assignment.
If not specified, the Location Type will not be updated for existing locations, and will be set to Automatic for new locations.
Lot/Expiration Info
Lot/Expiration info columns can be mixed and matched as needed. Depending on the Lot Types used by the Product at the different Locations will guide which columns to use and which Locations need will need values in a column. See the example section for an example updating multiple different Lot Types on different Products.
Lot ID
The ID for a Lot that already exists within the System. Can be found on the Lots/Expirations grid. This ID can also be viewed when hovering over a Location row on a Product's Inventory tab.
Lot Number Input
The Lot Number as it would be typed or scanned into the System. This column's data will be processed by the Lot Type's Lot Number Pattern and Replacement pattern.
Lot Number
The Lot Number as it would be if after going through the Lot Type's Lot Number Pattern and Replacement pattern. The difference between this and the Lot Number Input depends on how the Lot Type is set up to parse raw input so these values may or may not be the same.
Expiration Input
The Expiration Date as it would be typed or scanned into the System. This column's data will be processed by the Lot Type's Expiration Date Pattern and Replacement pattern.
Expiration Date
The Expiration Date as it would be formatted after going through the Lot Type's Expiration Date Pattern and Replacement pattern.
i.e.: Location "AA" cannot have both Lot Number Input and Lot Number values filled.
Origination Date
The Origination Date is normally set when the product's Delivery is Accepted into the warehouse.
-
m/d/yyyy or m-d-yyyy-
yyyy/m/d or yyyy-m-dScenarios:
Setup an existing warehouse for use with ShipStream:
Onboarding an existing warehouse could take several routes depending on data gathered. Keep in mind that all the data does not need to be imported at the same time. i.e.: If Lot Info is not known but the Locations' Labels, Products, and quantity are known.
Setup Locations for a new warehouse:
Setting up a new warehouse will typically just need to mass create the Locations.
Update Lot Info on Locations:
Specific Lot Info can only be updated on Lot Types that track said info.
i.e.: An Expiration only Lot Type will not allow a Lot Number (Input) value.
There are several usable combinations to update the Lot Info on a Location.
- Situations where the current Location should have the same Lot ID that is being used at another Location. It may be easier to set the Location by including just this column.
- If there is any sort of scannable Lot Info or where the Lot Info is manipulated by one of replacement patterns in the Lot Type; use the "input" columns to enter the Lot Info.
- How the info is gathered will best determine which columns should be used.
- Using the Location Export to get a jump on the desired Locations, then manipulating the file to include the Lot Info
- Using a scanner to scan the Location, Product and Lot Info into an in between file
- When in doubt use the "input" column headers to make sure any manipulation in the Lot Type if performed.
Examples/Files:
Mixed example using various columns to achieve the desired update:
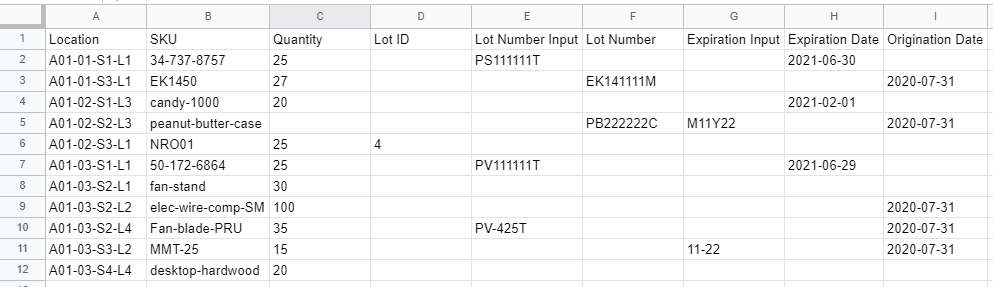
- Example from above:
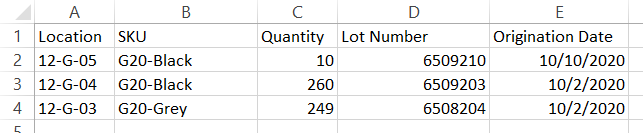
- Only Updating Lot Info:
- All Header Columns (not all headers may be required or used together, delete the ones you don't need):
How did we do?
Relocations
Assets