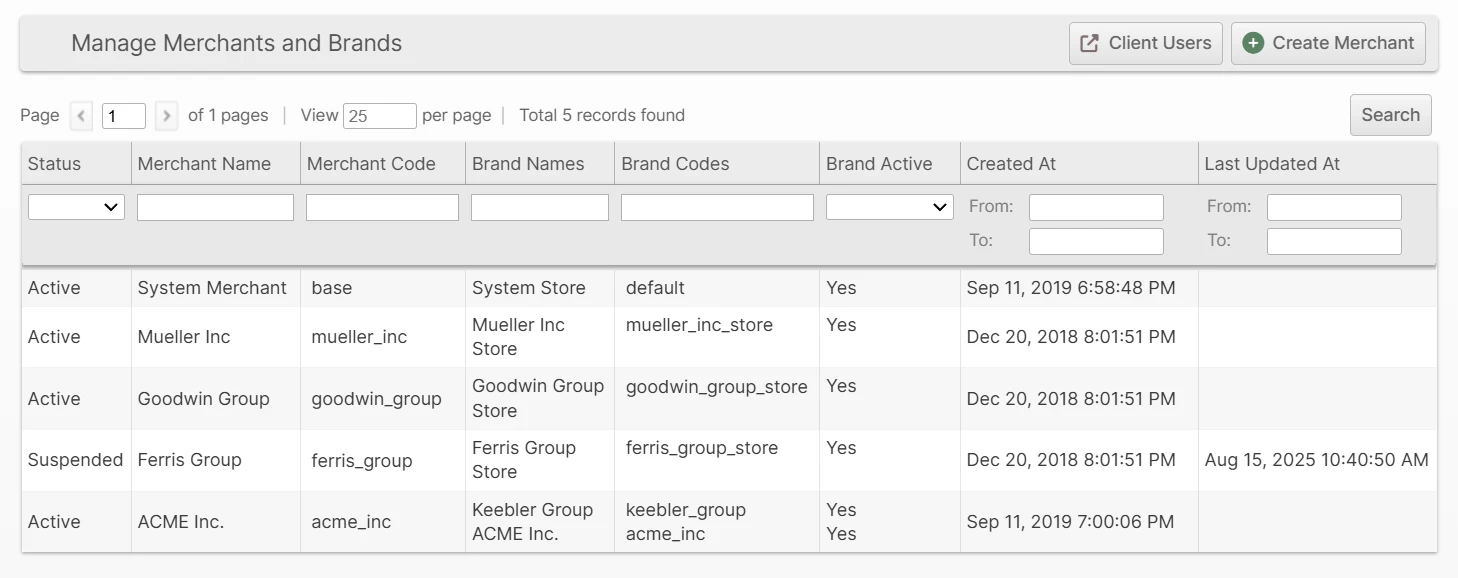
Merchants and Brands
Every Merchant in ShipStream has a separate "pool" of Products, Orders, ASNs, RMAs, and Work Orders. The unique identifiers for these (SKU, Order #, etc.) need only be unique for a given Merchant. For example, one Merchant may only have one SKU "A" but another Merchant may also have a SKU "A" and these will not conflict with one another in any way.
For 3PLs, the Admin UI will see all data across all Merchants while the Client UI will only show data pertaining to the Merchant that the user belongs to. So, of course, it will never allow one Merchant to see the data belonging to another Merchant. Only 3PL Admin users may create additional Merchants.
If a Merchant needs to operate with multiple brand names (or other channels, markets, etc) but sell from the same pool of inventory, they may use any number of Brands that are assigned to the same Merchant.
Each Brand can have uniquely customized configurations such as Packing Slip Design, Integrations, etc. A Merchant must have at least one Brand to receive Orders, and can have any number of Brands within reason. See Configuration Scope for more information on how to set configuration differently for different merchants and brands.
To manage Merchants and Brands, navigate to System -> Merchants and Brands.
Create a Merchant
- Click Create Merchant in the upper right corner of the main window.
- Input the Name of the Merchant.
- Fill in the Code field (this may be used by integrations to identify this merchant and so you should avoid ever changing it).
- Click Add Brand for each brand you wish to add and fill in the Name and Code for the Brand. Choose Active and Default as appropriate.
- Click Save.
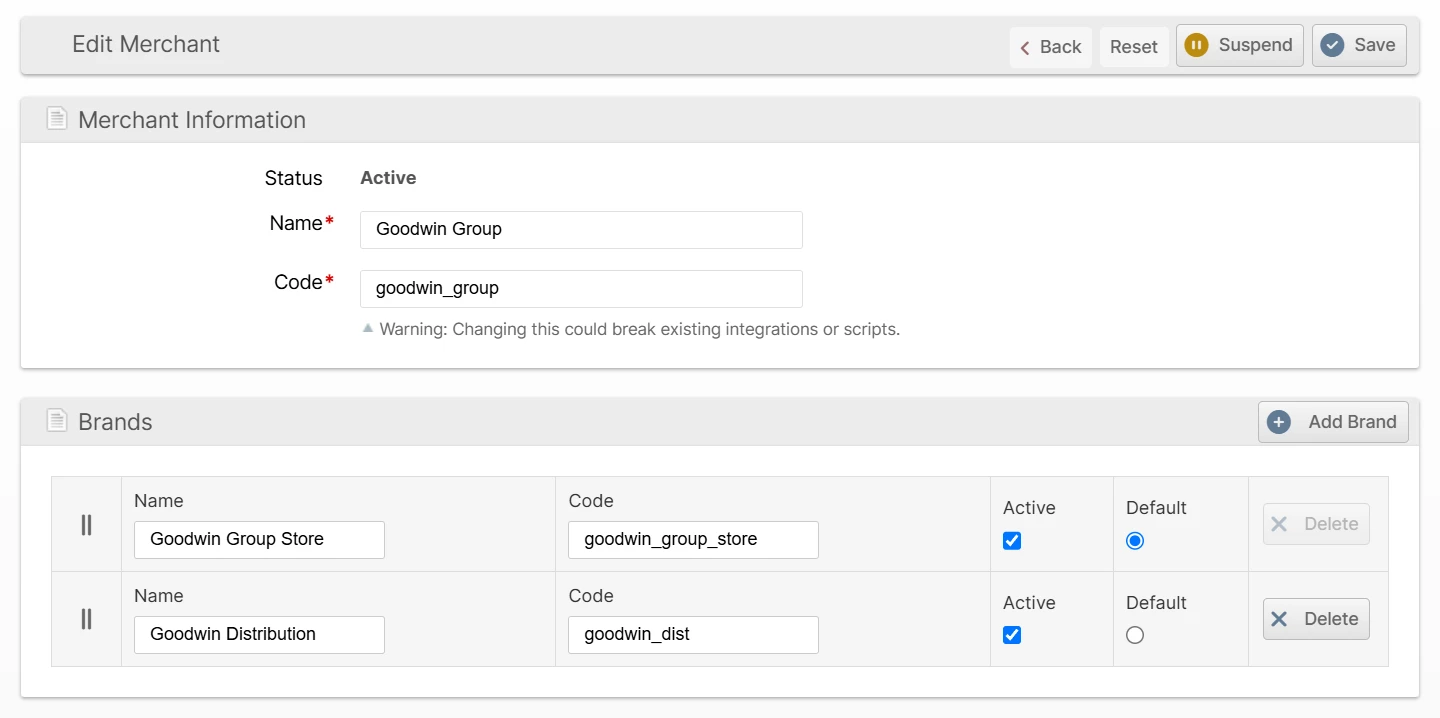
Create a Brand
- Select an existing Merchant from the list on the System -> Merchants and Brands grid.
- Click Add Brand.
- Fill in the Name and Code field (this may be used by integrations to identify this brand and so should never be changed) and select Active and Default as appropriate.
- Click Save to save the Merchant and all brands that were added.
Merchant Lifecycle
ShipStream's enhanced merchant status system provides unprecedented control over your client relationships, allowing you to manage everything from seasonal slowdowns to complete account closures with precision and professionalism.
Merchant Statuses
🟢 Active Status Your merchants operate at full capacity with complete access to all ShipStream features. This is the standard operational state where orders flow seamlessly, integrations work perfectly, and your clients have full control over their fulfillment operations.
🟡 Suspended Status - The Gentle Pause Perfect for temporary situations like payment issues or seasonal breaks. Suspended merchants retain their data and configurations while operations are safely paused. Your team maintains full administrative control for emergency situations, but day-to-day operations are restricted to prevent new commitments during the suspension period.
Ideal for: Payment disputes, temporary capacity constraints, seasonal merchants requesting holds, or clients undergoing internal transitions.

🟠 Inactive Status - Professional Offboarding Designed for merchants who are no longer active but may return in the future. This status ensures clean separation while preserving the possibility of reactivation. All integrations are properly disconnected, preventing error notifications, while maintaining data integrity for potential future use.
Ideal for: Completed client relationships, businesses on extended hiatus, or merchants transitioning to other solutions with potential for return.

🔴 Archived Status - Complete Closure The most comprehensive closure option, requiring special permissions. Archived merchants are entirely removed from operational views while maintaining historical data for compliance and reporting purposes. All active orders, deliveries, put-aways, work orders and relocations must be completed or voided before deactivation. All products, packaging features, scripts, shipping accounts, third-party billing groups, merchant rates, and webhooks are deactivated automatically upon deactivation.
Ideal for: Permanent client departures, legal requirements for data separation, or complete business closures.
Smart Operational Controls
Automated Safety Measures The system prevents accidental data loss by requiring cleanup of all open orders, deliveries, and work orders before allowing transitions to Inactive or Archived status. This ensures no customer orders are left in limbo during status changes.
Integration Management Each status level automatically manages third-party integrations appropriately. Suspended accounts pause integrations safely, while Inactive accounts properly disconnect webhooks and API connections to prevent error notifications and maintain clean integration logs.
User Access Control Client user access is managed intelligently based on merchant status. Suspended merchants allow login but prevent destructive actions, while Inactive merchants block client access entirely, ensuring clean operational boundaries.
Feature Matrix
| Feature/Operation | Active | Suspended | Inactive | Archived |
|---|---|---|---|---|
| API Access | ||||
| Merchant API calls | ✅ Full | ❌ 403 Forbidden | ❌ Blocked | ❌ Hidden |
| Global API access | ✅ Full | ✅ Full | ✅ Admin only | ❌ Hidden |
| User Access | ||||
| Client user login | ✅ Yes | ✅ Yes | ❌ No | ❌ No |
| Client view data | ✅ Yes | ✅ Yes | ❌ No | ❌ No |
| Client update data | ✅ Yes | ❌ No | ❌ No | ❌ No |
| Admin UI access | ✅ Full | ✅ Full | ✅ Limited | ❌ Hidden |
| Operations | ||||
| Scanner UI operations | ✅ Yes | ❌ Blocked | ❌ Blocked | ❌ Hidden |
| Receiving operations | ✅ Yes | ✅ Admin only | ❌ No | ❌ Auto-voided |
| Shipping operations | ✅ Yes | ✅ Admin only | ❌ No | ❌ Auto-voided |
| Order processing | ✅ Yes | ✅ Admin only | ❌ No | ❌ Auto-voided |
| Batching & Fulfillment | ||||
| Normal batching/BFO | ✅ Yes | ❌ Excluded | ❌ No | ❌ No |
| Mass action batches | ✅ Yes | ✅ Admin only | ❌ No | ❌ No |
| Picking batch inclusion | ✅ Yes | ❌ Excluded | ❌ No | ❌ No |
| Integrations | ||||
| Active webhooks | ✅ Yes | ❌ Deactivated | ❌ Deleted | ❌ Deleted |
| Plugin subscriptions | ✅ Yes | ✅ Yes | ❌ Deactivated | ❌ Deleted |
| Notifications | ||||
| Status update emails | ✅ Yes | ❌ No | ❌ No | ❌ No |
| Order notifications | ✅ Yes | ❌ No | ❌ No | ❌ No |
| Delivery reports | ✅ Yes | ❌ No | ❌ No | ❌ No |
| Visibility | ||||
| Main merchant filter | ✅ Yes | ✅ Yes | ❌ Hidden | ❌ Hidden |
| Grid column options | ✅ Yes | ✅ Yes | ✅ Separate group | ❌ Hidden |
| System configuration | ✅ Yes | ✅ Yes | ❌ Hidden | ❌ Hidden |
| Global search | ✅ Yes | ✅ Yes | ✅ Limited | ❌ Hidden |
| Data Management | ||||
| Create new entities | ✅ Yes | ❌ Client blocked | ❌ No | ❌ No |
| Edit existing entities | ✅ Yes | ❌ Client blocked | ❌ Admin only | ❌ No |
| Products/Packaging Features | ✅ Active | ✅ Active | ✅ Active | ❌ Disabled |
| Shipping accounts | ✅ Active | ✅ Active | ✅ Active | ❌ Deactivated |
| Status Transitions | ||||
| Can suspend | ✅ Yes | - | - | - |
| Can resume | - | ✅ Yes | - | - |
| Can deactivate | - | ✅ Yes | - | - |
| Can activate | - | - | ✅ Yes | - |
| Can archive | - | - | ✅ Yes* | - |
| Can unarchive | - | - | - | ✅ Yes* |
*Requires the "Archive Merchants" special permission
Brand Statuses
A Brand may be either Active or Inactive. An inactive Brand cannot receive new orders.
One Brand for each Merchant is designated as the Default brand. This is the brand that will be chosen by default when an order is submitted via the API without a specific brand code.