Table of Contents
Locations
Summary. A Location in ShipStream represents a barcoded location in the warehouse which may or may not be assigned to one product (SKU). If assigned to a product, the quantity contained in a location…

Summary
A Location in ShipStream represents a barcoded location in the warehouse which may or may not be assigned to one product (SKU). If assigned to a product, the quantity contained in a location is tracked in three statuses:
- Put-Away (put-away inventory associated to a Delivery, but not yet committed to inventory)
- Unreserved (not yet assigned to a specific Shipment - does not imply that the inventory is Available)
- Reserved (assigned to a Shipment - waiting to be picked)
Locations can be created on the fly during Put-Away or Relocation operations, and also using "Assign Location" on a Product's Inventory tab. You can also import locations along with their quantity on the shelf using the "Import" button from the Locations grid.
Location Fields
Warehouse
The warehouse that this Location is at.
Label
The name of this Location. This is also the Barcode that will be scanned for Picking and Put-Away. When making Barcodes for Locations add the prefix L: to the beginning of the Label in order create scan-able Location Barcodes. i.e.: Label is A01-W01-A1s the encoded barcode needs to be L:A01-W01-A1s.
Rack
The Rack to which this Location belongs. If this Location Label does not match any Rack Location Patterns then this Location will be assigned to the "Default" rack.
Location Type
Each Location must be assigned to one Location Type at all times. The Location Type can be assigned automatically using pattern matching or manually.
Priority
The Priority is for determining the inventory reservation order relative to other locations containing the same product. The Priority can be set when editing a Location or by using the arrows in a Product's Inventory tab. Pickable locations will always have a higher priority (lower number) than non-pickable locations.
Location Naming Tips
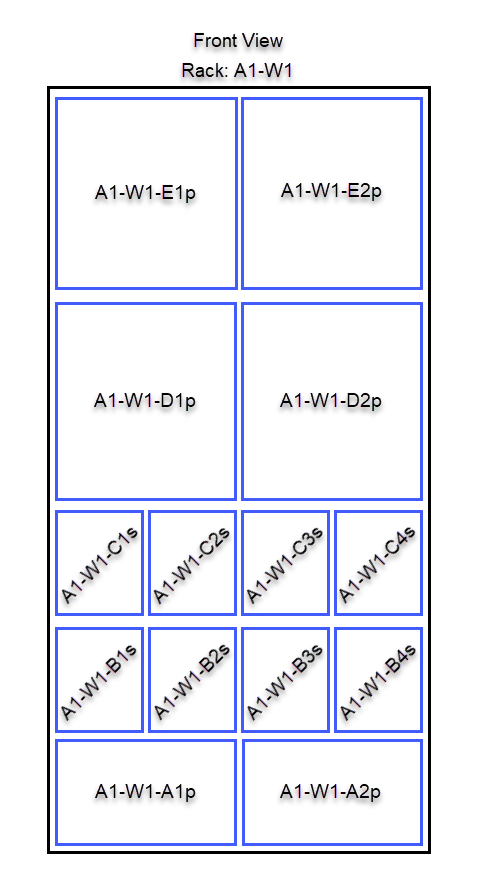
It can be helpful to create maps of the Types of Racks your warehouse will use. Creating side views of your different rack designs will help plan your Locations labels and set your patterns as described above.
Below is a sample design for a Rack with 5 levels. The first level is for short pickable pallets, level 2 and 3 are pickable shelves and the top two levels are for non-pickable pallets. In this example we have a Rack named "A1-W1" and the rack's Location Pattern is A1-W1-% so that it matches all locations prefixed with A1-W1 so that these locations will automatically be assigned to this rack.
To allow for easier patterns to be created take into consideration padding the length of your Location Labels to make them all a consistent length of characters. e.g.:
- A1-W1-A1s — 9 characters
But without padding that would only cover a small warehouse because aisle 10 would increase the length. e.g.:
- A10-W1-A1s — 10 characters
The same would happen if the aisle was longer then 9 racks, so that should be padded with zeros as well. e.g.:
- A01-W01-A1s — 11 characters
The reason this padding will help is when creating the patterns to automatically set a Location as Pickable and or as a Pallet we can create RegEx Patterns. It is easier to write a pattern if you're not having to also take into account that sometime the pattern is,(using 'c' for character and 'd' for digit ), 'cd-cd-cd' and sometimes is 'cdd-cdd-cdc' but instead is always 'cdd-cdd-cdc'.
Tags
Locations can be tagged with color-coded labels for categorization, filtering, and bulk operations. Tags are managed per entity type at System → Tags and stored as a JSON array on the location record with a multi-value index for efficient filtering.
Creating Tags
Navigate to System → Tags to manage tags. The page uses a tabbed layout with one tab per entity type (currently Locations). Within each tab you can:
- Add a tag with a name, color (from the Product Tiers color palette), and optional description.
- Reorder tags by dragging rows.
- Edit a tag by clicking its row to open a dialog with Name, Color, and Description fields.
- Delete a tag (soft-delete). Deleted tags are dimmed and can be restored.
A separate System → Tags permission controls access to tag management.
Assigning Tags to Locations
On the Edit Location page, a Tags multi-select field appears after Location Type. The field uses color swatches for easy identification and supports multiple selections. If a tag has been deleted, it appears as a dimmed badge that can be removed. The Tags field is hidden when no Location tags exist.
Locations Grid
A Tags column displays colored badges in the Locations grid. The column supports multi-select filtering — select one or more tags to find matching locations. The column is hidden automatically when no Location tags have been defined.
Mass Actions
Three mass actions on the Locations grid enable bulk tag management:
- Add Tags — merges selected tags into each location's existing tags.
- Remove Tags — removes selected tags from each location.
- Replace Tags — replaces all existing tags with the selected set.
All three present a multi-select field with color swatches, consistent with the edit form.
Import Support
The Location Import CSV/XLSX format supports three new columns:
- Add Tags — comma-separated tag names to merge with existing tags.
- Remove Tags — comma-separated tag names to remove.
- Replace Tags — comma-separated tag names to replace all existing tags. Use
-orNULLto clear all tags.
Tag name matching is case-sensitive and whitespace-tolerant. Imported tags appear in the import result grid for verification.
How did we do?
Racks
Location Types