Receiving Services
Receiving Services enable you to track value-added services performed during the receiving process. This functionality allows warehouse staff to quickly quantify the additional services they provided…

Receiving Services enable you to track value-added services performed during the receiving process. This functionality allows warehouse staff to quickly quantify the additional services they provided while processing an ASN or RMA, without leaving the Processing UI. To ensure consistency, you can configure your Receiving Services require specific user interaction to avoid the possibility of human error in forgetting to record the services provided.
The operational benefits of this feature are:
- Better documentation of value-added work performed during receiving
- Improved visibility into service frequency and volume across deliveries
- Enhanced ability to analyze service patterns by merchant, delivery type, or container type
- Streamlined process for recording services during your normal workflow
- Consistent tracking of services that previously may have been noted inconsistently or not at all
The feature specifically provides:
- Ability to define your own services directly from the Receiving -> Services menu (Admin users only)
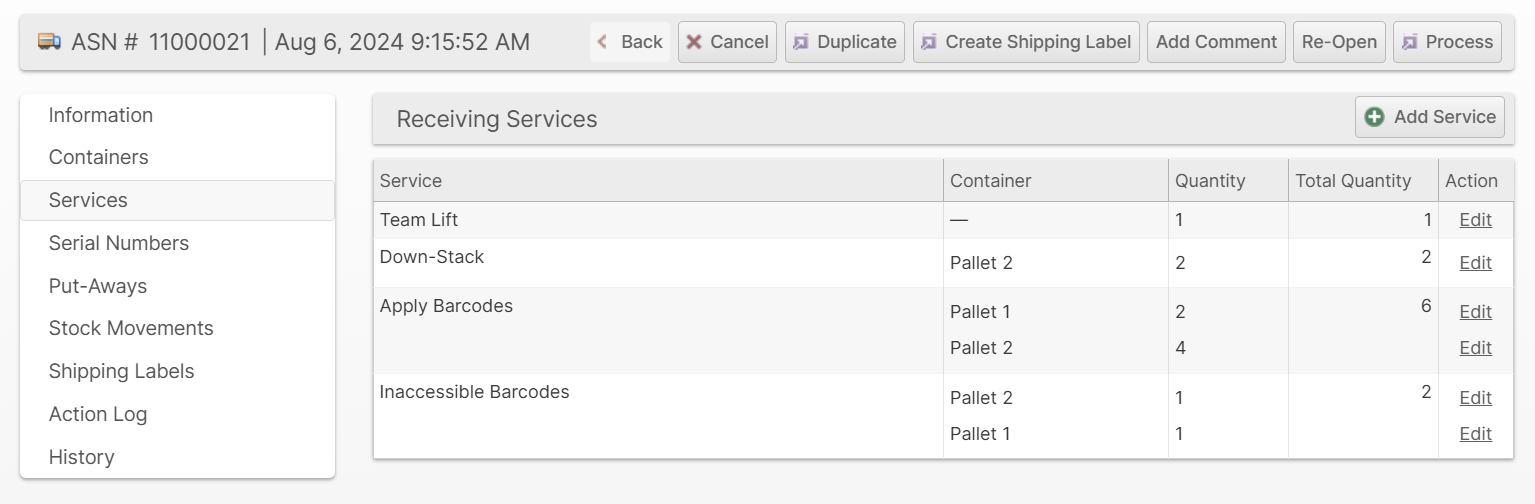
- A Services tab on the delivery page showing all applied services
- Export capabilities for captured data in CSV and Excel formats
- Integration of the service history into the existing delivery History tab
Create a Receiving Service
- Navigate to Receiving -> Services.
- Click Add Receiving Service at the top right.
- Choose which Merchant will "own" this Receiving Service.
- Fill in the remaining form fields and click Save. The form fields are described in more detail below.
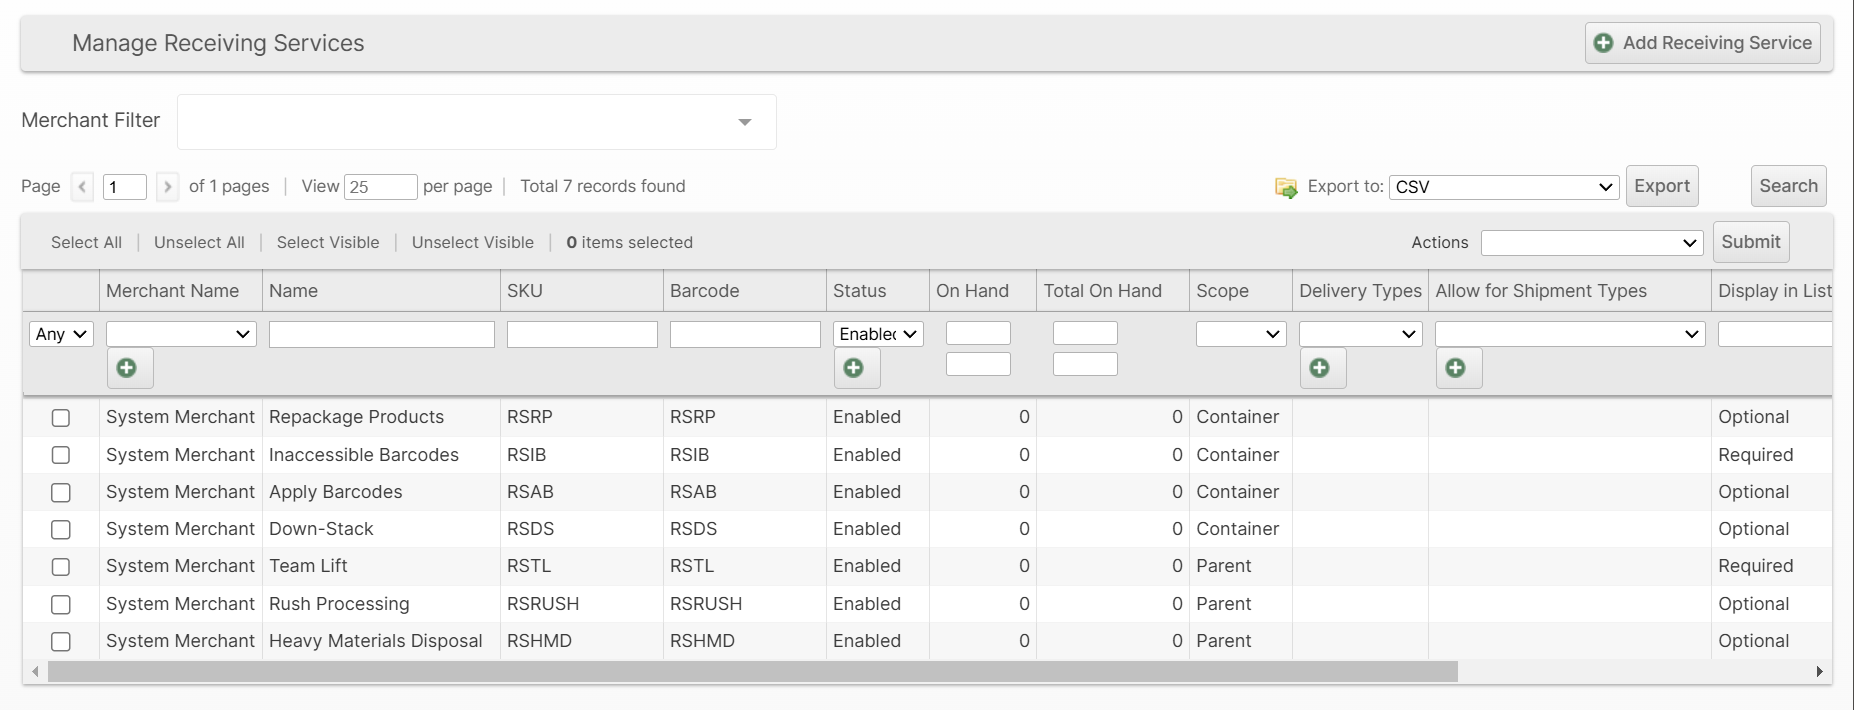
Once a Receiving Service has been created successfully, it can be viewed in the Receiving Services grid.
When services have been recorded for a delivery, they are visible in the Services tab on the delivery page and can also be exported from the appropriate grid.
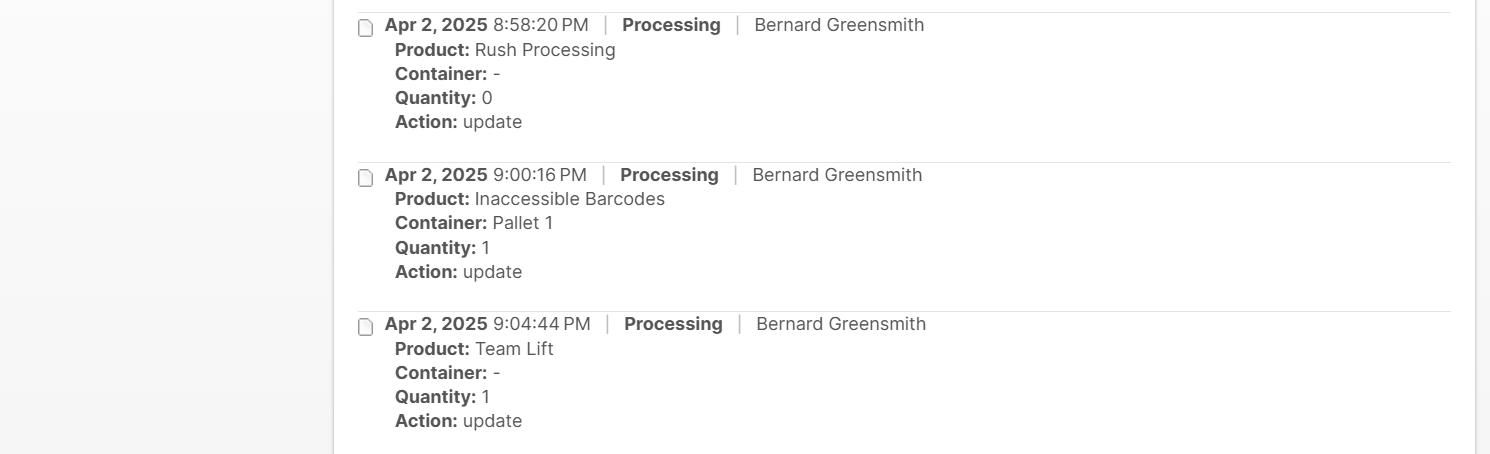
The record for every update to a receiving service is shown in the History tab:
Receiving Service Attributes
You control the behavior of the Receiving Services system by setting attributes on each one according to your needs.
Name
The name will appear throughout the system wherever users must interact with services.
SKU
Although it is optional to manage inventory for services, you must provide a unique SKU for each one.
Barcode
Barcodes for services are optional, but may be useful if your receiving process involves a way to scan barcodes for your services.
Scope
A service can apply to either the delivery as a whole (Parent) or to each specific container (Container). This cannot be changed once it is set.
Delivery Types
If specified, this receiving service will only be applicable to the selected delivery types.
Allow for Shipment Types
If specified, this receiving service will only be applicable to the selected shipment types. This only applies to ASNs.
Allow/Disallow for Merchants
If specified, this receiving service will only be applicable to the selected merchants (Allow) or applicable to all except for the selected merchants (Disallow). The Allow and Disallow options are mutually exclusive.
Display in List
This determines the behavior of the services during processing.
- Optional -> The service is visible, but data entry is not required
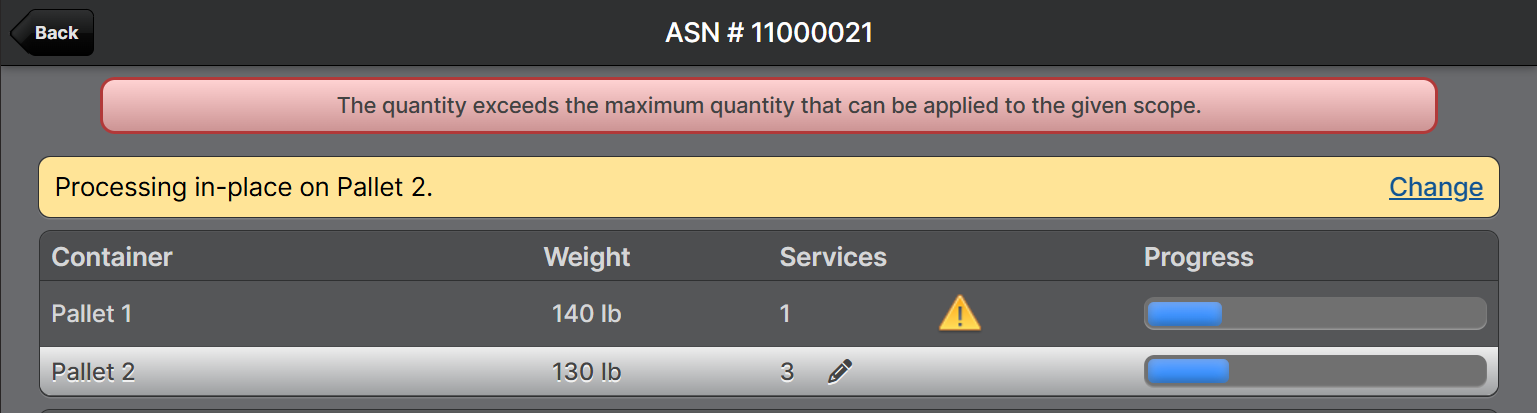
- Required -> The service is visible and must be given a non-empty value to finish processing. Note that 0 is still allowed when the service is Required, but a 0 must be entered explicitly.
- Hidden -> The service can be added via the Admin UI, but does not appear in the normal list of services in the Scanner UI.
Example showing Optional vs Required services:
Auto-Prompt
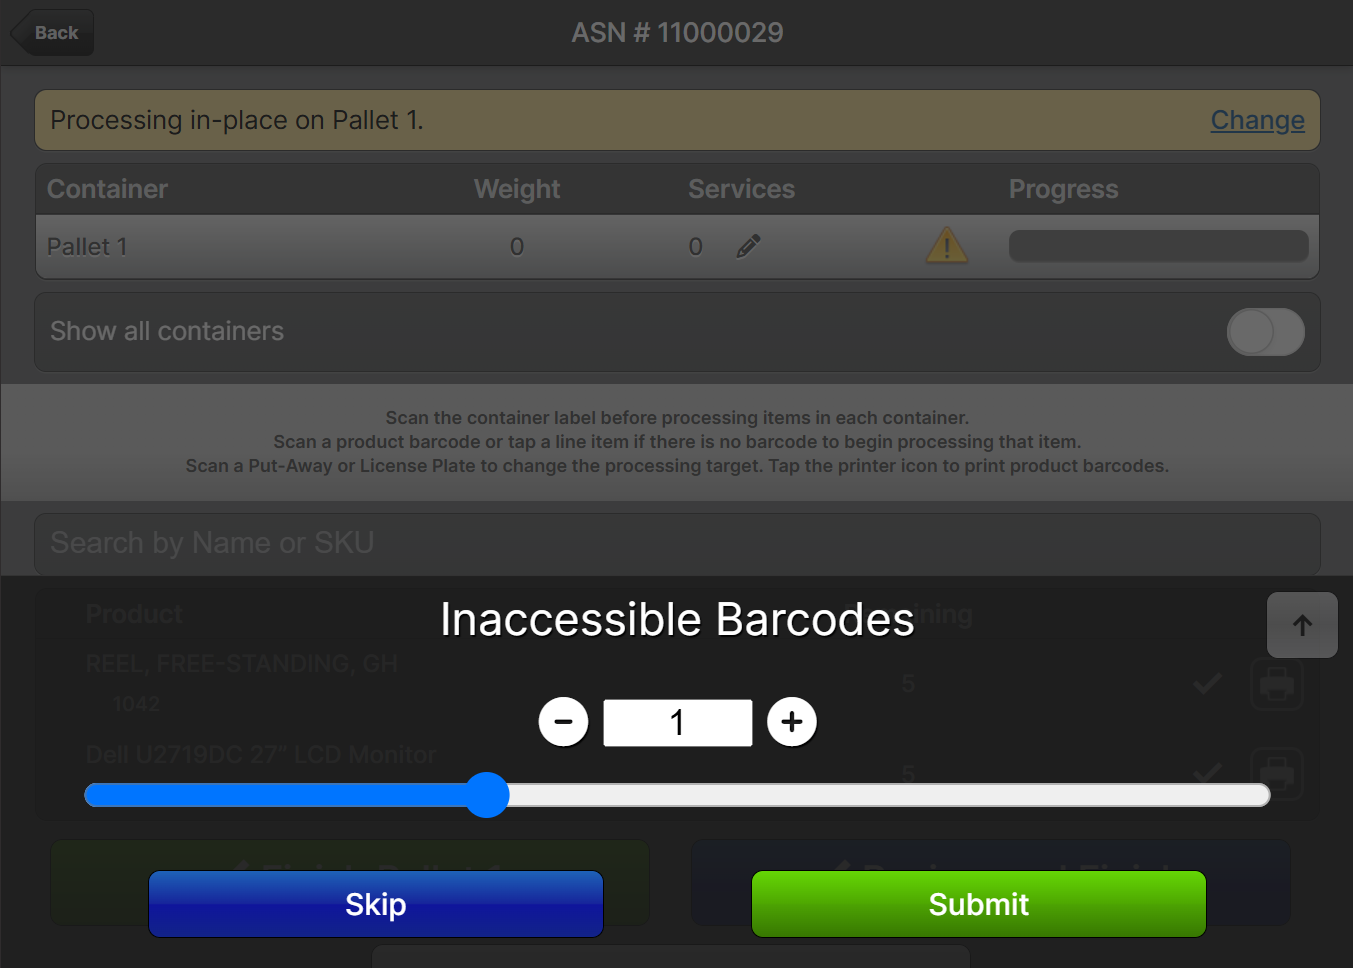
If On Start is chosen, the user will be prompted to specify the quantity at the beginning of the processing workflow.
Example prompt when starting processing:
Maximum Value
The maximum quantity that can be applied to the given scope. For example, specify 1 for a "yes/no" type service.
Using Receiving Services
Receiving Services can be added any time during Processing in the Scanner UI or during and after for the Admin UI.
Admin UI - not Processing
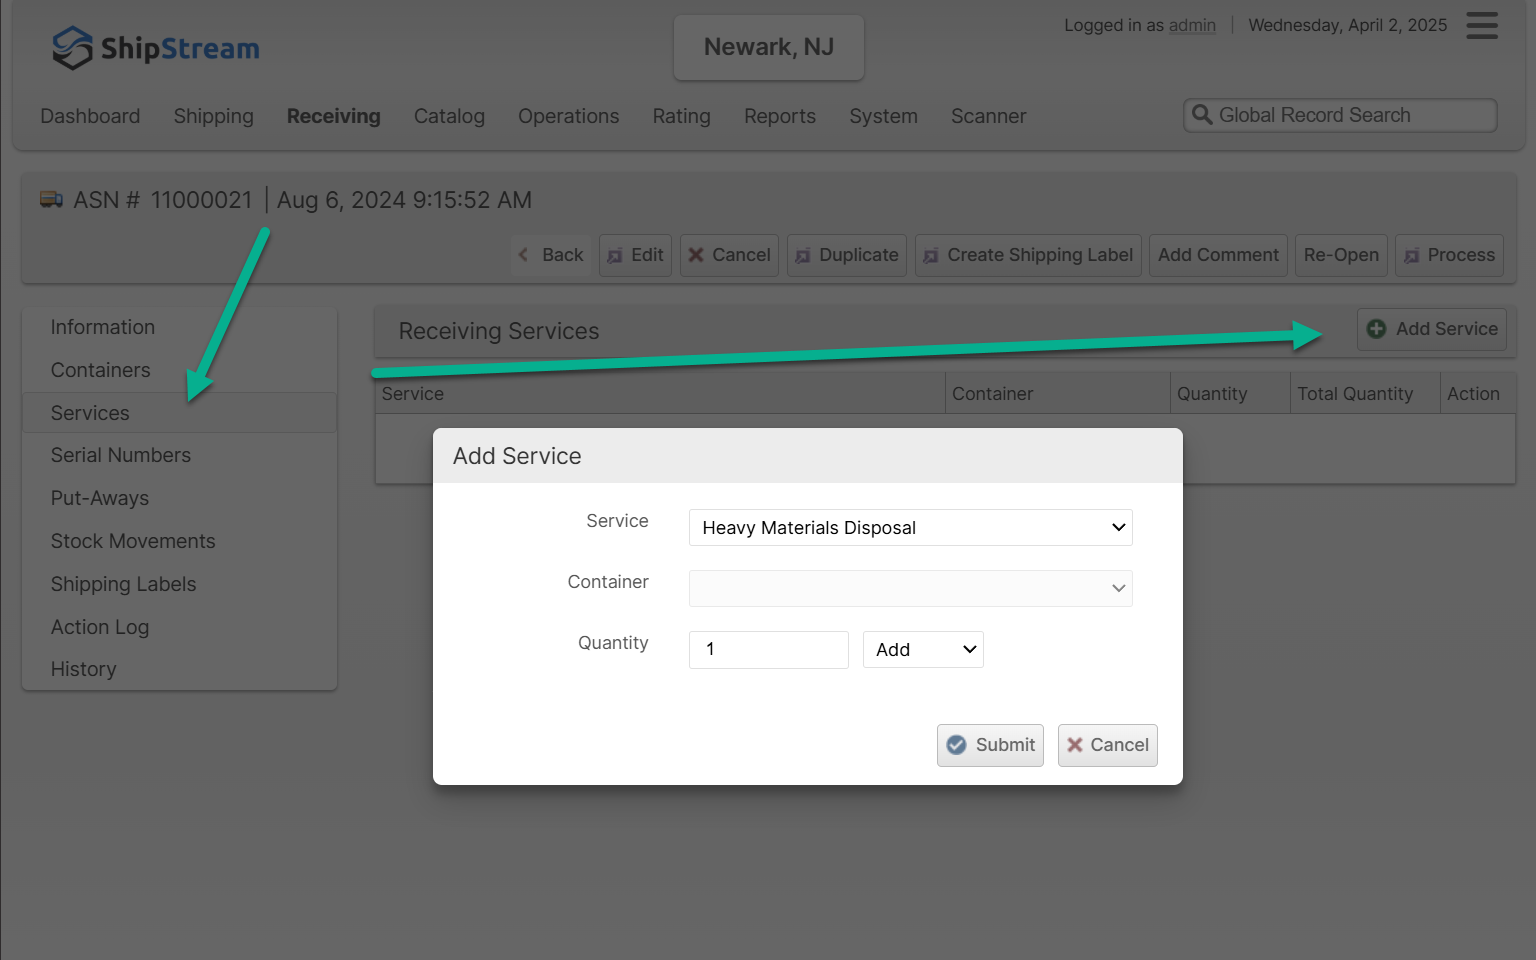
- Navigate to Receiving -> ASN, RMA or Other Delivery and locate the appropriate delivery
- Click on the Services tab
- Click Add Service
- Choose the Service and Container (if appropriate)
- Enter a number in the Quantity field and choose if you want to Add this to the existing amount, Subtract from the existing amount or Substitute the existing amount for the new amount.
- Click Submit
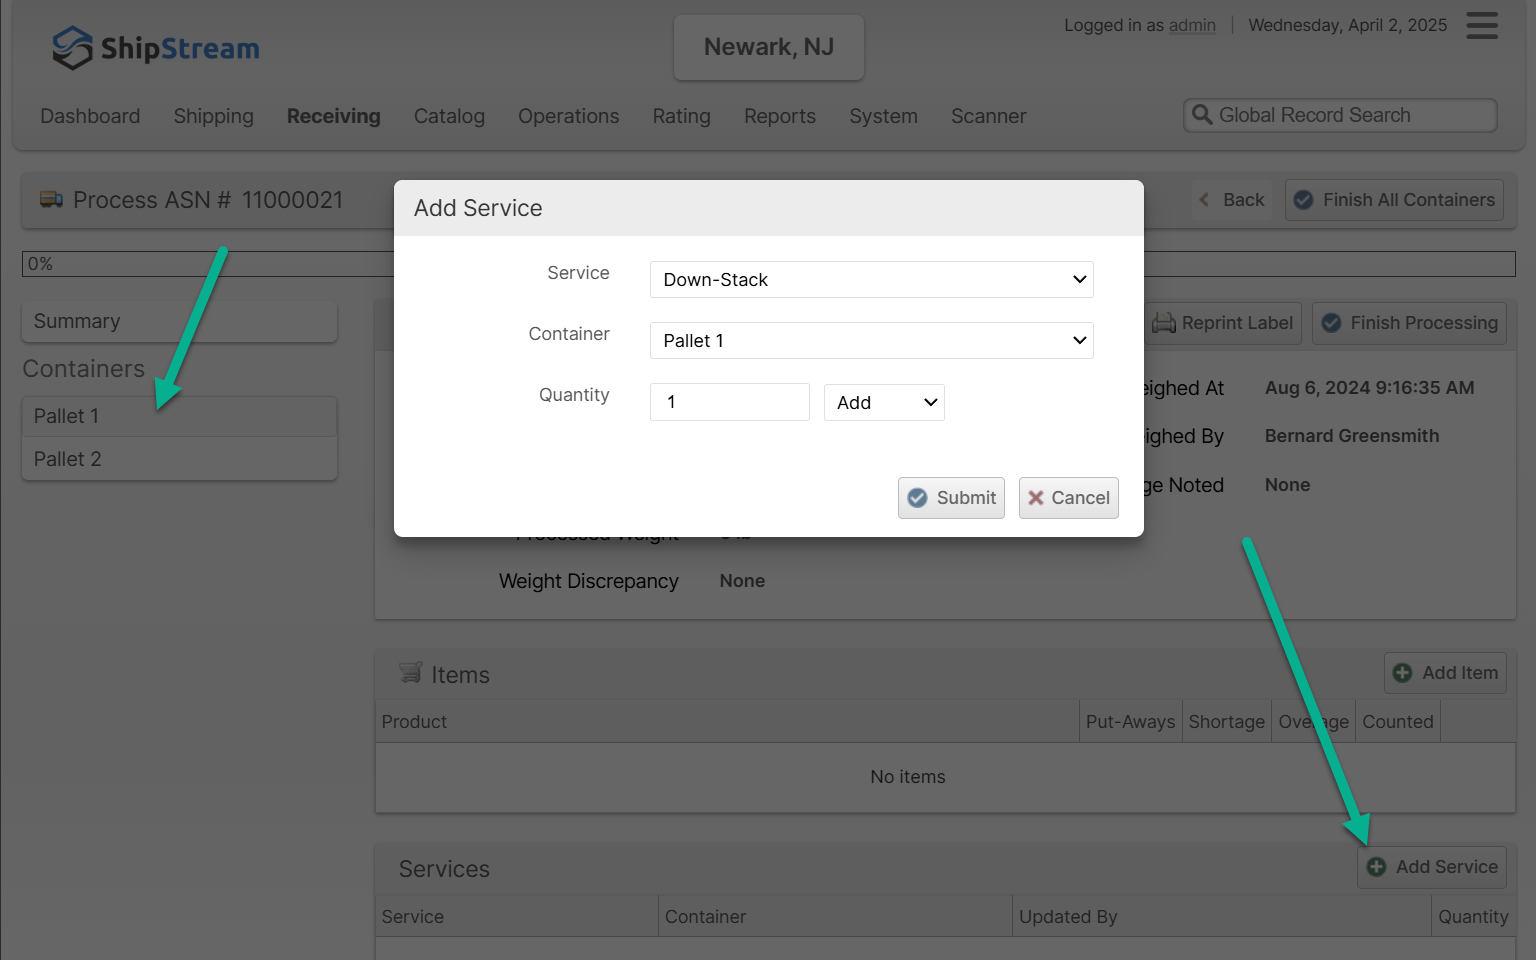
Example adding one unit of a Scope: Parent service:
Admin UI - Processing
Similar to above, you can add services from the Process page.
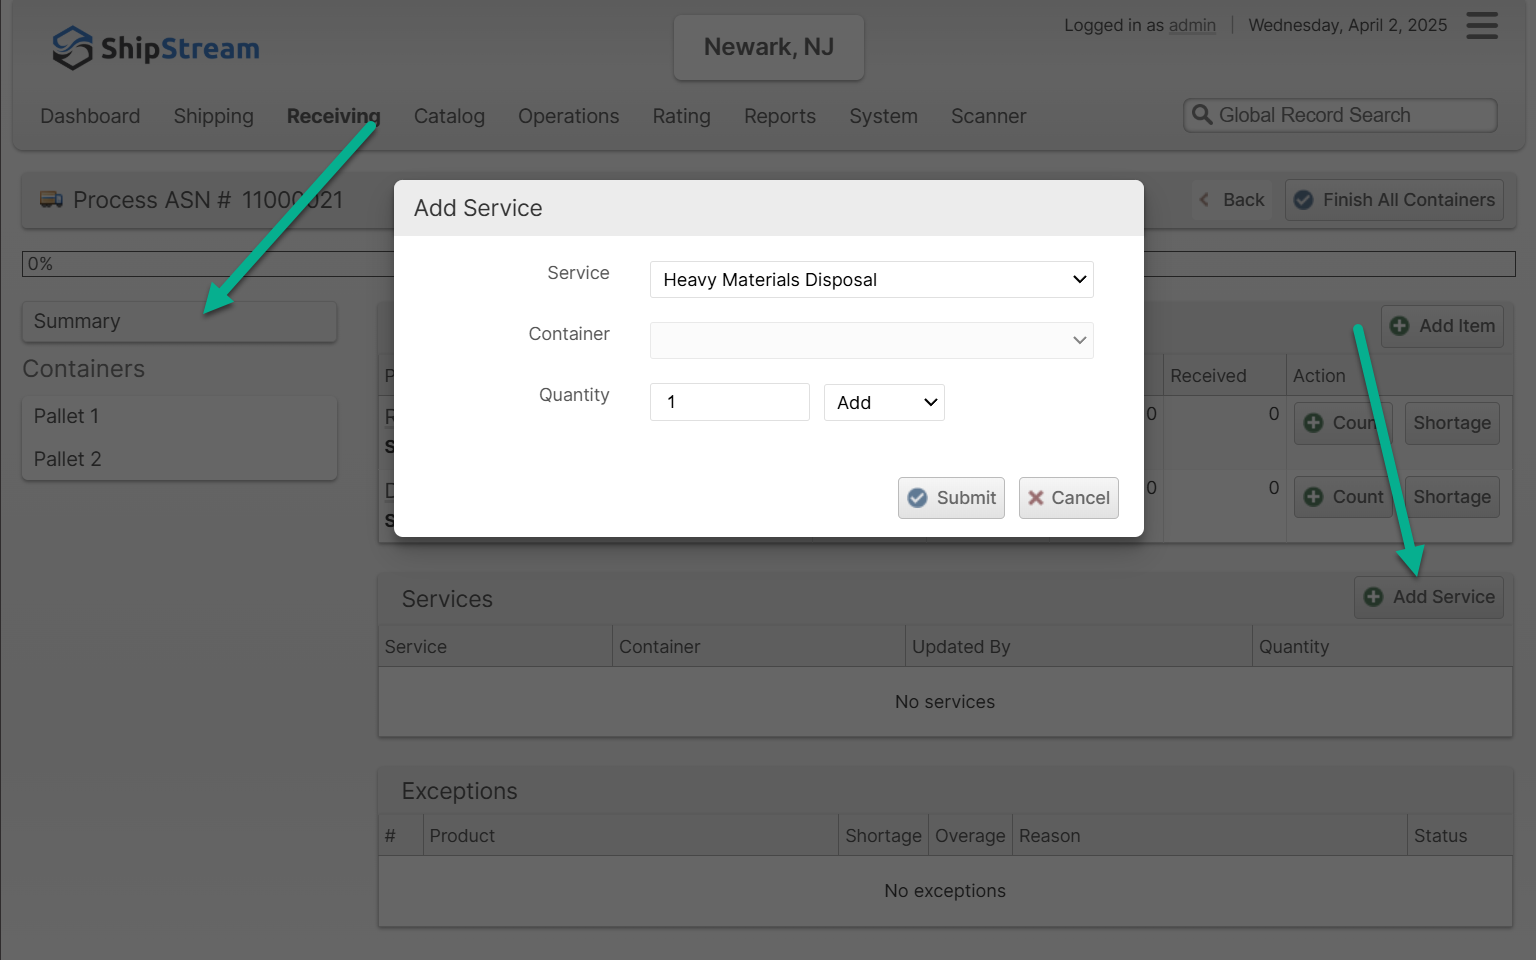
- Navigate to a delivery and click Process
- Click the Add Service button appearing on the top right of the Services table on either the Summary tab or a container tab
- Choose the desired values in the form and click Submit
Scanner UI
Services are added through the Processing UI in one of four ways:
- Submit a value to the action sheet that appears when starting processing if the Receiving Service has Auto-Prompt enabled.
- Scan a barcode assigned to a Receiving Service during processing
- The first scan will select the service, the second and subsequent scans will increment the count by one up to the Maximum Value. The device will play the "ding" sound to confirm each increment.
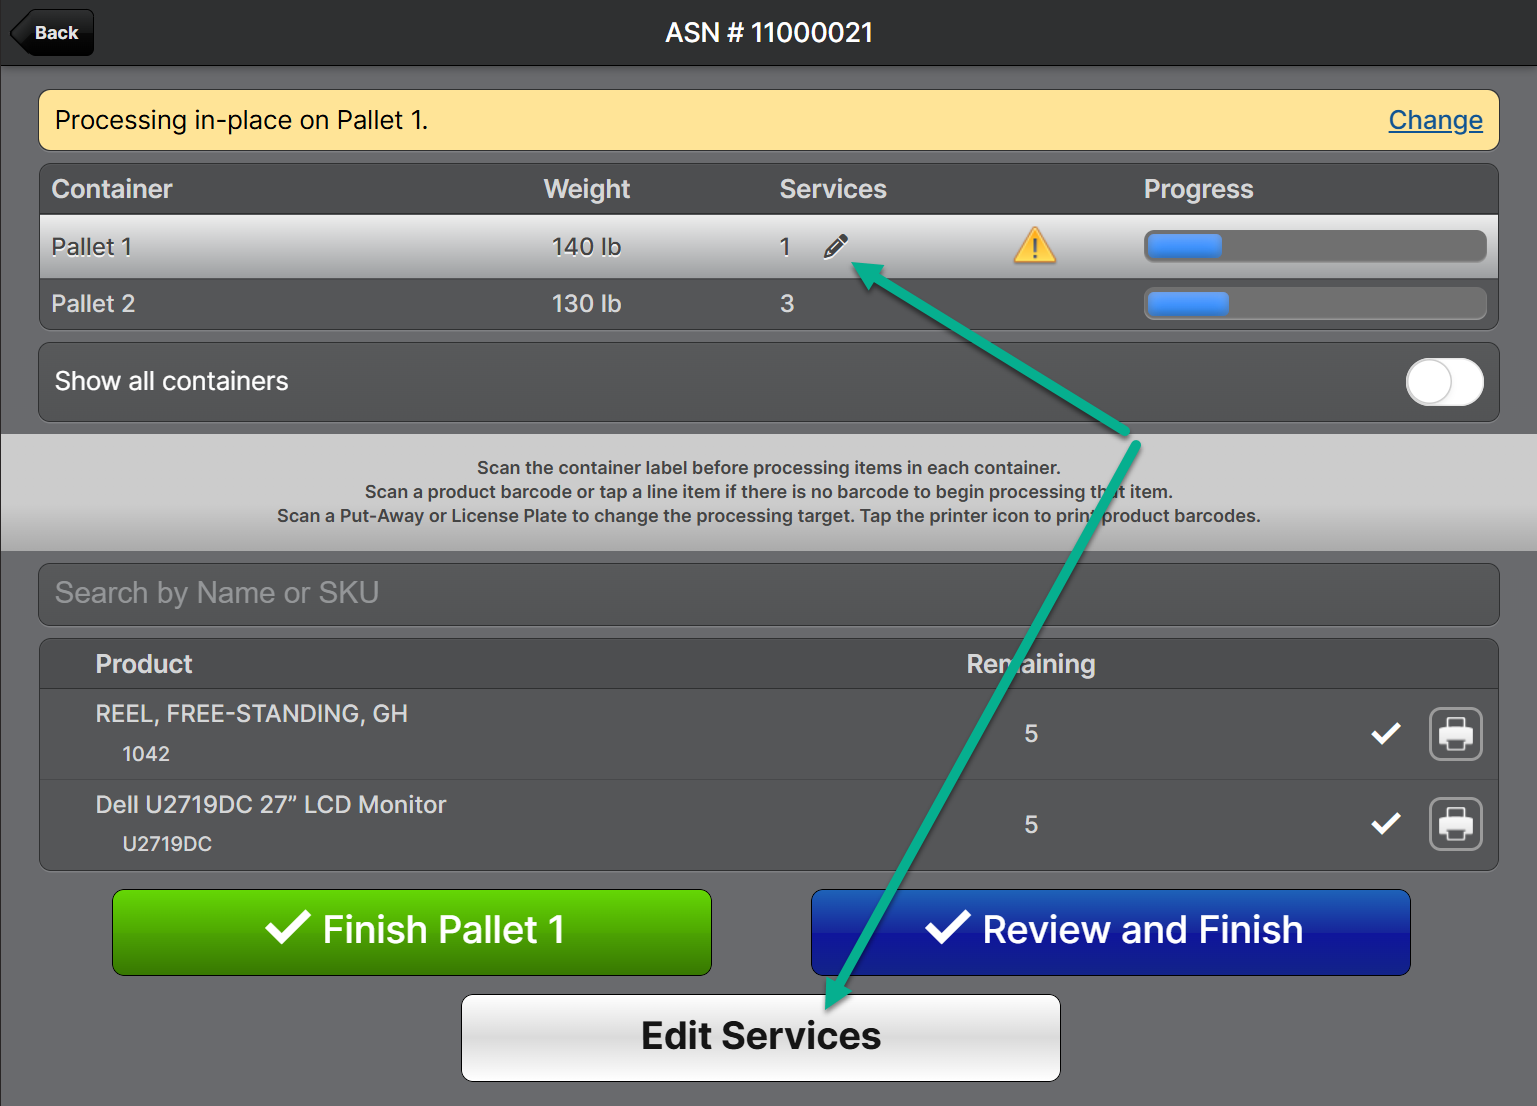
- Click the ✏️ icon on the list of containers to edit the services for just the Parent and that one container.
- Click Edit Services at the bottom of the page to edit the services for all containers.
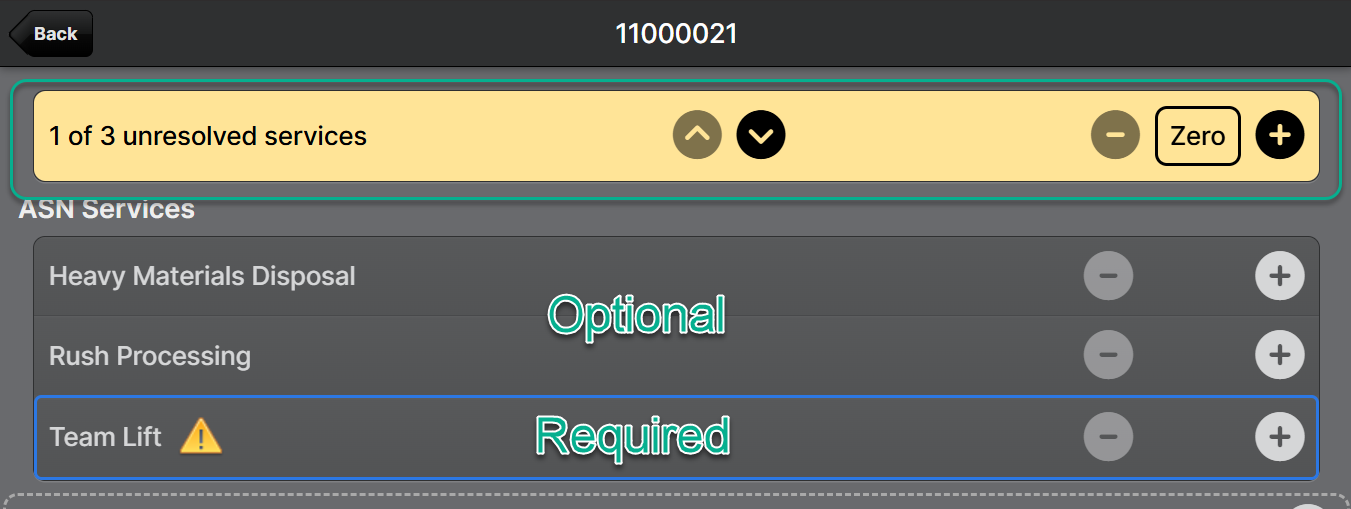
Either 2 or 3 will load a page for viewing and editing the collected services like so:
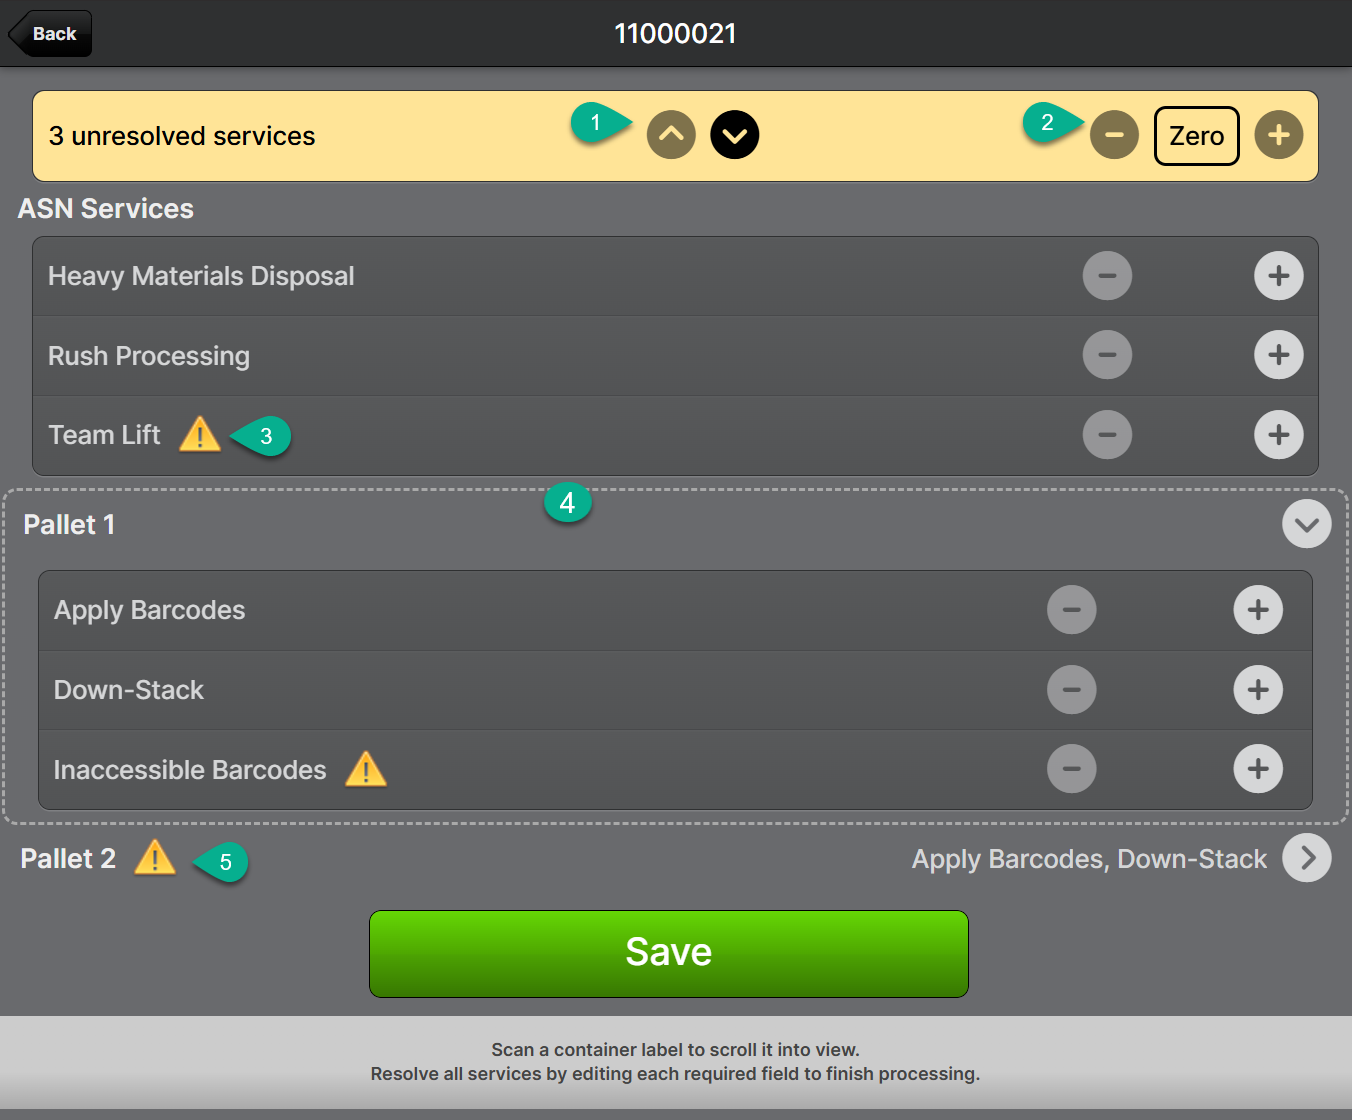
If there are any Required services, the yellow bar at the top will appear and help the user navigate quickly to the required services by tapping the up and down arrows (1).
When a service is selected, the "-", "Zero" and "+" buttons (2) can be used to decrement, set to zero or increment the value respectively.
The ⚠️ symbol denotes services that are Required but have not yet been given a value. All required services must be given a value to finish processing, although 0 is a valid value.
The currently selected service is denoted by a blue highlight. Once selected, you may scan the barcode or use the button to change the value as appropriate.
If there are multiple containers, tap a container row to expand it. The expanded container is highlighted with a dashed line (4).
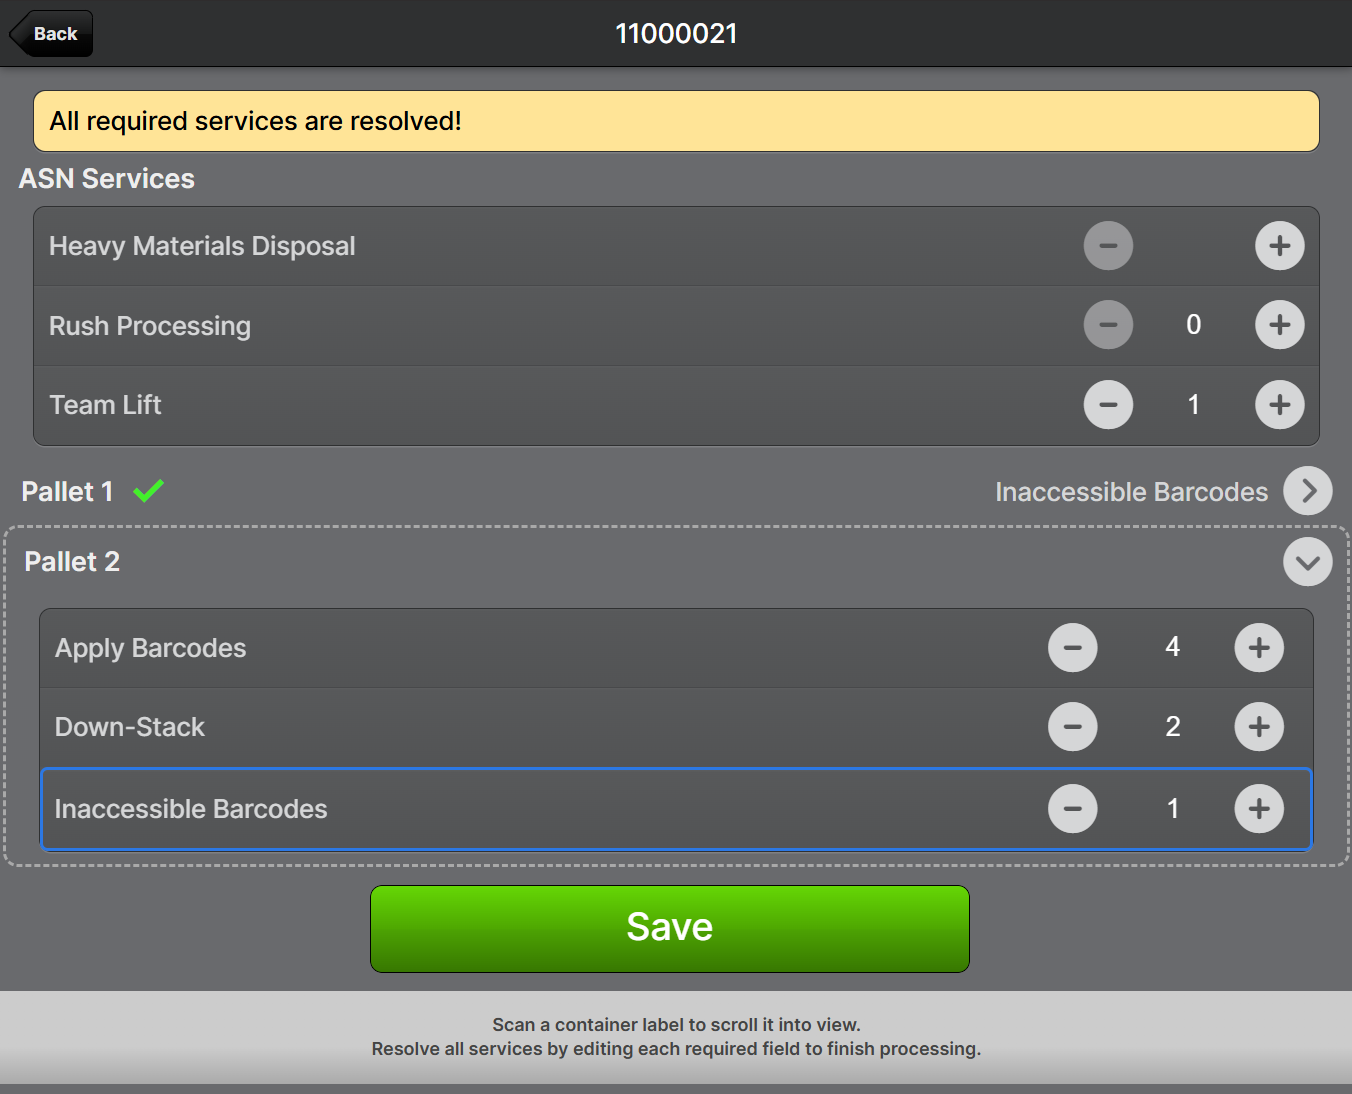
When a container is collapsed and if there are required services, you will see either a ✅ if all required services for the container have a value, and otherwise a ⚠️ symbol (5).
The main processing page will also show a ⚠️ symbol for any containers that have unresolved services.
Example showing when all required services are resolved:
Scanner
How did we do?
Receiving Configuration