Webhooks
Webhooks are a "push" mechanism for communication between two applications. In this case, ShipStream will send an HTTP request with a useful payload of data to a specified URL when a certain event occurs. The receiving application being notified of the event (which can be based on any platform capable of receiving and processing an HTTP request) can then take appropriate action, such as updating data or triggering a process.
Webhooks should be used as an alternative to "polling" whereby your application checks to see if some data has changed, in particular when there is not likely to be any new data since the last update.
Here are some common advantages of using webhooks:
- Polling is inherently limited in its ability to scale as your business grows because the number and frequency of requests may increase beyond a reasonable limit and exhaust resources on either end. For example, if you poll the same piece of data 100 times before it is updated, webhooks would be 100x more efficient.
- Webhooks are sent in near-real-time so that your application can be made aware of changes as soon as they happen instead of waiting until the next polling event.
- Webhooks sometimes include details that are more difficult to obtain with just polling. For example, when a status changes, the webhook payload may include both the old status and the new status.
- With polling, you can miss intermediate updates. For example, if a shipment progresses from "picking" to "picked" to "packing" and "packed" all before the next time the status is polled, you would not know when the intermediate statuses occurred.
Examples of uses of webhooks commonly include:
- Trigger some data to be updated in your application using the payload data or data requested from the API.
- Send an email or post a message to a Slack channel.
- Log an event for KPIs or anomaly monitoring.
- Sync data to a third-party system using a no-code or low-code connector like Pipedream, Zapier, or Shopify Flow.
Are webhooks reliable?
When ShipStream sends an HTTP request for a webhook event, the request is only considered a "success" if the receiving application responds with a 200 response code. This ensures that if there was a network issue or your application somehow missed the webhook or was unable to process it, the webhook will be attempted again. ShipStream will make many attempts to retry the webhook so if there is any temporary outage of your application, there will be no data loss as all failed webhooks will be retried automatically.
Webhook events are recorded in ShipStream's transactional database so that if an event occurs that warrants a webhook, there will absolutely be a corresponding webhook event for it. Combined with the retry mechanism and assuming your application doesn't return a 200 response code incorrectly, there should be no way that a webhook is ever missed unless your application is down for several consecutive days.
Error Handling
In the case of a timeout or other connection error or a non-200 response, the webhook will be retried up to 14 times using the following schedule, advancing the next retry time for each consecutive failure:
- +1 minute
- +2 minutes
- +4 minutes
- +8 minutes
- +15 minutes
- +30 minutes
- +1 hour
- +2 hours
- +4 hours
- +8 hours
- +16 hours
- +24 hours
- +24 hours
- +24 hours
Additionally, when a webhook fails on the first attempt, this is logged as an Integration Error and a notice will be displayed on the Client UI panel if there are any unresolved errors.

If the webhook succeeds on a retry, the error is automatically marked as Resolved so the alert automatically disappears when there are no unresolved errors.
The error details can be seen in the Admin UI or Client UI under System > Integration > Errors. Like most other errors, they can be manually marked as Resolved, meaning the system will not retry them anymore and the dashboard notice is no longer applicable.
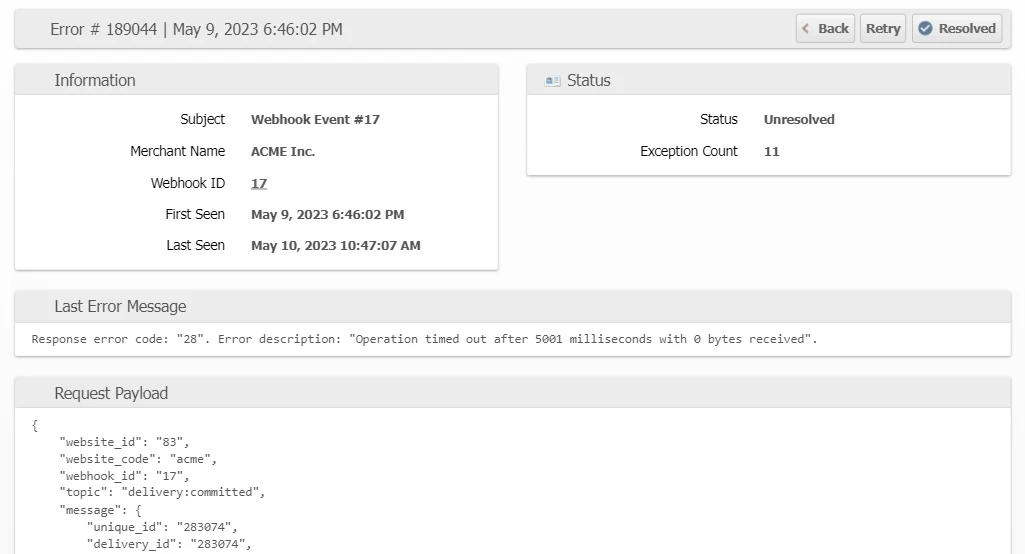
You can also click Retry to force an immediate attempt which can be helpful when troubleshooting.
Notifications
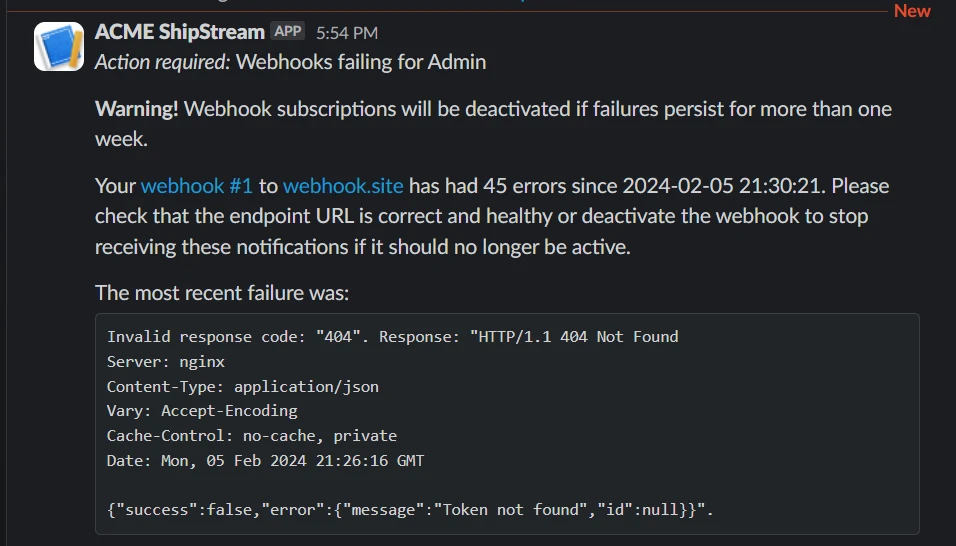
Notifications are sent to the Technical Contact every 2 hours for all webhooks that are in an error state. When a webhook is successful the error status is cleared automatically.
Throttling and Deactivation
When a webhook is experiencing ongoing issues for over an hour it will be "throttled" causing the number of attempts to decrease until a successful response is received. This reduces unnecessary resource waste and prevents flooding your webhook endpoint as failing requests pile up in the event of an availability incident. The throttling is automatically returned to normal when the endpoint starts responding with a success status again.
If your webhook continues to fail for one week, it will be automatically deactivated and a notification will be sent to the Technical Contact. It can be reactivated manually but will not be reactivated automatically.
Creating a Webhook
Webhooks are often created programatically via the API when an application connects successfully, but can also be created by users on an as-needed basis.
- Navigate to System > Integrations > Webhooks
- Click Add New Webhook
- Fill the form and click Save
Events Filter
The Events Filter field allows you to provide a CEL (Common Expression Language) expression that is evaluated against each event payload before it is sent. If the expression evaluates to false, the event is silently skipped — no HTTP request is made and no error is recorded.
This is useful when you subscribe to a broad topic (such as shipment:packed) but only care about a subset of events, such as those belonging to a specific shipping method or source channel.
Syntax
CEL is a simple, readable expression language. Expressions evaluate to true or false. You access event payload fields directly by name:
source == "shopify"
Supported operators:
| Operator | Meaning | Example |
|---|---|---|
== | Equals | status == "complete" |
!= | Not equals | source != "manual" |
&& | Logical AND | status == "complete" && source == "shopify" |
|| | Logical OR | status == "picked" || status == "packed" |
! | Logical NOT | !is_global |
>, <, >=, <= | Comparison | qty_ordered >= 10 |
in | Membership in a list | status in ["picked", "packed"] |
Nested fields are accessed with dot notation:
address.country_id == "US"
Functions
In addition to the operators above, the standard CEL function library is available. The most useful functions for filtering are:
| Function | Meaning | Example |
|---|---|---|
startsWith(prefix) | String begins with a prefix | order_ref.startsWith("WEB-") |
endsWith(suffix) | String ends with a suffix | order_ref.endsWith("-INT") |
contains(substring) | String contains a substring | shipping_method.contains("express") |
toLower() / toUpper() | Convert case | carrier_code.toLower() == "fedex" |
int(x) / string(x) | Convert between types | int(qty_ordered) >= 10 |
size(x) | Length of a string or list | size(items) > 1 |
String functions are called method-style on the value — for example field.startsWith("X"), not startsWith(field, "X").
Not supported
CEL macros (map, filter, all, exists, has) are not enabled, to prevent expensive iteration over large payloads. Regular-expression matching (matches()) is also not available — use startsWith(), endsWith(), or contains() instead. Expressions that reference an unavailable macro or function are ignored at runtime and the event is sent as if no filter were set (see Behavior on error). Test your filters before relying on them.
Examples
| Use case | Expression |
|---|---|
| Only orders from a specific source | source == "shopify" |
| Source matching a channel family (case-insensitive) | source.toLower().startsWith("shopify") |
| Only freight shipments | shipment_type == "freight" |
| Shipments to a specific country | shipping_address.country_id == "CA" |
| Deliveries via one of several carriers | carrier_code in ["fedex", "ups", "usps"] |
| High-volume orders from one channel | source == "shopify" && int(qty_ordered) >= 10 |
Payload fields
The filter expression has access to the same fields that appear in the webhook payload message object. Refer to the Webhook Topics API documentation for the full list of fields for each topic.
Behavior on error
If the filter expression contains a syntax error or cannot be evaluated (for example, because a referenced field does not exist in the payload), the filter is ignored and the event is sent as if no filter were set. This prevents a broken filter from silently dropping all events.
Security
For data security reasons, ShipStream requires that the receiving endpoint implement the HTTPS protocol with a valid and non-expired SSL certificate to prevent any eavesdropping. This ensures that the payload is strongly encrypted as it is being transmitted.
Additionally, it is wise to validate that the webhook payload is authentic should the location of your endpoint or the details of your implementation become known to a malicious actor. Payload validation using an HMAC signature is the best method to protect your endpoint, but this is not enforced by ShipStream so it is up to you to implement some validation. HMAC signature validation is covered below with examples for common programming languages.
Authentication
Webhook authenticity can be verified by the X-Plugin-Hmac-Sha256 HTTP header which is included with every webhook request. You can compare this header value with the HMAC generated locally to ensure that the request was not spoofed or modified in transit. The HMAC “message” is the entire request body and the HMAC “secret” is the "Secret Key" associated with the webhook when it was created.
PHP Example
// Define your webhook secret key
$webhookSecretKey = 'your-webhook-secret-key';

// If the header is not present, respond with 401 Unauthorized
$headerValue = $_SERVER['HTTP_X_PLUGIN_HMAC_SHA256'] ?? '';
if (!$headerValue) {
    http_response_code(401);
    exit;
}

$json = file_get_contents('php://input');
$expectedValue = base64_encode(hash_hmac('sha256', $json, $webhookSecretKey, TRUE));
if ($headerValue !== $expectedValue) {
    http_response_code(401);
    exit;
}

// Handle the webhook request here
Node JS Example
const express = require('express');
const crypto = require('crypto');
const bodyParser = require('body-parser');

const app = express();

// Define your webhook secret key
const webhookSecretKey = 'your-webhook-secret-key';

// body-parser is the first Express middleware.
app.use(bodyParser.json({ verify: function(req, res, buf, encoding) {
  const headerValue = req.headers['x-plugin-hmac-sha256'];
  const expectedValue = crypto
    .createHmac('sha256', webhookSecretKey)
    .update(data)
    .digest('base64');
  if (headerValue !== expectedValue) {
    throw new Error("Invalid signature.");
  } else {
    console.log("Valid signature!");
  }
}}))

// Route for handling webhook requests
app.post('/webhook', (req, res) => {
  // Handle the webhook request here
  res.sendStatus(200);
});

// Start the server
app.listen(3000, () => {
  console.log('Server is running on port 3000');
});
Python Example
from flask import Flask, request
import hmac
import hashlib

app = Flask(__name__)

# Define your webhook secret key
webhook_secret_key = b'your-webhook-secret-key'

# Middleware to validate the contents of the request
@app.before_request
def validate_request():
    header_value = request.headers.get('X-Plugin-Hmac-Sha256')

    # If the header is not present, respond with 401 Unauthorized
    if not header_value:
        return 'Unauthorized', 401

    data = request.data
    expected_value = hmac.new(webhook_secret_key, data, hashlib.sha256).digest()
    expected_value = expected_value.encode('base64').strip()
    if header_value != expected_value:
        return 'Unauthorized', 401

# Route for handling webhook requests
@app.route('/webhook', methods=['POST'])
def handle_webhook():
    # Handle the webhook request here
    return 'OK', 200

# Start the server
if __name__ == '__main__':
    app.run(debug=True)
ASP.NET Core Example
using System;
using System.IO;
using System.Security.Cryptography;
using System.Text;
using Microsoft.AspNetCore.Builder;
using Microsoft.AspNetCore.Hosting;
using Microsoft.AspNetCore.Http;
using Microsoft.Extensions.DependencyInjection;

public class Startup
{
    // Define your webhook secret key
    private byte[] webhookSecretKey = Encoding.UTF8.GetBytes("your-webhook-secret-key");

    public void ConfigureServices(IServiceCollection services)
    {
        services.AddMvc();
    }

    public void Configure(IApplicationBuilder app, IHostingEnvironment env)
    {
        app.Use(async (context, next) =>
        {
            string headerValue = context.Request.Headers["X-Plugin-Hmac-Sha256"];

            // If the header is not present, respond with 401 Unauthorized
            if (string.IsNullOrEmpty(headerValue))
            {
                context.Response.StatusCode = 401;
                return;
            }

            using (var reader = new StreamReader(context.Request.Body))
            {
                string data = await reader.ReadToEndAsync();
                byte[] expectedValue = new HMACSHA256(webhookSecretKey).ComputeHash(Encoding.UTF8.GetBytes(data));
                string expectedValueBase64 = Convert.ToBase64String(expectedValue);

                if (headerValue != expectedValueBase64)
                {
                    context.Response.StatusCode = 401;
                    return;
                }
            }

            await next.Invoke();
        });

        app.UseMvc(routes =>
        {
            routes.MapRoute(
                name: "default",
                template: "{controller=Home}/{action=Index}/{id?}");
        });
    }
}