EasyPost
EasyPost is a flexible, modern API designed to simplify technical and logistical requirements for shipping. ShipStream leverages EasyPost as an integration provider for the following carriers:
- USPS
- DHL eCommerce
- SpeeDee
- LSO
- LaserShip
- GLS
EasyPost offers the following features, fully supported by ShipStream for a seamless integration:
- USPS Commercial Plus pricing with no volume requirements
- Automatically generated customs documents for international orders
- Automatic printing of SCAN forms for end of day pickups
- Package insurance
- Address verification
- Tracking information
If there is a carrier supported by EasyPost that you'd like to use in ShipStream, just put in a request and we'll make it happen!
How to Set Up EasyPost
Users must first sign up with EasyPost to be able to use their account with ShipStream. The steps from a high level are:
- Obtain an EasyPost API Key and save it in the ShipStream configuration
- Choose EasyPost as the Integration Provider for each carrier you wish to use (if multiple providers are supported)
- Add a Shipping Account in ShipStream for each EasyPost carrier account you wish to use
Step 1 - EasyPost API Key
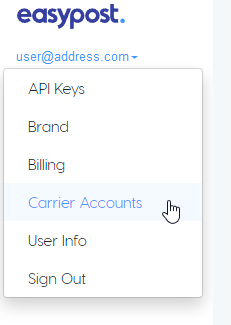
- Log In to EasyPost account dashboard, click your user name below the logo, and click API Keys.
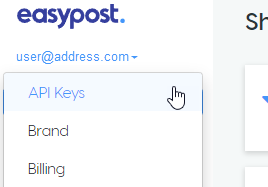
Choose an API Key and click copy to the right of the input field.
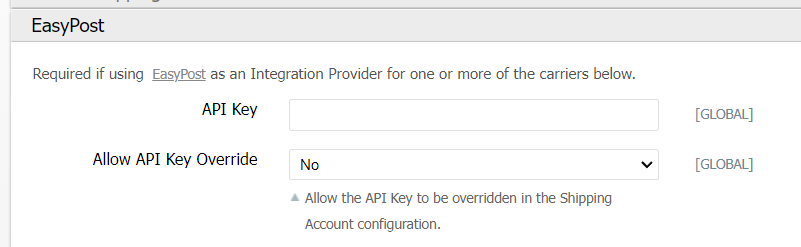
You may use either Production API Keys or Test API Keys, the difference being that the latter cannot be used to ship real packages as the test labels will be clearly marked as VOID to avoid accidental shipping.- In ShipStream, navigate to System > Configuration and click the Shipping Methods tab on the left side menu.
- Expand the EasyPost pane and paste the API Key from your EasyPost account and click Save Config.
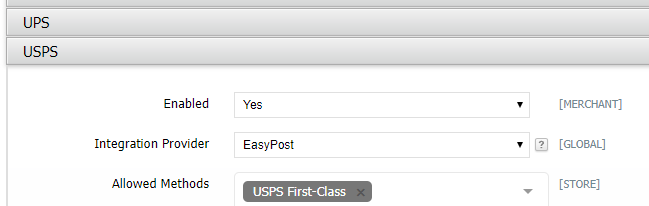
Step 2 - Integration Providers
For USPS, ShipStream supports multiple integration providers. Make sure "EasyPost" is chosen in Shipping Methods > USPS and click Save Config.
Step 3 - Shipping Accounts
See Shipping Accounts for more information on managing Shipping Accounts.
Obtain the Carrier Account ID
- Login to your EasyPost account dashboard and go to the Carrier Accounts page.
Locate the appropriate carrier account and copy the "Account ID" to your clipboard. The Account ID will always start with "ca_".
If you don't have a Carrier Account ID yet, you can add one by selecting the carrier you wish to use from the list that appears to the right of the page (this may require additional information from the carrier).With the Carrier Account ID in the clipboard, return to ShipStream and
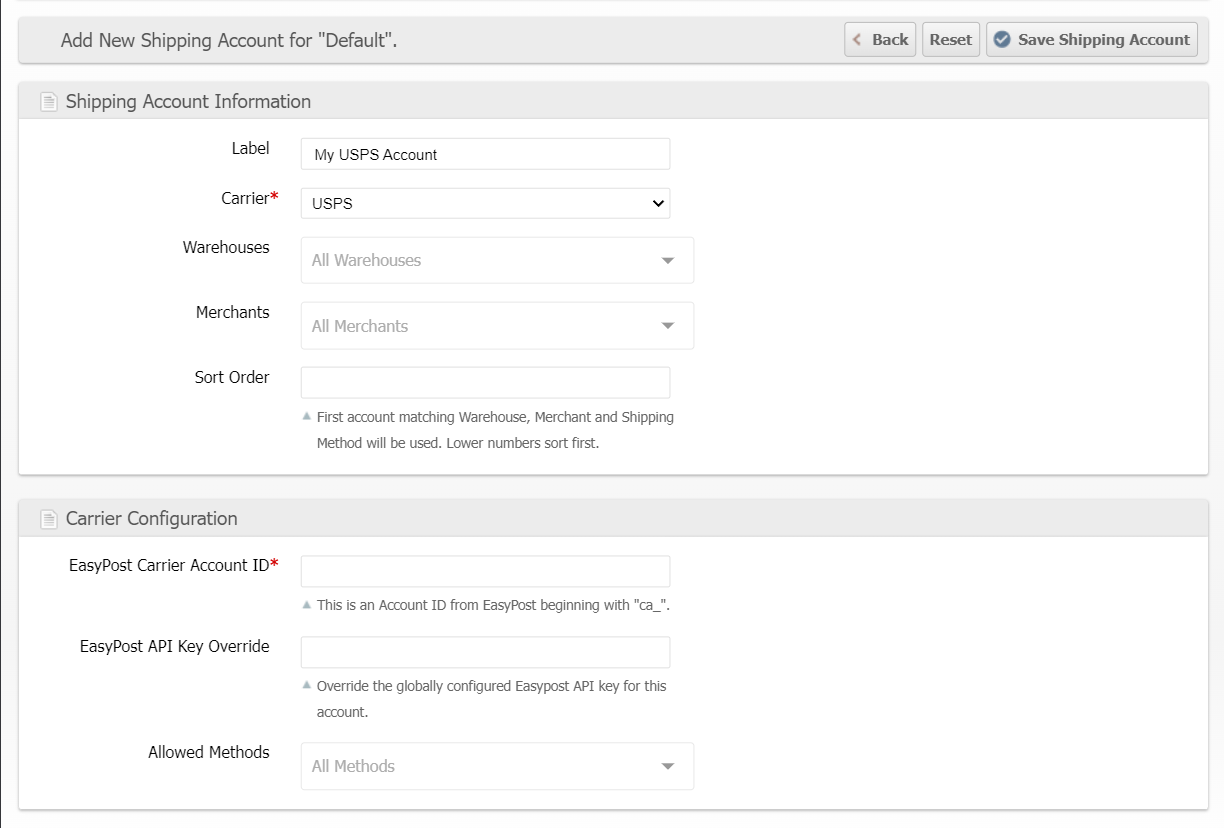
- Navigate to System > Shipping > Shipping Accounts
- Choose or create a Shipping Account Group as appropriate (use "Default" unless you have a special need for a different Shipping Account Group)
- Click a Shipping Account to edit or click Add New Shipping Account to add a new one
- Select the Carrier corresponding to the account you wish to add
- In the last pane titled "Carrier Configuration," paste the Account ID from EasyPost into the EasyPost Carrier Account ID input and click Save Shipping Account.
EasyPost Options
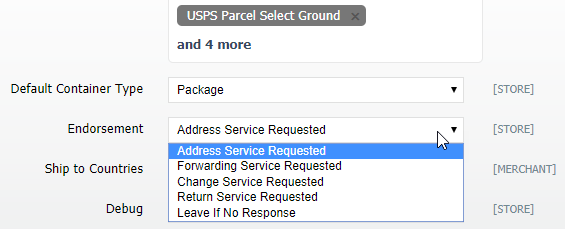
Endorsement
Users can select which endorsement service to request upon a failed delivery. Options include:
- Address Service Requested - Provides forwarding and address correction services when possible. If the mail is undeliverable and not forwardable, it is returned to the sender with the reason identified on the mailpiece.
- Forwarding Service Requested - New address notification is provided with returns.
- Change Service Requested - Provides address correction services without forwarding or return. If undeliverable, either the new address or the reason it is undeliverable is provided to the sender.
- Return Service Requested - Povides address correction services and always returns the piece.
- Leave If No Response
To set the Endorsement options navigate to System > Configuration and click the Shipping Methods tab in the left side menu. Scroll to the USPS pane and expand it. Choose the Endorsement method in the selection menu.