Table of Contents
Serial Number Tracking
A Serial Number is a unique identifier assigned to a specific unit of inventory which may serve multiple purposes: Tracking movements of inventory to better understand or audit where they have been a…

A Serial Number is a unique identifier assigned to a specific unit of inventory which may serve multiple purposes:
- Tracking movements of inventory to better understand or audit where they have been and how they got there
- Identifying units of inventory owned by customers to validate warranty claims and aid in returns processes
- Pinpointing quality control issues and holding suppliers accountable
- Recalling or quarantining units of inventory that should not be sold to end-customers
- Complying with regulatory requirements
- Preventing theft or loss by tracking stolen or missing goods
- Providing insights into inventory turnover, stock aging, and other key metrics
ShipStream's implementation of Serial Number Tracking is designed to be powerful and flexible yet easy to set up and maintain and fool-proof but efficient for end-users.
Serial Number Types
There are two simple steps to enabling serial number tracking:
- Define one or more Serial Number Types. This piece of data will be assignable to any number of products, but you may also create as many Serial Number Types as you need to achieve the level of customization you want.
- Assign the Serial Number Type field value for one or more products.
Create a Serial Number Type
- Navigate to System > Catalog > Serial Number Types. This requires that one of your user roles has the System > Catalog > Serial Number Types permission.
- Click Add New
- Fill out the form to fit your needs and click Save
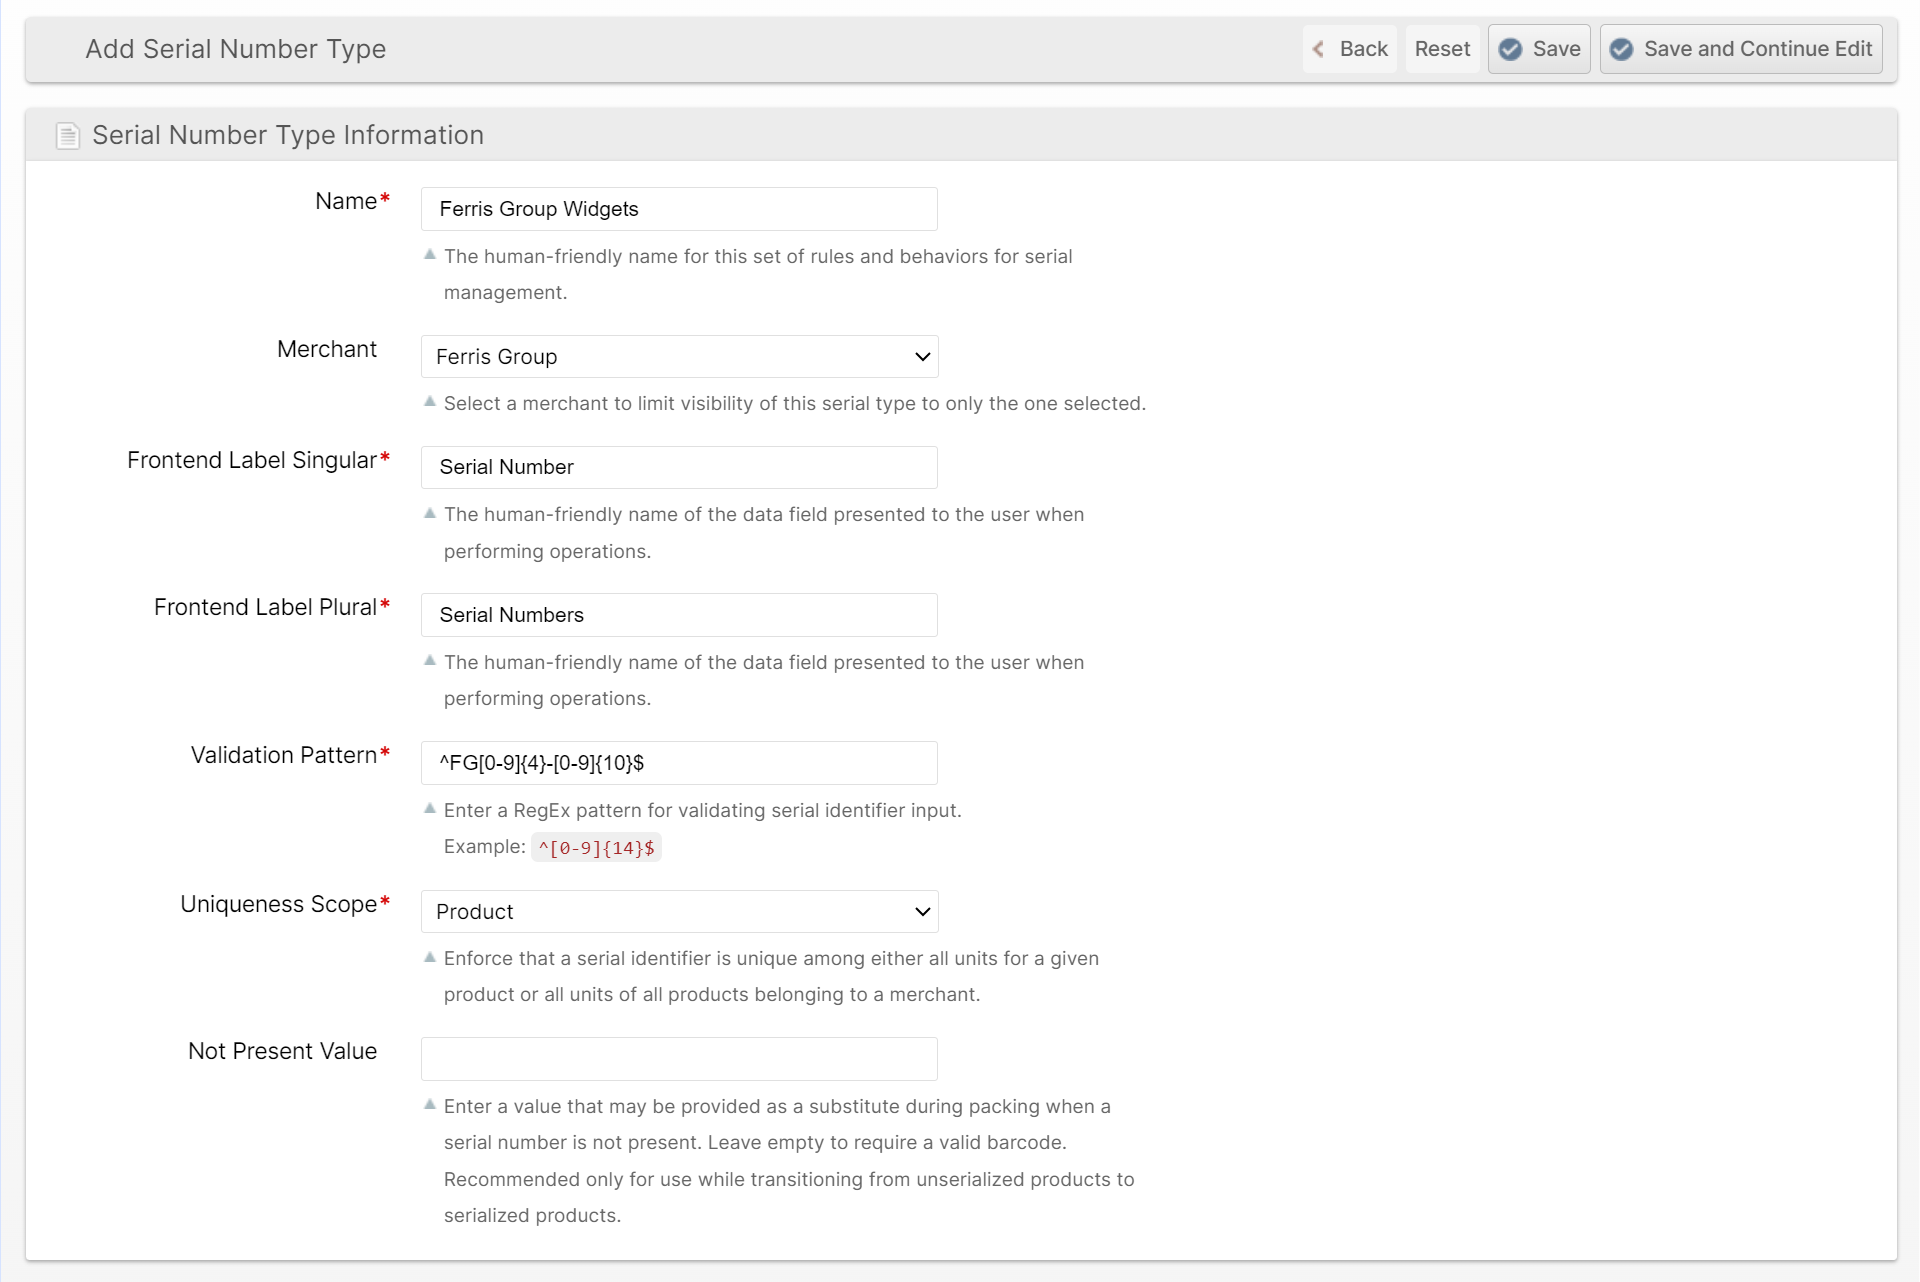
Name
The display name of the Serial Number Type will appear in the UI and be potentially used for product data imports.
Merchant
A Serial Number Type may belong to a single merchant or be available for "All Merchants". If it is assigned to a single merchant, it will not be visible or usable to other merchants.
Frontend Label Singular/Plural
This is how the serial data will be referred to in the user interface. An example beside the obvious might be things like an "IMEI Number" for cell phones.
Validation Pattern
This is a regular expression pattern that will be used to validate inputs such that input which does not match will be rejected as a valid serial number or not detected as a serial number when the context allows for multiple types of inputs.
Uniqueness Scope
Some manufacturers may share one serial number space across their entire product line while others may re-use the same number space for every product. For example, if SKU X and Y are both allowed to have serial number "001", then you should choose "Product". Only choose "Merchant" if you are certain that no two SKUs belonging to a given merchant share the same serial number.
Not-Present Value
When transitioning existing inventory from non-serialized to serialized using the same SKU and product barcodes, you will need to allow the non-serialized inventory to be processed somehow. By using a special purpose barcode of your choosing defined in this field, you can allow users to effectively bypass the requirement to scan a serial number when one does not exist.
When this Not-Present Value barcode is used for outbound operations, a random value will be appended to it and a serial number record created for it to track that the real serial number was reported by a user as not present.
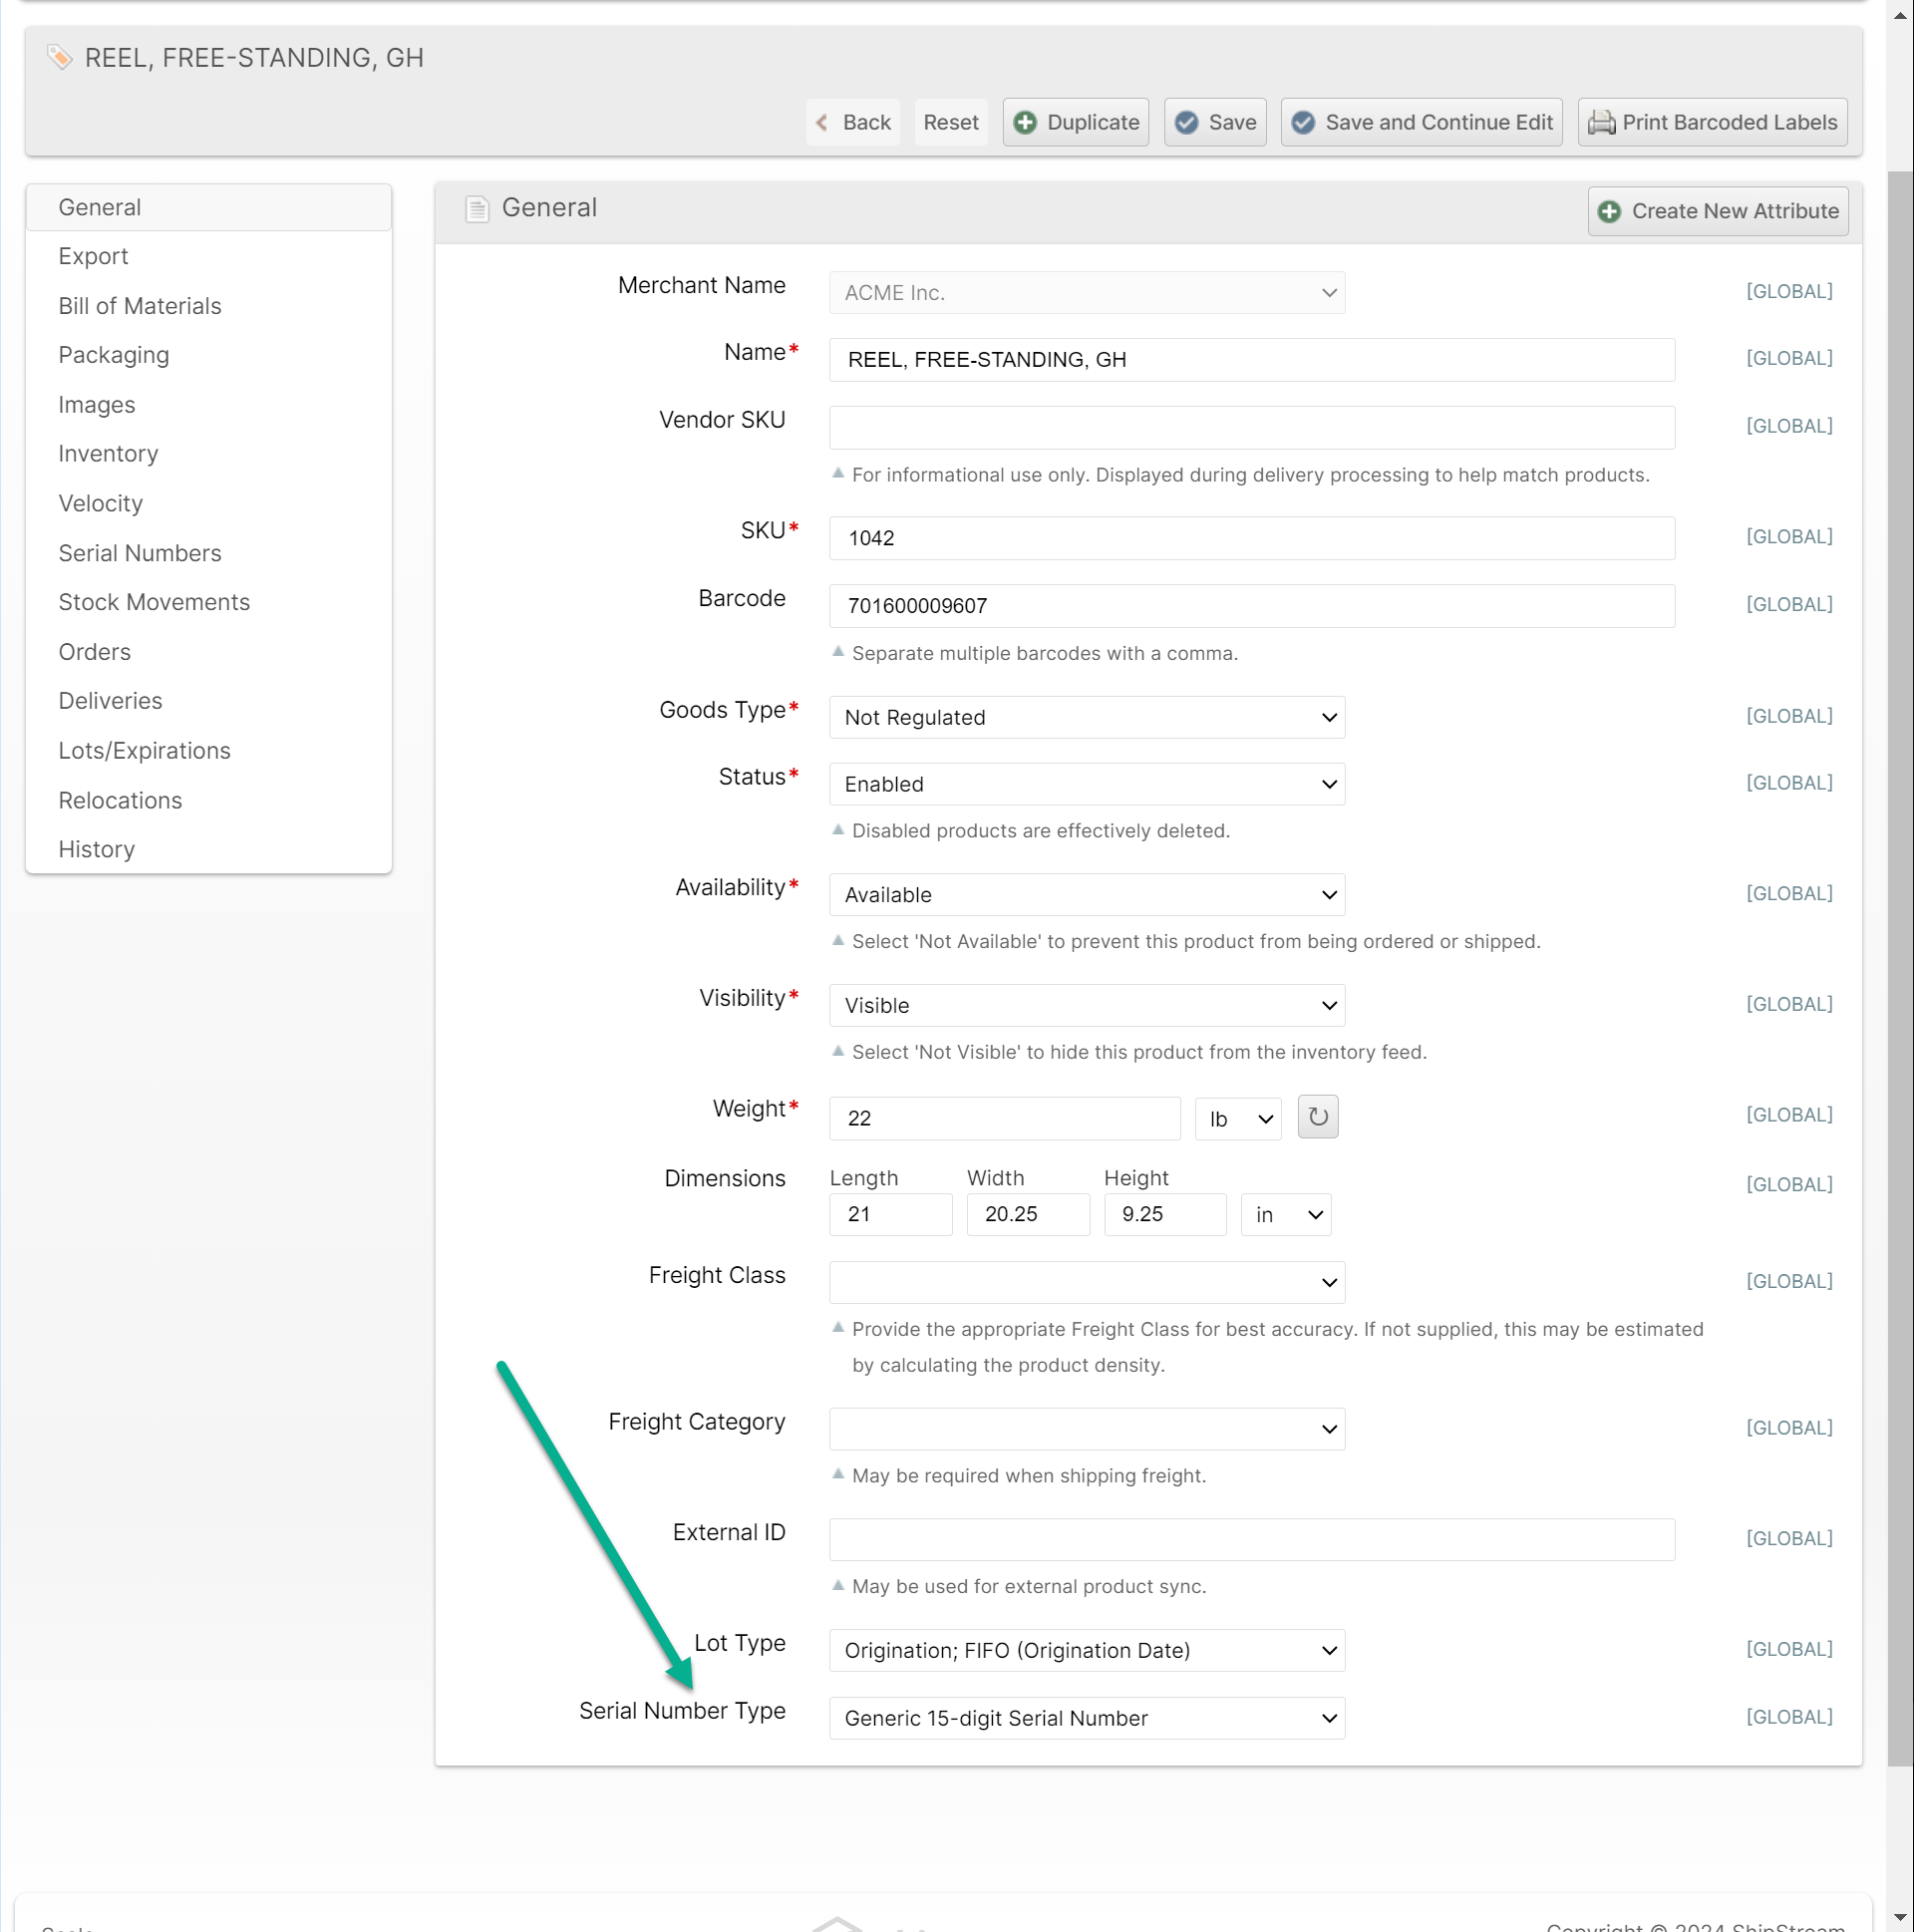
Assign a Serial Number Type
You can assign the Serial Number Type like any other product attribute such as by editing a single product, using mass actions, product imports and APIs. For example, to update a single product via the UI:
- Navigate to Catalog > Products
- Click a product in the grid to open the edit form
- Change the Serial Number Type attribute to the desired value
- Click Save
Serial Number Information
Serial numbers may be viewed in various contexts, such as from the Catalog > Serial Numbers page grid or in a Serial Numbers tab on an order or delivery page.
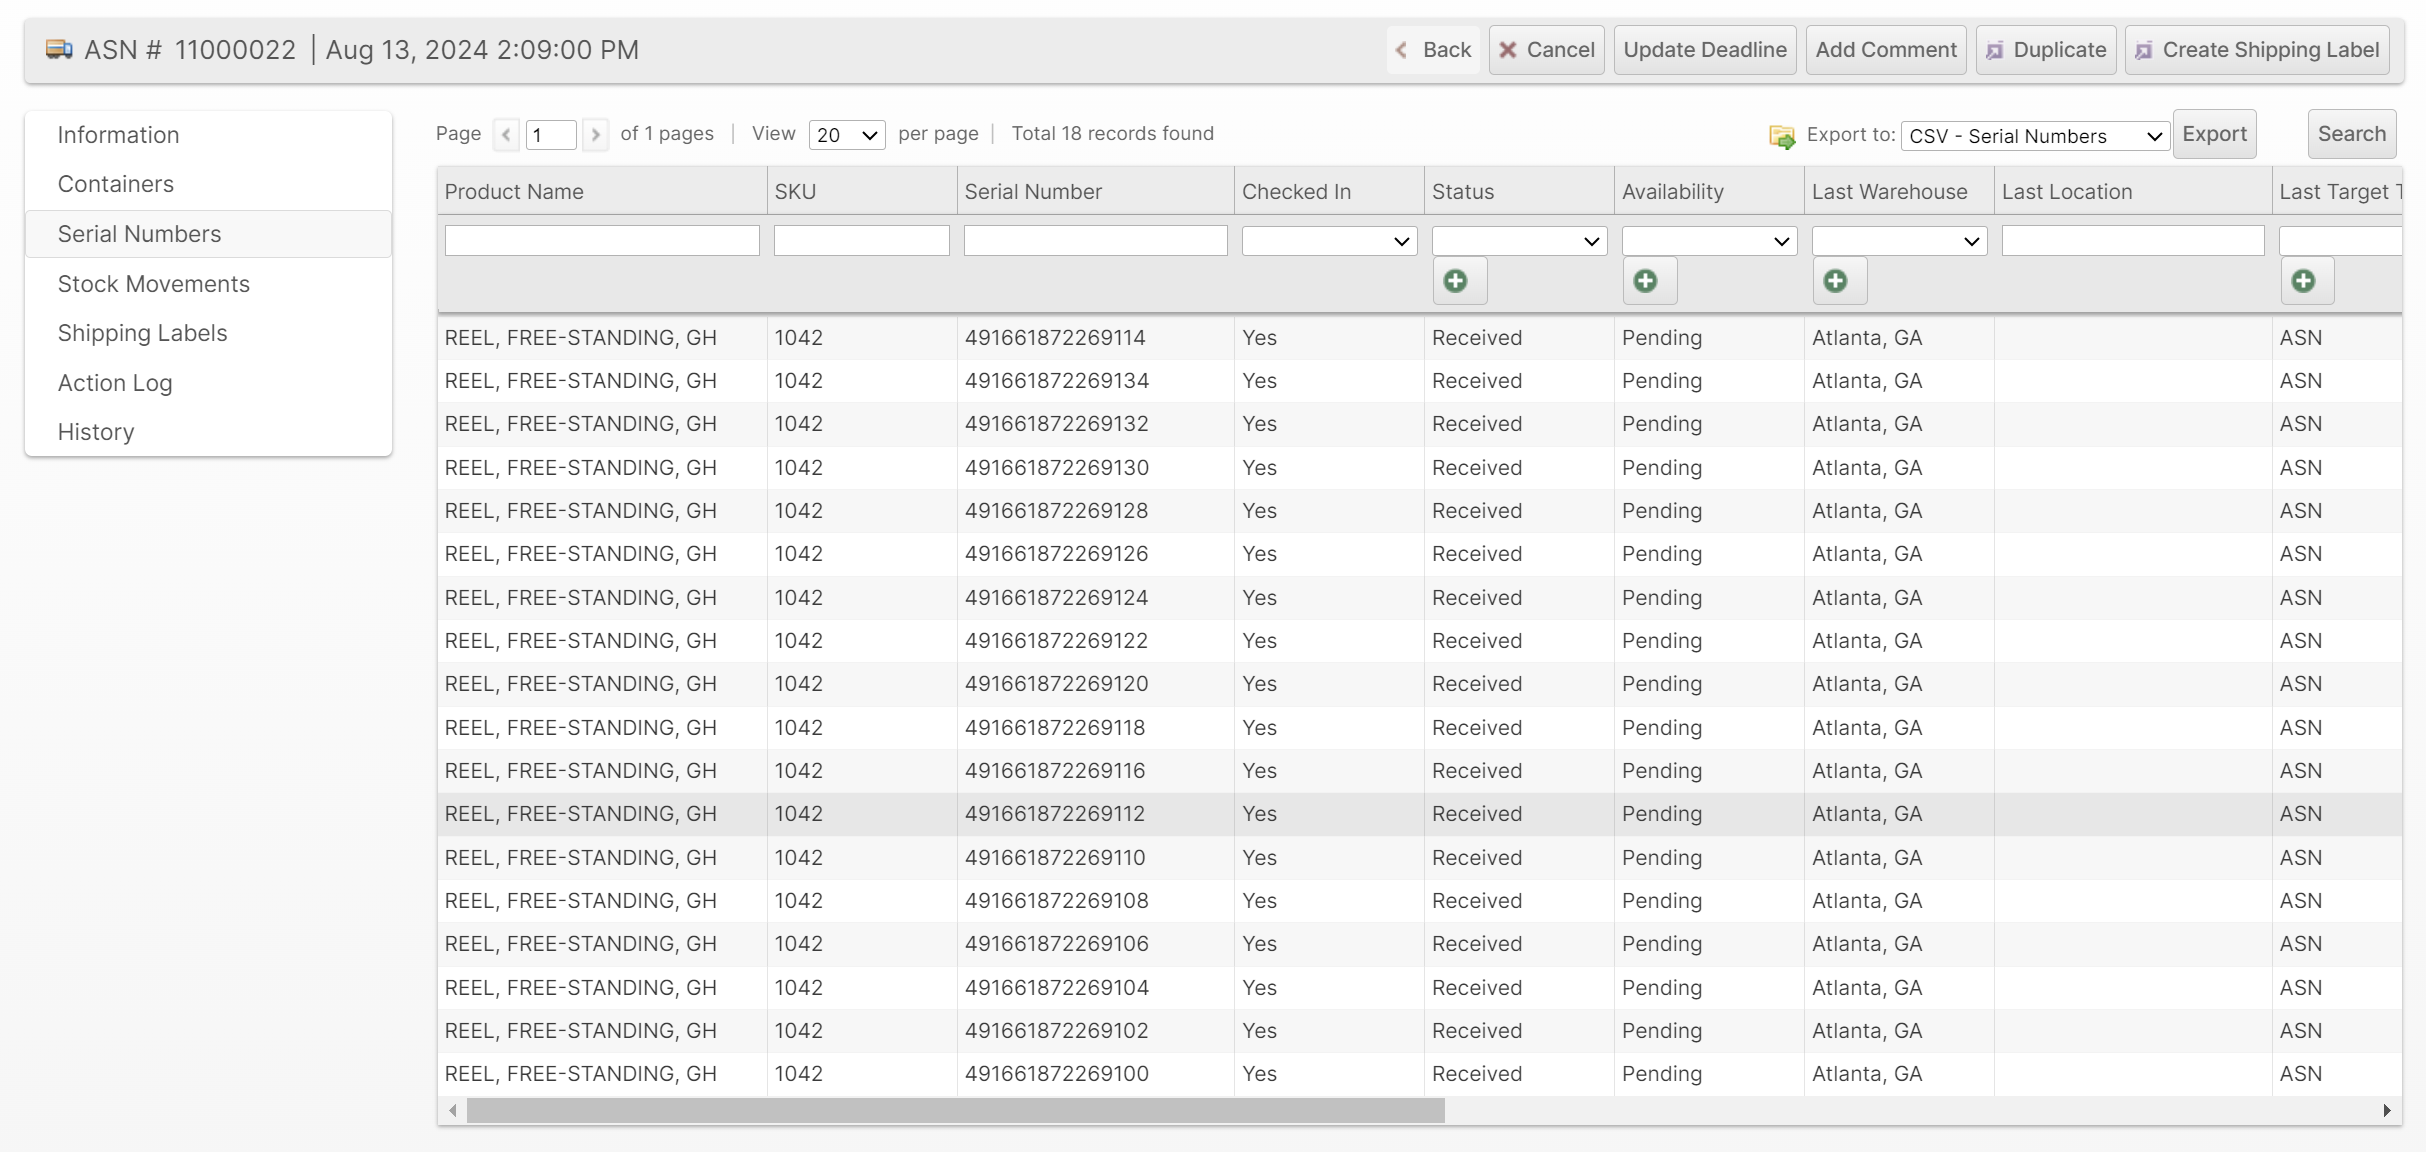
Statuses and Availabilities
A serial number may exist in one of several statuses and the availability can be independent of the status. In addition, for convenience there is a Checked In status that is a simple Yes or No to make grid filtering easy to separate checked in vs checked out serial numbers.
Status Definitions
Label | Definition |
Unknown | Was added and then removed before check-in was completed. |
Received | Was received into a warehouse. |
Packed | Was packed for a shipment. |
Shipped | The shipment the unit was packed on was shipped. |
Voided | The delivery that the unit was received on was canceled or voided so receipt was not completed. |
Availability Definitions
Label | Definition |
Pending | Not yet available but should become available once processing is complete. |
Available | Ready for consumption. |
Checked Out | Consumed (picked, packed and shipped or otherwise). |
Serial Number Log
Each serial number tracks not only the current Status and Availability but a full log keeps a record for each time one of these changes along with additional contextual information. Clicking a row on a Serial Numbers grid opens a Serial Number page with this info and the full log for that record.

You can also export the Serial Number Log from any Serial Numbers grid.
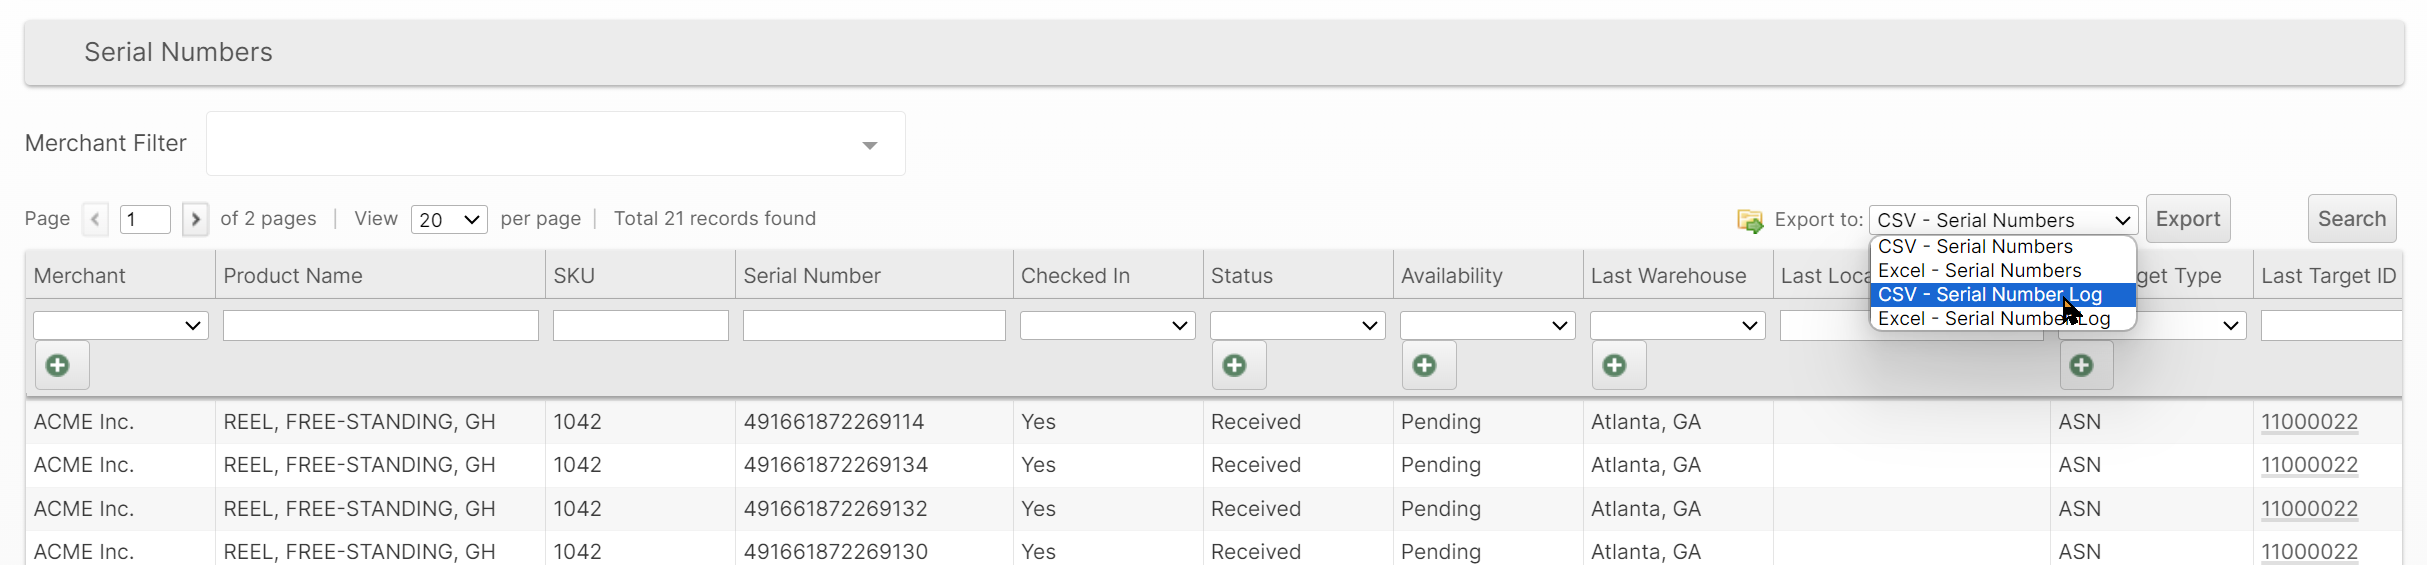
Lastly, you can search the Serial Number Log across the entire system by navigating to Catalog > Serial Numbers > Log.
Receiving Serial Numbers
Currently, the only way to ingest serial numbers into ShipStream is via an ASN or another delivery type as part of the receiving process via the Scanner UI. Serial numbers are captured at the time the items are counted using the same user interface. Specifically, when a Serial Number Type is assigned to the product being counted, some changes will be applied to the Counter dialog as follows:
- A colored bar stating the Frontend Label Plural value will appear below the counter buttons to represent the status of all of the captured serial numbers.
- The Submit button will be disabled until the number of unique serial numbers matches the counter value.
- Additional instructions will appear at the bottom of the page.

See the Capturing Serial Numbers - Scanner UI below for more information on the UI.
Receiving serial numbers in this way will cause the serial numbers to be checked in with the Received status and Pending availability.
Packing Serial Numbers
You can pack out products with serial numbers in both the Admin UI and the Scanner UI. When packing out serial numbers, they will be updated to the Packed status and Pending availability. Once the package/shipment advances to Shipped status, the serial number status will advance to Shipped and the availability to Checked Out and of course each of these updates will receive a separate log entry with added context.
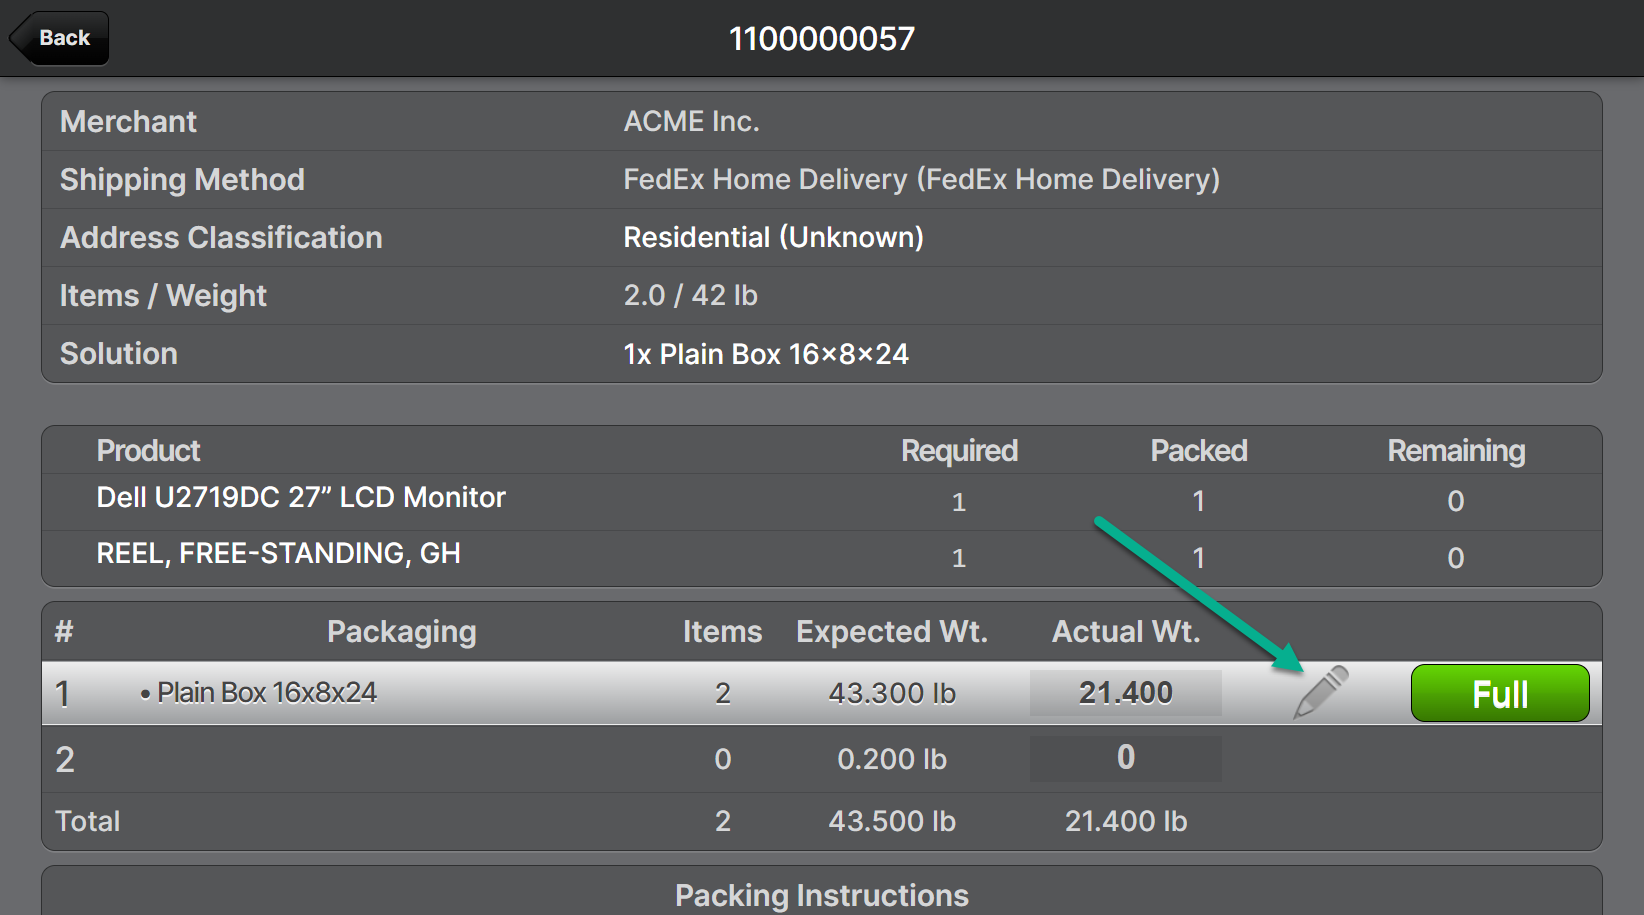
Admin UI
In the Admin UI, there is a column on the items list with an Edit button for each product that has a Serial Number Type. Clicking Edit opens the Capture Serial Numbers dialog for easy data capture. Once confirmed, a green check will appear in the row beside the button to indicate the correct number of units have been captured successfully.
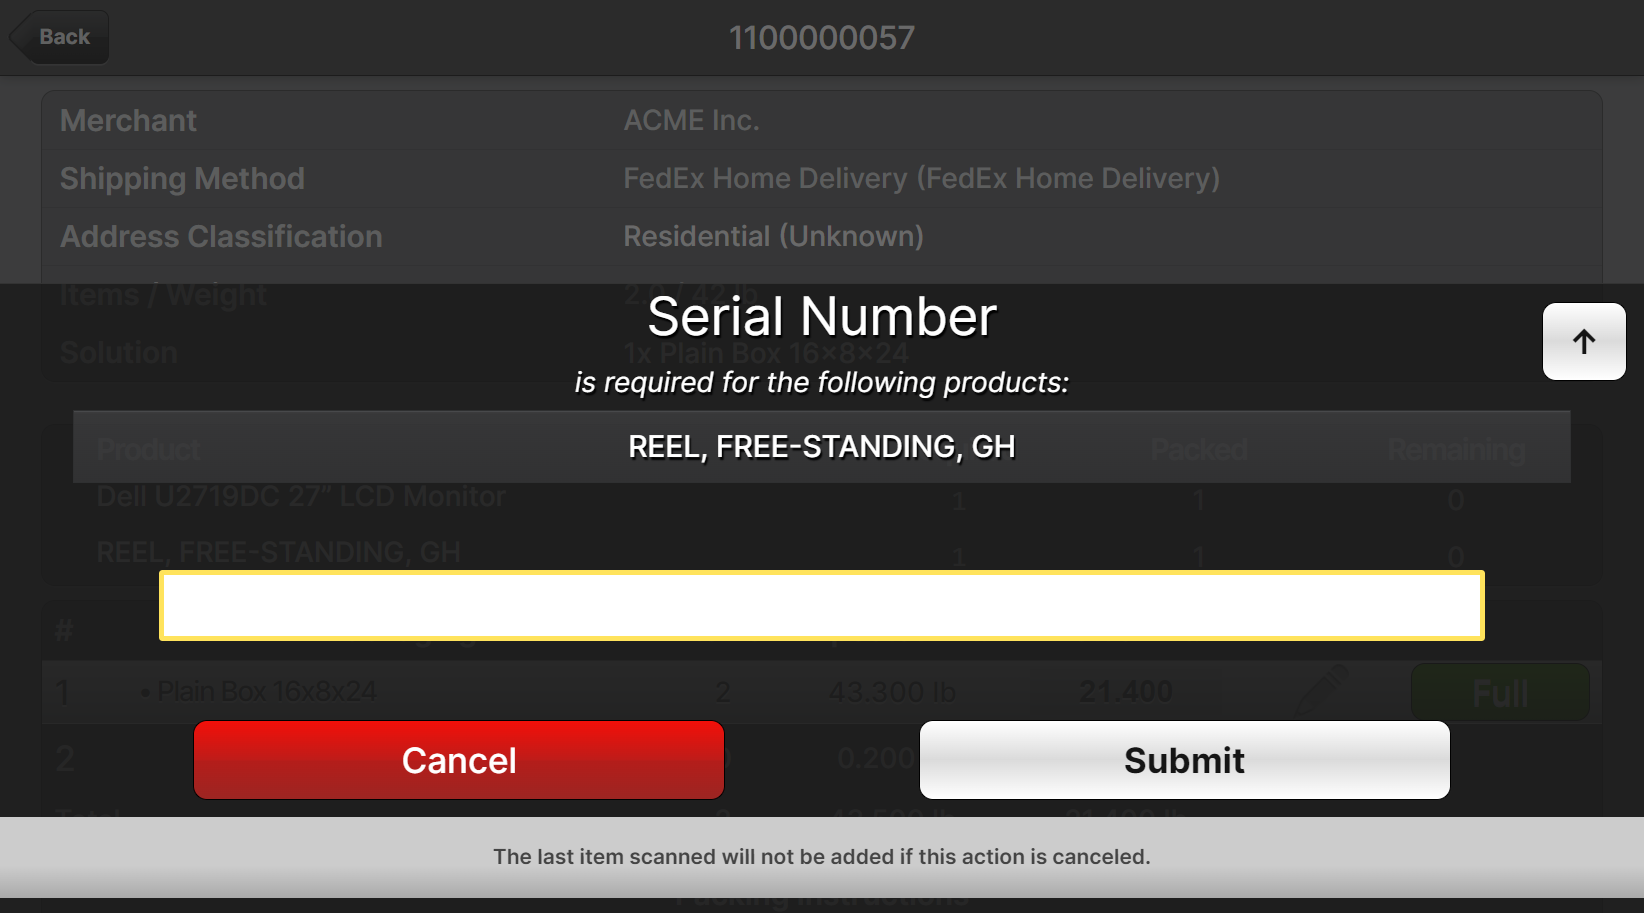
If you attempt to add serial numbers to a shipment that have not yet been checked in, they will be created on-the-fly. Any serial numbers that match one in the system that is not in a compatible status will show an error and will not be counted as a valid record.
Clicking the invalid record will display more information. In this case, the serial number was already packed on a different shipment.

Scanner UI
Capturing serial numbers in the Scanner Packing UI is very similar to the Data Collection feature of Packaging Features. An action dialog will be displayed prompting the user to scan or enter the serial number.
To review the captured serial numbers and optionally remove them:
- Click the pencil icon for a given package to edit the details.
- Click Recount on the row of the product which you wish to review.
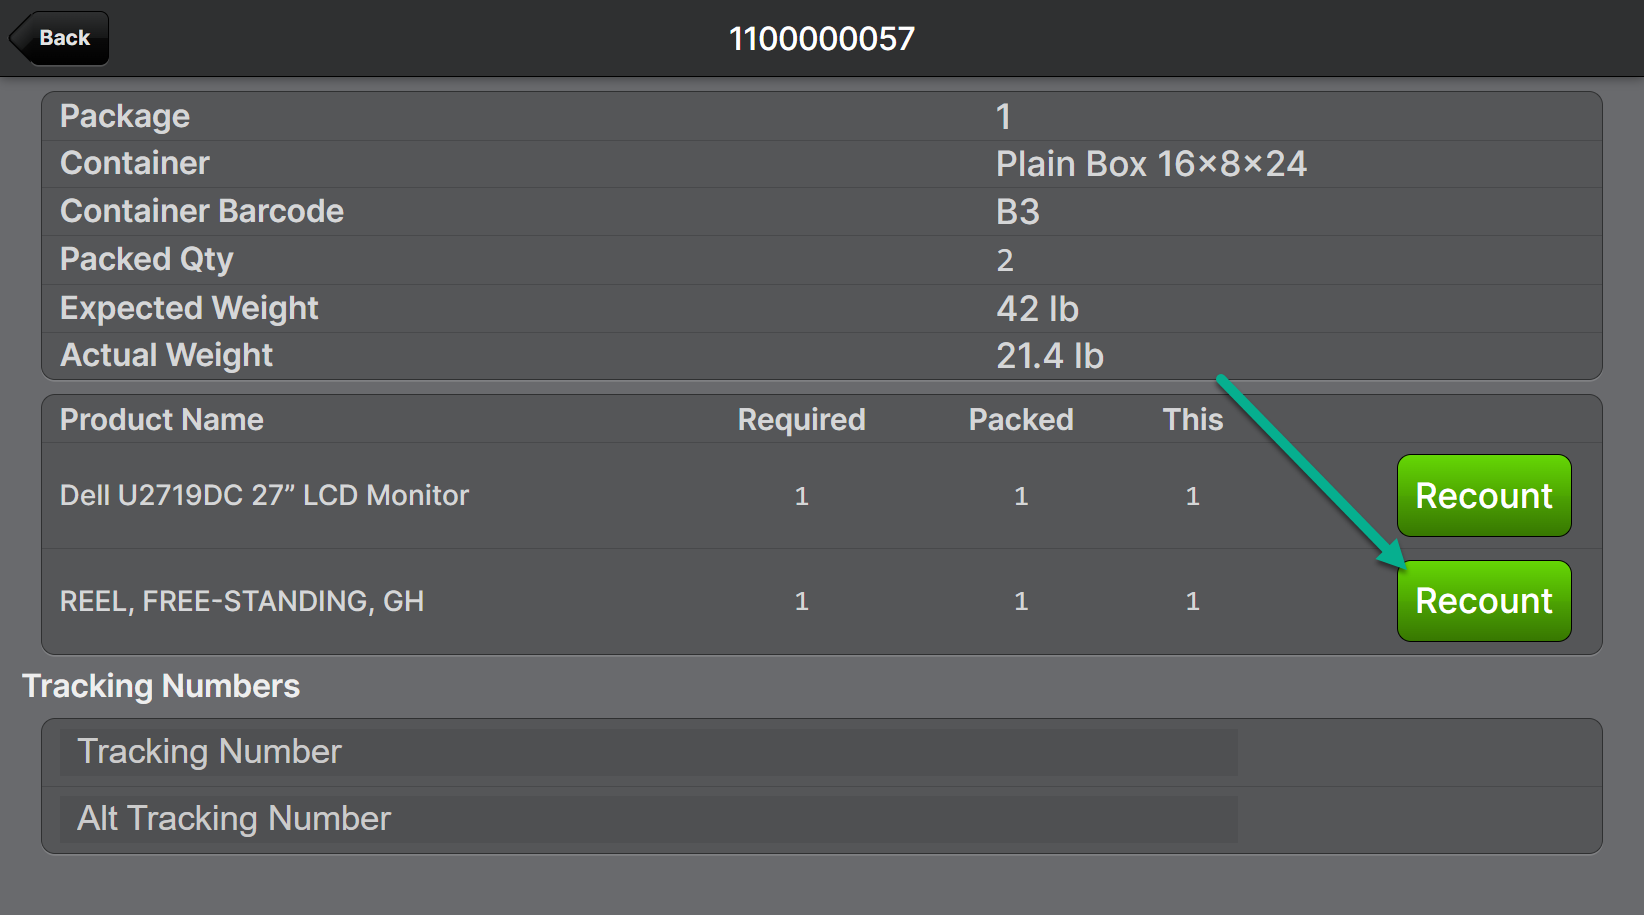
- Confirm the product barcode by scanning or entering the value.
- You can now update the captured serial number as covered in the Correcting Mistakes section below.
Capturing Serial Numbers - Scanner UI
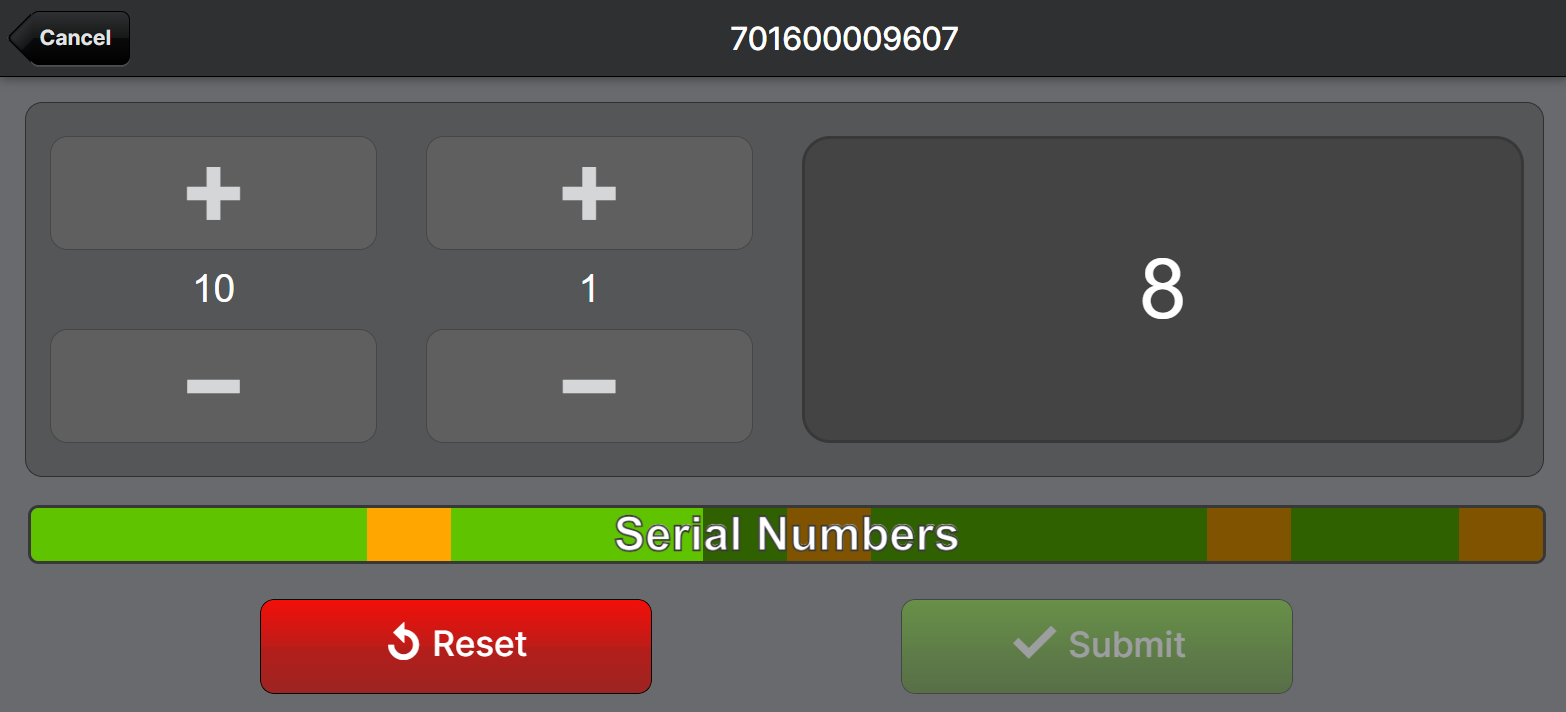
On the counter page with serial number capture activated, the colored bar is your primary indicator to show how many serial numbers have been captured compared to the counter value and the confirmation status of each one.
One "confirms" a serial number by scanning the product barcode just before or just after the serial number barcode. The scans may occur in either order as long as they are in pairs.
In the example below you can see that the count is 5 and there is one confirmed serial number indicated by green and one unconfirmed serial number indicated by orange. The remainder (the difference between the counter value and the number of unique serial numbers), 3 in this case, is dark grey.

If the number of unique serial numbers scanned is greater than the count, the "extra" numbers appear with a reduced brightness as seen in the example below, which depicts 18 unique serial numbers but a counter value of only 8.
Incrementing
Tapping either "+" button will increase the count by the number below the button. You can change this number if you wish to count in group sizes that match your physical product packing structure. For example, you may wish to count by layers on a pallet if the pallets are all packed consistently. However, you will still be required to scan each serial number before you can submit the count.
Scanning a product barcode will increment the counter by one when it is not used to confirm a previous scan.
Scanning a serial number will increment the counter by one when it is a new serial number that was not previously scanned and it is not used to confirm the previous scan and the current quantity of serial numbers is not less than the count.
This behavior allows you to use a workflow where you first arrive at the total by counting without scanning serial numbers, and then scan all of the serial numbers (either confirming or not) and at the end you should arrive at the same number that you initially counted. This workflow can ensure that you do not under-represent the actual count by missing one or more serial numbers. Otherwise, this type of human error would be very difficult to detect.
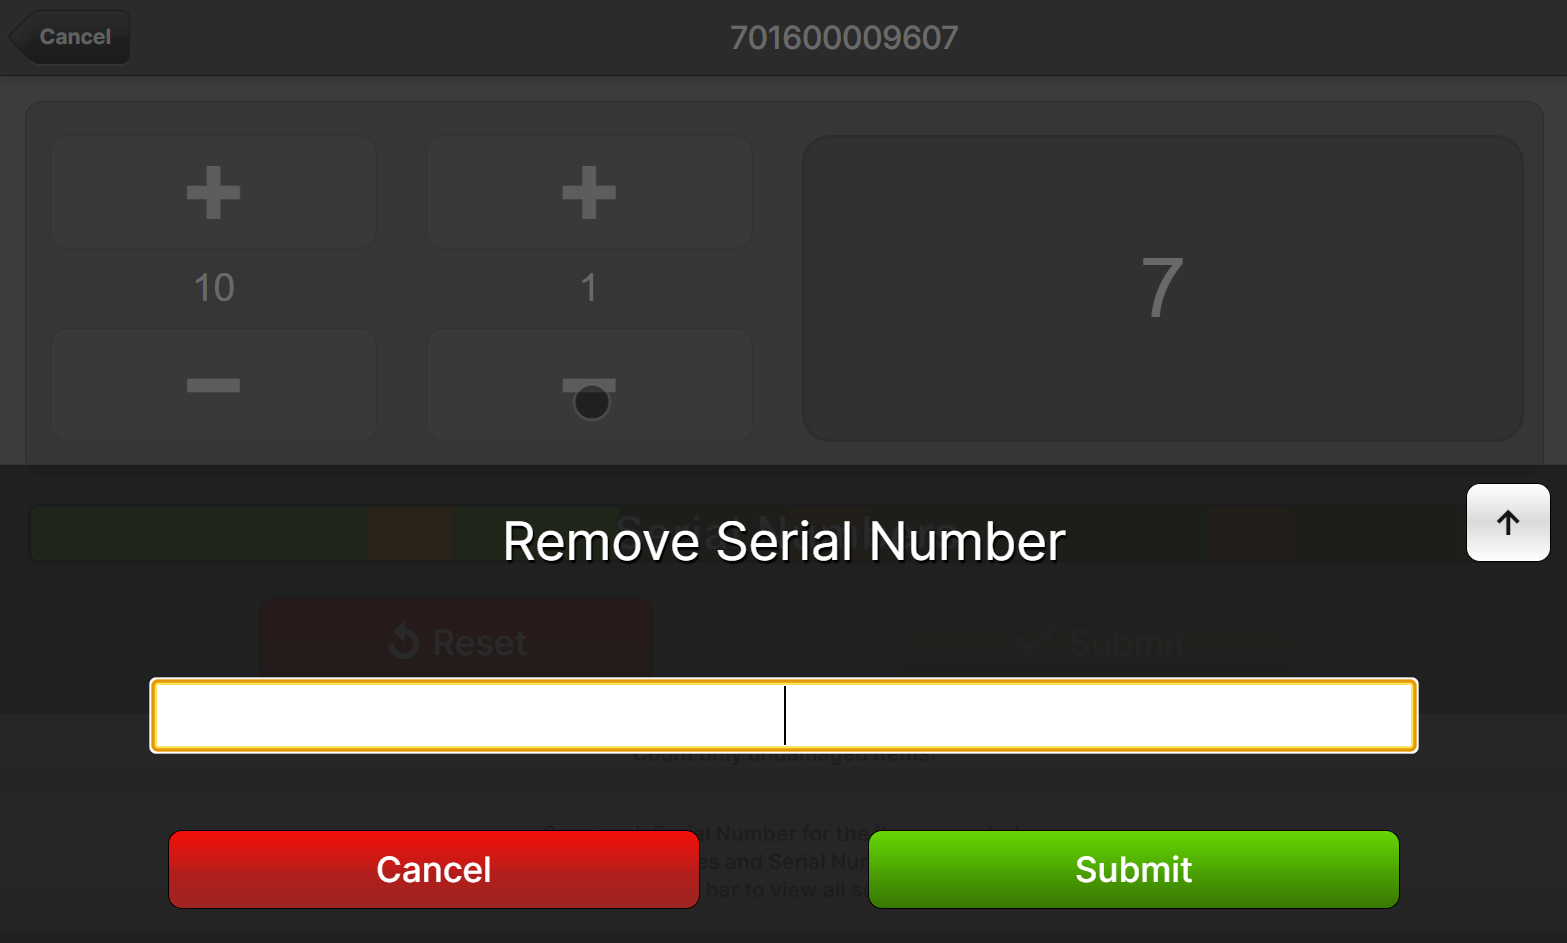
Decrementing
Tapping either "-" button will decrease the count by the number above the button. If the number is "1", a dialog will appear asking you to enter or scan the corresponding serial number that should be removed. Tapping Cancel will cause no serial numbers to be removed, but the count will still have been decremented.
Correcting Mistakes
There are a few ways to go about correcting mistakes depending on the situation.
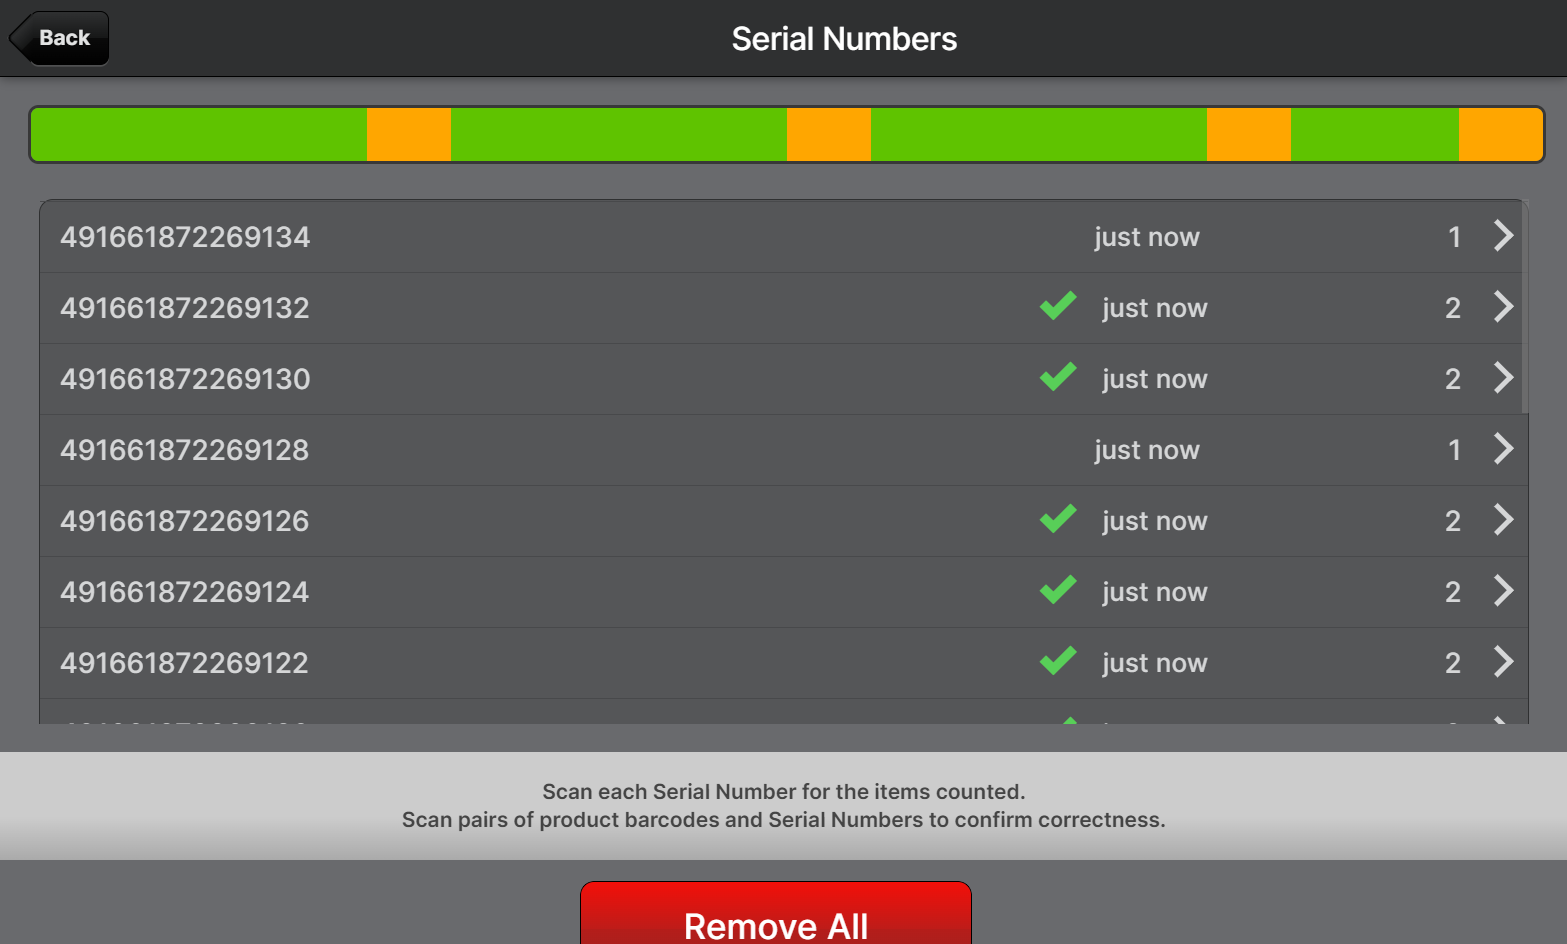
Reviewing scans
Tap the Serial Numbers bar to open a full list of captured serial numbers. You can see how many times each one was scanned and whether or not it has been confirmed as indicated by the green checkmark.
If you tap on a row in the list, you can also see each individual scan, how long ago it occurred, and if the scan was confirmed with a product barcode scan.
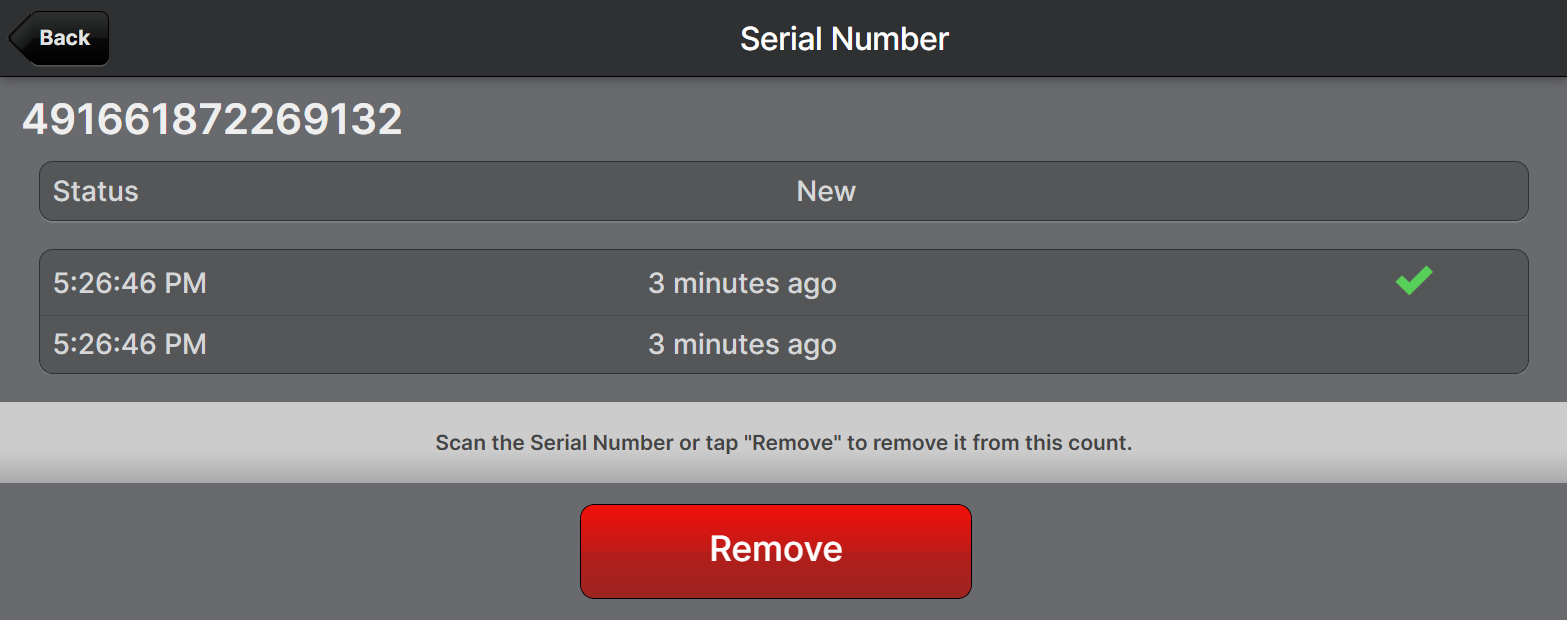
If you have any doubts, you can remove the serial number by tapping it in the list and then tapping Remove, or by tapping the "-" button below "1" and scanning the serial number that you wish to remove. You can also tap Remove All if you need to start with a clean slate.
Re-scanning items
You can re-scan serial numbers without double-counting them; only unique serial numbers are additive. If you re-scan a serial number you can also re-scan the product barcode immediately after to confirm it without incrementing the counter. Using this method to ensure you have a full green bar before tapping submit is the best way to ensure that none of the items were barcoded incorrectly.
Reset
Tapping this button will reset the counter dialog to the initial state it was in when it was first loaded including the counter value and list of serial numbers.
Capturing Serial Numbers - Admin UI
In the Admin UI, wherever serial number capture is supported, the Capture Serial Numbers dialog will be used to support three methods of input:
- Upload a file by dropping it in the drop zone or clicking the upload icon.
- Pasting or typing the input into the text area and clicking Add.
- Using a barcode scanner.
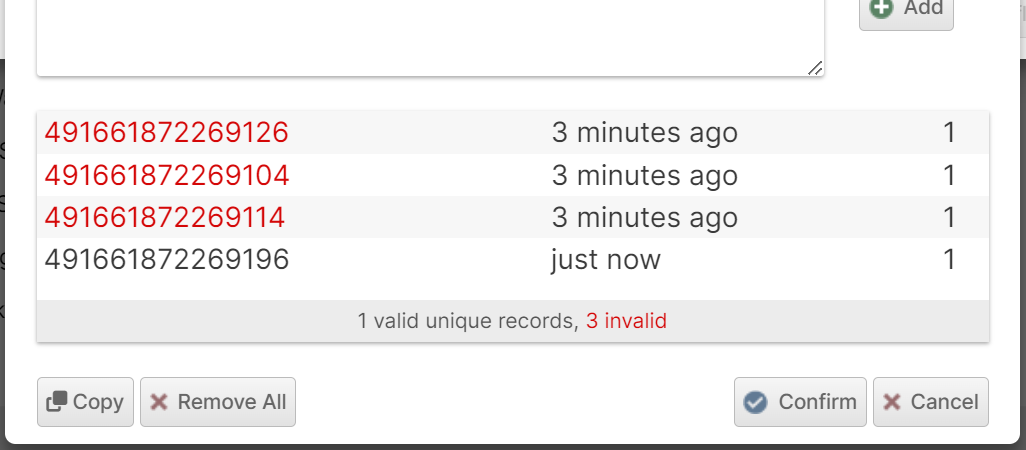
Example: Inputting serial numbers from the Pack and Ship... dialog:
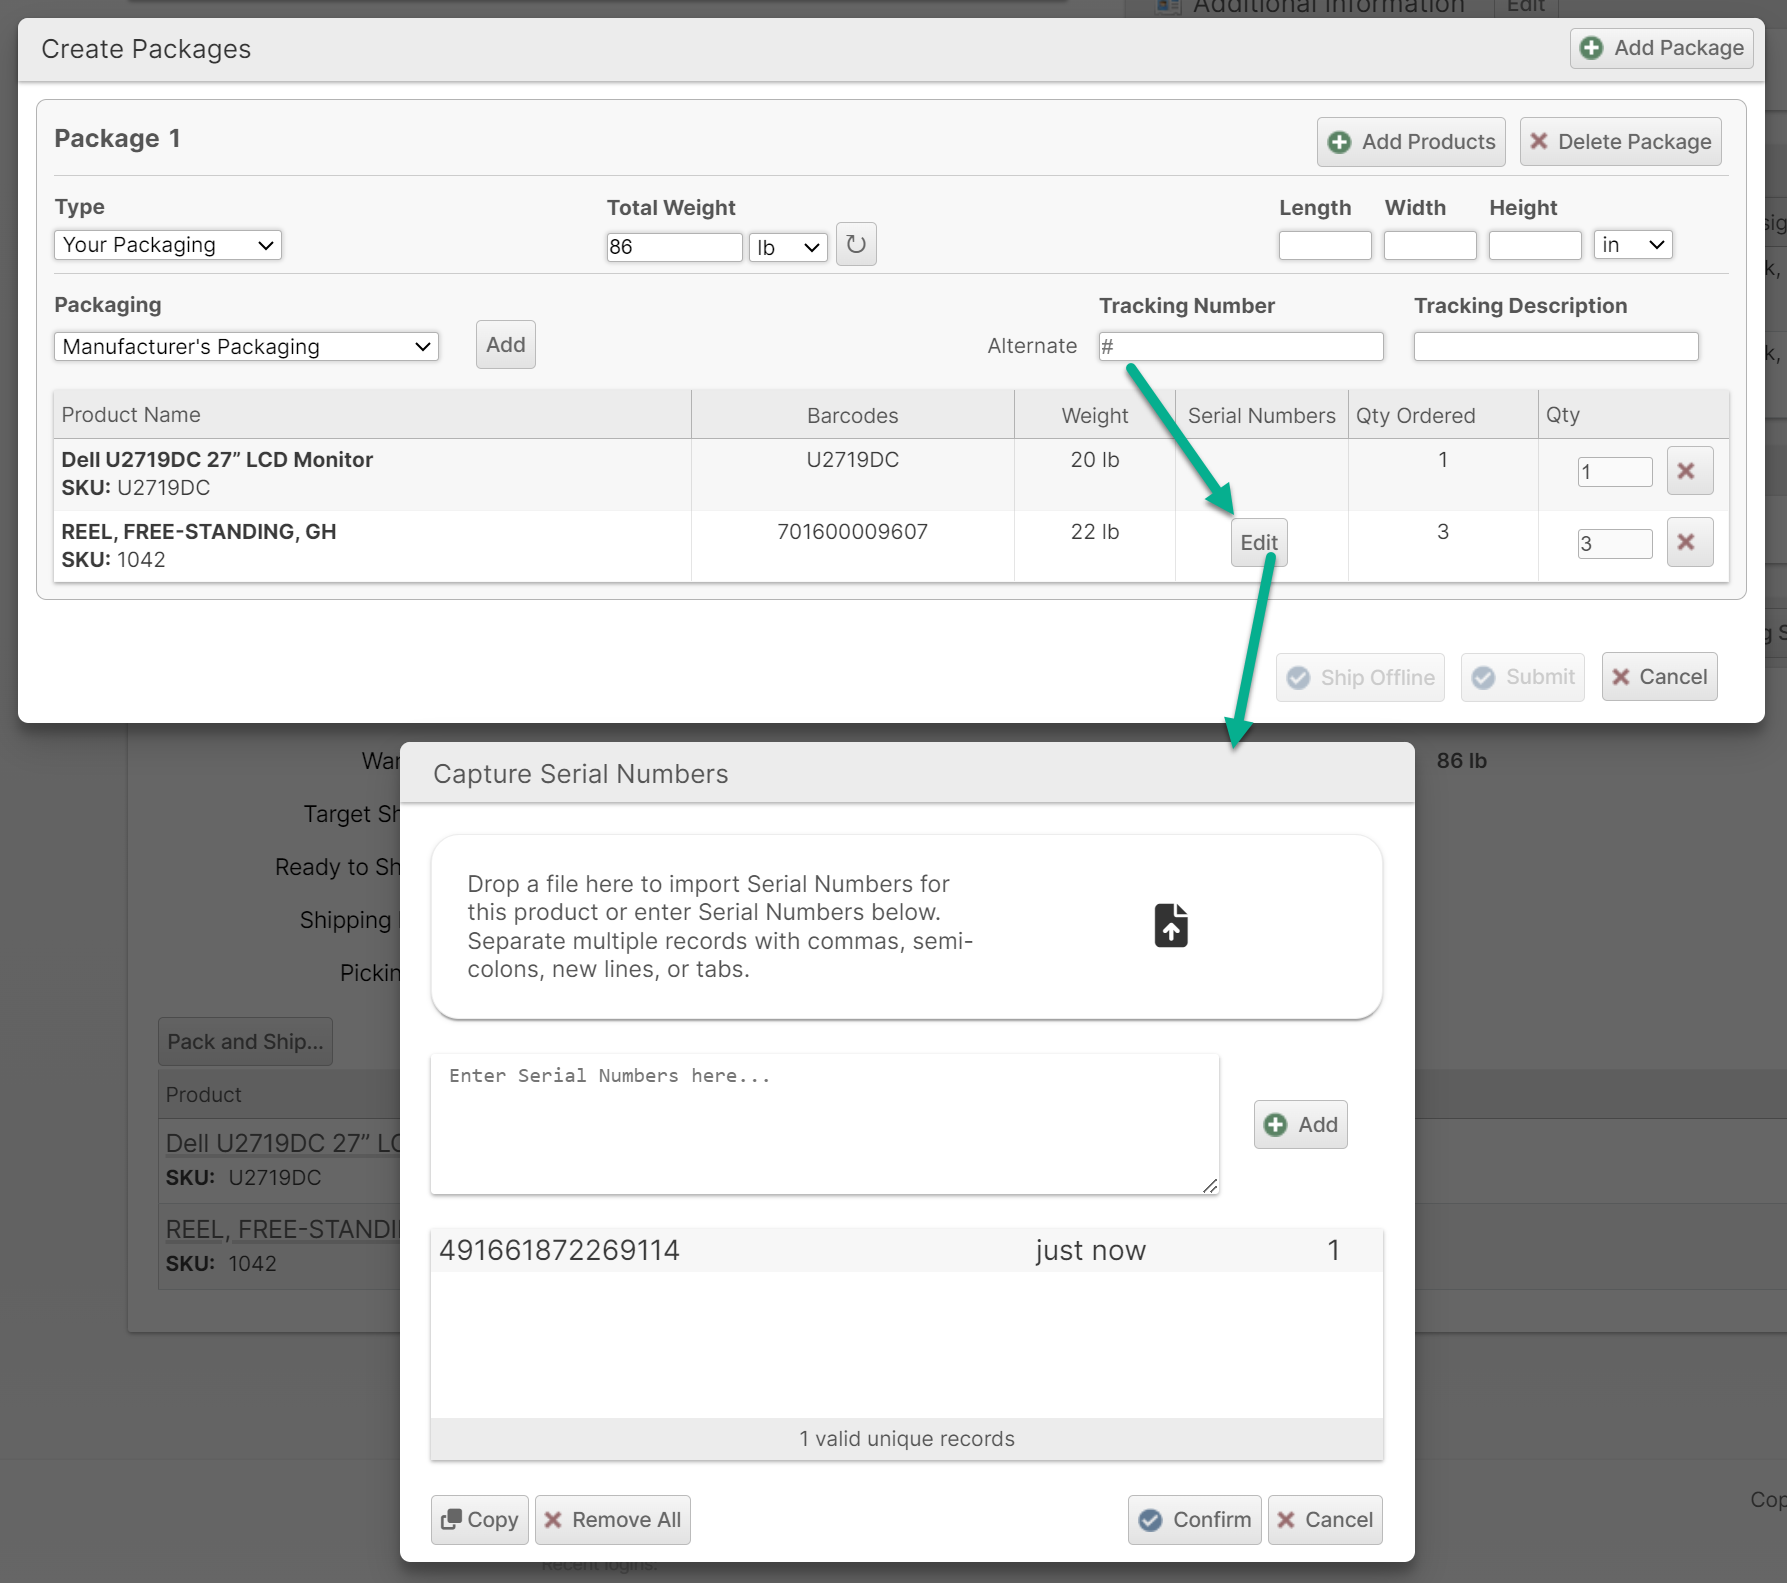
A list and count of unique records is displayed in the lower portion for visual verification. Clicking on a serial number in this list allows you to view when it was inputted, and optionally, you can click Remove to remove individual serial numbers.
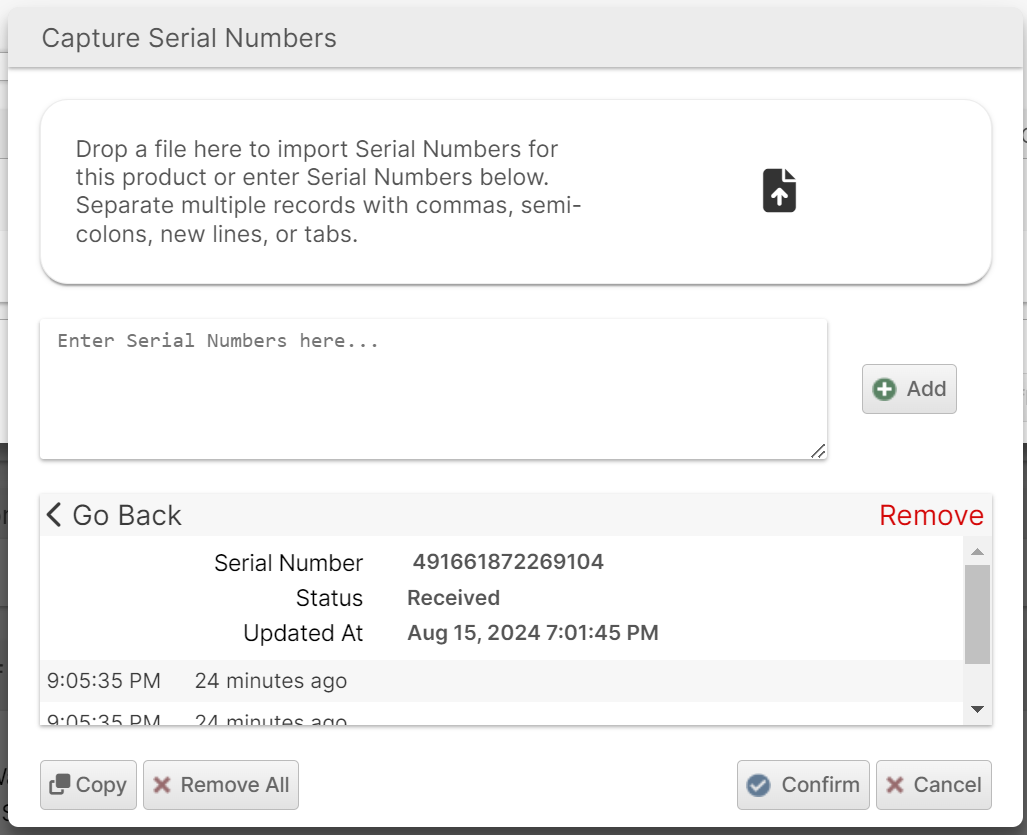
Click Go Back to return to the full list of serial numbers.
Click Remove to remove the currently displayed serial number.
Click Copy to copy the full list of serial numbers to your clipboard.
Click Remove All to remove all of the serial numbers from the list to start over.
Click Confirm to save the changes made to the list of serial numbers and close the dialog. The serial numbers status will advance to Picked and availability to Pending.
Click Cancel to discard all changes that were made to the serial numbers list since the dialog was opened.
How did we do?
Tracking Numbers for Offline Shipments
Custom Fields for Shipments