SPS Commerce

SPS Commerce offers, among other things, a leading solution for business-to-business data exchange, taking much of the pain out of setting up and maintaining your EDI connections.
ShipStream's SPS Commerce integration makes a direct connection to your SPS Commerce account and simplifies the setup of your trading partners to get you launched quickly and with minimal effort.
Overview
In a nutshell, there are two components to setting up EDI via SPS Commerce:
- Setup the Global Integration to connect to your SPS Commerce account (only performed once)
- Add a Merchant Integration to map your Trading Partners to the correct ShipStream Merchants and Brands by Vendor ID and Trading Partner ID (performed once per merchant)
The Global Integration establishes the connection to SPS Commerce and acts as a communication channel for the SPS Commerce Merchant Integration, of which you may setup any number of subscriptions. This allows the configuration to be managed per-Merchant, giving your merchants maximum flexibility and visibility while keeping the EDI data and connection management siloed appropriately.
- When an EDI file is received from SPS Commerce, ShipStream will parse the file and attempt to match it to a Merchant Integration subscription based on the Vendor ID and Use Test Directories options.
- Merchants will be able to see Integation Errors that are logged for troubleshooting so long as the incoming EDI files matched the Merchant's SPS Commerce integration subscription using the Vendor ID.
- If a Merchant cannot be matched to the incoming file's Vendor ID, the EDI Transaction will be left in "Merchant Not Found" status and will not be visible to any merchants. After you add a new Merchant Integration or update the Vendor ID and Use Test Directories options of an existing one you may click "Retry" on the EDI Document page to resume the processing.
- All sent and received documents can be seen at System > Integrations > EDI Documents for organization users. Client users also have this page, but will only be able to see the EDI Documents that were matched to them based on the Vendor ID.
Supported Fulfillment Models
ShipStream currently supports the Drop Ship (B2C) and Bulk Import (B2B) fulfillment models. Please let us know if you are interested in supporting other fulfillment models.
The following document types are utilized:
- Orders - Receive orders for goods fulfillment
- 850, 875, 940, ORDERS, PurchaseOrders
- Will be read from
/out/*or/testout/*paths by default. Override with Order File Paths configuration.
- OrderAcks - Acknowledge receipt of or reject Orders
- 855, ORDRSP, PurchaseOrderAcks
- Will be written to
/in/PR*or/testin/PR*paths
- Shipments (Outbound ASN) - Notify of shipped goods including tracking details
- 856, 945, AdvanceShipNotices, DESADV
- Will be written to
/in/SH*or/testin/SH*paths
- Warehouse Stock Transfer Shipment Advice (Inbound ASN) - Receive notice of inbound shipments to be received as ASNs
- 943, WarehouseStockTransferShipmentAdvice
- Will be read from
/out/SW*or/testout/SW*paths by default. Override with Delivery File Paths configuration.
- Warehouse Transfer Receipt Advice - Confirm what was received against an ASN created from a 943
- 944, WarehouseTransferReceiptAdvice
- Will be written to
/in/RE*or/testin/RE*paths
- Inventory Advice - Notify of inventory levels
- 846, INVRPT
- Will be written to
/in/IB*or/testin/IB*paths
- Inventory Adjustment Advice - Notify of inventory adjustments as deltas (hourly batches or real-time)
- 947, WarehouseInventoryAdjustmentAdvice
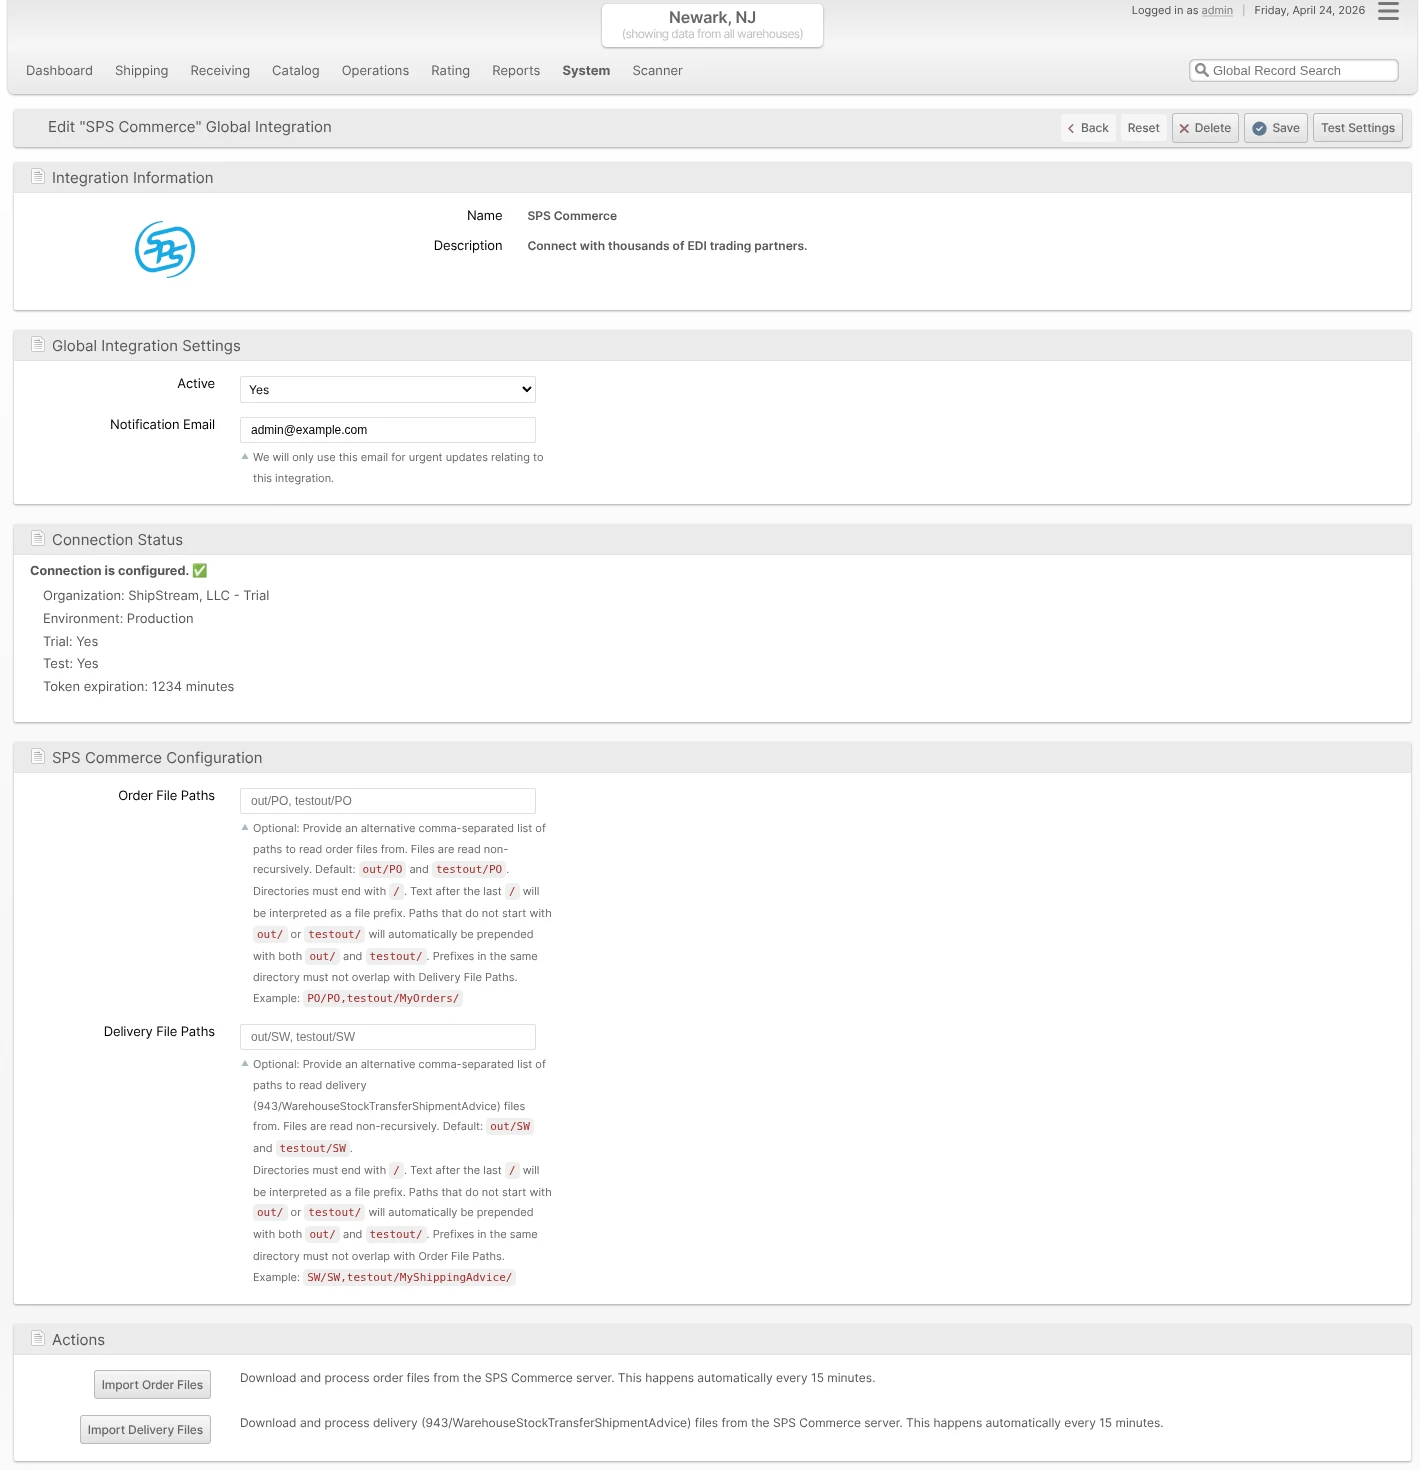
Setup Global Integration
Before you can start, you will need an account with SPS Commerce. If you don't have one, let us know and we'll get you introduced!
Once you have your SPS Commerce account, head over to your ShipStream instance and follow these instructions.
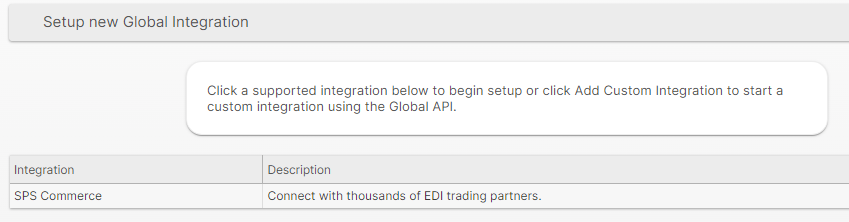
- Login and click System > Integrations > Global Integrations (if you don't see this you may need to add or update your User Roles).
- Below "Setup new Global Integration" click "SPS Commerce".
- If you have specific needs for Location IDs, add them to the Location ID Map. By default, the ShipStream Warehouse IDs (see System > Enumerations > System > Warehouses) will be used as the Location IDs which works for most situations.
- Click Save and Continue Edit.

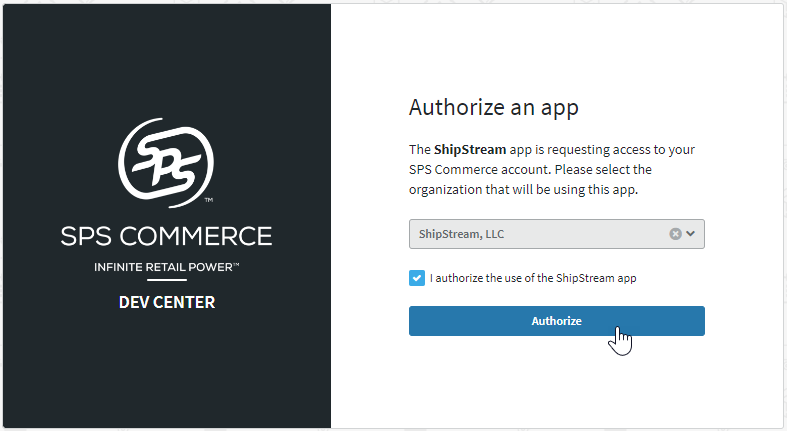
- Click the Authorize button and complete the authorization with your SPS Commerce account.
- When you are returned to the ShipStream page for the SPS Commerce integration you should see your company name as designated by SPS Commerce listed in the Connection Status after "Organization".
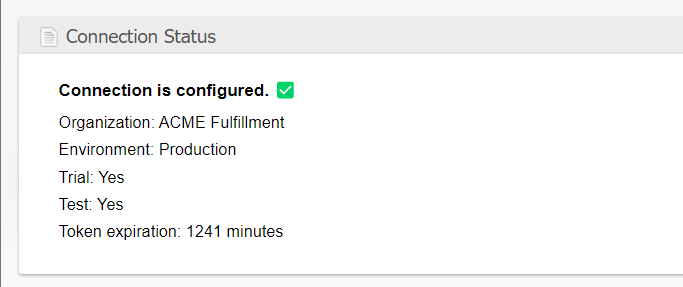
The connection setup is now complete and ShipStream can now pull and push data files to and from your SPS commerce account!
You are now ready to proceed to Setup Merchant Integration below.
Additional Configuration
There are some additional configuration options that are not typically required but may be necessary in some cases.
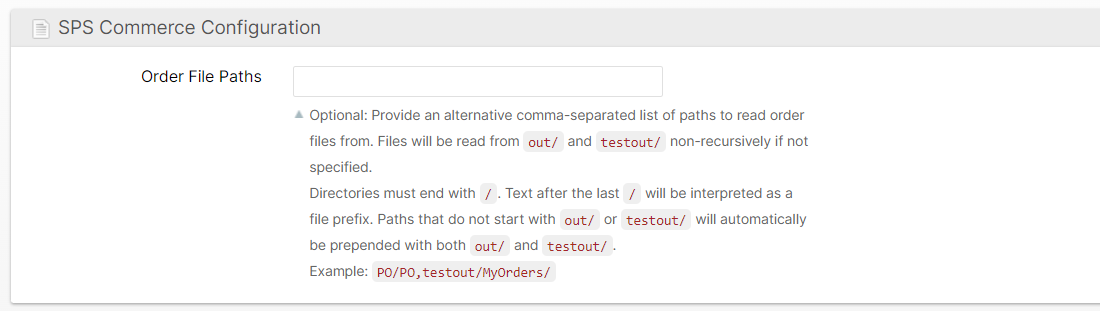
Order File Paths
By default, ShipStream will read order files from the out/ and testout/ directories of the SPS Commerce server. Subdirectories are ignored by default, so if you need to read files from a different directory or only with specific prefixes, these must be specified here. For example, a configuration of PO/PO,testout/MyOrders/ would cause ShipStream to only read files matching these paths and ignore all others:
- out/PO/PO*
- testout/PO/PO*
- testout/MyOrders/*
testout/ will only be matched to Merchant Integrations with the Use Test Directories option set to Yes.Delivery File Paths
By default, ShipStream will read 943/WarehouseStockTransferShipmentAdvice (inbound delivery) files from the out/SW and testout/SW directories of the SPS Commerce server. The format and behavior is the same as Order File Paths above. Override this if your trading partners drop 943 files into a different directory or use a different filename prefix.
Prefixes specified here must not overlap with Order File Paths in the same directory — if they do, the integration will report a configuration error so you can disambiguate them.
You may also trigger an immediate import without waiting for the next 15-minute cron run by clicking Import Delivery Files in the Actions section of the Global Integration page.
Setup Merchant Integration
Once your Global Integration is set up you still need to set up a Merchant Integration subscription for each merchant that will use SPS Commerce. Incoming documents are mapped to these Merchant Integrations based on the Trading Partner ID. If different Trading Partners require different settings you can set up multiple Merchant Integrations, but you can also receive multiple Trading Partners to the same Merchant Integration.
- Log in and click System > Integrations > Merchant Integrations (if you don't see this you may need to add or update your User Roles).
- Click Add New Subscription.
- Select the appropriate Merchant and click SPS Commerce in the list of integrations.
- Configure the integration as appropriate (details below) and click Save Subscription.
Subscription Configuration
On the subscription page, expand the Subscription Configuration section to configure it to the merchant's specific needs.
Use Test Directories
Selecting "Yes" will cause incoming files to be matched to this integration only if they come from the testout/ directory, and file uploads will be placed in the testin/ directory. Otherwise, incoming files from the out/ directory will be potentially matched and file uploads will be placed in the in/ directory.
Trading Partner ID Map
Add a row for each Trading Partner ID for which you will be receiving orders and select the appropriate Brand for each.

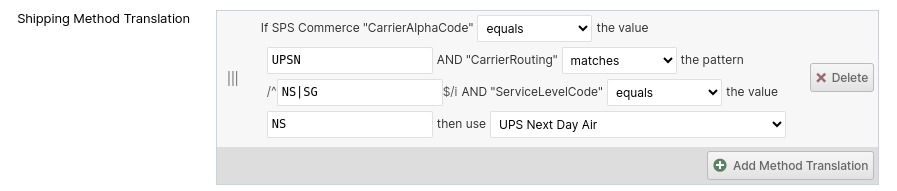
Shipping Method Translation
As every order must have a Shipping Method assigned, the integration will make it's best effort to map the incoming CarrierAlphaCode and ServiceLevelCode fields to the closest matching Shipping Method. But, you may override this and specify a Shipping Method Translation to map the CarrierAlphaCode, CarrierRouting and ServiceLevelCode values coming from SPS Commerce to the ShipStream Shipping Method of your choice.
The CarrierRouting value is a free-form field so will vary by Trading Partner. The ServiceLevelCode should be somewhat standardized and the expected values are listed in Default Shipping Method Translation.
Example 1
To map any value for CarrierAlphaCode and any value for CarrierRouting and the ServiceLevelCode for "Standard Ground" service (SG) to a Virtual Shipping Method which performs Rate Shopping.

Example 2
To map CarrierAlphaCode "UPSN" with CarrierRouting values "NS" or "SG" and ServiceLevelCode "NS" to UPS Next Day Air you could use the following:
Send Order Acknowledgement
Choose Yes if your trading partners require an Order Ack document for each Order document received.
Send Shipment ASN
Choose Yes if your trading partners require an ASN document for each Shipment. The timing of this depends on the Wait for Shipped option described next.
Wait for Shipped
If Yes, a Shipment ASN will not be generated until the shipment advances to Shipped status. Otherwise, the ASN will be sent as soon as the shipment is Packed or automatically at 8AM or 8PM in the warehouse timezone. Select No if you intend not to use the Loading feature and do not wish to wait for the Shipped status. Waiting for Shipped can be useful to ensure that the required tracking numbers have been added if they are not added at the time of packing and are required by your trading partner.
SSCC Label Format
If the trading partner requires unique SSCC codes to be generated and applied to each package, specify the mapping of each Vendor ID to the Label Format desired. The vendor-specific labels will be requested from the SPS Commerce API whenever you click "Print SSCC". See Outbound SSCC Barcodes for more information on this feature.

Inventory Advice
To report your inventory levels to your trading partners you will simply need to add an Inventory Advice configuration for each Trading Partner which is entered in the first field, and the time interval selected for that Trading Partner in the second field.

Once saved, you can also force an upload to occur immediately by clicking "Upload Inventory Advice" in the Actions section.

The 846 also reports inventory currently set aside via Inventory Holds, broken down by SPS Commerce Quantity Qualifier code. The mapping is configured per-subscription via the Inventory Advice — Hold Reason Codes widget that appears immediately below the Inventory Advice rows. See Hold Reason EDI Mappings below for the default codes and how to override them.
Send Inventory Adjustment Advice
In addition to the periodic full inventory snapshots sent by Inventory Advice, you can have ShipStream notify trading partners of inventory changes as they happen using the 947/WarehouseInventoryAdjustmentAdvice document. This covers cycle counts, manual adjustments, hold placements and releases, and any other event that alters on-hand inventory or its availability without waiting for the next scheduled 846.
The Send Inventory Adjustment Advice field has three modes:
- No - 947 documents are not generated.
- Hourly - ShipStream batches all physical stock adjustments since the previous run into a single 947 document per Trading Partner, emitted once per hour. Virtual inventory changes (for example, adjustments to a Product's advertised quantity) are not included.
- Real-Time - ShipStream emits a 947 document immediately for every adjustment event. Physical stock adjustments (reason code AH) and virtual inventory changes (reason code AA) are emitted as separate documents so that trading partners that do not accept mixed reason codes in the same file can still be supported.
When the 947 is enabled, hold placements and hold releases are also emitted, with the W15-04 Adjustment Reason Code drawn from the per-subscription Inventory Adjustment Advice — Hold Reason Codes map. See Hold Reason EDI Mappings for defaults and overrides.
The 947 reuses the Trading Partner IDs you configured under Inventory Advice above — no additional trading partner setup is required.
Hold Reason EDI Mappings {#hold-reason-edi-mappings}
ShipStream's Inventory Holds feature lets warehouse staff and integrations set inventory aside for QC, recalls, expirations, damage, and other reasons. Each Merchant Integration subscription has two map widgets that translate ShipStream Hold Reasons into the EDI codes your trading partner expects:
- Inventory Advice — Hold Reason Codes - Maps each system Hold Reason to a SPS Commerce Quantity Qualifier code emitted on the 846. Hidden when no Inventory Advice trading partners are configured above.
- Inventory Adjustment Advice — Hold Reason Codes - Maps each system Hold Reason to a W15-04 Adjustment Reason Code emitted on the 947. Hidden when Send Inventory Adjustment Advice is set to No.
Each widget shows one row per system Hold Reason with the Reason's label, the ShipStream Reason code, and a Code dropdown listing every value allowed by the SPS Commerce spec. Selecting (omit) from the dropdown means held inventory with that Reason will not appear in the corresponding EDI document at all.
User-defined Hold Reasons inherit their parent system Reason's code automatically, so you only need to configure the mapping at the system-Reason level. Reasons missing from the saved map fall back to the defaults below; if neither the saved map nor the default has a code for a Reason, the 846 omits it and the 947 falls back to AH (Inspection Required).
Default 846 Quantity Qualifier codes:
| ShipStream Hold Reason | Default 846 Code | Description |
|---|---|---|
| QC Inspection | QA | Quality Inspection |
| Cycle Count | 02 | Cycle Count / Inventory Audit |
| Damaged | 14 | Damaged |
| Recalled | RET | Returned / Awaiting Disposition |
| Expired | P90 | Expired |
| Near Expiry | P80 | Near Expiration |
| Contaminated | 20 | Unusable |
| Customs/Bond Hold | QH | On Hold / Blocked |
| Pending Disposal | 20 | Unusable |
| Pending Return to Vendor | RET | Returned / Awaiting Disposition |
Default 947 W15-04 Adjustment Reason Codes:
| ShipStream Hold Reason | Default W15-04 Code | Description |
|---|---|---|
| QC Inspection | AH | Inspection Required |
| Cycle Count | BA | Location Error |
| Damaged | AA | Damaged |
| Recalled | AJ | Quarantined |
| Expired | AC | Expired |
| Near Expiry | AD | Near Expiry |
| Contaminated | AE | Contaminated |
| Customs/Bond Hold | AG | Quality Hold |
| Pending Disposal | AS | Scrapped / Pending Disposal |
| Pending Return to Vendor | AN | Vendor Return |
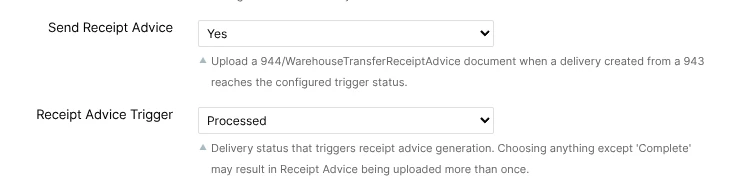
Send Receipt Advice
Choose Yes if your trading partners require a 944/WarehouseTransferReceiptAdvice in response to a 943/WarehouseStockTransferShipmentAdvice. The 944 confirms what was actually received against the ASN that was created from the 943, including any shortages, overages, and lot details. The timing of the upload is controlled by Receipt Advice Trigger below.
Receipt Advice Trigger
Selects the Delivery status that triggers the 944 upload. Available options are:
- Processed - Send the 944 as soon as the Delivery advances to Processed (counting is finished).
- Committed - Send the 944 once the inventory has been committed and is available.
- Complete - Send the 944 once the Delivery is closed and Complete.
Warehouse Location Map
When a 943 is received, ShipStream uses this map to determine which warehouse the inbound shipment is destined for, by matching the Trading Partner ID, Vendor, Location ID Qualifier, and Location Number in the EDI message to one of the rows you configure here.
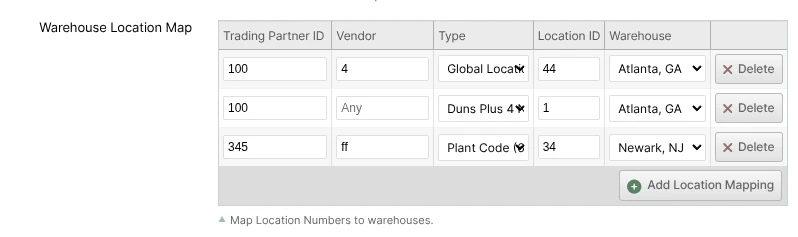
For each row:
- Trading Partner ID - The SPS Commerce Trading Partner ID for the sender of the 943. Must match the message exactly.
- Vendor - Optional. Leave blank as a wildcard that matches any vendor (or no vendor). Specific vendor matches always win over wildcard matches, so you can configure a per-vendor override alongside a catch-all "any vendor" fallback for the same Trading Partner.
- Type - The Location Code Qualifier in the EDI message — most commonly Buyer Location Number (92) for Ship-To addresses, but the full SPS RSX qualifier set is supported (DUNS, GLN, Plant Code, etc.).
- Location ID - The Address Location Number that the 943's Ship-To address must contain to match this row.
- Warehouse - The ShipStream warehouse where the resulting ASN will be created.
Order Transform Script
You can provide some basic Javascript code to transform the order data based on the entire SPS Commerce document which is present as a Javscript object in the variable spsCommerceOrder. This script can modify the order object before it is submitted.
Example 1 - mapping order options
This example script maps Signature Required and Saturday Delivery values for Target.com orders to the relevant ShipStream order options.
let carrierInformation = spsCommerceOrder.Header.CarrierInformation[0] || {};
switch (carrierInformation.CarrierRouting) {
    case 'SG':   // Signature Required (UPS/FedEx)
    case 'NDSS': // Next Day Air with Signature Required (FedEx)
    case 'HDS':  // Home Delivery with Signature Required (FedEx)
    case 'PONS': // Priority Overnight with Signature Required (FedEx)
    case 'NDSS': // Next Day Standard with Signature Required (FedEx)
    case 'ESS':  // Express Saver with Signature Required (FedEx)
    case 'HDS':  // Home Delivery with Signature Required (FedEx)
    case 'IS':   // Through the Door with Signature Required (LTL)
    case 'RS':   // Room of Choice with Signature Required (LTL)
    case 'WS':   // White Glove with Signature Required (LTL)
    case 'AS':   // White Glove Assembly with Signature Required (LTL)
        order.options.signature_required = 'any'
        break
}

let serviceLevelCodes = carrierInformation.ServiceLevelCodes.map(v => v.ServiceLevelCode)
let saturdayDelivery = serviceLevelCodes.some((v) => {
    switch (v) {
        case 'NS': // Next Day Saturday
        case 'SS': // 2 Day Saturday
            return true;
        default:
            return false;
    }
})
if (saturdayDelivery) {
    order.options.saturday_delivery = true
}
Example 2 - mapping order item SKUs
This example overrides the default behavior of using the VendorPartNumber for the item SKU with using the BuyerPartNumber.
order.items.forEach(item => {
  spsCommerceOrder.LineItem.forEach(spsItem => {
    if (spsItem.OrderLine.VendorPartNumber === item.sku && spsItem.OrderLine.BuyerPartNumber) {
      item.sku = spsItem.OrderLine.BuyerPartNumber
    }
  })
})
Example 3 - using arbitrary references
Since the EDI file header References data is an array and allows arbitrary values for ReferenceQual and ReferenceID, you can "stuff" just about any information into these fields as needed to pass non-standard data from SPS Commerce to ShipStream.
// Enable Item-level SSCC generation for ABC/123 orders
if (spsCommerceOrder.Header.References.some((ref) => ref.ReferenceQual == 'ABC' && ref.ReferenceID == '123')) {
     order.options.generate_sscc = ['item']
}

// Override the shipping method with a "Custom Shipping Method" ref
const shippingMethodRef = spsCommerceOrder.Header.References.find((ref) => ref.ReferenceQual == 'CSM')
if (ref) {
     order.options.shipping_method = ref.ReferenceID
}
Shipment Transform Script
The Reference Qualifiers and Order Line Item properties will be copied from the original Order document when generating the Shipment document and we make a best effort to map our shipping methods to the "Carrier Routing" value as well. However, sometimes these may not meet specific requirement of your Trading Partners so we provide the Shipment Transform Script which allows you to customize the generated document before it is transmitted to SPS Commerce.
This script has in it's scope the following variables:
eventData- data from theshipment:packed,shipment:shippedormanifest:sealedeventshipment- the ShipStream shipment being evaluatedorder- the ShipStream order associated with the shipmentOrder- an object containing methods providing access to Order Custom Field valuesspsCommerceShipment- the object which will be used to generated the SPS Commerce Shipment documentspsCommerceOrder- an object representing the original SPS Commerce Order document received
For example, if you need to hard-code the CarrierRouting value to be "XYZ", the script to do so would be:
spsCommerceShipment.Header.CarrierInformation[0].CarrierRouting = 'XYZ'
Order Ack Transform Script {#order-ack-transform-script}
You can provide some basic Javascript code to transform the Order Acknowledgment data before it is sent to your trading partners. This script has access to the SPS Commerce OrderAck object which is present as a Javascript object in the variable spsCommerceOrderAck, allowing you to modify the acknowledgment before it is transmitted.
This script has in its scope the following variables:
order- the ShipStream order associated with the OrderAck (null if order was rejected)Order- an object containing methods providing access to Order Custom Field values (only available if order exists)spsCommerceOrderAck- the object which will be used to generate the SPS Commerce OrderAck documentspsCommerceOrder- an object representing the original SPS Commerce Order document received
Example 1 - Change Item Status Code from "IH" to "IA"
Some vendors don't like the "IH" (On Hold) status code and prefer "IA" (Accept) instead.
// Change order line item ack itemStatusCode from "IH" to "IA" if your vendor doesn't support "IH"
if (spsCommerceOrderAck.LineItem) {
    spsCommerceOrderAck.LineItem.forEach(lineItem => {
        if (lineItem.LineItemAcknowledgement) {
            lineItem.LineItemAcknowledgement.forEach(acknowledgement => {
                if (acknowledgement.ItemStatusCode === 'IH') {
                    acknowledgement.ItemStatusCode = 'IA'
                }
            })
        }
    })
}
ItemStatusCode.Example 2 - Inject ItemScheduleDate for Backordered Items
Add a scheduled date when items are backordered.
// Inject an ItemScheduleDate when an order is backordered
const backorderDate = new Date()
backorderDate.setDate(backorderDate.getDate() + 14) // 14 days from now
const formattedDate = backorderDate.toISOString().split('T')[0] // YYYY-MM-DD format

if (spsCommerceOrderAck.LineItem) {
    spsCommerceOrderAck.LineItem.forEach(lineItem => {
        if (lineItem.LineItemAcknowledgement) {
            lineItem.LineItemAcknowledgement.forEach(acknowledgement => {
                // If item is backordered, add a schedule date
                if (acknowledgement.ItemStatusCode === 'IB') { // IB = Backordered
                    acknowledgement.ItemScheduleDate = formattedDate
                }
            })
        }
    })
}
Example 3 - Add Custom References
Add custom reference information to the OrderAck.
// Add custom references to the OrderAck

// Add a custom reference to the header
if (!spsCommerceOrderAck.Header.References) {
    spsCommerceOrderAck.Header.References = []
}

spsCommerceOrderAck.Header.References.push({
    ReferenceQual: 'ZZ', // Mutually Defined
    ReferenceID: 'CUSTOM-REF-' + new Date().toISOString().split('T')[0].replace(/-/g, ''),
    Description: 'Custom Reference'
})

// Add item-level references if needed
if (spsCommerceOrderAck.LineItem) {
    spsCommerceOrderAck.LineItem.forEach(lineItem => {
        if (!lineItem.References) {
            lineItem.References = []
        }

        lineItem.References.push({
            ReferenceQual: 'LT', // Lot Number
            ReferenceID: 'LOT-' + lineItem.OrderLine.LineSequenceNumber,
            Description: 'Lot Number'
        })
    })
}
Example 4 - Modify Acknowledgment Type Based on Order Status
Change the acknowledgment type based on the order status.
// Modify acknowledgment type based on order status
if (order) {
    const orderStatus = order.state || ''

    switch (orderStatus) {
        case 'holded':
            spsCommerceOrderAck.Header.OrderHeader.AcknowledgementType = 'AH' // Acknowledge-Hold
            break

        case 'canceled':
            spsCommerceOrderAck.Header.OrderHeader.AcknowledgementType = 'RJ' // Rejected-No Detail
            break

        case 'complete':
            spsCommerceOrderAck.Header.OrderHeader.AcknowledgementType = 'AD' // Acknowledge-With Detail No Change
            break

        default:
            spsCommerceOrderAck.Header.OrderHeader.AcknowledgementType = 'AC' // Acknowledge-With Detail and Change
            break
    }
}
AcknowledgementType.Shipment Advice Transform Script {#shipment-advice-transform-script}
When a 943/WarehouseStockTransferShipmentAdvice is received, this script lets you modify the Delivery payload before the ASN is created. Use it to override automatic field mappings (warehouse, expected delivery date, item SKUs, lot/serial handling, etc.) or to skip a delivery or specific items entirely.
This script has in its scope the following variables:
delivery- the ShipStream Delivery payload that will be submitted todelivery.create. Settingdelivery.skip = truewill cause the integration to skip creating the ASN. Settingskip = trueon any item indelivery.itemswill drop that item from the payload.spsCommerceStockTransfer- an object representing the original 943 document received
Example - override the warehouse based on a custom reference
const whRef = spsCommerceStockTransfer.Header.References.find(r => r.ReferenceQual === 'WH')
if (whRef) {
    delivery.warehouse_id = parseInt(whRef.ReferenceID, 10)
}
Receipt Advice Transform Script {#receipt-advice-transform-script}
The 944/WarehouseTransferReceiptAdvice is generated automatically from the Delivery and the original 943, copying identifiers and references through. If your trading partners require additional fields or custom values, this script lets you modify the document before transmission.
This script has in its scope the following variables:
delivery- the ShipStream Delivery the 944 is being generated forspsCommerceReceiptAdvice- the object that will be used to generate the 944 documentspsCommerceStockTransfer- an object representing the original 943 document received
Example - add a custom reference qualifier
spsCommerceReceiptAdvice.Header.References = spsCommerceReceiptAdvice.Header.References || []
spsCommerceReceiptAdvice.Header.References.push({
    ReferenceQual: 'ZZ',
    ReferenceID: 'CUSTOM-' + delivery.increment_id
})
Order Interpretation
When receiving an order from SPS Commerce, ShipStream makes an effort to interpret the data as it is intended. These behaviors should handle most cases properly but can be overridden with scripts if needed.
SKUs and Barcodes
The VendorPartNumber in the EDI file will be used to match products in ShipStream with either the same SKU or Vendor SKU. Additionally, the ConsumerPackageCode in the EDI file will be used to match products in ShipStream with the same Barcode in case a SKU match is not found.
Inner and Outer Packs
Currently the only OrderQtyUOM supported is EA. However, when an order item contains the PackQualifier fields with outer_qty and inner_qty, these will be used to convert the order item to the appropriate number of units of the related BOM product. For example, if a product exists as both singles with a SKU matching the order item and in cases of 20 with a different SKU, and 40 units of the singles SKU are ordered with inner_qty=1 and outer_qty=20, the order item will be converted to 2 units of the 20-pack case SKU instead of 40 units of the single SKU.
Service Level Codes
These are common qualifiers and definitions for the ServiceLevelCode field.
| Qualifier | Definition |
|---|---|
| 3D | Three Day Service |
| AM | A.M. Service |
| CG | Ground |
| CX | Express Service |
| DC | Delivery Confirmation |
| DS | Door Service |
| ET | Proof of Delivery with Signature |
| FC | First Class |
| G2 | Standard Service |
| IDL | Inside Delivery |
| IE | Expedited Service - Worldwide |
| IS | International Service |
| IX | Express Service - Worldwide |
| LM | Last Mile Delivery (typically services that use USPS for the last-mile delivery - e.g. FedEx Ground Economy, UPS SurePost, DHL SmartMail, etc.) |
| LT | Economy |
| ME | Metro |
| ND | Next Day Air |
| NF | Next Flight Out |
| NH | Next Day Hundred Weight |
| NM | Next Morning |
| NXD | Next Day |
| ON | Overnight |
| PA | Primary Service Area - Next Day by 10:30 A.M. |
| PB | Priority Mail |
| PC | Primary Service Area - Next Day by 9:30 A.M. |
| PI | Priority Mail Insured |
| PM | P.M. Service |
| PN | Primary Service Area - Next Day by Noon |
| PO | P.O. Box/Zip Code |
| PR | Primary Service Area - Next Day by 5:00 P.M. |
| PS | Primary Service Area - Second Day by Noon |
| PT | Pooled Shipment |
| PX | Premium Service (typically seen as White Glove Service, but varies by carrier or provider ) |
| SA | Same Day |
| SC | Second Day Air |
| SD | Saturday Service |
| SE | Second Day |
| SG | Standard Ground |
| SH | Second Day Hundred Weight |
| SI | Standard Ground Hundred Weight |
Default Shipping Option Translation
ShipStream automatically sets the following service level options based on the CarrierAlphaCode and ServiceLevelCode. This can be overridden by the Order Transform Script.
| CarrierAlphaCode | ServiceLevelCodes | Service Level |
|---|---|---|
| * | ET | Signature Required |
| * | SD | Saturday Delivery |
Default Shipping Method Translation
ShipStream automatically sets the following shipping methods based on the CarrierAlphaCode and ServiceLevelCode. This can be overridden by either the Shipping Method Translation or the Order Transform Script.
| CarrierAlphaCode | ServiceLevelCodes | Region | Shipping Method |
|---|---|---|---|
| FDE | SC | US | FedEx 2 Day |
| FDE | PS | US (Hawaii outbound) | FedEx 2 Day AM |
| FDE | IE | US,EU,LAC,MEISA | FedEx International Priority |
| FDE | G2,3D | US,LAC | FedEx Express Saver |
| FDE | PC | US,MX,MEISA | FedEx First Overnight |
| FDE | IS | US,EU,APAC | FedEx International Economy |
| FDE | IX | US,EU,APAC | FedEx International First |
| FDE | PN | US,EU,LAC,MEISA | FedEx Priority Overnight |
| FDE | SA | US,MX | FedEx Same Day |
| FDE | ON,ND | US,LAC,MEISA | FedEx Standard Overnight |
| FDEG | G2,SG | US | FedEx Ground |
| FDEG | CG | US | FedEx Home Delivery |
| FXFE | ND | US | FedEx 1 Day Freight |
| FXFE | SE | US,LAC | FedEx 2 Day Freight |
| FXFE | 3D | US | FedEx 3 Day Freight |
| FXFE | IS | US,APAC,EU | FedEx International Economy Freight |
| FXFE | IE | US,LAC,APAC,MEISA,EU | FedEx International Priority Freight |
| FXSP | G2,LM | US | FedEx Ground Economy |
| LASG | SG | US | LaserShip Ground |
| LSOV | AM,NXD | US | LSO Early Next Day |
| LSOV | LT,SG | US | LSO Economy Next Day |
| LSOV | SG | US | LSO Ground |
| LSOV | NXD | US | LSO Priority Next Day |
| LSOV | SD | US | LSO Saturday |
| ONTC | SG | US | OnTrac Ground |
| ONTC | SA | US | OnTrac Same Day |
| ONTC | NM | US | OnTrac Sunrise |
| SDED | ON | US | Spee-Dee Delivery |
| UPSM | PB,IS | US | UPS Economy Mail Innovations International |
| UPSM | FC | US | UPS First Class Mail Innovations |
| UPSM | PB,CX | US | UPS Parcel Select Mail Innovations |
| UPSM | PB | US | UPS Priority Mail Innovations |
| UPSM | PB,IE | US | UPS Priority Mail Innovations International |
| UPSN | SC | US | UPS 2nd Day Air |
| UPSN | SC,AM | US | UPS 2nd Day Air A.M. |
| UPSN | 3D | US | UPS 3 Day Select |
| UPSN | CG,SG | US | UPS Ground |
| UPSN | ND | US | UPS Next Day Air |
| UPSN | ND,AM | US | UPS Next Day Air Early |
| UPSN | ND,PM | US | UPS Next Day Air Saver |
| UPSN | G2 | US | UPS Standard |
| UPSN | LM | US | UPS SurePost |
| UPSN | IE | US | UPS Worldwide Expedited |
| UPSN | IX | US | UPS Worldwide Express |
| UPSN | IX,CX | US | UPS Worldwide Express Plus |
| UPSN | IS | US | UPS Worldwide Saver |
| USPS | FC | US | USPS First-Class |
| USPS | FC,IS | US | USPS First-Class International |
| USPS | SG | US | USPS Parcel Select Ground |
| USPS | PB | US | USPS Priority Mail |
| USPS | CX | US | USPS Priority Mail Express |
| USPS | IX | US | USPS Priority Mail Express International |
| USPS | IS | US | USPS Priority Mail International |
Outbound Shipment ASN Generation
This section covers the outbound 856/945 ASN sent in response to an inbound order. For the inbound 943 ASN that creates a Delivery, see Inbound Delivery (943) Ingest.
If "Send Shipment ASN" is enabled, ShipStream will generate and send an ASN document when the shipment is Packed, or transitions to Shipped depending on the Wait for Shipped option. The transition to Shipped can be achieved in one of three ways:
- Seal and load a manifest containing the last packages of the shipment
- Click Shipped in the admin UI on the Order or Shipment page
- Provide the primary tracking number(s) if Automatically Mark Shipped is enabled for External Shipping Methods
The ASN is generated from the shipment data as you would expect, with some important things to note described in the sections below.
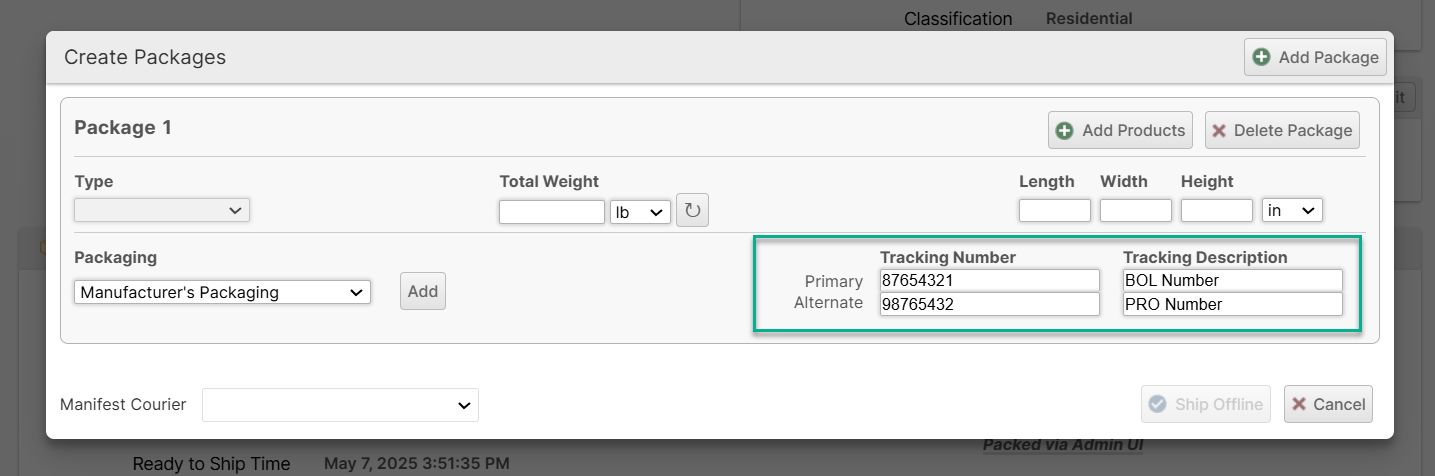
ShipmentHeader
The BillOfLadingNumber is populated using the first package tracking number (either primary or alternate) that has a description containing the letters "BOL" or "Lading", case-insensitively.
The CarrierProNumber is populated using the first package tracking number (either primary or alternate) that has a description containing the letters "PRO", case-insensitively.
Here is an example showing how to populate these fields during packing:
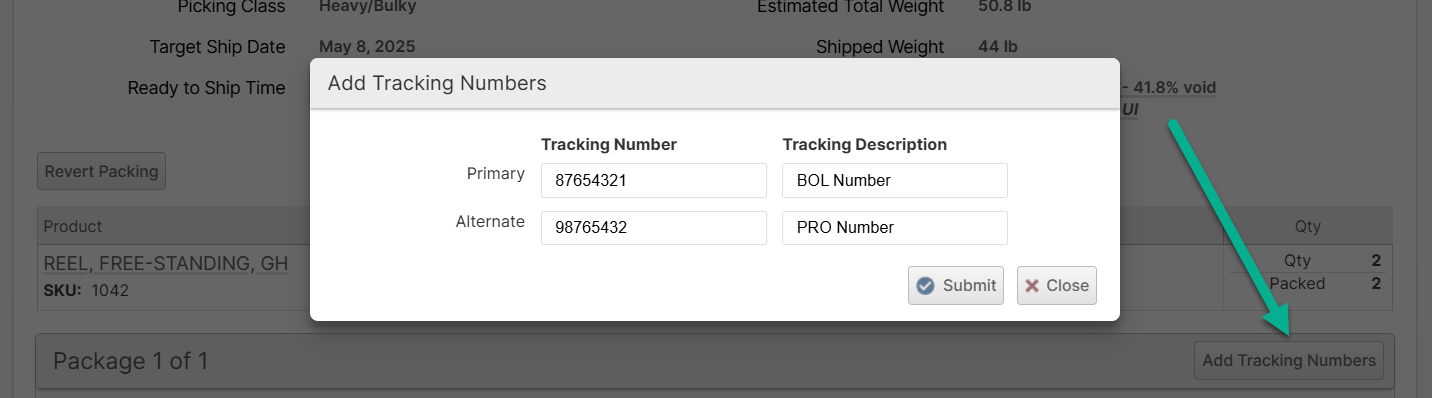
These can also be added after packing if you use the Wait for Shipped option by adding tracking numbers later:
References
By default, the ASN will contain all references copied from the source EDI file for the order. If you need to add, remove or modify these, you can do so with the Shipment Transform Script. The JSON Schema validation for the ReferenceQual field "enum" values has been disabled to allow non-conventional values.
For example, this script adds one reference with ReferenceQual value "X" and ReferenceID value "Y":
spsCommerceShipment.Header.References.push({
  ReferenceQual: "X",
  ReferenceID: "Y"
})
Packs
If the order has Items SSCCs, each unit of inventory will be wrapped in a separate "Pack". Otherwise, the Packs will correspond to the Packages which were created during packing. For each pack, the ShippingSerialID will be set according to the SSCC assignment and the CarrierPackageID will be set using the package's primary tracking number.
Many fields will be populated using OrderLine data from the source order EDI file, including ProductID, ApplicationID, References and more.
CarrierAlphaCode
This will be set as follows:
- The SCAC value assigned directly to the shipment if available (can be set by the carrier integrations)
- The SCAC value of the Manifest Courier assigned to the shipment if the Manifest Courier is set and the Manifest Courier has an SCAC value defined.
Carrier Routing
The CarrierRouting field in particular lacks standardization, so it may be common that you need to override this field using a Shipment Transform Script to meet the needs of your trading partners.
Example 1 - Service Description:
spsCommerceShipment.Header.CarrierInformation[0].CarrierRouting = eventData.service_description
Example 2 - Carrier Code
spsCommerceShipment.Header.CarrierInformation[0].CarrierRouting = shipment.carrier_code.toUpperCase()
Default Value
The value ShipStream generates out of the box for this field is based on the following table:
| CarrierRouting | Description |
|---|---|
| AS | White Glove Assembly with Signature Required LTL |
| HD | Home Delivery with No Signatured Required FedEx |
| HDS | Home Delivery with Signature Required FedEx |
| IS | Through the Door with Signature Required LTL |
| MI | Mail Innovations/MIP/MM UPS |
| NDS | Next Day Air with No Signature Required UPS/FedEx |
| NDSS | Next Day Air with Signature Required UPS/FedEx |
| NS | No Signature Required UPS / FedEx |
| PON | Priority Overnight FedEx |
| PONS | Priority Signature FedEx |
| RS | Room of Choice with Signature Required LTL |
| SG | Signature Required UPS / FedEx |
| SMP | SmartPost with No Signature Required FedEx |
| SMPU | Signature FedEx |
| SP | SurePost UPS |
| TD | To the Door LTL |
| WS | White Glove with Signature Required LTL |
Inbound Delivery (943) Ingest
When the integration imports a 943/WarehouseStockTransferShipmentAdvice file, ShipStream creates a corresponding ASN Delivery for the merchant. The 943 effectively replaces the manual "Create New ASN" step described in ASNs and RMAs, and the resulting Delivery is processed through the same accept → process → put-away → commit flow.
Trading Partner and Warehouse Routing
The integration matches the 943 to a Merchant Integration using the same Trading Partner ID Map used for orders. The destination warehouse is then resolved from the Warehouse Location Map by looking up the Ship-To address's Location Number and Location Code Qualifier for the Trading Partner (with vendor-specific overrides taking precedence over wildcard rows).
Multi-Order Documents
A single 943 can contain multiple OrderLevel blocks. Each OrderLevel is split into its own ASN Delivery, and the merchant_ref on each Delivery is suffixed with -1, -2, etc., so they remain individually identifiable and cancelable.
Item Matching and Lots
Item lookup follows the same rules as orders — VendorPartNumber matches the ShipStream SKU or Vendor SKU, and ConsumerPackageCode falls back to a Barcode match. Lot identifiers, expiration dates, and pack quantities present on the 943 are preserved on the resulting Delivery line items.
Cancellations
A 943 with TsetPurposeCode 01 (Cancellation) cancels the previously-created Delivery for the same ShipmentIdentification. For multi-order documents the cancellation is scoped to the matching OrderLevel — only the corresponding Delivery is cancelled. If no Delivery is found for a cancellation, or more than one matches, the EDI Document is left in an error state so a user can resolve it.
TsetPurposeCode values 00 (Original) and 01 (Cancellation) are currently supported. 04 (Change), 05 (Replace), 06 (Confirmation), and 07 (Duplicate) will leave the EDI Document in an error state until they are explicitly handled.Receipt Advice (944) Generation
If Send Receipt Advice is enabled, ShipStream will generate and send a 944/WarehouseTransferReceiptAdvice for any Delivery that was created from a 943, once the Delivery reaches the configured Receipt Advice Trigger status. The 944 reports back to the trading partner what was actually received against the 943, including any shortages, overages, and per-lot breakdowns.
Both the inbound 943 and the outbound 944 are visible on the Delivery page under the EDI Messages tab, alongside any creation/cancellation events:

Source of Truth
The 944 is generated from the Delivery as-processed in ShipStream — the actual received quantities, lot numbers, and exception status — combined with identifiers and references copied through from the original 943. ShipStream keeps a reference to the inbound 943 message on the Delivery to make this round-trip possible.
Cancellations
When a Delivery created from a 943 is cancelled in ShipStream, a 944 is automatically generated and sent regardless of the Receipt Advice Trigger setting, since cancellation is a terminal state that the trading partner needs to know about.
Re-Sends
ShipStream suppresses re-uploads when a regenerated 944 has the same payload as a previously-uploaded one (for example, when Receipt Advice Trigger is set to Processed and the Delivery transitions through Committed and Complete with no change in counts). Any genuine difference will produce a new 944 upload, so triggers earlier than Complete can result in the trading partner receiving multiple 944s for a Delivery that is being received in stages.
Order Ack Codes Reference
Item Status Codes Reference
Common item status codes that can be used in scripts:
| Code | Description |
|---|---|
| AA | Item Accepted - Order Forwarded to Alternate Supplier Location |
| AC | Item Accepted and Shipped |
| AR | Item Accepted and Released for Shipment |
| BP | Item Accepted - Partial Shipment, Balance Backordered |
| CC | Item Rejected - Customer Cancelled |
| DR | Accept - Date Rescheduled |
| IA | Accept |
| IB | Backordered |
| IC | Item Accepted - Changes Made |
| ID | Item Deleted |
| IE | Item Accepted - Price Pending |
| IF | Item on Hold, Incomplete Description |
| IH | On Hold |
| IP | Accept - Price Changed |
| IQ | Accept - Quantity Changed |
| IR | Item Rejected |
| IS | Accept - Substitution Made |
| IW | Item on Hold - Waiver Required |
Acknowledgment Type Codes Reference
Common acknowledgment type codes:
| Code | Description |
|---|---|
| AC | Acknowledge-With Detail and Change |
| AD | Acknowledge-With Detail No Change |
| AE | With Exception Detail Only |
| AH | Acknowledge-Hold |
| AK | Acknowledge-No Detail or Change |
| AP | Acknowledge-Product Replenishment |
| RD | Reject with Detail |
| RF | Reject-With Exception Detail Only |
| RJ | Rejected-No Detail |
| RO | Reject-With Counter Offer |
Error Handling
Errors generated by this integration are handled similarly to other errors as described in Integrations Overview. However, here are some additional notes:
- The Retry and Resolve buttons on an EDI document page behave the same as the buttons on the corresponding Error page.
- If a duplicate file is detected (same name and contents as another file that was previously imported), this will throw an error. Clicking "Retry" on the error will force the duplicate file to be processed. Clicking "Resolved" on the error will have no effect and a new error will be generated as long as the duplicate file still exists on the server.