Table of Contents
Lots/Expirations Tracking
Overview of Lot/Expiration Tracking feature and creating a Lot Type.

ShipStream supports tracking both Lot Numbers and Expiration Dates as well as Origination Date which is simply the date a product was received. This information will be captured while processing a Delivery and will remain with the inventory at it's stock location until it is Picked and finally Packed and shipped out. This feature will allow you to:
- Gain visibility on inventory aging and lot numbers in stock.
- Enforce the order in which inventory is allocated to new orders (e.g. FIFO, FEFO).
- Report on which customers received a product with a given Lot Number or Expiration Date.
- Prevent mixing fulfillment of a single order from multiple Lot Numbers or Expiration Dates.
Enabling Lot Tracking
To enable Lot Tracking, the first step is to create a Lot Type and the second is to assign it to your products. Both of these steps are covered in more detail in the sections below, so this section is just an overview.
Different products may have different requirements, so just create one Lot Type for each set of requirements and then assign the appropriate products to each Lot Type. Once a product is assigned to a Lot Type, the Lot Tracking functionality will automatically be enabled for that product.
The simplest Lot Type can have no "inputs" as depicted below, but this will still ensure that the Origination Date is assigned to all received inventory going forward. If you choose to have Lot Number or Expiration Date inputs, these will be captured during Processing, Cycle Count or Relocation. You can also import lot numbers and expiration dates if you already have this information using the Location Import tool.
Creating a new Lot Type
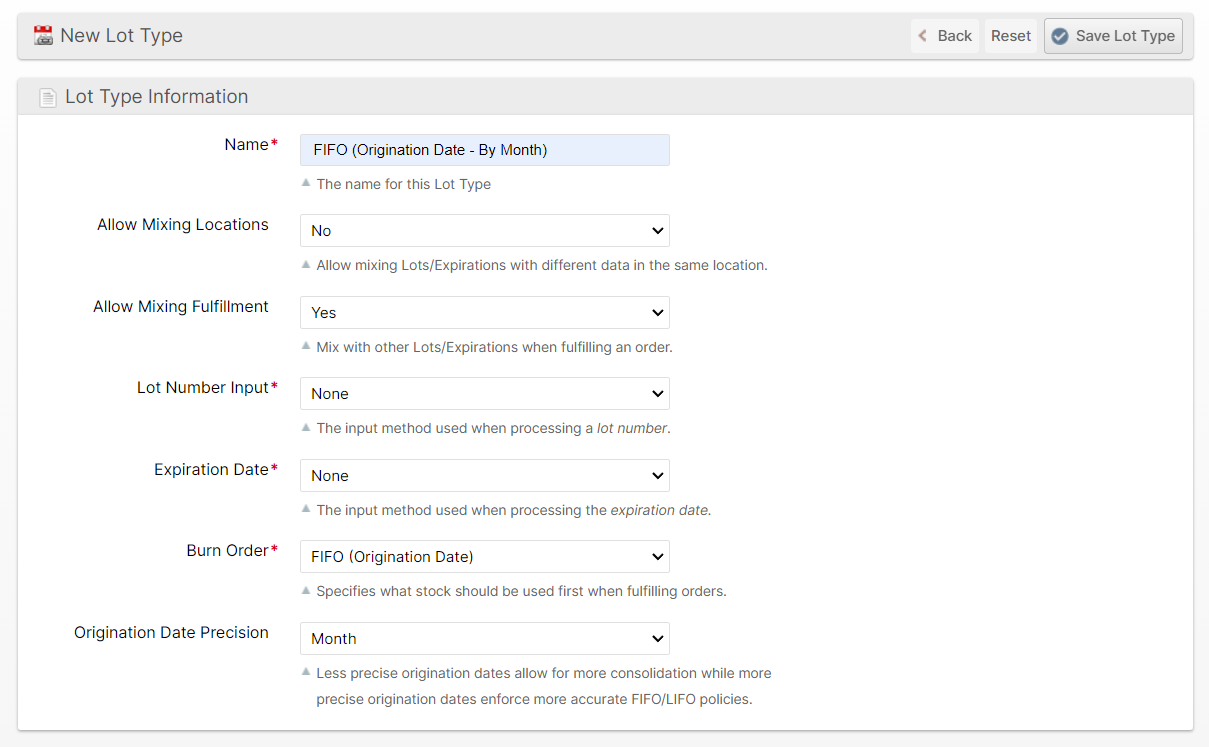
Go to System > Catalog > Lot Types and click Add New.
The form fields are described in more detail below.
Name
The name for this Lot Type
Allow Mixing Locations
Specifies whether a Lot is allowed to mix with other lots in the same location (same Lot Type and Product but different Lot/Expiration/Origination Date depending on the Burn Order).
- No - Allowed only when two lots are essentially identical (same origination date, lot number and expiration date values).
- Yes - Always allowed even with different lot data. This option allows for some destruction of data if lots with different lot numbers or expiration dates are mixed.
- Same Burn Order - Allowed when the two lots have the same Burn Order Sort Value, but potentially different Origination Dates, provided that the lot number and expiration dates match exactly. This is affected by the Origination Date Precision option described below and is safe to use if the exact origination date is not critical.
Allow Mixing Fulfillment
Specifies whether a Lot is allowed to mix with other Lots when fulfilling an order (same Lot Type and Product but different Lot/Expiration/Origination Date depending on the Burn Order).
Lot Number Input
The input method used when processing the lot number. Choose between:
- None — A lot number will not be tracked, no input field
- Choose Date — A calendar field will be used to enter the lot number. Use when the lot number is a full date ( year, month, and day).
- Extract Date — A text entry field to enter the lot number. Use to extract a date from the lot number.
- Text — A text entry field to enter the lot number
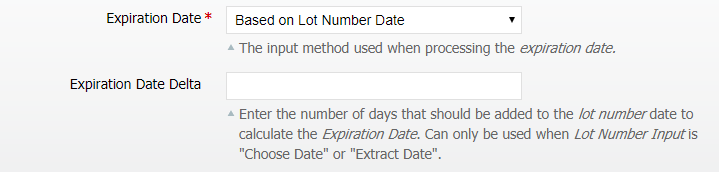
Expiration Date
The input method used when processing the Expiration Date info. Choose between:
- None — An expiration date will not be tracked, no input field
- Choose Date — A calendar field will be used to enter the expiration date. Use when the expiration date is a full date ( year, month, and day).
- Extract Date — A text entry field to enter the expiration date. Use to extract a date from the lot or expiration numbers.
- Based on Lot Number Date — Used when the lot number has a date that is used to calculate the expiration date, no input field
Burn Order
Specifies what stock should be used first when fulfilling orders. Can specify Choose Between:
- None — No preference between Lot Numbers, Expiration Dates, and those without when fulfilling an order.
- FIFO (Origination Date) — First in first out; based on the date the delivery was accepted
- LIFO (Origination Date) — Last in first out; based on the date the delivery was accepted
- FEFO (Expiration Date) — First expired first out; based on the expiration date
- LEFO (Expiration Date) — Last expired first out; based on the expiration date
- FIFO (Lot Number) — First in first out; based on the lot number
- LIFO (Lot Number) — Last in first out; based on the lot number
Origination Date Precision
When a Burn Order is chosen which references the Origination Date, you may choose how precisely the burn order will be enforced. In many cases, inventory that arrived just a few days apart can for all intents and purposes be considered the "same".
For example, if Origination Date Precision is set to Month, any products received in the same month will be given the same burn order. Moreover, they can be stored in the same location even with Allow Mixing Locations set to No. Effectively, lots that originated on different days in the same month with all else being equal would be treated as equivalent for the purposes of burn order and storage mixing, allowing you to increase storage density and allowing the system to potentially better optimize picking batches when you have multiple locations.
Lot Number Input Selection Fields
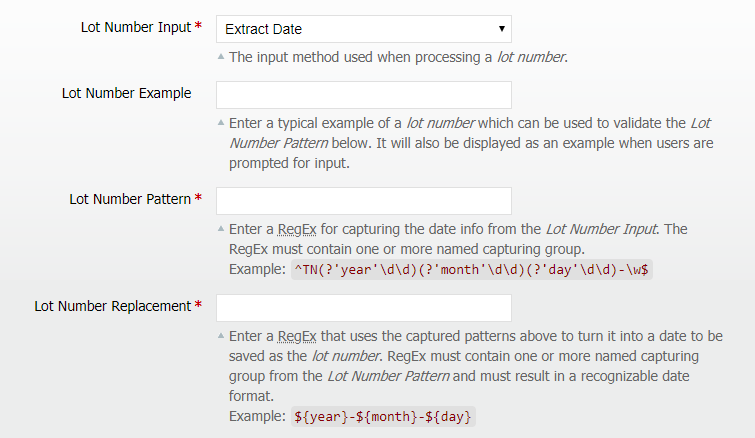
Extract Date
When selecting Extract Date three new fields will be shown.
- Lot Number Example — Used to enter in a typical example of the lot number used on the product(s). This will be used to validate the Lot Number Pattern below and displayed to users when prompted to input a lot number.
- Lot Number Pattern — Used to enter in a Regular Expression (RegEx) for capturing the date info from the Lot Number Input.
- Lot Number Replacement — Used to enter a RegEx that is used to turn the captured pattern above into a recognizable date that will be saved as the lot number.
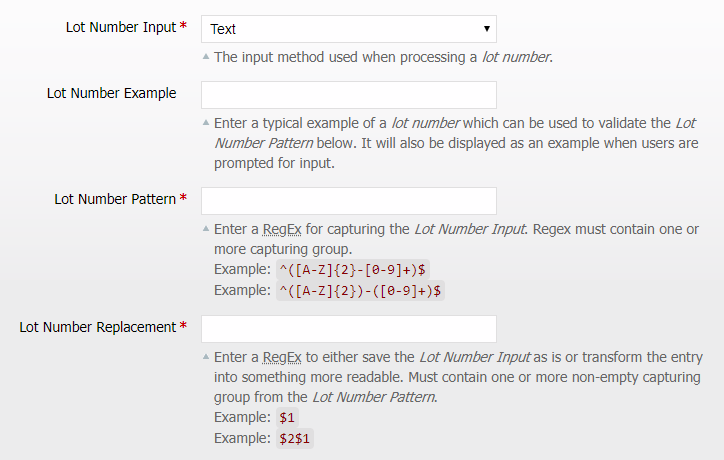
Text
When selecting Text three new fields will be shown — the same ones shown for Extract Date but with slightly different usage and instructions.
- Lot Number Example — (The same use as for Extract Date) Used to enter in a typical example of the Lot Number used on the product(s). This can then be used to validate the Lot Number Pattern below and can be displayed to users when they are prompted to input a Lot Number.
- Lot Number Pattern — Used to enter in a RegEx for capturing the Lot Number
- Lot Number Replacement — Used to enter a RegEx that is used to either just save the Lot Number as is or can transform the entered Lot Number into something that is more human readable.
Expiration Date Selection Fields
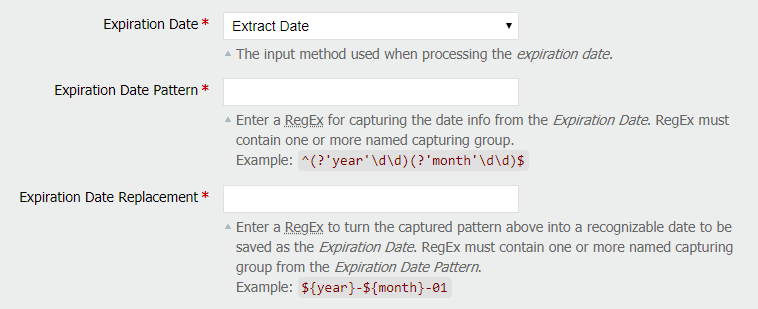
Extract Date
When selecting Extract Date three new fields will be shown.
- Expiration Date Pattern — Used to enter in a Regular Expression (RegEx) for capturing the date info from the Expiration Date.
- Expiration Date Replacement — Used to enter a RegEx that is used to turn the captured pattern above into a recognizable date that is saved as the Expiration Date.
Based on Lot Number Date
When using Based on Lot Number Date one new field will be shown
- Expiration Date Delta — Used to enter the number of days that should be added to the Lot Number Date to calculate the Expiration Date.
Origination Dates
The Origination Date is simply the date on which a lot first arrived into inventory. This is used to implement the FIFO (Origination Date) and LIFO (Origination Date) burn orders. The Burn Order Sort Value is derived directly from the Origination Date in this case, but can also be substituted with a different value depending on the Origination Date Precision option.
If needed, the user can edit a Lot and modify the Origination Date should the automatically determined values need to be overridden.
If you are already tracking lot numbers or expiration dates, it may preferable to use FIFO (Lot Number) or FIFO (Expiration Date) as these will naturally be more accurate and immune to human error.
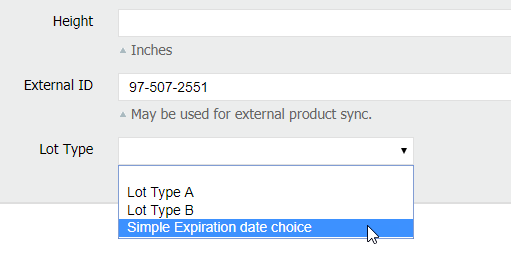
Assigning a Lot Type to a Product
To assign a Lot Type to a product, go to your product's General tab. You will find a field called "Lot Type" that is a selection list of all the available Lot Types. Select the Lot Type you want assigned to this product.
Receiving Lot-tracked Products
Processing
Processing a delivery will only be different once the user begins to process a product that has a Lot Type assigned to it. The differences start when the user goes to start counting the product. When the "Count" button is clicked, instead of going to the normal count screen the user will be shown the new Lot/Expiration page.
• a Lot Number
• an Expiration Date
• a Lot Number and an Expiration Date — Will ask for the lot number then the expiration date.
The user will then be asked to enter in the expected lot info. After entering and submitting all of the lot info the user will be taken to the normal counting screen but they are counting undamaged product for this particular lot on the selected container. When they encounter a second lot, this should be processed as a different lot. The user will submit the count for the first lot, once submitted the user will be back to normal processing screens.
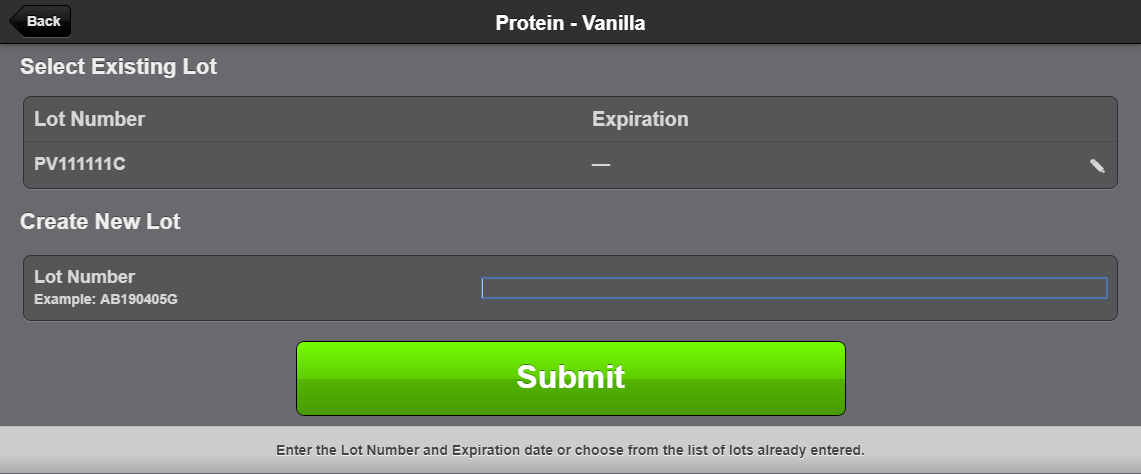
When the user goes to count a different lot for that product the lot info page will now show all previously entered lots.
On this page the user can now:
- edit the other lots
- create a new lot
- select a previously entered lot to count
Put-Away
Put-away will remain the same until the user begins put-away on a product with a Lot Type. Once the user scans the product they will be shown a list of all the lots processed for this delivery. The user will tap a lot to go to the location selection page which will display some new information.
- The selected lot's information will be displayed as a grid in the upper right corner.
- The lot number and or expiration date as well as the origination date
- The amount put-away and the amount remaining for this lot
- The product's locations
- White text indicates a valid location for selected lot
- Grayed out text indicates an invalid location for the selected lot
- Two new columns the Lot Number and the Expiration Date
- Rows sorted by the lot that expires the soonest and locations with no lot info are last
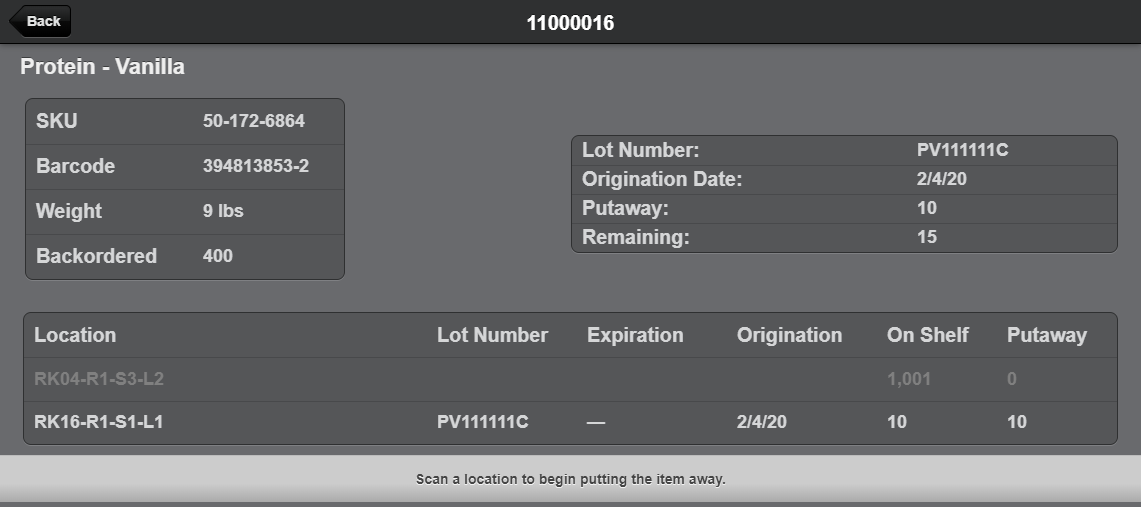
Once a valid location has been chosen the user will again see the normal put-away pages.
Unassigned Items
When a Lot Type is assigned to a Product after it has been received and the Delivery has been partially processed, the Unassigned Items dialog will be displayed during Put-Away. This dialog will allow the user doing Put-Away to assign Lot Info to the items that were processed without capturing any Lot Info.
The Unassigned Items dialog will be visible on the Lot selection page. The user can click this row and it will bring up the Lot/Expiration page similar to the one shown during Processing.
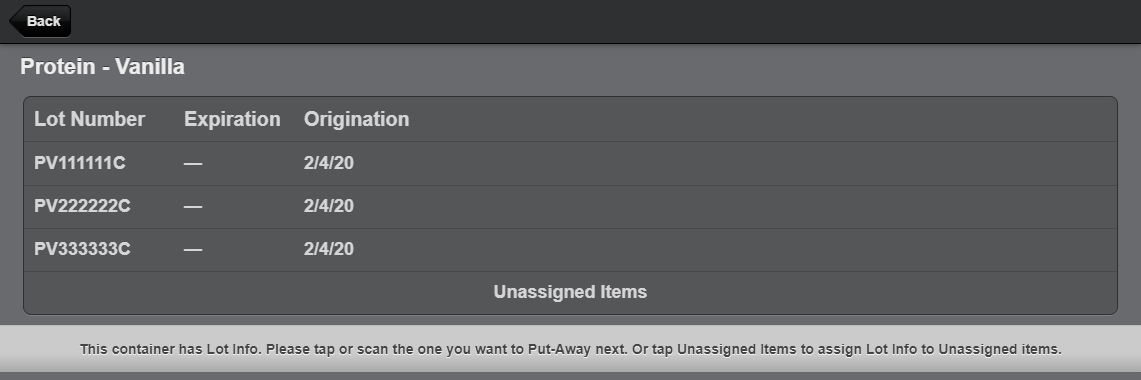
The User can enter in a new Lot or select any Lots that were processed already for this Delivery. Once a new Lot is submitted or a previous Lot is select, the user will count the number of items belonging to this Lot that were previously unassigned. Users will not be able to enter a count higher then the number of unassigned items, which is the number of items processed minus the number counted for all Lots.
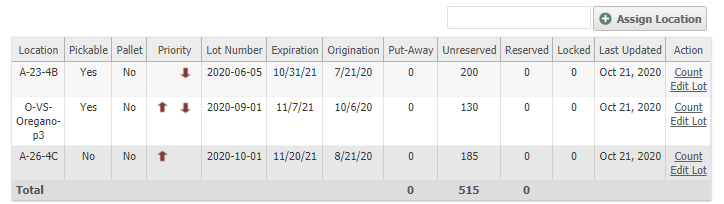
Viewing Lot Information
A Product's Inventory
A product's lot info is shown on Inventory tab in each warehouse's locations. You will see three new columns: Lot Number, Expiration and Origination.
All Processed Lots
To view all Lot Records, go to Catalog > Lots/Expirations.
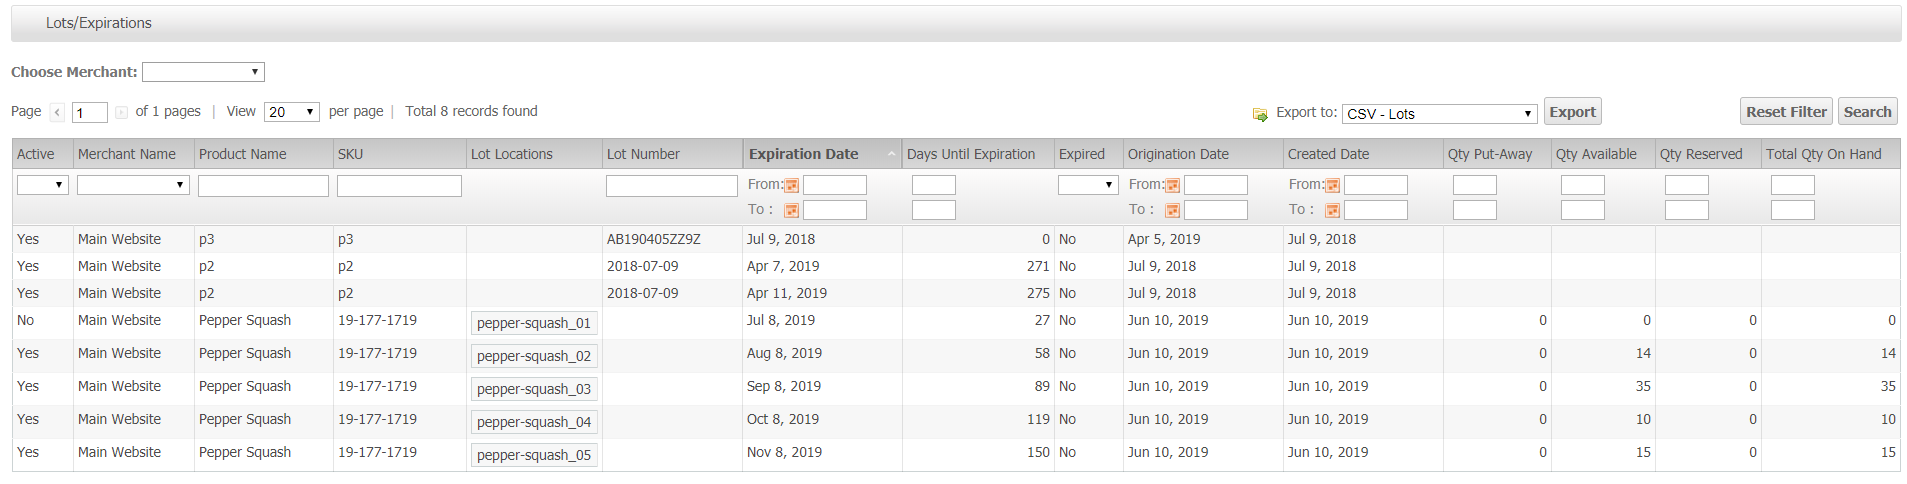
Clicking on a row will show that Lot Record's information
Lot Record
The Information tab shows the Lot information and inventory.
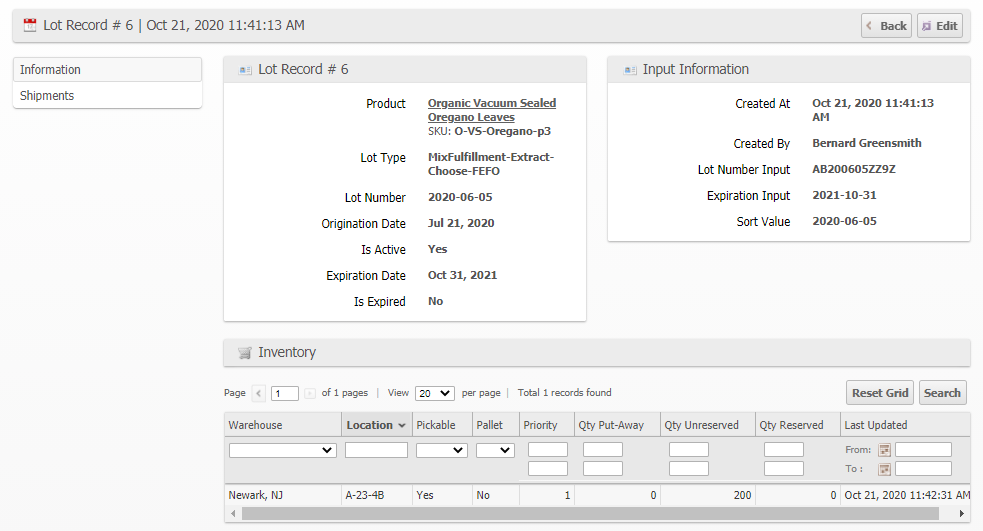
The Shipments tab will show any shipments that have used this Lot.

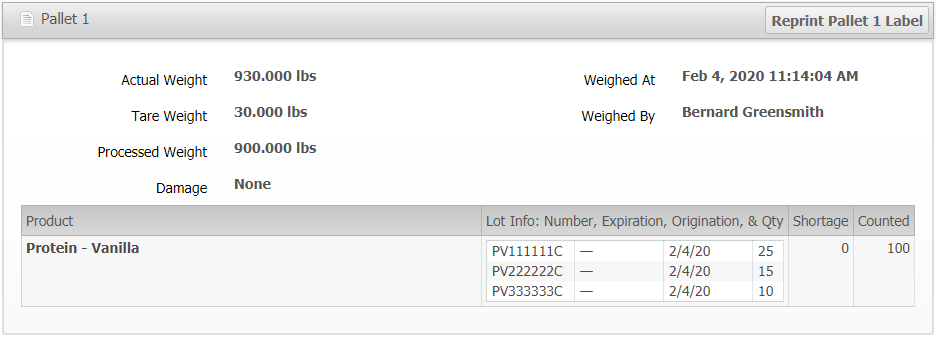
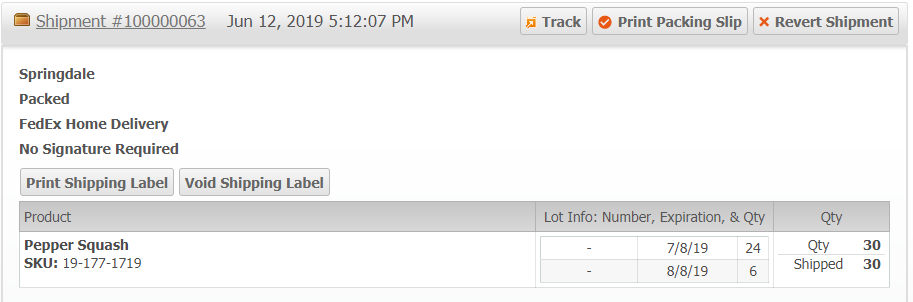
A Shipment's View
When a shipment has a product with a Lot Type the lot info is displayed as a new column on the product in a shipment.
Exporting Lot Information
Receiving, Shipping, and Lots/Expirations grids will allow you to export out the lot information.
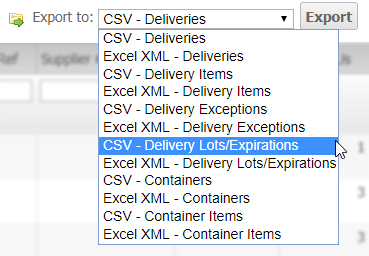
Receiving Grids
From the Receiving grids, ASNs, RMA, Cancellations, and Other Shipments, you can export out the Delivery Lots/Expirations as CSV or Excel XML files.
Shipping Grids
From the Shipping grids, Orders and Shipments, you can export out the Shipment Item Lots/Expirations as CSV or Excel XML files.

Lots/Expirations Grid
The Shipment Item Lots/Expirations export is also on the Lots/Expirations grid.
Importing Lot Information
Lot information can be imported using the Location Import tool located at Operations > Warehouse > Locations > Import.
How did we do?
Product Attributes
Product Velocity