Table of Contents
Magento 2 / Adobe Commerce
ShipStream's Magento 2 / Adobe Commerce integration provides a direct integration with the Magento 2 and Adobe Commerce platforms (referred to collectively as just Magento) with the following functio…

ShipStream's Magento 2 / Adobe Commerce integration provides a direct integration with the Magento 2 and Adobe Commerce platforms (referred to collectively as just Magento) with the following functionality:
- Import Sales Orders from Magento depending on the order status
- Synchronize available inventory from ShipStream to Magento
- Update shipment tracking information in Magento
This integration uses immediate push notifications in both directions so that updates occur quickly and efficiently, rather than relying on slow or inefficient polling mechanisms. It also eliminates potential for race conditions with a basic locking mechanism for order submission and performs accurate inventory level adjustments using a single transaction within Magento's database.
Frequently Asked Questions
What functionality does this extension add to my Magento 2 store?
- Adds a Stock and a Source corresponding to the ShipStream instance with names corresponding to the ShipStream WMS global configuration
- Adds a Stores-> Settings-> Configuration-> (section) Services > ShipStream Sync
- General > Enable Real-Time Order Sync
- General > Send New Shipment Email
- Adds three new order statuses: "Ready to Ship", "Failed to Submit" and "Submitted"
- Adds new API endpoints under the
shipStreamSyncnamespace:- Get info about Magento version and extension version
- Update Magento config to save webhook location
- Sync inventory with lock on submitting orders
- Adjust inventory
- Fetch order info
- Create shipment with tracking and add comment, lot data and serial data
- Adds an event observer for
sales_order_save_commit_afterto trigger an order sync when an order is saved - Adds a cron job to do a full inventory sync every hour (with a short random sleep time) to the added Source
- Stores the ShipStream remote url in the
core_flagtable to accommodate the real-time order sync
Why is this required? Doesn't Magento 2 already have an API?
Yes, but there are several shortcomings which this extension addresses:
- When syncing remote systems over basic HTTP protocol there is no locking between when the inventory amount is known and when it is updated, so setting an exact quantity for inventory levels is prone to race conditions. Adding the "adjust" method allows ShipStream to push stock adjustments (e.g. +20 or -10) rather than absolute values which are far less susceptible to race condition-induced errors.
- The Magento 2 Catalog Inventory API does not use proper database-level locking so is also prone to local race conditions.
- This module implements a "pull" mechanism so that Magento 2 can lock the inventory locally and remotely, take a snapshot of local inventory and remote inventory, then sync the inventory amounts all inside of one database transaction. This ensures that inventory does not drift or hop around due to race conditions. For a high-volume store these issues are much more frequent than you might imagine.
- The Magento 2 API
shipment.infomethod returns SKUs that do not reflect the simple product SKU which is used by ShipStream. This extension returns SKUs that are appropriate for the WMS to use. - Four or more API calls can be cut down to one with the
CreateWithTrackingmethod which also allows for easy customization (e.g. receiving and storing serial numbers or lot data).
The API endpoints are implemented using Magento's provided SOAP/XML-RPC API and require new permissions, so these endpoints do not create any additional security vulnerability exposure or affect the backwards compatibility of your store.
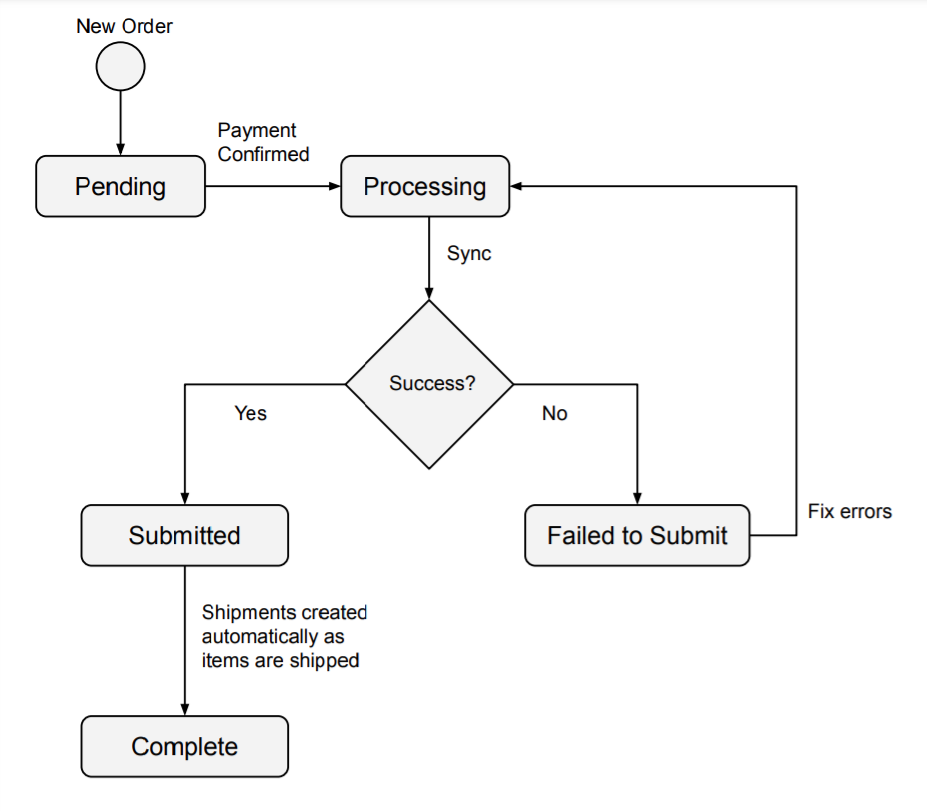
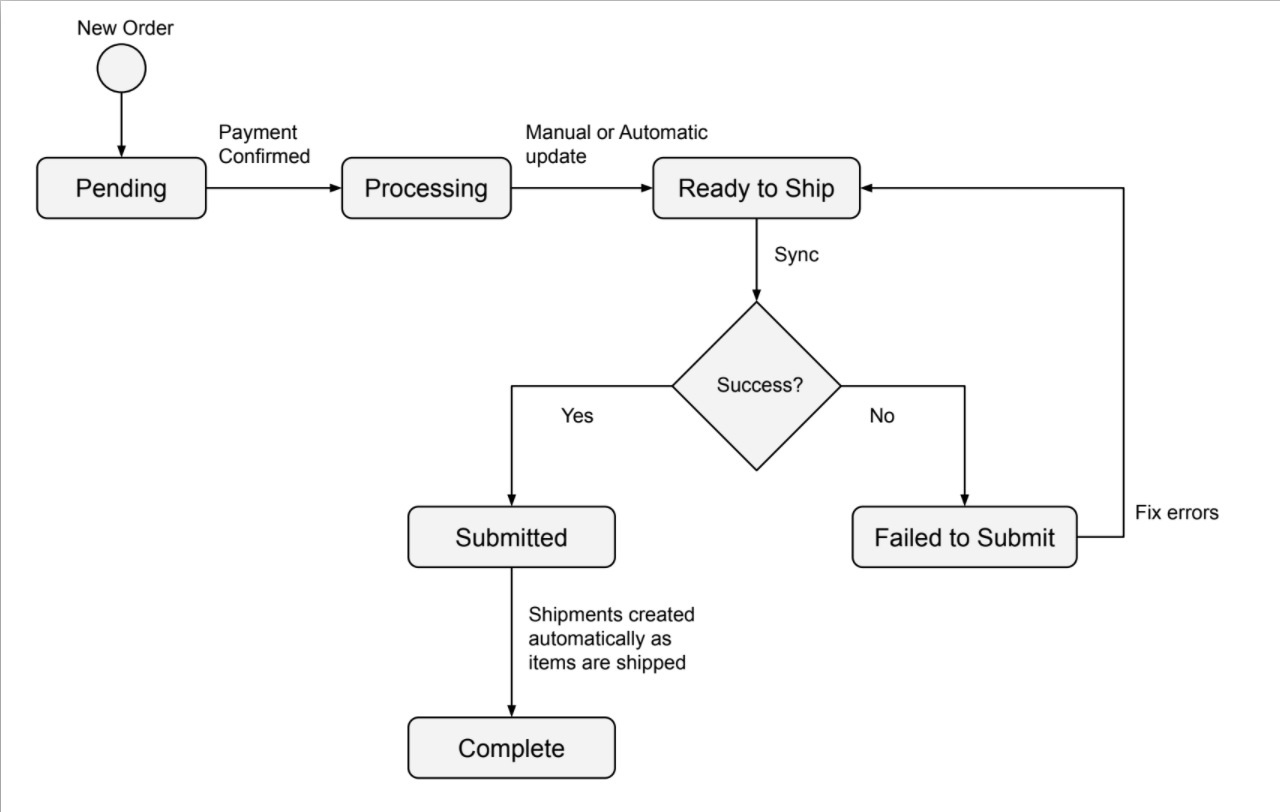
What is the point of the new statuses?
Without a state between "Processing" and "Complete" it is otherwise difficult to tell if an order is ready to be submitted to the warehouse, if it has been successfully submitted to the warehouse, or if the order has been processed at the warehouse.
The "Ready to Ship" status can be set manually or programmatically (using some custom code with your own business logic) to indicate when an order is ready to be shipped. If you don't want to use this status simply ignore it and configure ShipStream to pull orders in "Processing" status instead.
The "Failed to Submit" status indicates that there was an error when trying to create the order at the warehouse.
The "Submitted" status indicates that it was successfully submitted to the warehouse, but that it has not yet been fully shipped. Once it is fully shipped the order status will automatically advance to "Complete".
Setup
At a high level, the integration can be completed in these steps:
- Update the Global Configuration (just once)
- Install the ShipStream Sync extension into the Magento store
- Create and Activate the integration from the Magento store
- Update the Merchant Integration subscription
- Update the ShipStream Sync configuration
Global Configuration
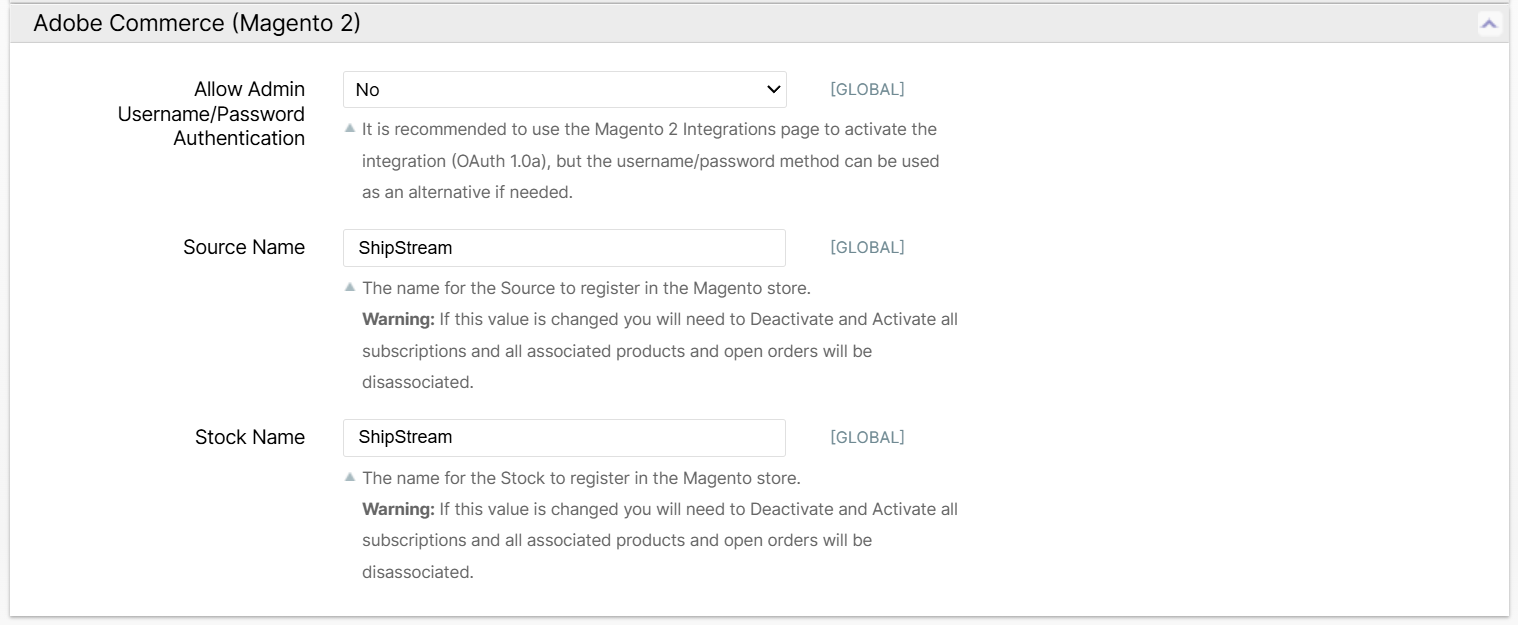
If you are a 3PL, you will want to set the Source Name and Stock Name before setting up any integration subscriptions since changing these values requires subscriptions to be deactivated and re-activated.
Navigate to System -> Configuration -> Integrations -> Magento2 Plugin and set the values to your liking:
Installation
The integration requires an extension to be installed in your Magento store. This integration provides improved API endpoints
- Navigate to your Magento root directory
- Install the extension via Composer
- Enable the module
- Run setup upgrade
Please refer your web developer to this information. Here is how he might complete these steps in a Linux environment:
cd /path/to/your/magento2
composer require shipstream/magento2-shipstream-sync
bin/magento module:enable ShipStream_Sync
bin/magento setup:upgrade
bin/magento setup:di:compile
Activation
- In your Magento store, navigate to System -> Integrations and click Add New Integration.
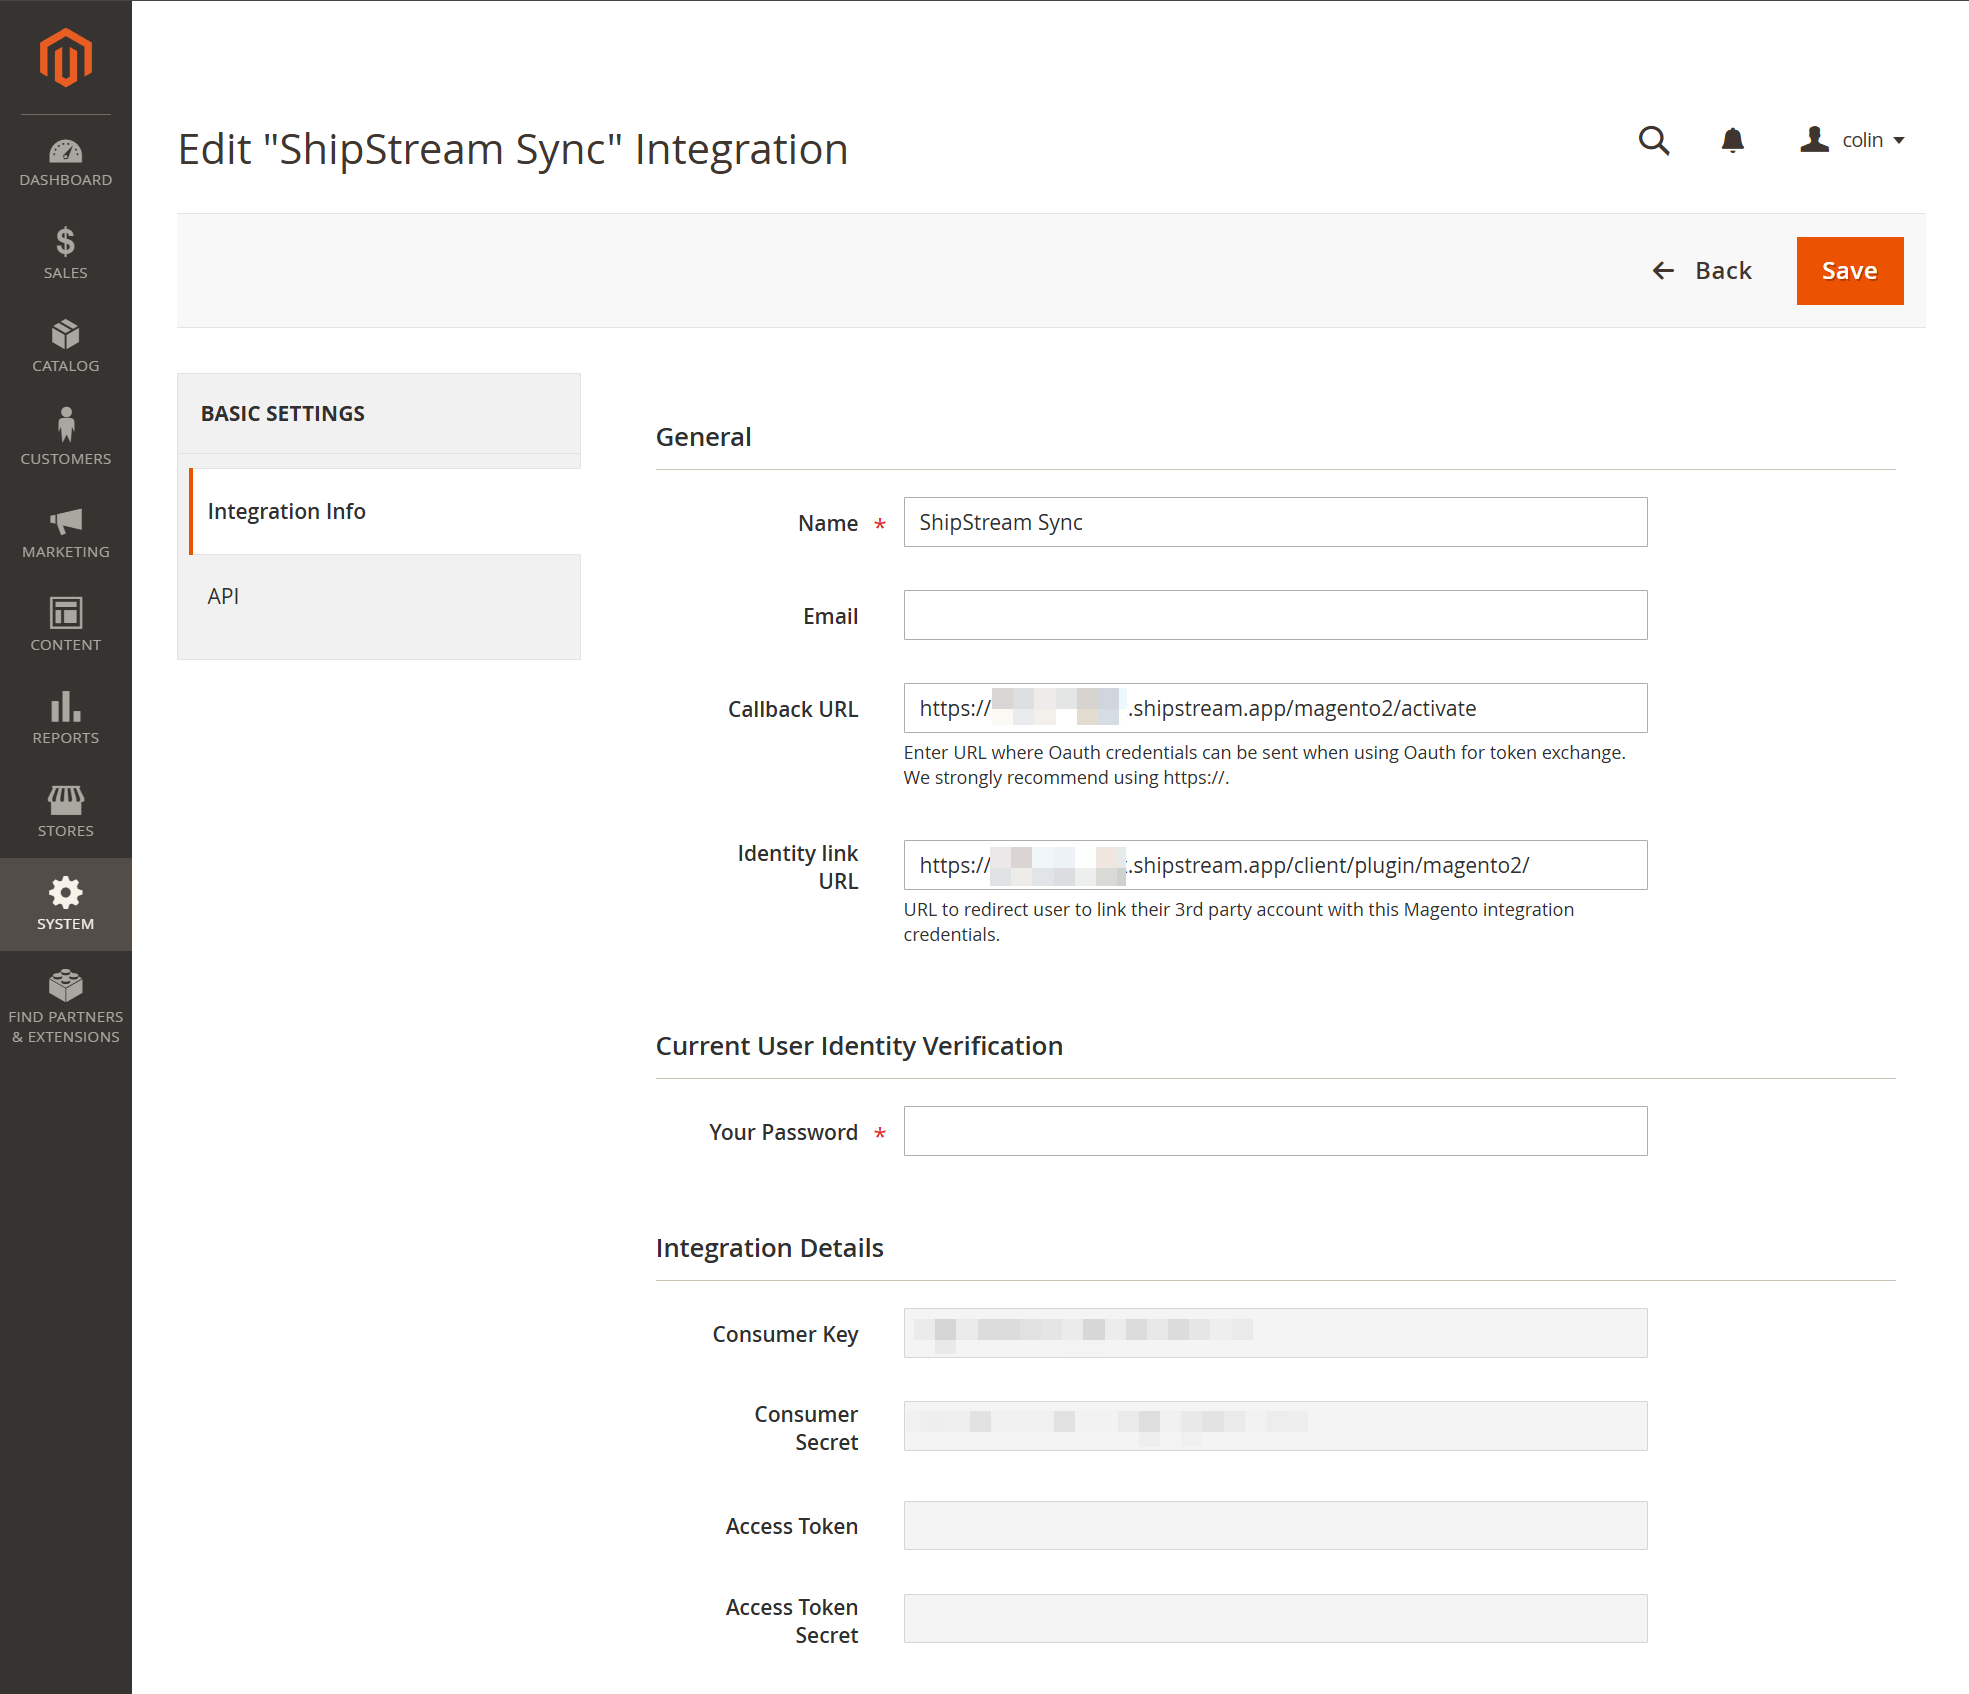
- Fill out the fields in the Integration Info tab as seen above:
Field Name | Example Value | Description |
Name | A name such as "ShipStream" or the name of your 3PL | This will just make it easier to identify this integration in the future. |
The email address of your technical contact. | Used only for important notifications. | |
Callback URL | https://your-name.shipstream.app/magento2/activate https://your-custom-domain.com/magento2/activate | Your ShipStream base url with |
Identity Link URL | https://your-name.shipstream.app/client/plugin/magento2/ https://your-custom-domain.com/client/plugin/magento2/ | Leave empty if you are not a 3PL. If you have a custom domain, it must be used here. |
Your Password | ****** | Since adding an integration is a way to provide elevated access to your store, this action requires your current password as a security precaution. |
- Click the API tab, choose Resource Access: Custom, and check the box for Stores -> Settings -> Configuration -> ShipStream Sync:
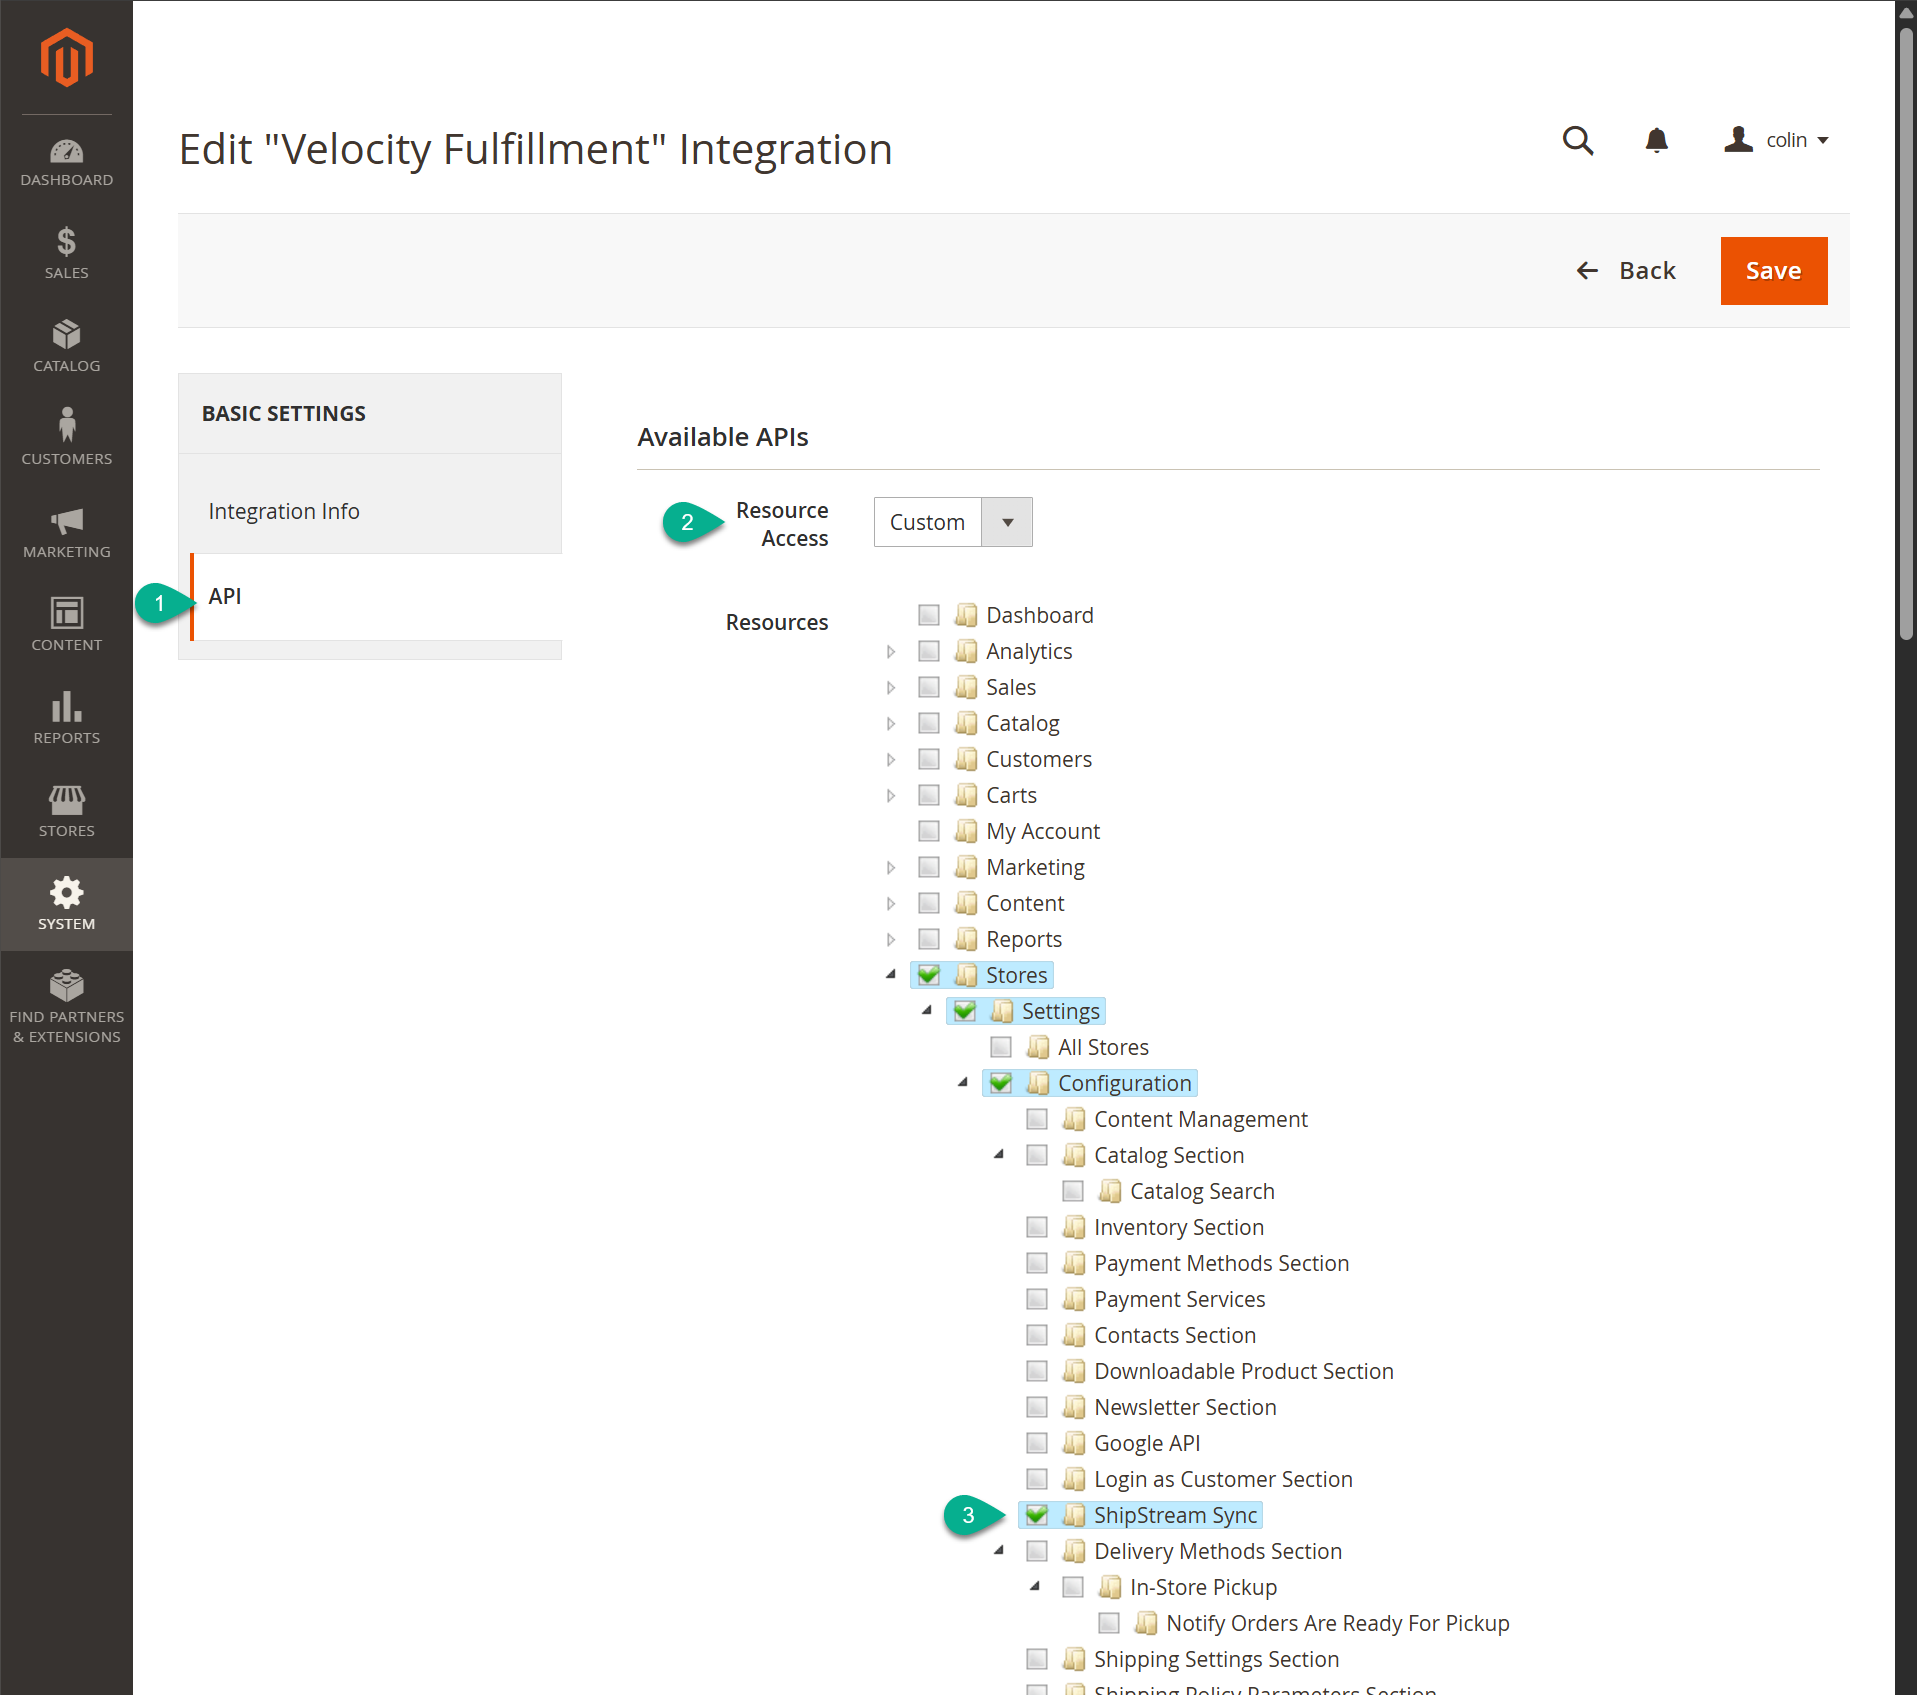
- Click Save
- On the row of the newly added integration, click Activate.
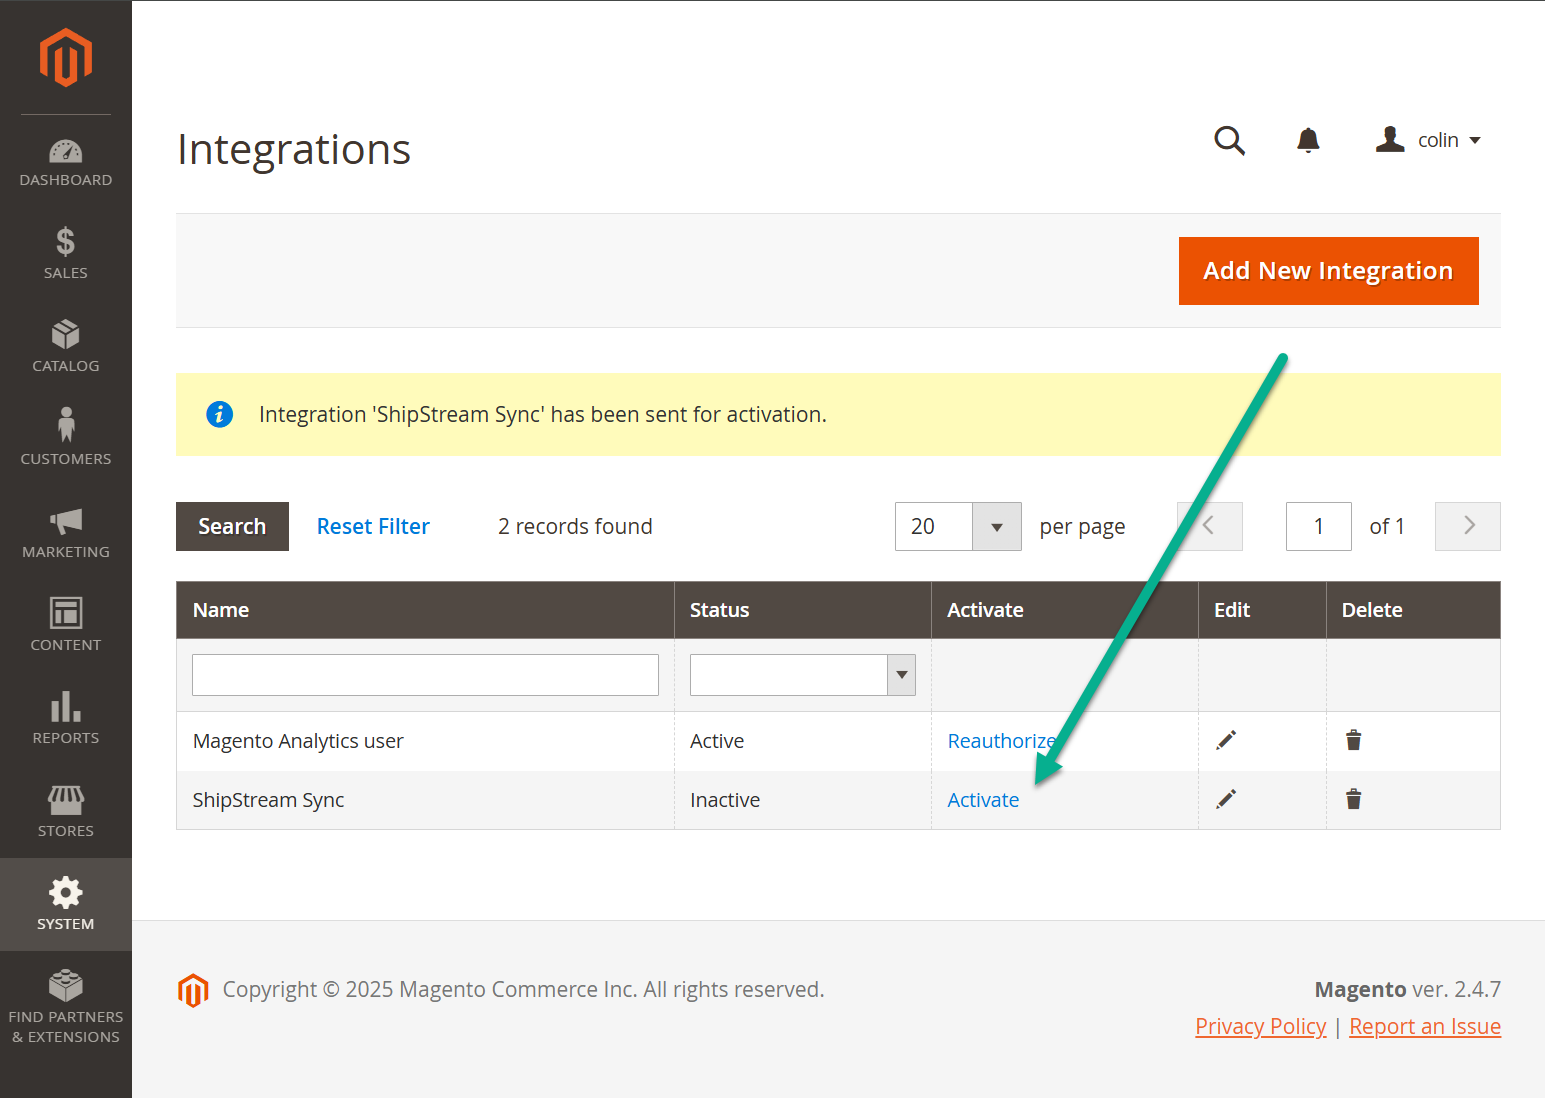
- On the following page, verify the permissions match as described above and click Allow.
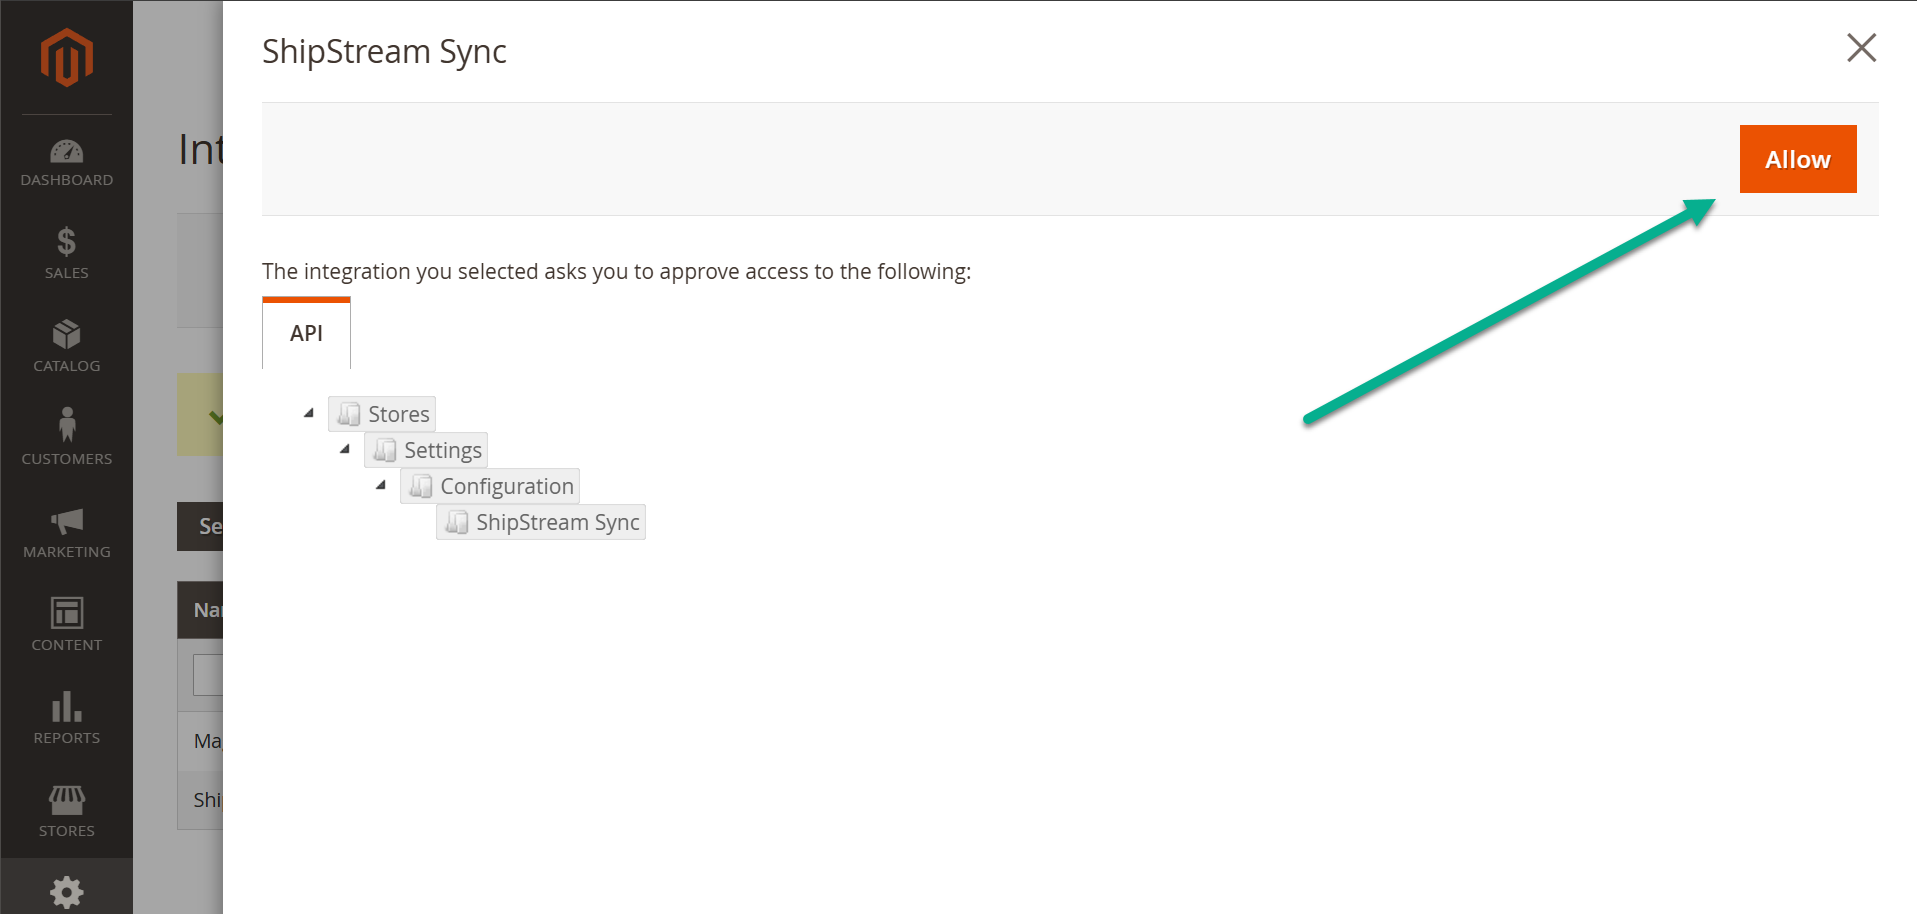
- Magento will open a small popup window to your ShipStream WMS where you may need to login with your ShipStream Username and Password if you are not already logged in. If you are already logged in, you will only see a solid white the popup for a brief moment and then it will disappear if successful.
- Finally, you should see a success message and the status of the new integration should say Active.
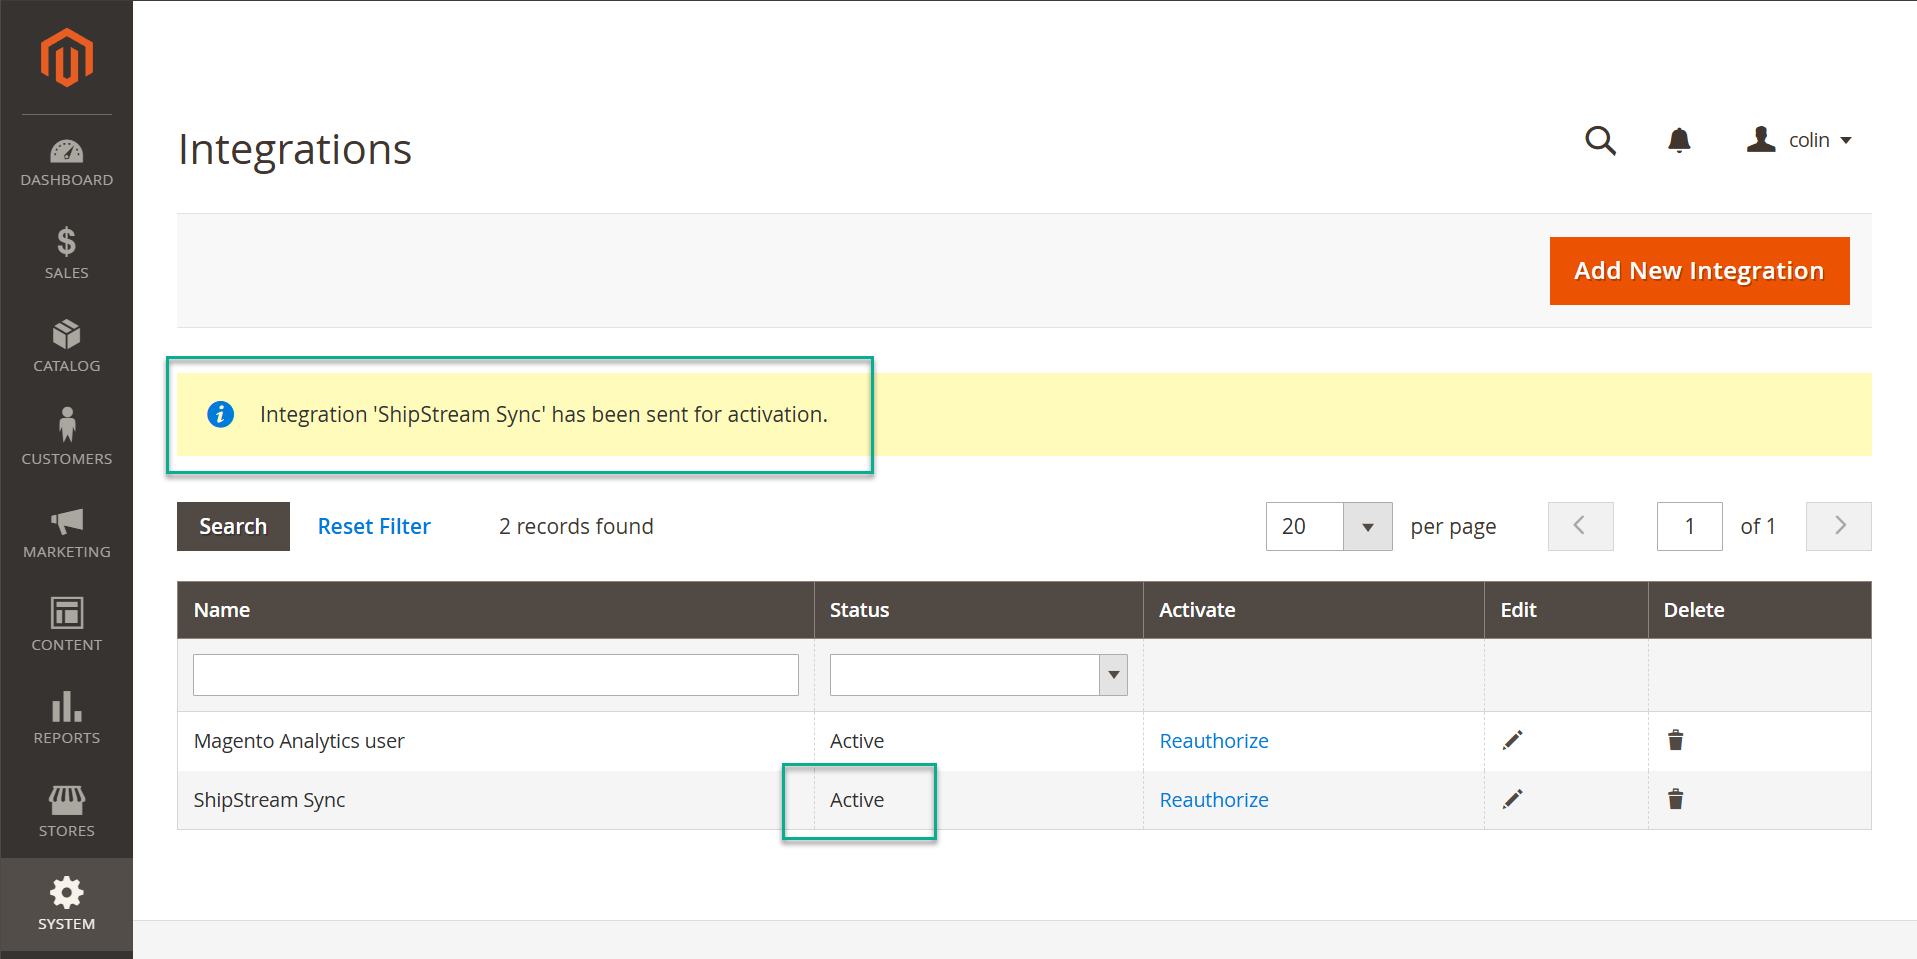
Managing Subscriptions
Each new connection to a Magento installation needs a Merchant Integation subscription. By initiating the connection from Magento (following the instructions in the section above under Activation) the subscription will be created automatically. However, it still needs to be configured and activated.
- Navigate to System -> Integrations -> Merchant Integrations and locate the correct integration subscription in the list.
The subscription page will then look like the following:
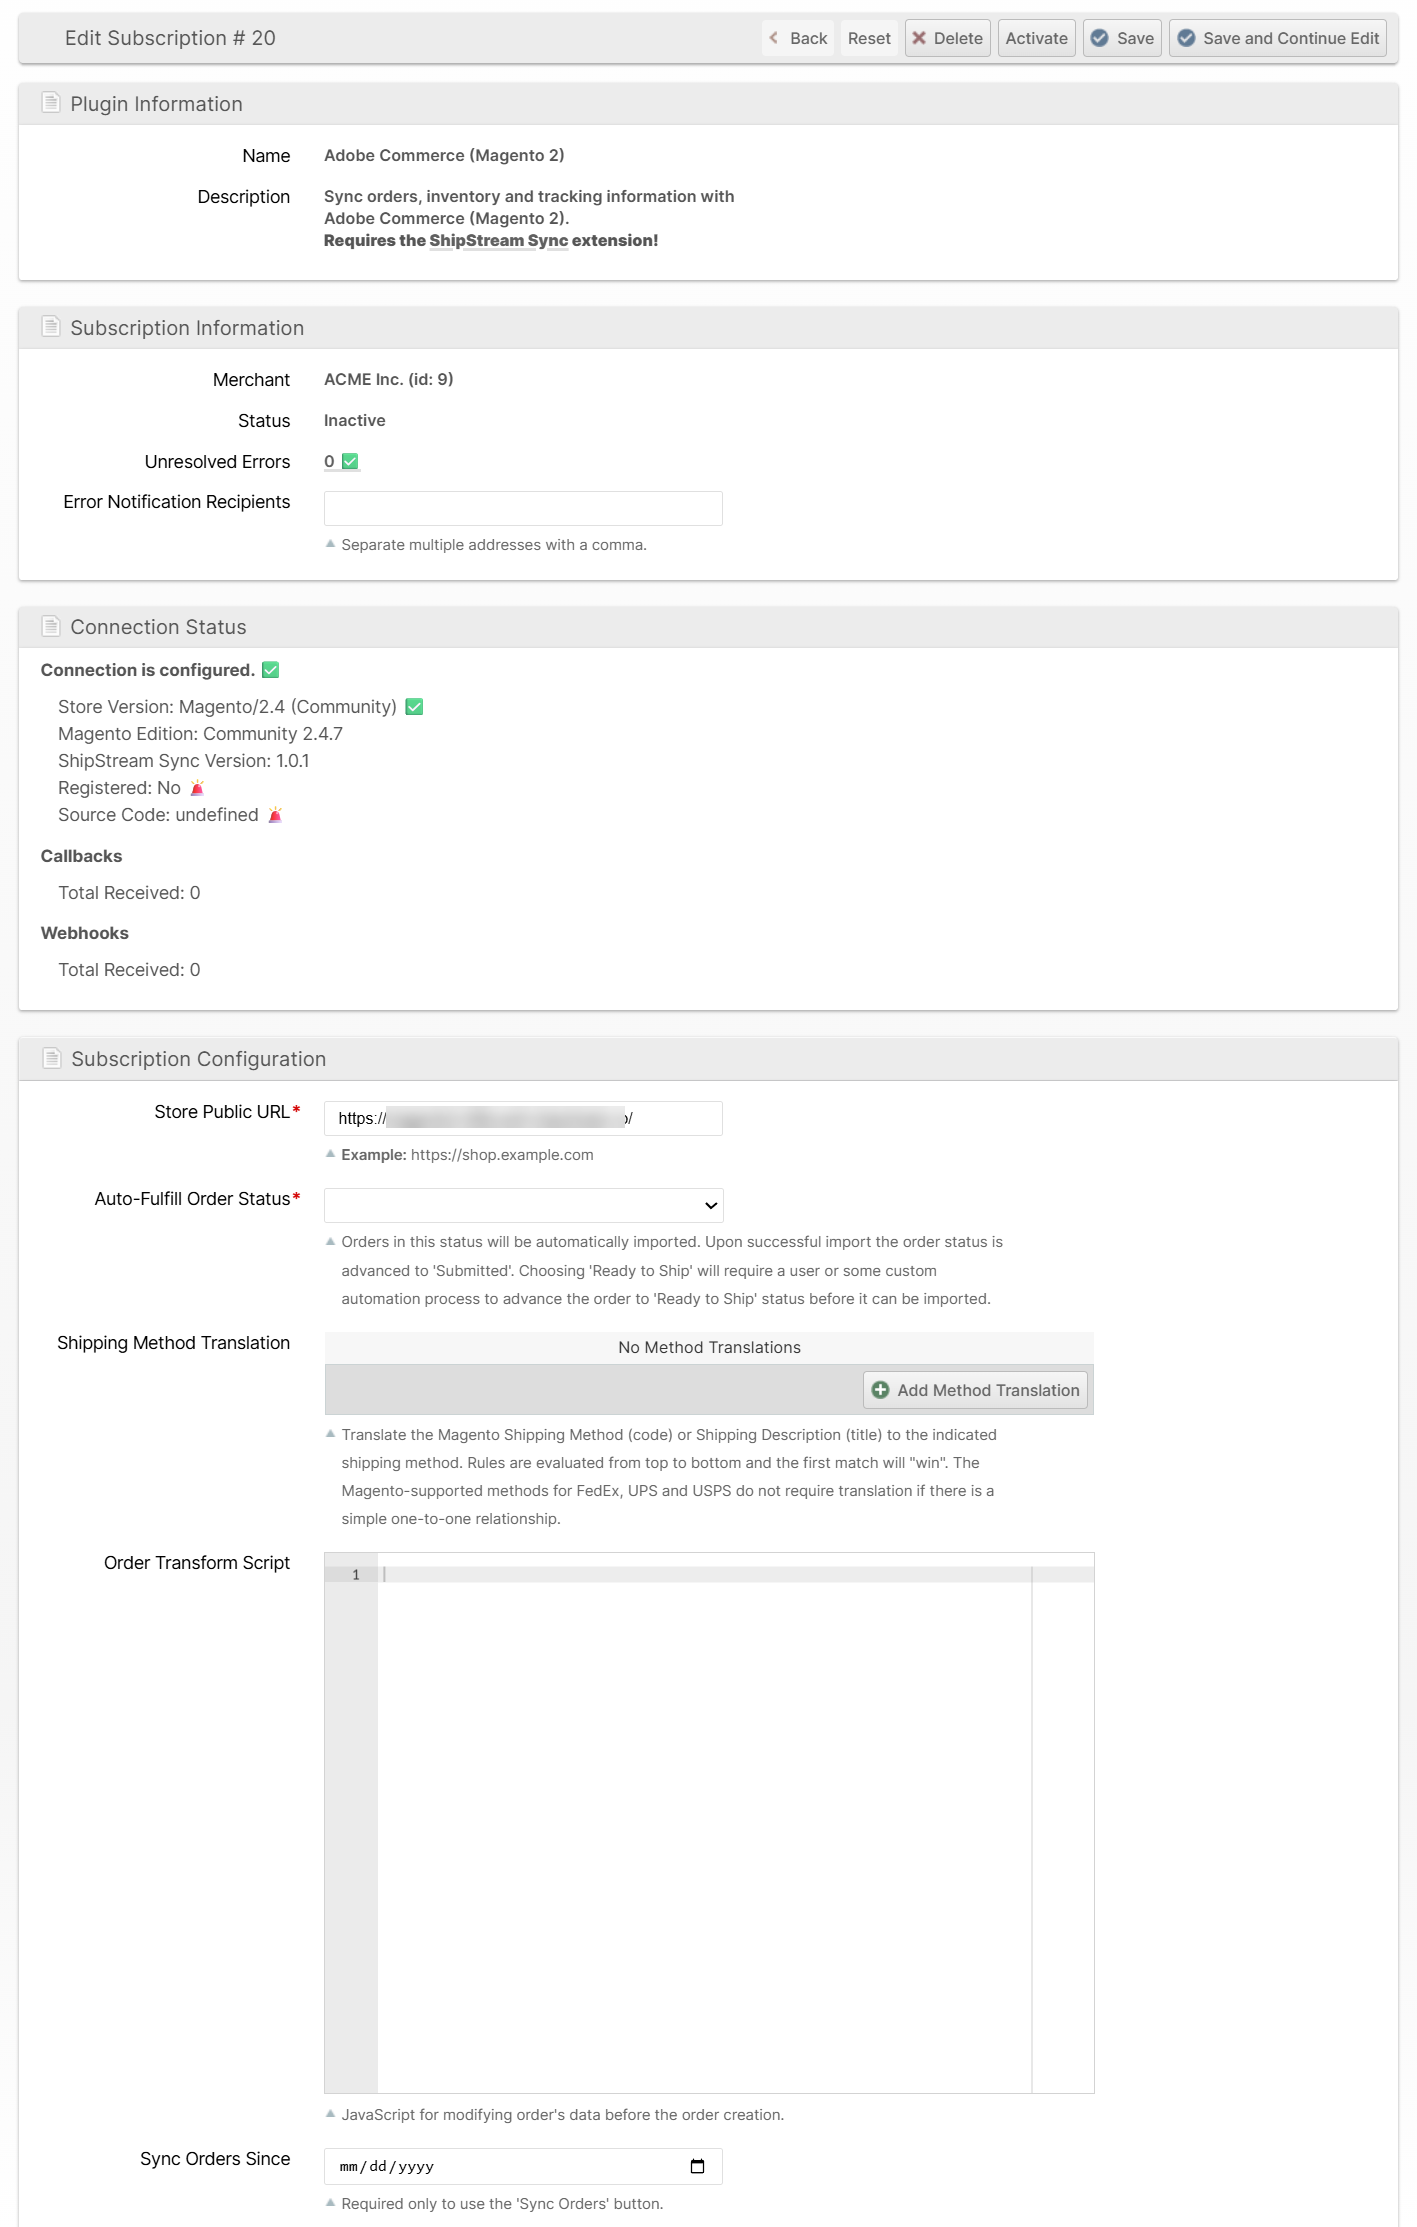
- Set the configuration according to your needs (fields are described in more detail below) and then click Save and Continue Edit.
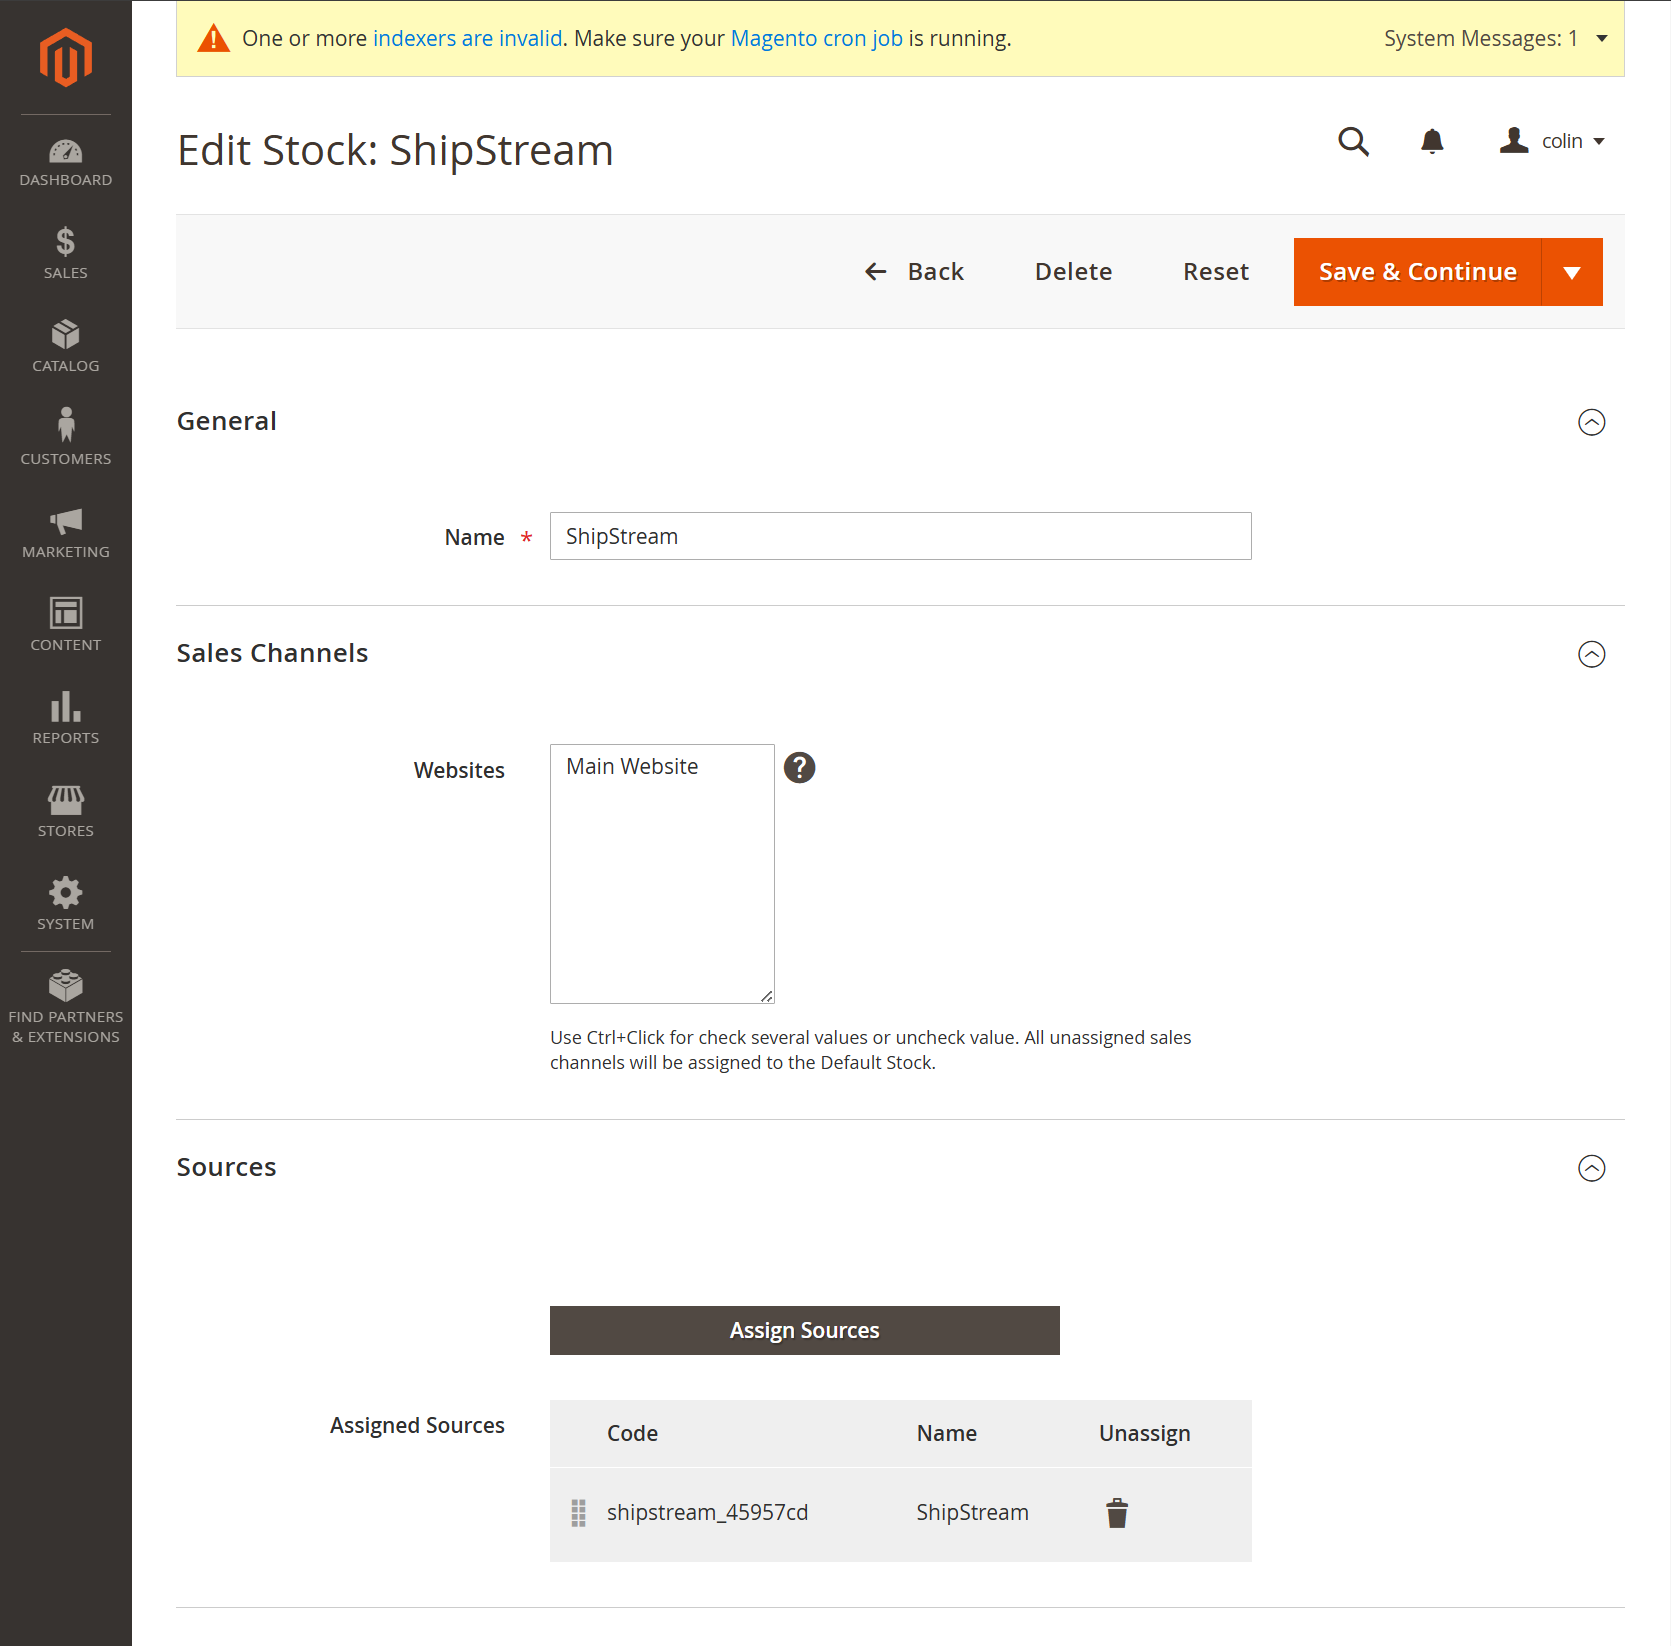
- Finally, click Activate to activate the subscription. This will create the Source and Stock in Magento which correspond to the ShipStream WMS.
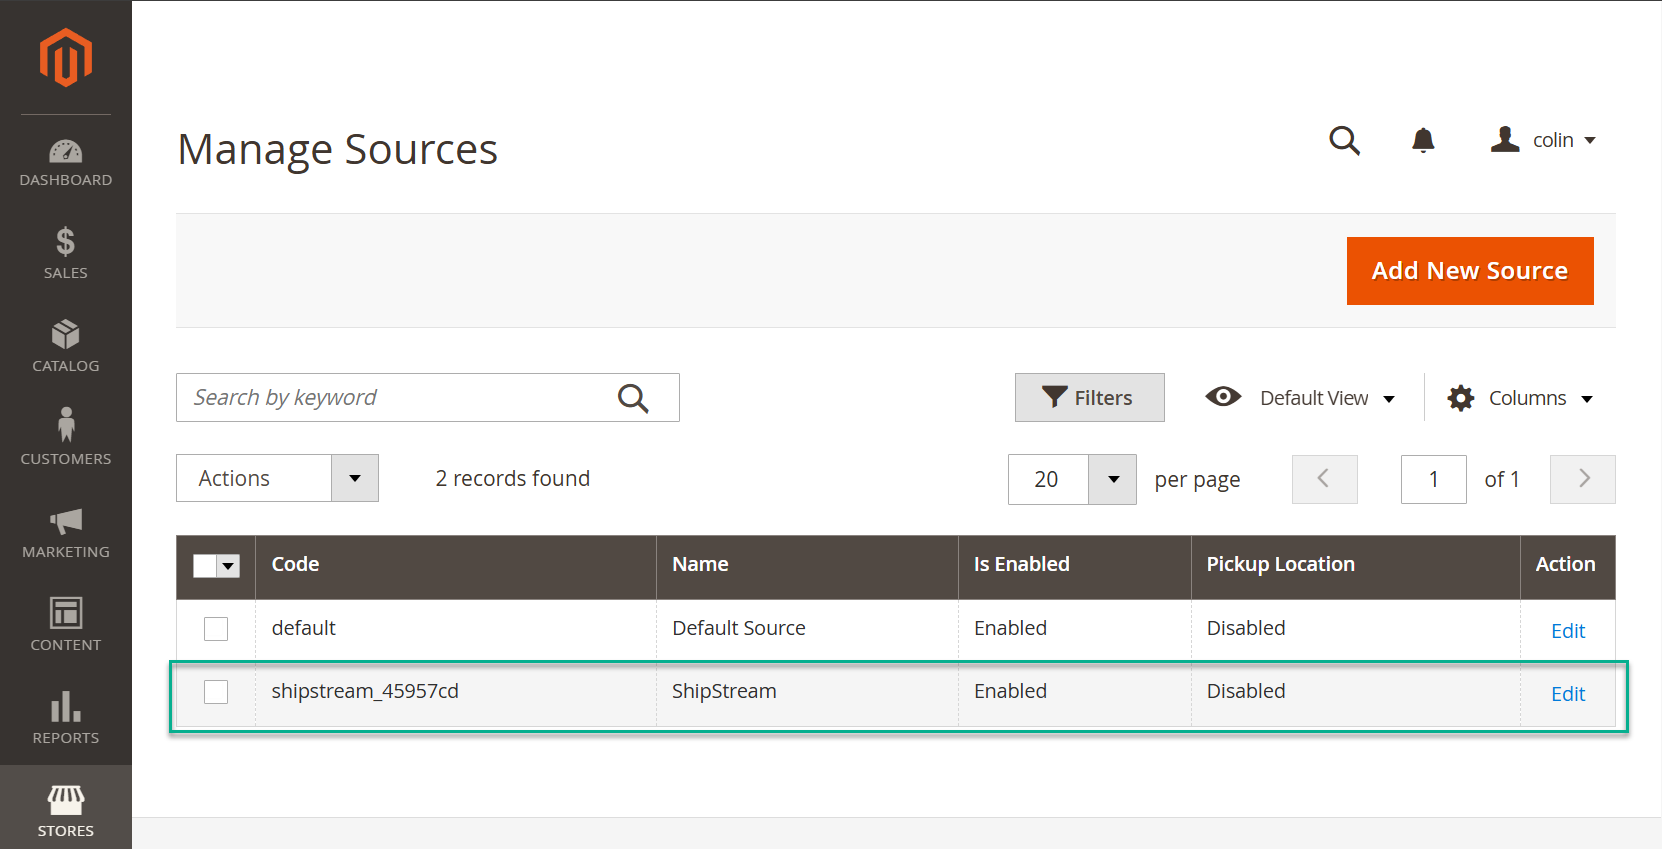
Example Stores -> Integrations -> Sources page after successful activation:
Example Stores -> Integrations -> Stocks pages after successful activation:
You are now ready to assign your producs to the newly added Source to enable real-time inventory sync. Please see the Adobe documentation here for instructions on assigning products to sources.
Store Public URL
This is your store's public URL and will be used to build the API requests which are required for the integration to work. Make sure this url is publicly available and does not result in a redirect.
Auto-Fulfill Order Status
The integration can be configured to work in a few different modes of operation to fit your needs.
- Disabled - When this is chosen, the orders will not be auto-fulfilled at all. This is typically only used if you want to sync only the inventory and not the orders.
- Processing - This is the simple "out of the box" option that will cause your orders to be synced to ShipStream as soon as they reach "Processing" status which usually happens automatically after payment has been received.
- Ready to Ship - This option works well if you want to have a human in the loop changing the order statuses to Ready to Ship manually, or some custom integration which advances the order statuses programmatically.
- Custom (advanced) - This option is available if you want to use a custom status and for some reason do not want to use Ready to Ship.
Shipping Method Translation
Because ShipStream and Magento do not always use the same shipping method codes, they must be translated when the order is submitted. This is done by defining a set of rules that will be evaluated from top to bottom and the first one to have a successful match will be applied.
Order Transform Script
Similar to a Before Create Order Script, you can modify the order data after it is recevied from Magento, but before it is finally submitted. In the script context you will have a variable called order which is the mutable data that represents the new ShipStream order and magentoOrder which contains the immutable raw order data from Magento.
const order = {
    "store": null,
    "items": [
        {
            "sku": "FLSK",
            "qty": 1,
            "order_item_ref": "17",
            "product": {
                "sku": "FLSK",
                "name": "Fancy Lad's Snack Cakes",
                "barcode": "FLSK",
                "external_id": null,
                "vendor_sku": null,
                "goods_type": "NORMAL",
                "regulation_id": null,
                "status": "1",
                "availability": "1",
                "visibility": "2",
                "weight": 0.4,
                "length": 5,
                "width": 2,
                "height": 1,
                "export_description": null,
                "country_of_manufacture": null,
                "customs_value_usd": null,
                "customs_value": null,
                "customs_value_currency": null,
                "hts_base_code": null,
                "hts_country_code": null,
                "requires_packaging": 1,
                "requires_infill": null,
                "require_weight_check": 1,
                "allowed_container_styles": [],
                "valid_containers": [],
                "disallowed_containers": [],
                "special_supplies": [],
                "special_other": [],
                "unit_qty": 1,
                "bulk_qty": null,
                "max_per_package": null,
                "is_ship_separate": 0,
                "ship_separate_tag": null,
                "can_tip": 1,
                "can_contain_other_items": 0,
                "freight_class": null,
                "freight_category": null,
                "weight_lb": 0.4,
                "weight_oz": 6.4,
                "weight_kg": 0.18143694800000001,
                "weight_g": 181.43694800000003,
                "length_in": 5,
                "length_cm": 12.7,
                "length_mm": 127,
                "width_in": 2,
                "width_cm": 5.08,
                "width_mm": 50.8,
                "height_in": 1,
                "height_cm": 2.54,
                "height_mm": 25.4
            }
        }
    ],
    "address": {
        "firstname": "Betty",
        "lastname": "Pearson",
        "street": "11409 Vault 4",
        "city": "Knoxville",
        "region": "Knoxville",
        "region_code": "TN",
        "country_id": "US",
        "phone": "8332497447",
        "postcode": "37933-1563",
        "street1": "11409 Vault 4"
    },
    "options": {
        "order_ref": "000000002-15",
        "shipping_method": "cheapest_ALL",
        "source": "magento:000000002-15"
    },
    "timestamp": {
        "date": "2025-07-01 17:19:29.426698",
        "timezone_type": 3,
        "timezone": "America/New_York"
    }
};

const magentoOrder = {
    "order_increment_id": "000000002-7",
    "increment_id": "000000002-7",
    "items": [
        {
            "item_id": "9",
            "order_id": "9",
            "parent_item_id": null,
            "quote_item_id": "10",
            "store_id": "1",
            "created_at": "2025-07-01 20:43:29",
            "updated_at": "2025-07-01 20:43:41",
            "product_id": "1",
            "product_type": "simple",
            "product_options": {
                "info_buyRequest": {
                    "qty": "1.0000",
                    "options": []
                }
            },
            "weight": "0.2000",
            "is_virtual": "0",
            "sku": "FLSK",
            "name": "Fancy Lad's Snack Cakes",
            "description": null,
            "applied_rule_ids": null,
            "additional_data": null,
            "is_qty_decimal": "0",
            "no_discount": "0",
            "qty_backordered": null,
            "qty_canceled": "0.0000",
            "qty_invoiced": "1.0000",
            "qty_ordered": "1.0000",
            "qty_refunded": "0.0000",
            "qty_shipped": "0.0000",
            "base_cost": null,
            "price": "2.9900",
            "base_price": "2.9900",
            "original_price": "2.9900",
            "base_original_price": "2.9900",
            "tax_percent": "0.0000",
            "tax_amount": "0.0000",
            "base_tax_amount": "0.0000",
            "tax_invoiced": "0.0000",
            "base_tax_invoiced": "0.0000",
            "discount_percent": "0.0000",
            "discount_amount": "0.0000",
            "base_discount_amount": "0.0000",
            "discount_invoiced": "0.0000",
            "base_discount_invoiced": "0.0000",
            "amount_refunded": "0.0000",
            "base_amount_refunded": "0.0000",
            "row_total": "2.9900",
            "base_row_total": "2.9900",
            "row_invoiced": "2.9900",
            "base_row_invoiced": "2.9900",
            "row_weight": "0.2000",
            "base_tax_before_discount": null,
            "tax_before_discount": null,
            "ext_order_item_id": null,
            "locked_do_invoice": null,
            "locked_do_ship": null,
            "price_incl_tax": "2.9900",
            "base_price_incl_tax": "2.9900",
            "row_total_incl_tax": "2.9900",
            "base_row_total_incl_tax": "2.9900",
            "discount_tax_compensation_amount": "0.0000",
            "base_discount_tax_compensation_amount": "0.0000",
            "discount_tax_compensation_invoiced": "0.0000",
            "base_discount_tax_compensation_invoiced": "0.0000",
            "discount_tax_compensation_refunded": null,
            "base_discount_tax_compensation_refunded": null,
            "tax_canceled": null,
            "discount_tax_compensation_canceled": null,
            "tax_refunded": null,
            "base_tax_refunded": null,
            "discount_refunded": null,
            "base_discount_refunded": null,
            "gift_message_id": null,
            "gift_message_available": null,
            "free_shipping": "0",
            "weee_tax_applied": "[]",
            "weee_tax_applied_amount": null,
            "weee_tax_applied_row_amount": null,
            "weee_tax_disposition": null,
            "weee_tax_row_disposition": null,
            "base_weee_tax_applied_amount": null,
            "base_weee_tax_applied_row_amnt": null,
            "base_weee_tax_disposition": null,
            "base_weee_tax_row_disposition": null,
            "extension_attributes": [],
            "product": []
        }
    ],
    "status": "processing",
    "shipping_method": "flatrate_flatrate",
    "shipping_address": {
        "firstname": "Betty",
        "lastname": "Pearson",
        "street": "11409 Vault 4",
        "city": "Knoxville",
        "region": "Knoxville",
        "region_code": "TN",
        "country_id": "US",
        "phone": "8332497447",
        "postcode": "37933"
    },
    "shipping_description": "Flat Rate - Fixed",
    "tracks": [],
    "comments": []
}
For example, to change the Batch Tag property for order numbers that begin with "5" you could set the Order Transform Script to the following:
if (magentoOrder.increment_id.match(/^5/)) {
    order.options.batch_tag = 'Five'
}
Sync Orders Since
Set a date and save, then click the Sync Orders button to force an order import of all orders updated since the given date. This will happen hourly anyway, but using this option allows you some extra flexibility if you somehow end up with orders that did not sync on the first shot.
Update Magento Configuration
Navigate to Stores -> Services -> ShipStream Sync to configure the Magento side of the integration.
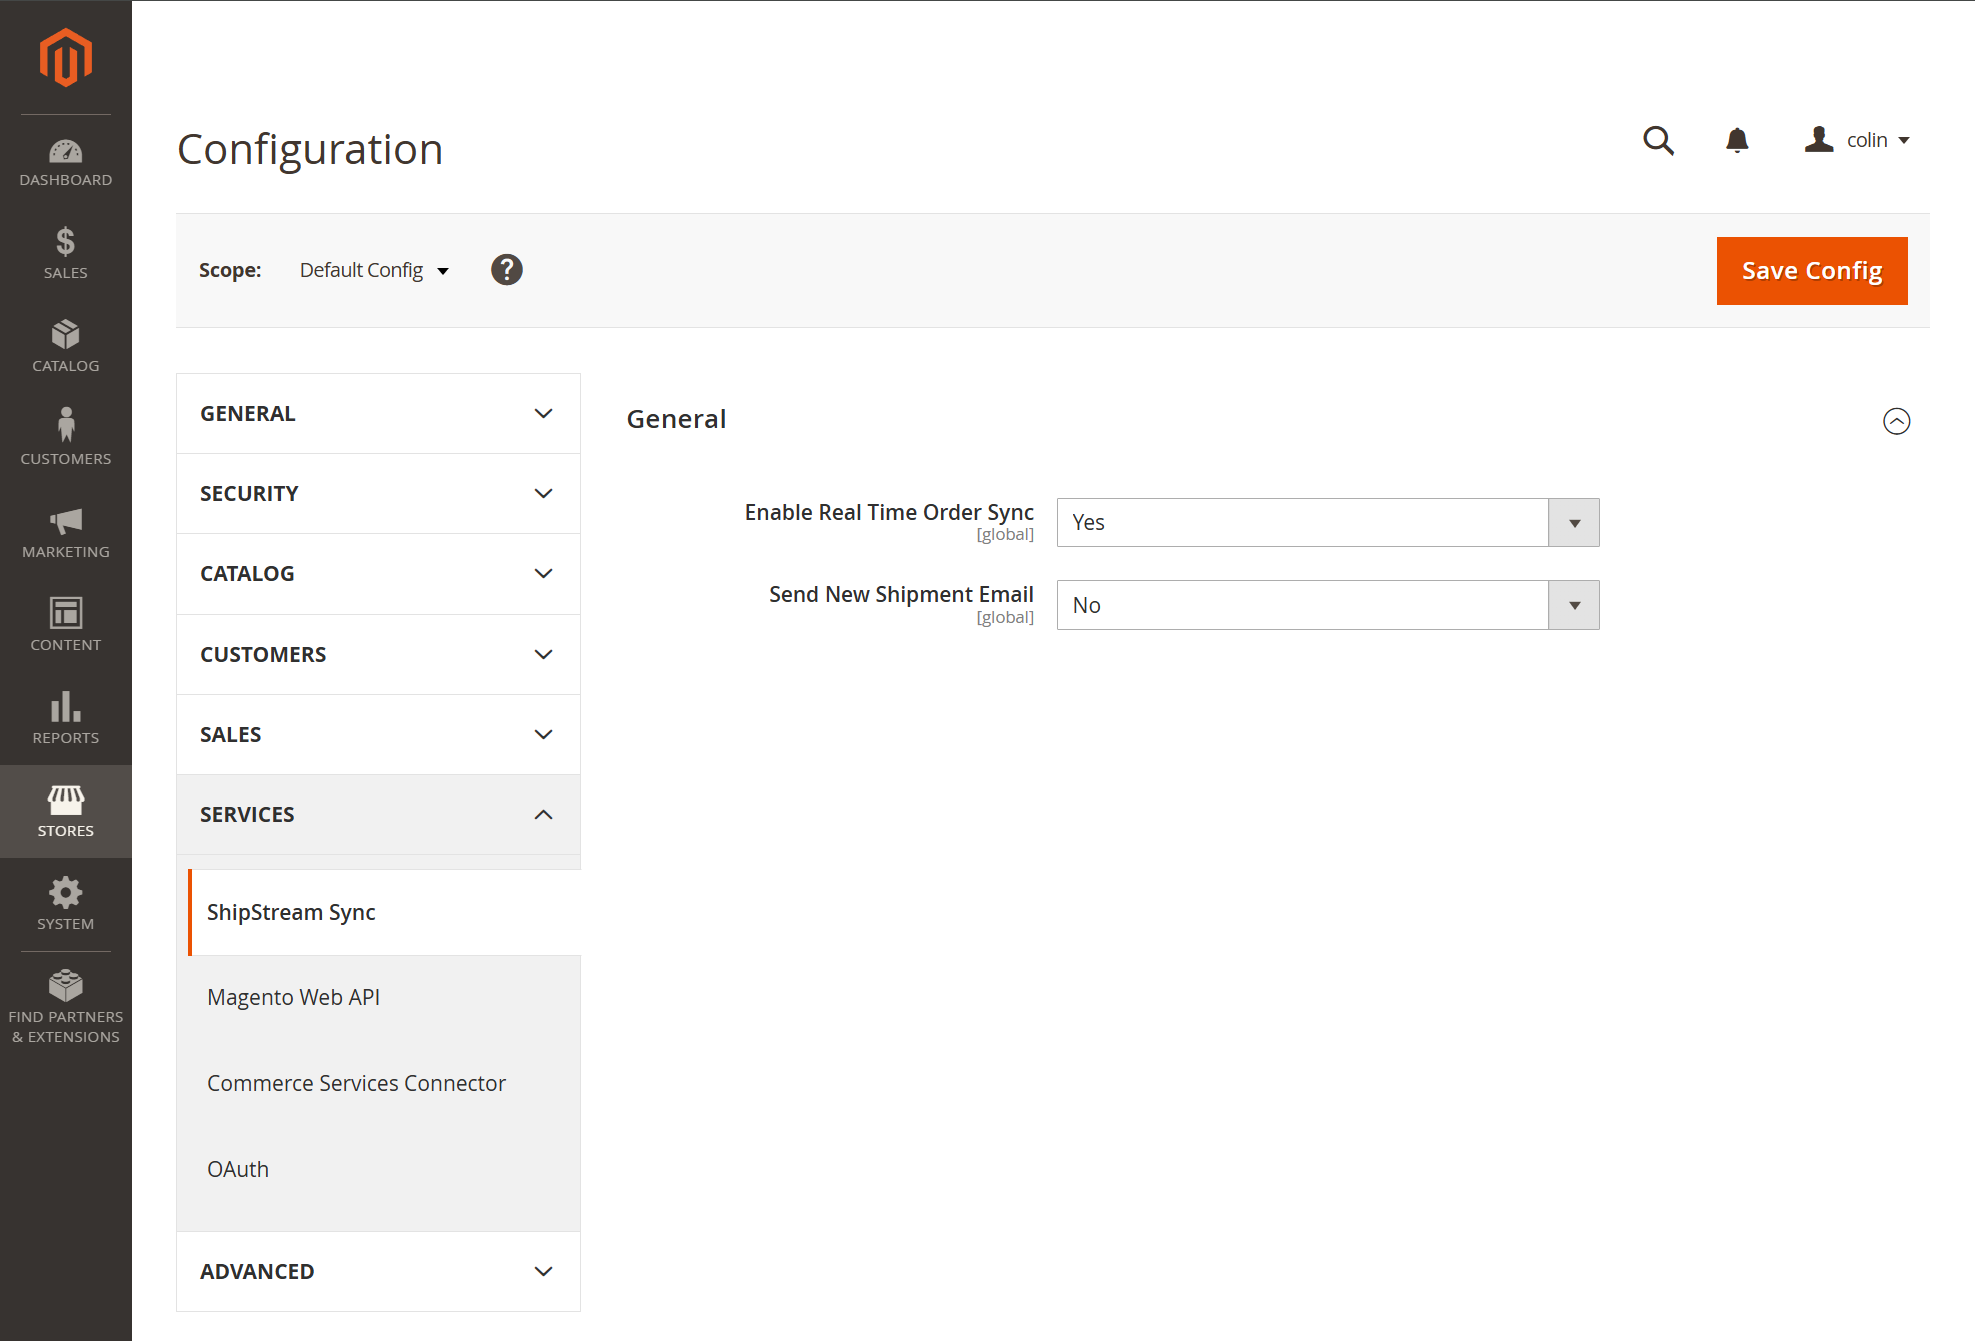
Enable Real Time Order Sync
Real Time Order Sync in this case means that the Magento extension will send wehook requests to ShipStream to trigger immediate import when a new order is ready to ship.
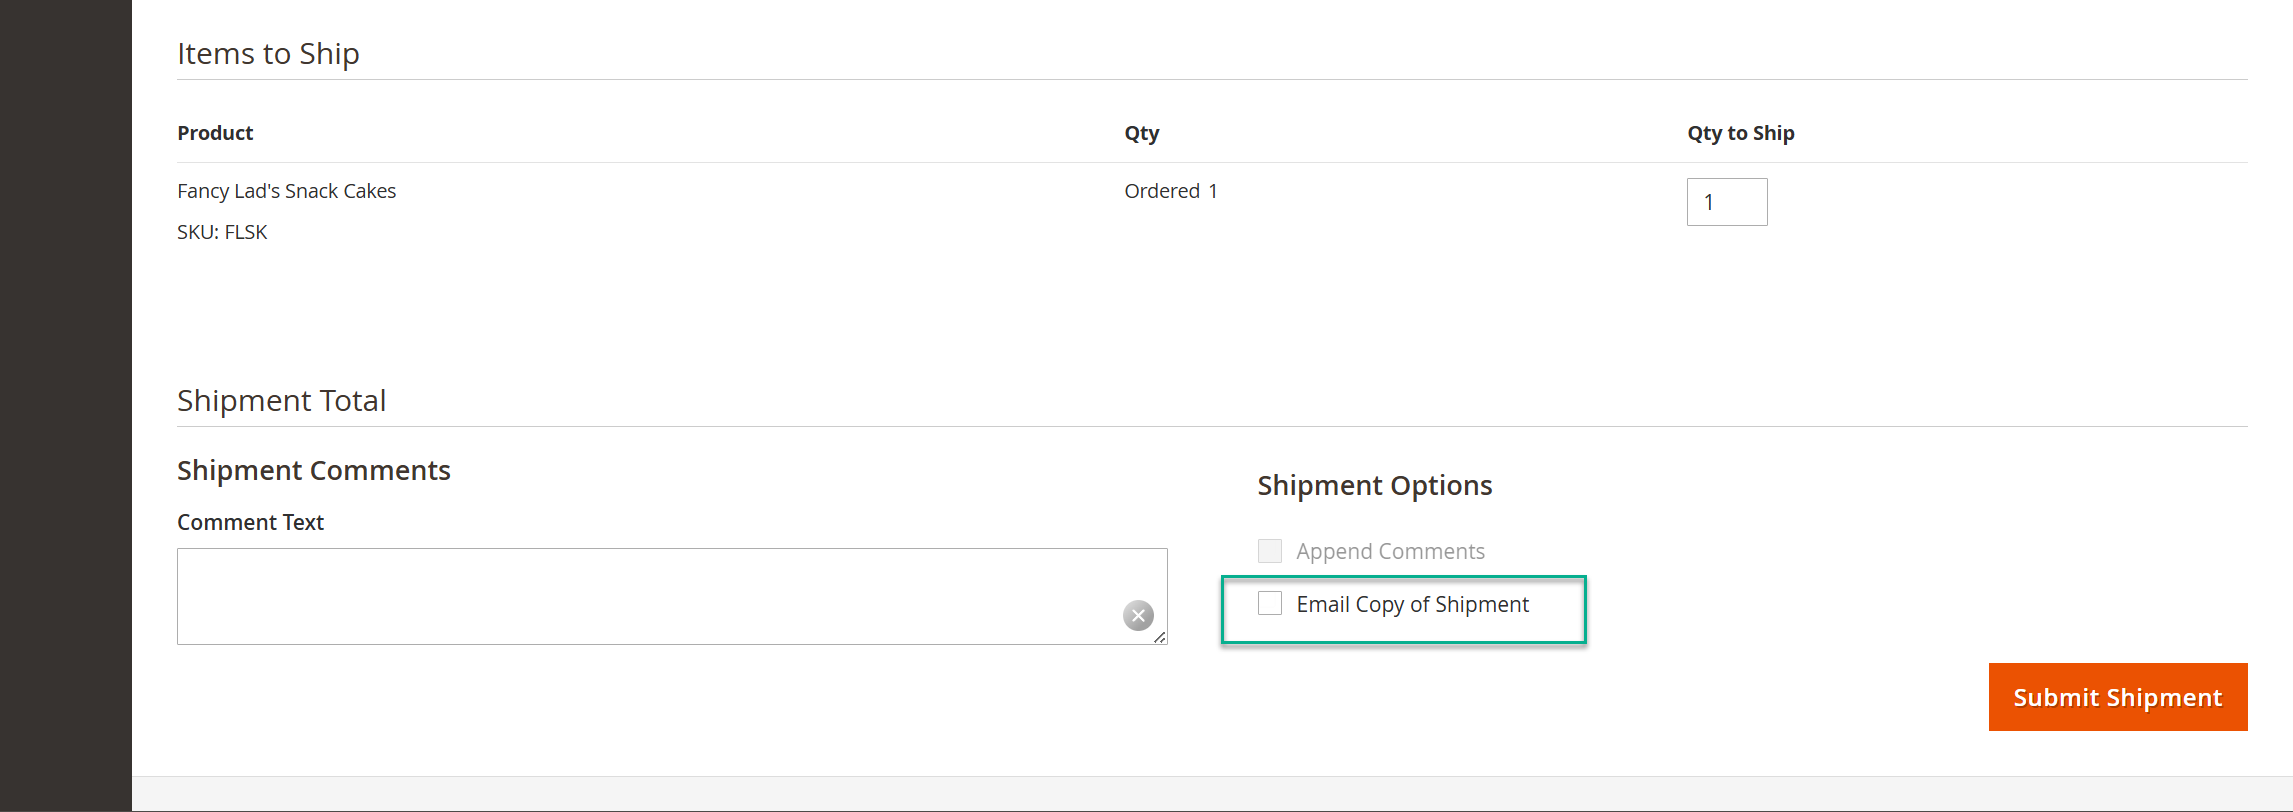
Send New Shipment Email
Setting this to Yes will cause the system to email the customer when the shipment is recorded. This is the equivalent of checking the "Email Copy of Shipment" checkbox when creating a shipment via the Admin UI:
How did we do?
Global Integrations
WooCommerce