Table of Contents
Time Tracking for Staff
Staff Users are able to track or manage their current Task or Status in two ways: The Status Dashboard or the Scanner UI.
Staff Users are able to track or manage their current Task or Status in two ways: The Status Dashboard or the Scanner UI.
Some users may not have access to the Status Dashboard from their mobile interface, depending on how the administrator setup their staff role, but some facilities use a designated computer or tablet kiosk with the Status Dashboard enabled for users to interact with.
Status Dashboard
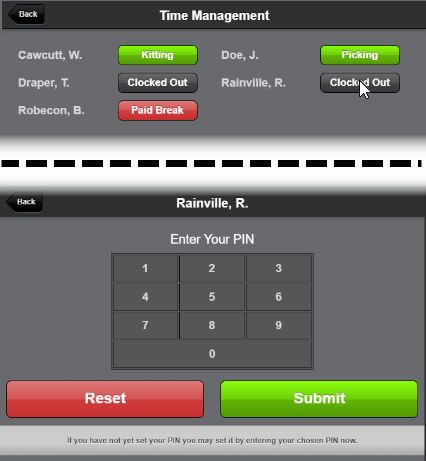
In some cases, you may not have direct access to the Status Dashboard from your personal mobile Scanner UI, but there may be a computer or tablet kiosk setup with this feature enabled for all users to access. Either way, if you are able to access the Status Dashboard you will need to enter a PIN number before clocking in or out, or to modify your current task.
Staff PIN Number
The first time a Staff User selects "Clocked Out" from the Status Dashboard in order to modify their status, they will be asked for a 4-digit PIN number. This will set the 4-digit PIN number for the user after they enter it a second time to confirm the number.
Clocking In or Out
Staff user will be automatically clocked-in once their status changes from Clocked Out to anything else such as Picking, Packing, Loading, etc. The clock will then start for that task and it will stop when a new task is selected or the user is clocked-out. At the end of the day, staff users should clock out by selecting their status from the Mobile Scanner UI or the Status Dashboard, then select Clocked Out from the status options.
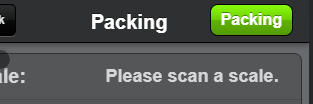
The image below shows an example of a user's Mobile Scanner UI while their status is currently "Packing". Staff users can select the "Packing" status to view other task/status options or clock-out.
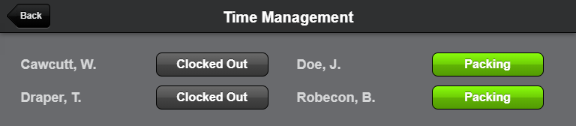
The next image is an example of how the Status Dashboard screen will appear. Staff users can select the status next to their name, such as "Packing," to proceed to the task/status options in order to clock out.
At the task/status options screen, select "Clocked Out" to change the status from Packing to Clocked Out.
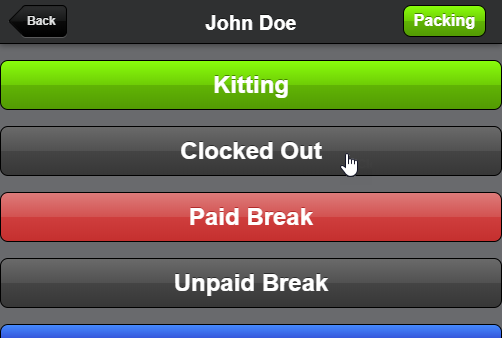
Task/Status Options
Users will typically clock-in from their own Mobile Scanner UI, but in some cases they may need to access a task from the Status Dashboard on a computer or tablet kiosk. This is useful if the staff user needs to go on paid or unpaid break, begin training another employee, attend a team meeting, etc. This allows the user to clock-in without beginning a task such as Picking or Packing which would automatically update the status.
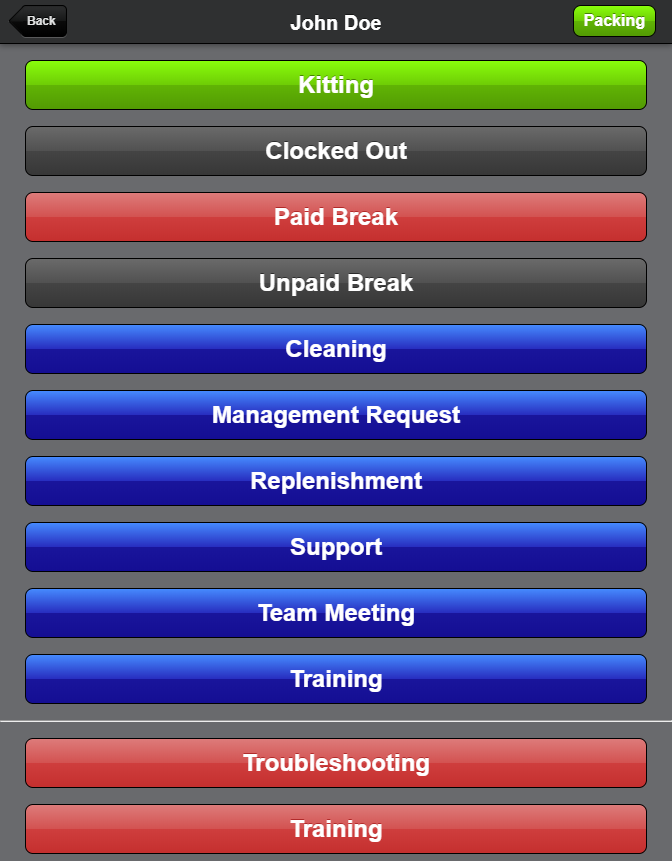
Task/Status Options Explained
Users should become familiar with all of the different task/status options available using the table below.
The green (automatic) options are typically assigned to a user when they choose a task from the main Scanner UI dashboard. For example, when a user enters the Packing screen, their status will automatically be set and will be displayed on both the status dashboard and on their mobile Scanner UI. This status will remain the same until a new task has been chosen from the Scanner UI dashboard.
By choosing one of the blue (manual) options, the user will be logged out, but will still be clocked-in and their status will have been updated. This is to avoid leaving a Scanner UI logged in and unattended for long periods of time.
The red options (or modifiers) can be used in addition to another status. For instance, if a user is currently Picking, they can choose either Troubleshooting, Training, or Special Project as a sub-status of Picking.
The Change Type column indicates how this status will be changed. Automatic means the status will change when the staff user enters the task screen, such as Picking or Packing, and are usually green. Manual types can only be changed from the options list and they are usually blue.
The Billable column shows whether or not the task is able to be billed. Currently only "Clocked Out" and "Unpaid Break" are not billed.
The Logout User column indicates that selecting the task will or will not log the user out when it is selected. Generally, the manual blue tasks will log the user out of all devices to prevent any accidental sharing of user accounts and prevent multiple logins from conflicting with one another. This has no effect on users clocking in using the Status Dashboard.
Modifier | Modifier | Modifier | |||||
Task Name | Color | Change Type | Billable? | Logout User? | Troubleshooting | Training | Special Project |
Delivery | green | automatic | yes | no | x | x | |
Processing | green | automatic | yes | no | x | x | |
Put-Away | green | automatic | yes | no | x | x | |
Picking | green | automatic | yes | no | x | x | x |
Packing | green | automatic | yes | no | x | x | x |
Cycle Count | green | automatic | yes | no | x | x | |
Relocation | green | automatic | yes | no | x | x | |
Loading | green | automatic | yes | no | x | x | |
Kitting | green | manual | yes | yes | x | ||
Clocked Out | gray | manual | no | yes | |||
Paid Break | red | manual | yes | yes | |||
Unpaid Break | gray | manual | no | yes | |||
Cleaning | blue | manual | yes | yes | x | ||
Management Request | blue | manual | yes | yes | x | ||
Replenishment | blue | manual | yes | yes | x | ||
Support | blue | manual | yes | yes | |||
Team Meeting | blue | manual | yes | yes | x | ||
Training | blue | manual | yes | yes |
Time Entry Log
Staff users with Time Management enabled will also have their task and status logged in the Time Entry Log outside of the Scanner UI, though this only updates after each refresh of the page, while the Status Dashboard updates in real-time on the Scanner UI.
While the task and status will be logged for the staff user, they will be unable to view the Time Entry Log unless an administrator enables this option for the User Role.
Time Report
Staff users can be granted access to Time Report if this option is enabled under the Staff > Time Management resource. If the user's Time Report permissions are set to View Own Report by the administrator, then only their own time log will be available.
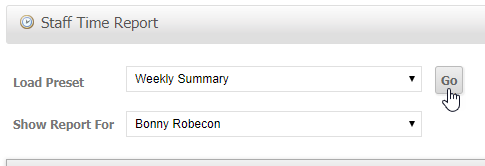
Otherwise if the user has View Full Report enabled by the administrator, then they can select All Staff Users or a specific user from the drop down menu labeled "Show Report For".
Follow the steps provided to generate a report:
- Navigate to Operations > Staff > Time Reports.
- Specify the criteria for the time report you wish to view.
- Click Show Report to apply any filters you may have set.
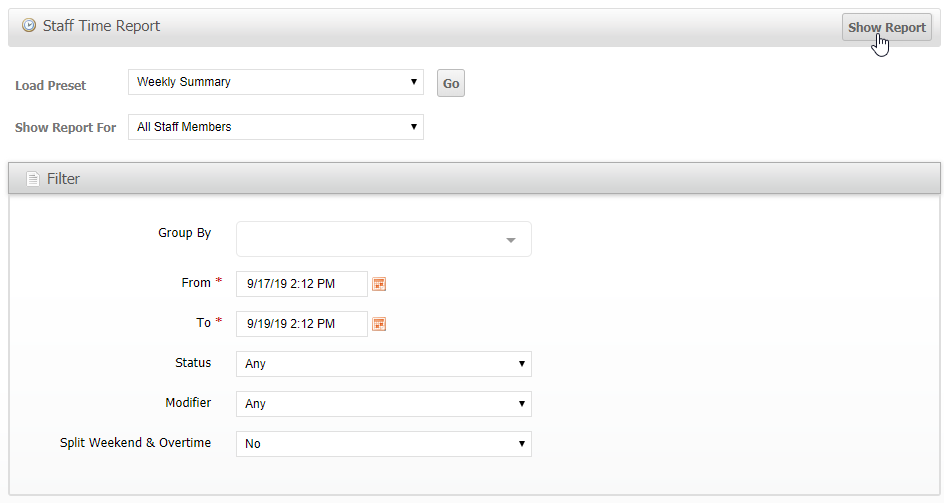
If you wish to display a report without the Filter form, then clicking Go will generate a weekly summary of the last completed work week from 12:00:00 AM Monday to 11:59:59 PM Sunday.
How did we do?
Time Tracking for Administrators
Relocations