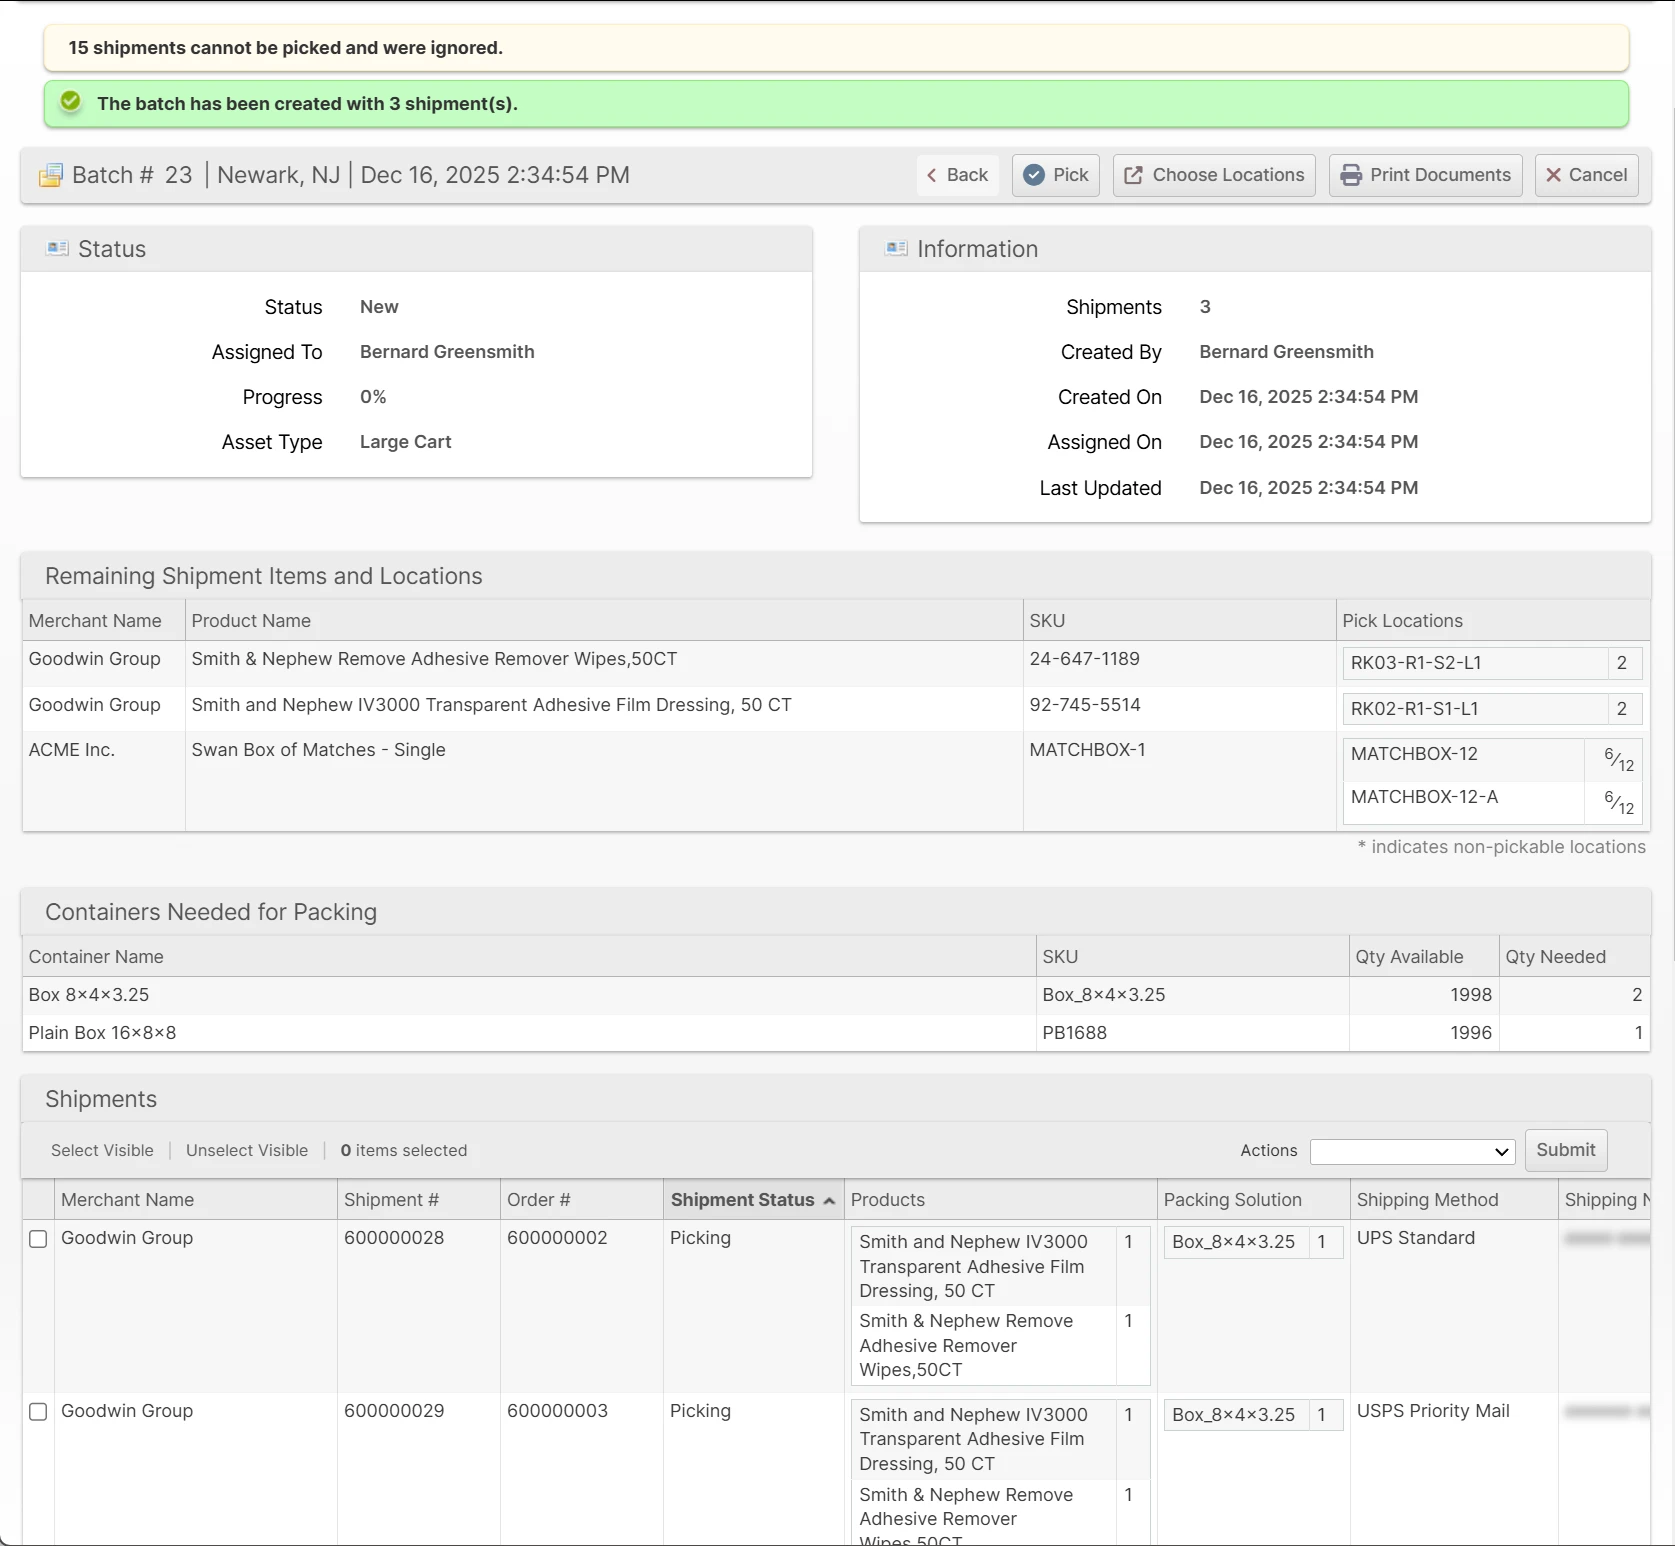
Picking Batches
A Picking Batch represents one or more Shipments that belong to the same warehouse (and usually the same Picking Class) which are grouped together so they can be picked as one unit. ShipStream optimizes the selection of shipments and the pick locations of the items based on your inventory locations and the Racks and Zones defined for the warehouse to reduce overall travel time.
Although batches can be "force composed" using any shipments belonging to the same warehouse via a mass action on the Orders or Shipments grids, the recommended method (Compose Batch mass action or Create new Picking Batch dialog) allows ShipStream to compose the batch considering all shipments in your warehouse (segregated by Picking Class and usually Target Ship Date but possibly many other criteria) to optimize the picks into clusters of the same or nearby pick locations.
Creating a Batch
There are quite a few methods for creating batches:
Create by Admin UI
- Shipping -> Orders page
- Click Start New Picking Batch
- Use the Compose Picking Batch mass action
- Use the Force Compose Picking Batch mass action
- Shipping -> Shipments
- Click Start New Picking Batch
- Use the Compose Picking Batch mass action
- Use the Force Compose Picking Batch mass action
- Operations -> Picking Batches
- Click Start New Picking Batch
Start New Picking Batch
You can generate a new batch in the Admin UI by clicking the Start New Picking Batch button on any of these pages:
- Shipping -> Orders
- Shipping -> Shipments
- Operations -> Picking Batches
These will all result in the same dialog which allows you to easily define the criteria for the batch you want to create.
Upon clicking Submit the batch will be generated and if a printer has been selected the packing slips will be automatically sent straight to the printer, otherwise a single PDF will be downloaded which contains all of the packing slips.
The dialog contains a section at the top for drilling down to your shipments using a combination of Batch Preset, Picking Class and Asset Type.
The Workflowoption allows you to pre-assign a workflow to the newly created batch.
Additionally, you can specify further constraints using the multi-select fields as follows:
- Shipping Methods
- Merchants
- Service Levels
Apply a Batch Tagfilter to include only orders with the specified Batch Tag. The Batch Tag can be assigned using the Orders grid and Scripts and is useful for isolating a subset of orders with complex criteria without having to repeat those filtering criteria.
The Target Ship Dates field allows you to narrow your operational focus based on Service Levels.
The Accessibilityfield allows you to temporarily override your Asset Policies as follows:
- Strict - no override, shipments will be excluded if they are not pickable according to the Asset Policies which are active according to the Preset and Asset Type chosen
- Resolve Burn Order Conflicts - exceptions to the Asset Policies will be allowed only if required to allow a shipment to be pickable due the the burn order of one or more SKUs on the shipment
- Disregard - all Asset Policies are disregarded
Compose Picking Batch
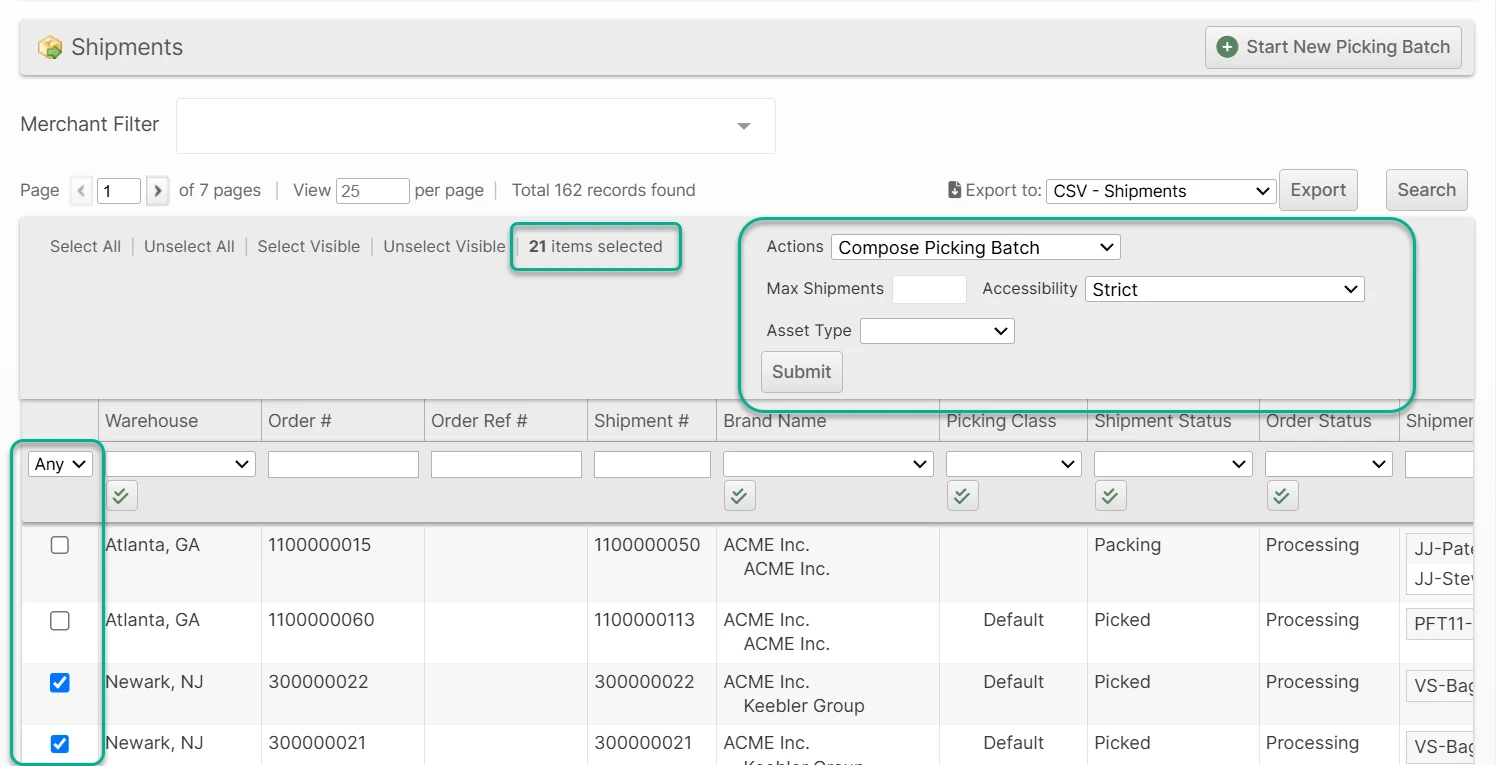
If you need to be more surgical with your batches you can use the grids with the Compose Picking Batch mass action. The system will still try to apply the proximity optimizations, but will not be able to apply the additional criteria imposed by Presets, Picking Classes or Asset Policies.
- Max Shipments - specify an upper limit for how many shipments to include.
- Accessibility- choose the degree to which the Asset Policies will be enforced (see above for details).
- Asset Type - this will assign the batch to the selected Asset Type and determine which Asset Policies are applicable (if any).
Create by Scanner UI
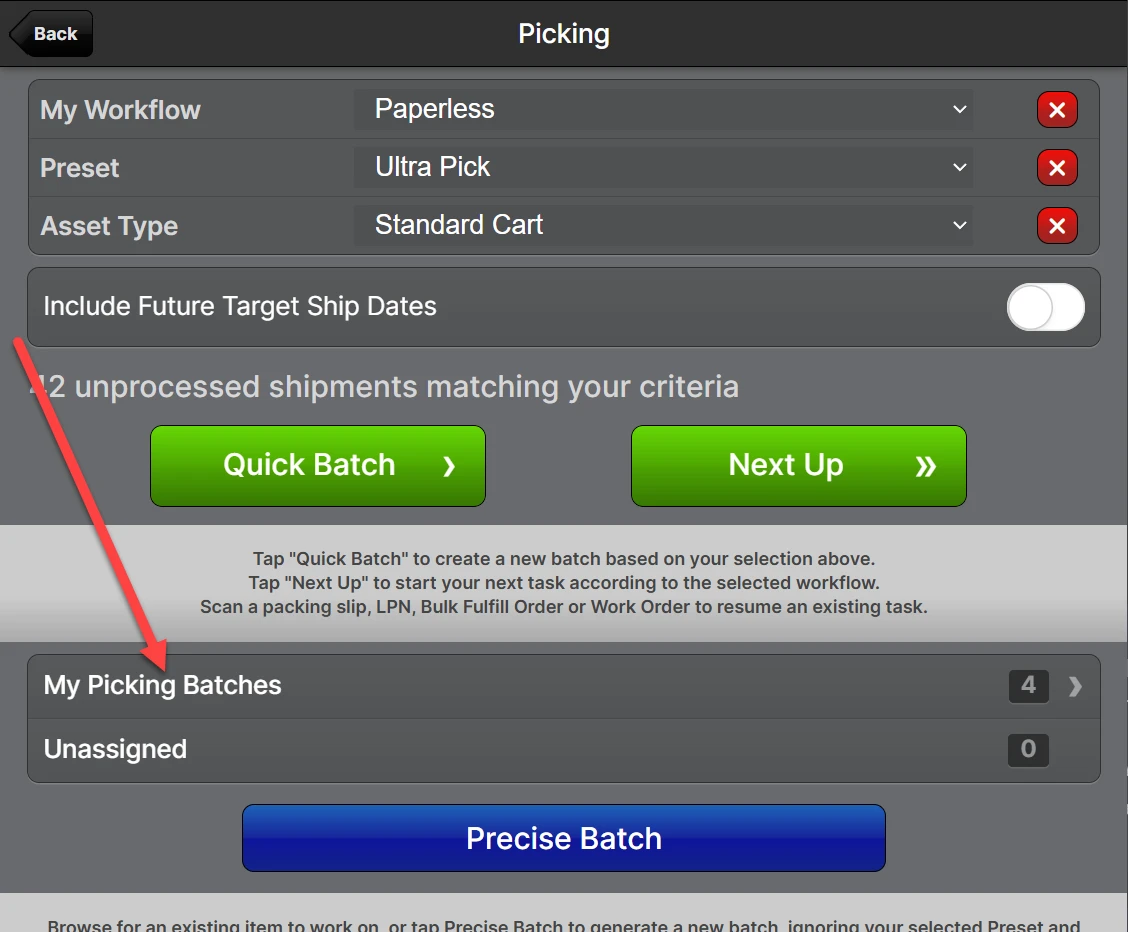
From the home screen tap Picking, then you have four choices:
Next Up
Tap Next Up and either an existing batch will be assigned to you, your oldest batch will be selected, or a new batch matching will be created for you. In all cases, the batch will match the Preset and Asset Type you've chosen.
Quick Batch
Select a preset from the list at the top of the page, or scan a Batch Preset barcode (those with a BP: prefix) and an Asset Type barcode (those with an AT: prefix). This selection will be remembered until it is cleared (by clicking the red "x" button) or changed.
Tap Quick Batch and then proceed to either Create Now or drill down farther by choosing a Picking Class, Merchant or Carrier.
Precise Batch
Tap Precise Batch and then drill down to the subset of shipments you wish to pick, clicking Create Now when you are satisfied with the criteria.
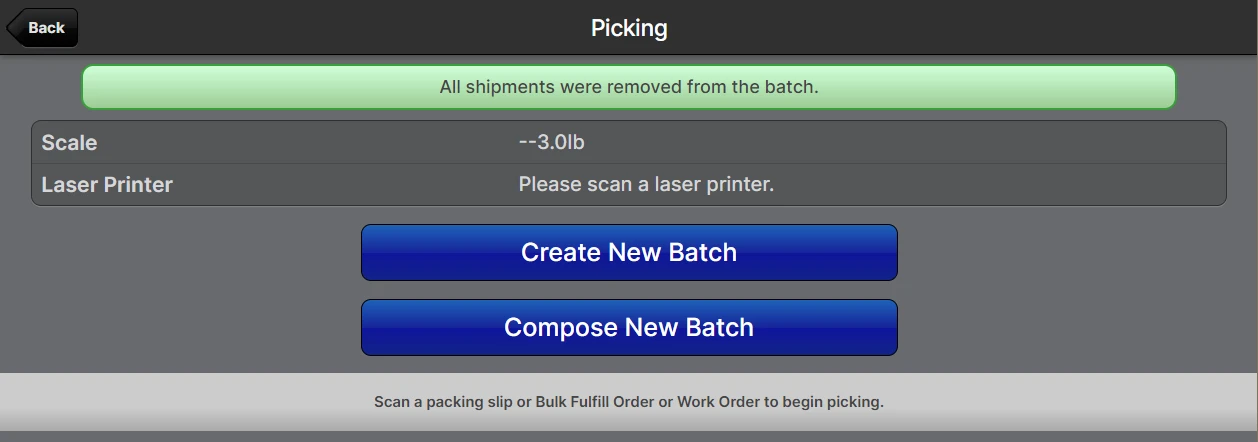
Compose New Batch
In this case the shipments must already be processed and you have a packing slip already with a barcode to scan for each. You simply scan all of the shipments and tap Create Batch. The shipments will be removed from any batch they may currently belong to and be added to the new batch.
Print Packing Instructions
If Print Packing Instructions is selected, any Packing Instructions attached to the orders of the shipments belonging to the new batch will be automatically sent to the appropriate printer if a printer is selected and if the Target Printer is the same type as is used by the Packing Slip. Using this feature allows you to print documents before picking rather than during packing which may increase your packing efficiency and allow you to maintain fewer printers at the packing stations.
The packing instructions for each shipment will be interleaved with the packing slips so that the corresponding documents always come after the packing slip to which they belong.
Pick by Paper
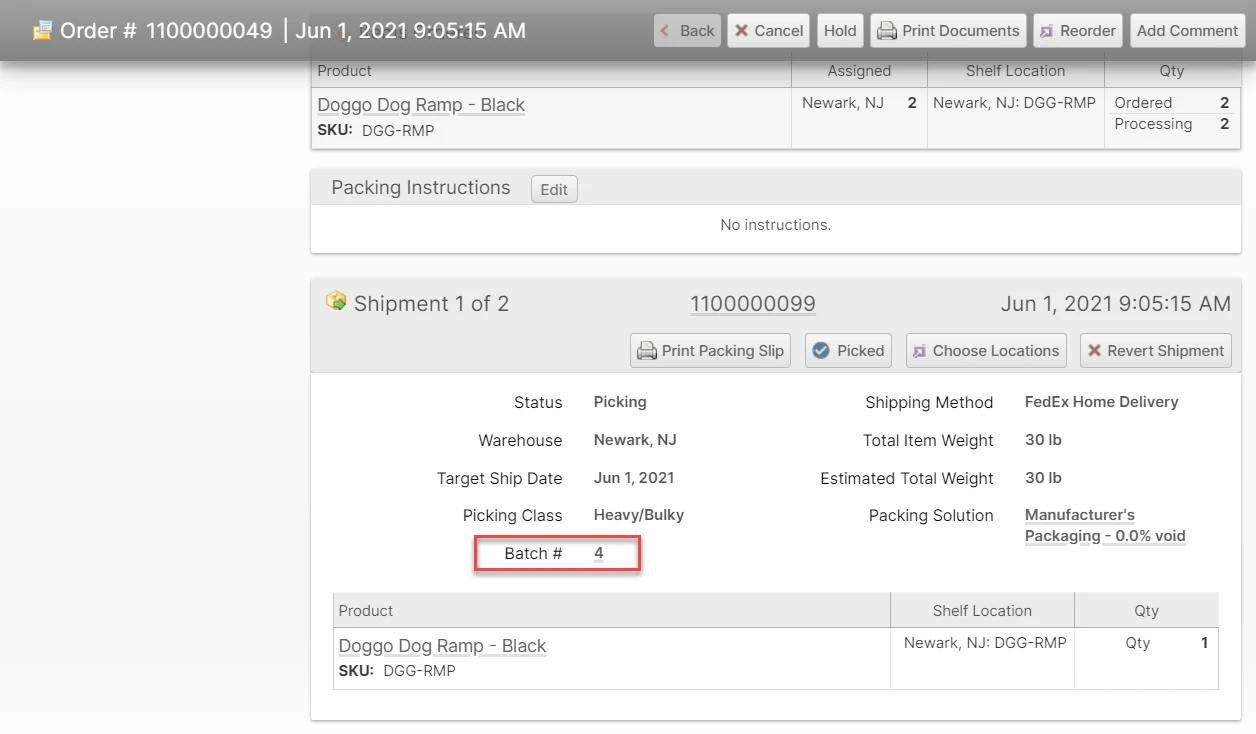
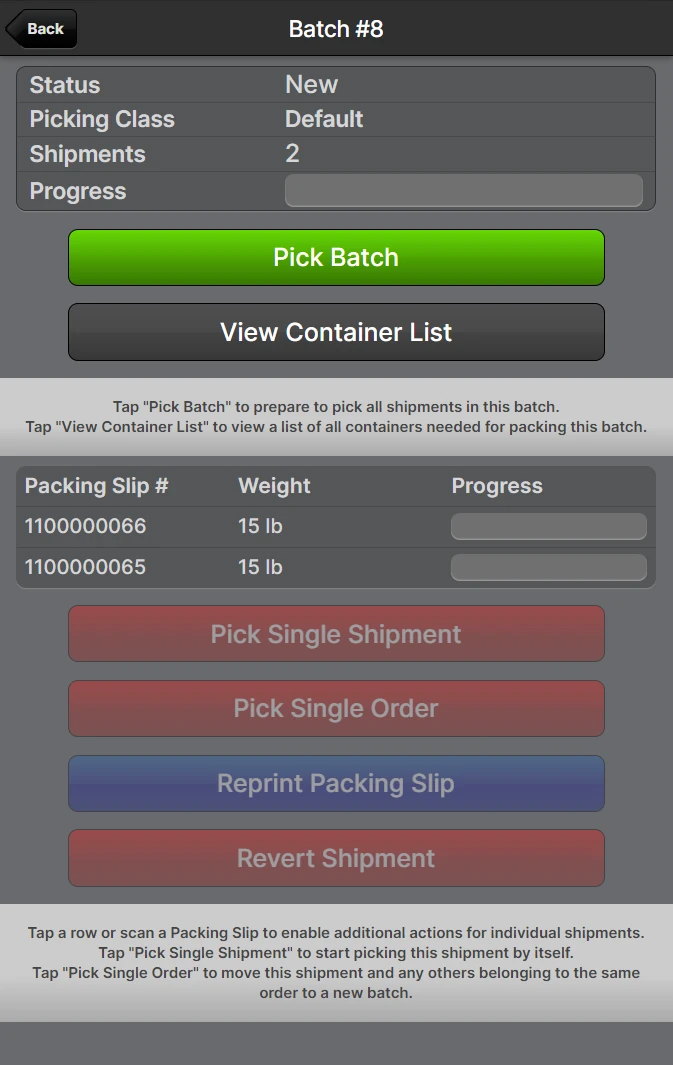
Navigate to the batch page in the admin UI by either clicking Operations -> Picking Batches and locating the appropriate batch in the grid, or by scanning any packing slip (which automatically navigates you to the Shipment page) and then clicking the Batch # on the shipment page.
On the batch page simply click Pick in the header bar and all picks will be registered moving the inventory out of the designated pick location and into Picked status.
Pick by Scanner
For the greatest accuracy we recommend using the Scanner Interface to pick your batches using barcodes. This process ensures that the correct items are picked from the correct locations to prevent inventory inaccuracies and packing errors. It also guides the user along the designated pick path based on the Picking Order of the Racks to reduce wasted travel.
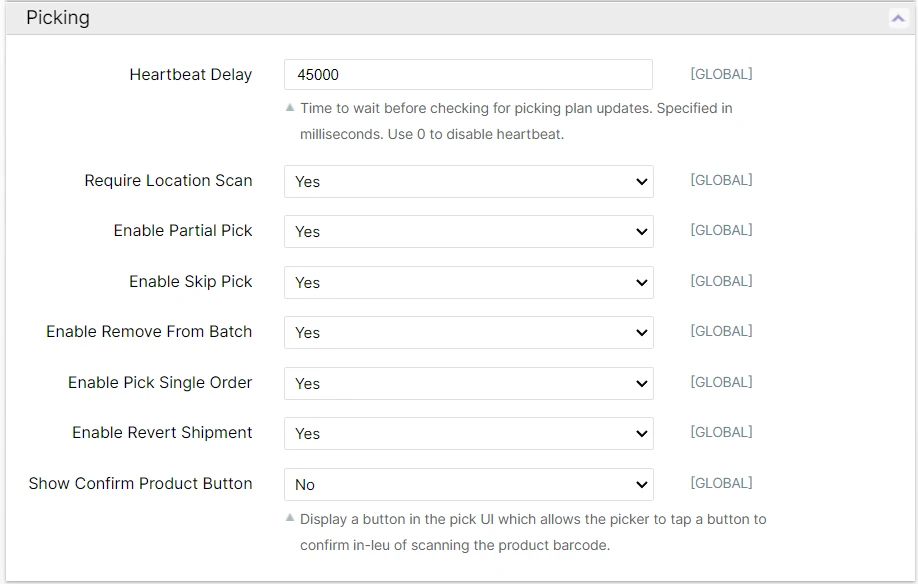
Configuration
Many features of the Picking UI are configurable to your liking at System -> Configuration -> Warehouse -> Scanner -> Picking.
Cart Location Barcodes
To pick by scanner you first need to have barcoded "Cart Locations". These barcodes do not necessarily need to be affixed to a cart, they could be on the picking bins or attached to an accessible location of a fork lift as well, for example. The only requirement is that for a given batch each barcode is unique for that batch. So, if you have barcoded bins you would want to make sure each bin gets a unique barcode to avoid conflcits, but if you have barcoded carts then you can use the same set of barcodes for each cart so they are familiar to users.
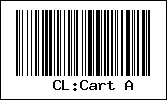
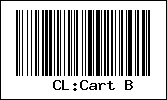
This barcode must encode any arbitrary characers prefixed with "CL:". Here are some examples for cart locations named "Cart A" and "Cart B":
Picking Process
To pick by scanner:
- Tap Scanner to open the scanner home screen and then tap Picking
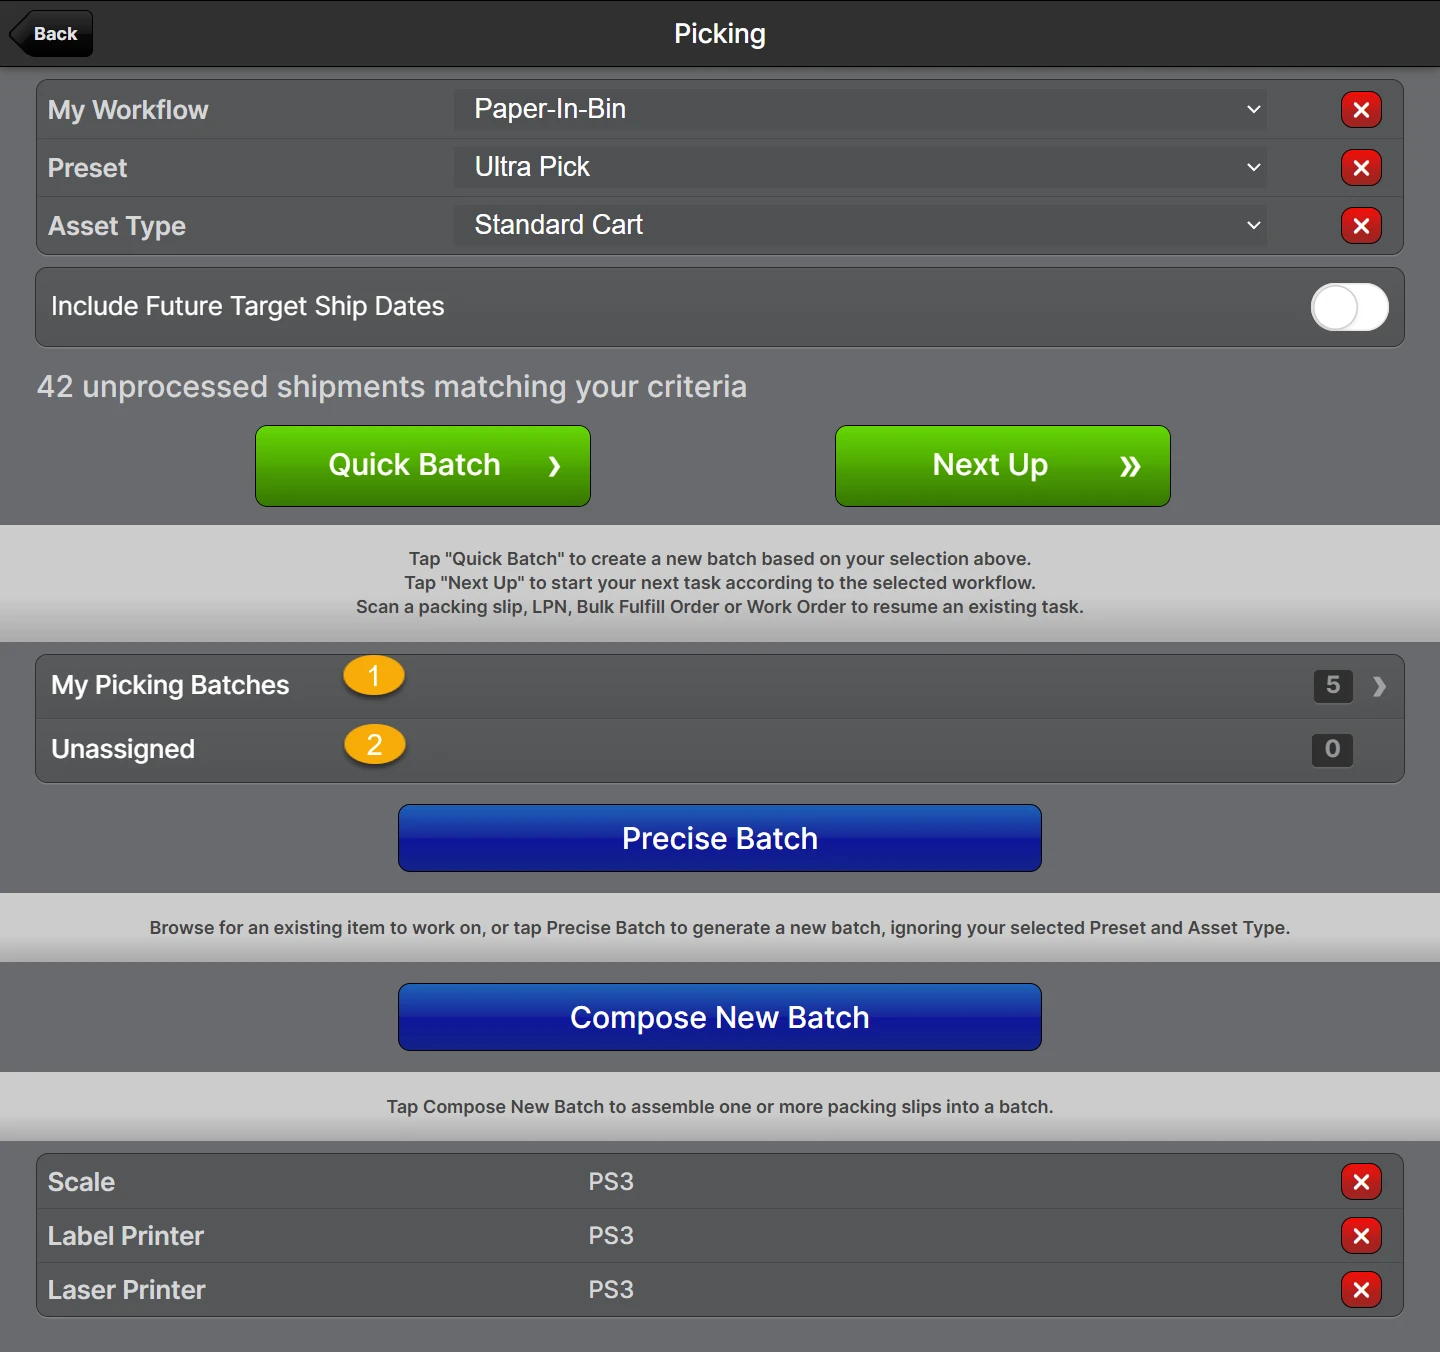
- Scan any packing slip that is part of the batch you wish to pick or choose My Picking Batches (1), Unassigned (2), or create a new batch using one of the methods described above.
- Tap Pick Batch to start the picking preparation step, if required.
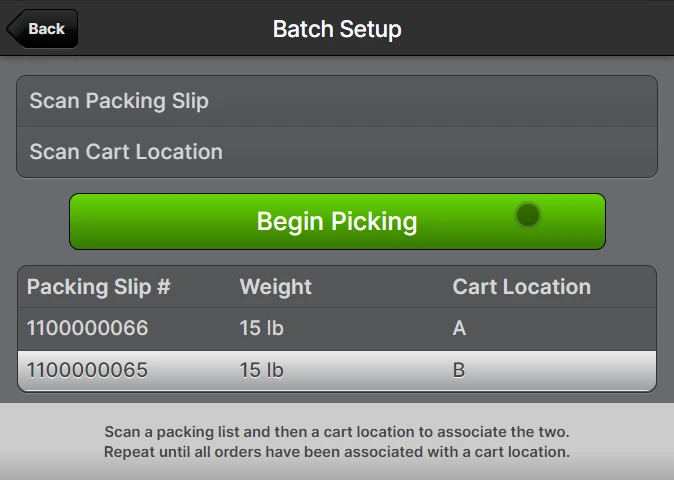
Scan a packing slip and then scan a cart location - this pairs the packing slip to the cart location for future reference.
A setup step may not be required for some picking workflows such as Paperless with the Assigned Just-In-Time or Numbered cart location strategies. See System -> Configuration -> Warehouse -> Scanner -> Picking -> Default Paperless Cart Location Strategy.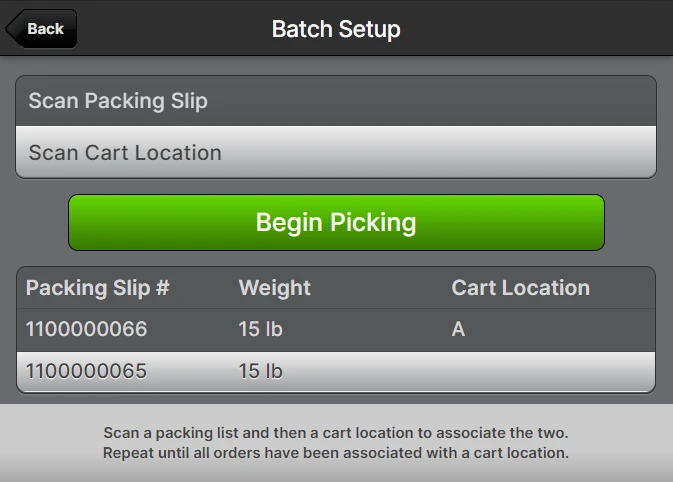 This step can be repeated in rapid succession, as fast as you are able to scan, so it is usually most efficient to place the packing slips in each location first and then rapidly scan each pair after.
- When all packing slips have been assigned to a cart location you are ready to tap Begin Picking.
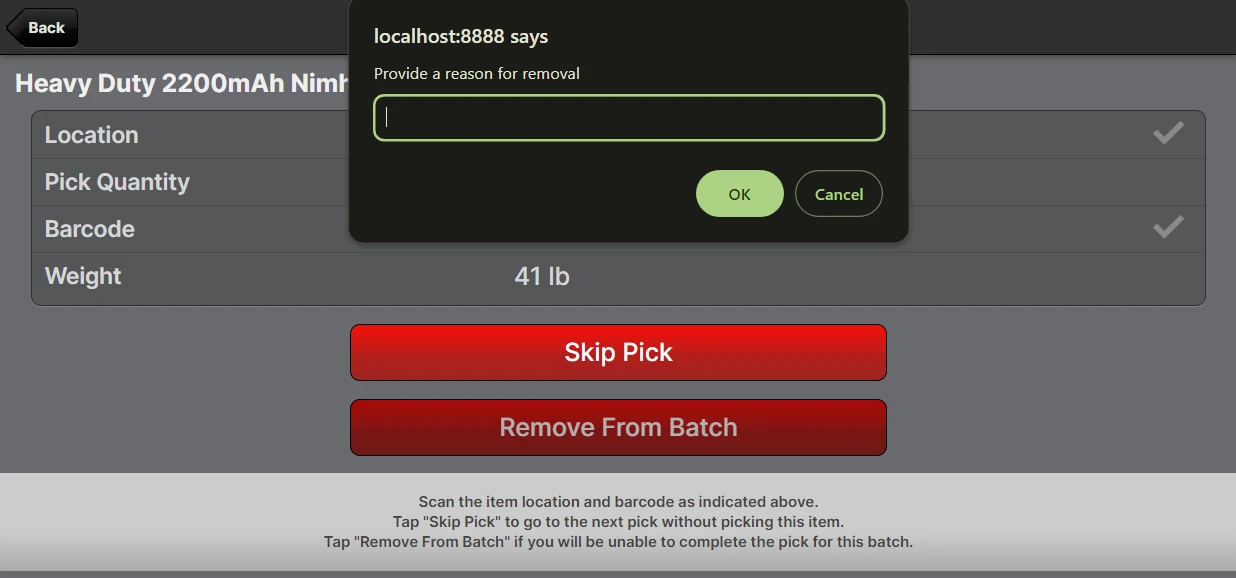
Scan the shelf location label and the product barcode (if one is set) to confirm the pick location. The check boxes will turn green when the barcodes are confirmed.
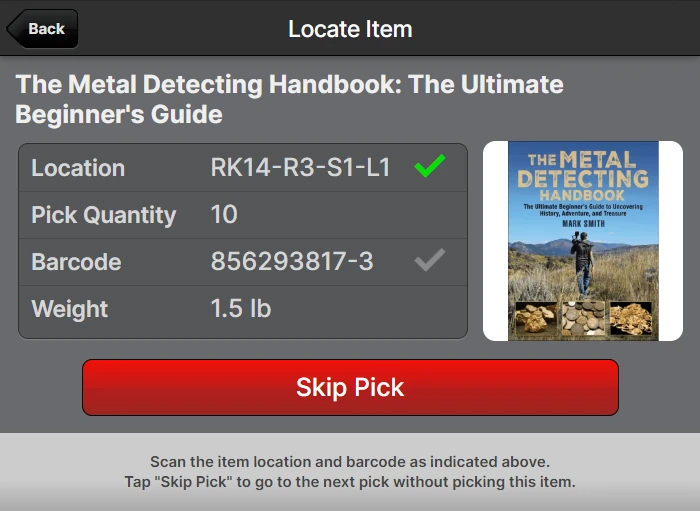 If an image was added to the product it will be visible on the page above.
- After physically picking the correct amount as indicated, scan the Cart Location barcode to confirm the pick was placed in the correct bin.
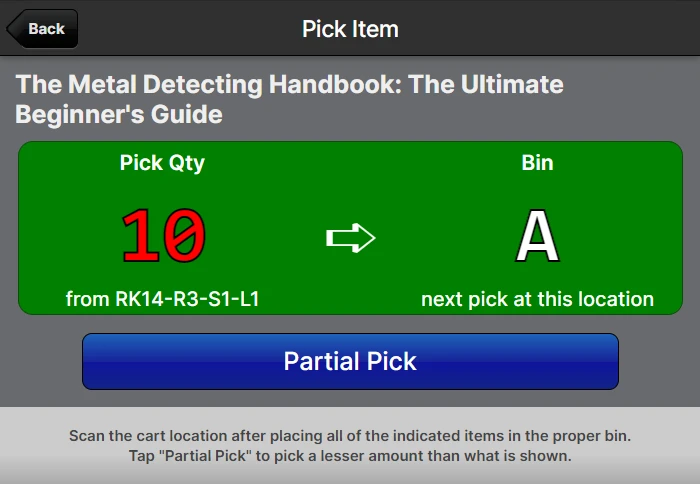
- Repeat steps 6 and 7 until all items are picked.
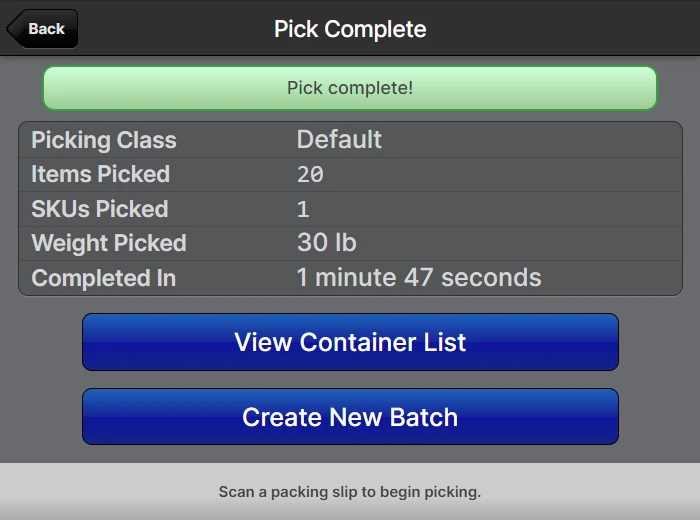
- After the last item is picked, the Complete Pick page appears with a stopwatch running while the picker walks the cart back to the packing area. Scan a Drop Location, Packing Station, or Device barcode at the drop point to close out the route, or tap End Pick Route if scan-to-complete is not required (see Completing the Pick Route below).
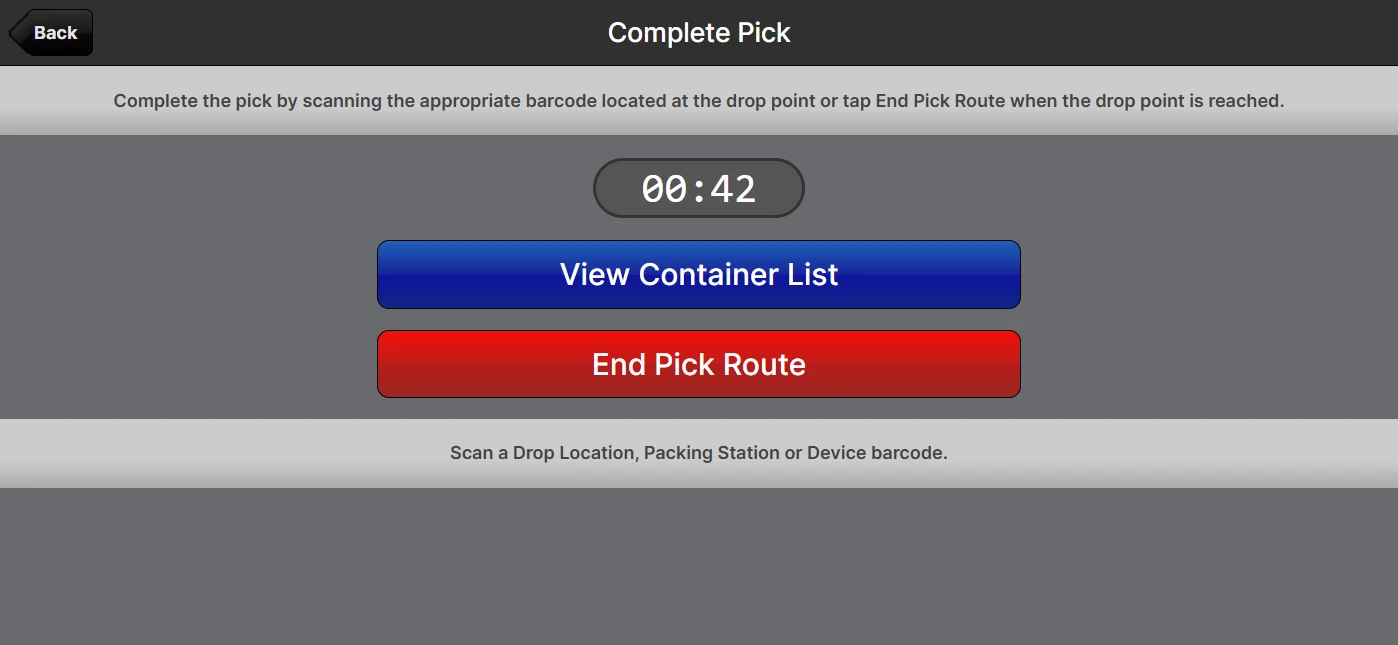
Completing the Pick Route
When the last pick on a batch is confirmed, the batch enters an In Transit status and the Complete Pick page is displayed. A stopwatch tracks the time the picker spends moving the cart from the last pick location to the drop point so that the round-trip is captured in batch metrics.
To close the route, the picker scans one of the following at the drop point:
- A Drop Location barcode (
DL:<id>) — for warehouses that drop carts at a designated drop zone rather than at a packing station - A Packing Station barcode (
PS:<name>) — when carts are dropped directly at the packing station - A Device barcode (
SCALE:,LABEL:, etc.) paired to the destination workstation
Once the drop is recorded, the Pick Complete! summary page is shown with the batch's Preset, Picking Class, Items Picked, SKUs Picked, Weight Picked, Time To First Pick, Picks Per Minute, Time To Drop-Off, and Total Time. Metrics that cannot be computed (e.g. when a batch was force-closed by a timeout) are displayed as -.
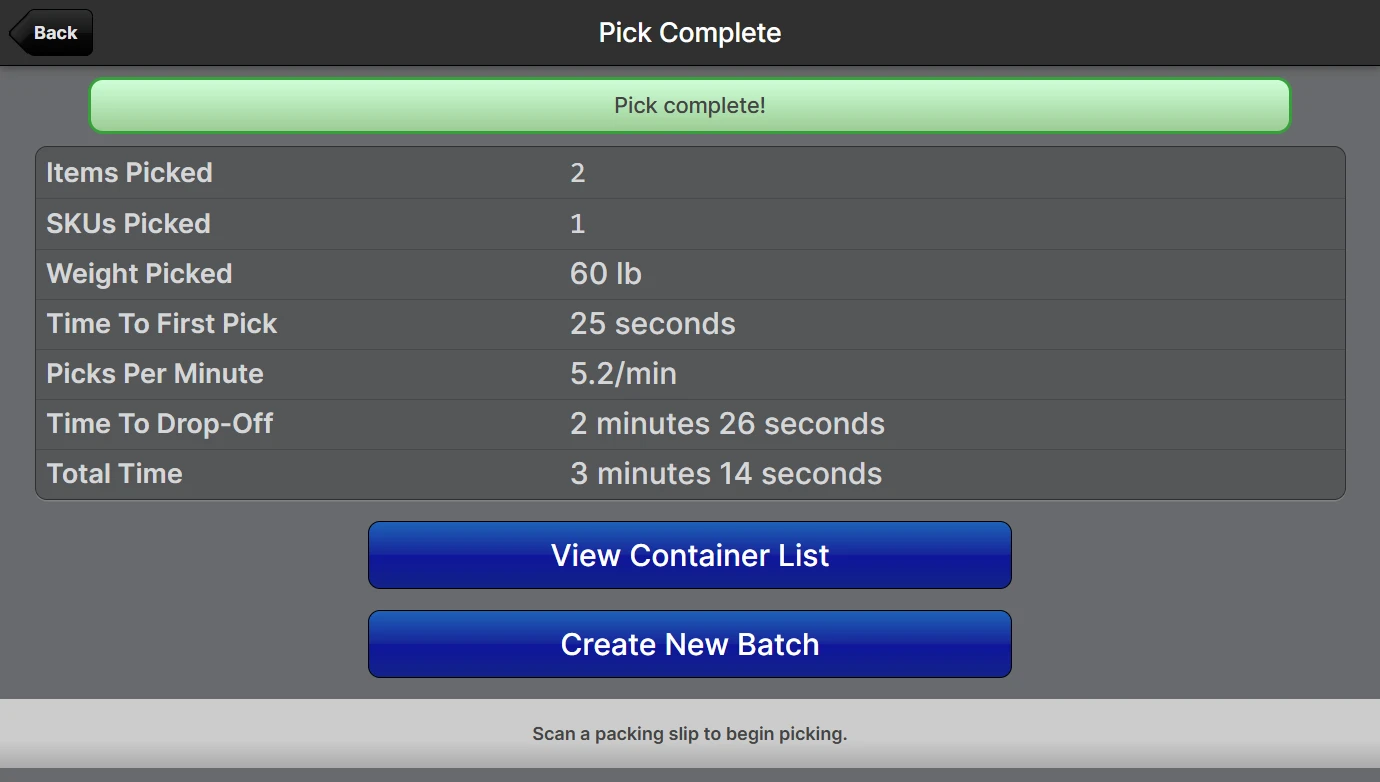
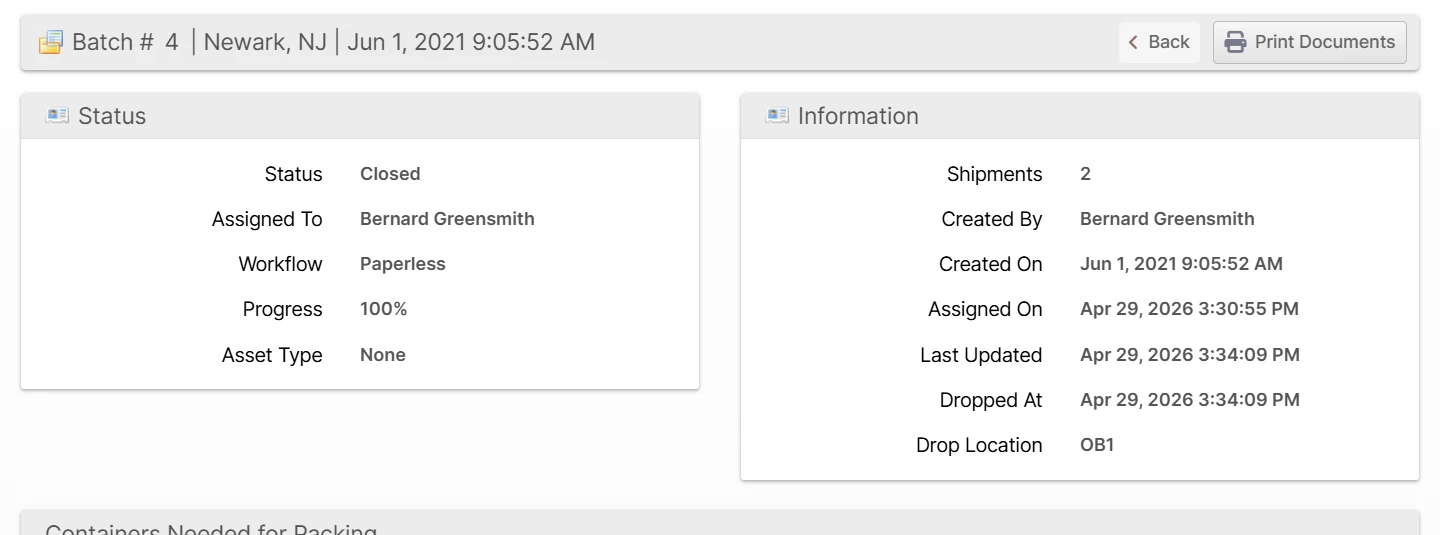
The drop time and matched location are also persisted on the batch itself and exposed as Drop Location and Dropped At on the Picking Batches grid and the Admin UI Batch page.
Resume Banner
If a picker leaves the Complete Pick page before scanning the drop point — for example by exiting back to the Scanner home screen — the picking pages will display a banner with the message "The last batch pick route is still in progress." and a Resume link. Tapping Resume returns the picker to the Complete Pick page so they can finish the drop scan without re-scanning the batch.
A batch left In Transit for more than 15 minutes is automatically closed; the drop time and any drop-off-related metrics on the Pick Complete summary will then show as -.
Picking Workflows
Allowed Workflows and Default Workflows may be set at both the Warehouse-level configuration and the Batching Preset level. They can also be overridden by users at the time of starting a batch as long as the workflow chosen is one of the Allowed Workflows.
Paper-In-Bin
This workflow is the one depicted above. The system prints one packing slip per sheet of paper and then the user distributes the packing slips to different "bins" or "cart locations" and then pairs each packing slip to a bin/cart location before starting the first pick. This gives the picker crystal clear instructions while picking to ensure that the right items get picked to the right bin.
Paperless
The Paperless workflow, as the name implies, eliminates the need for paper packing slips in favor of unique License Plates (LPNs). License Plates could be either re-usable or single-use, but the gist is that the license plate barcode takes place of the packing slip. Therefore, there are three "Cart Location Strategies" with the Paperless workflow.
Assigned Just-in-Time
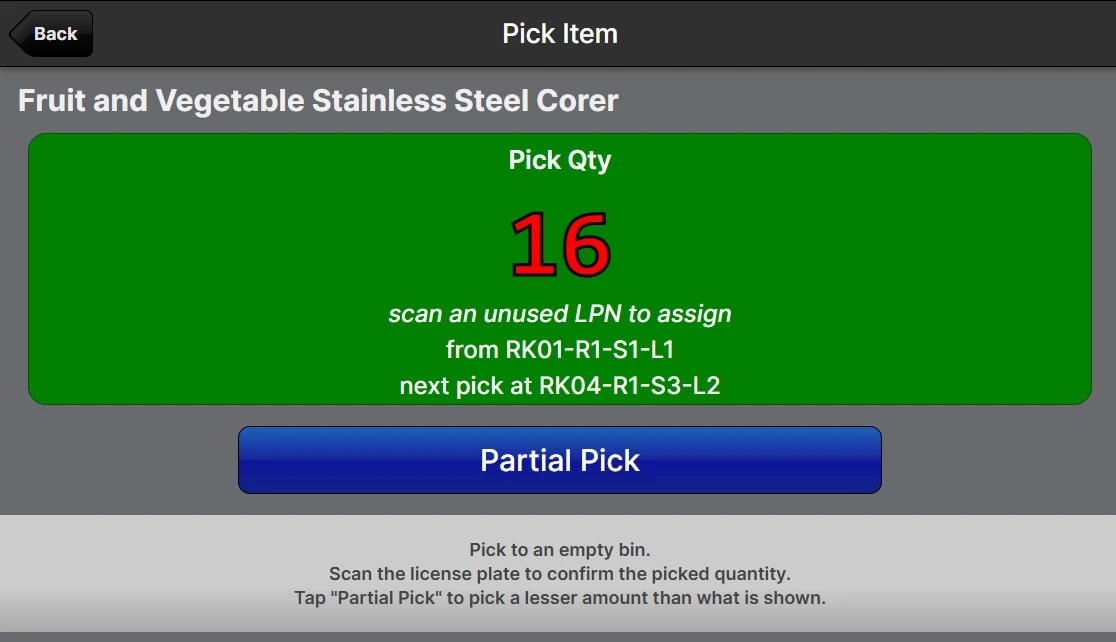
Setup is skipped initially, and as each shipment gets the first item picked, the user will choose an empty bin/LPN to associate to the shipment.
Assigned Upfront
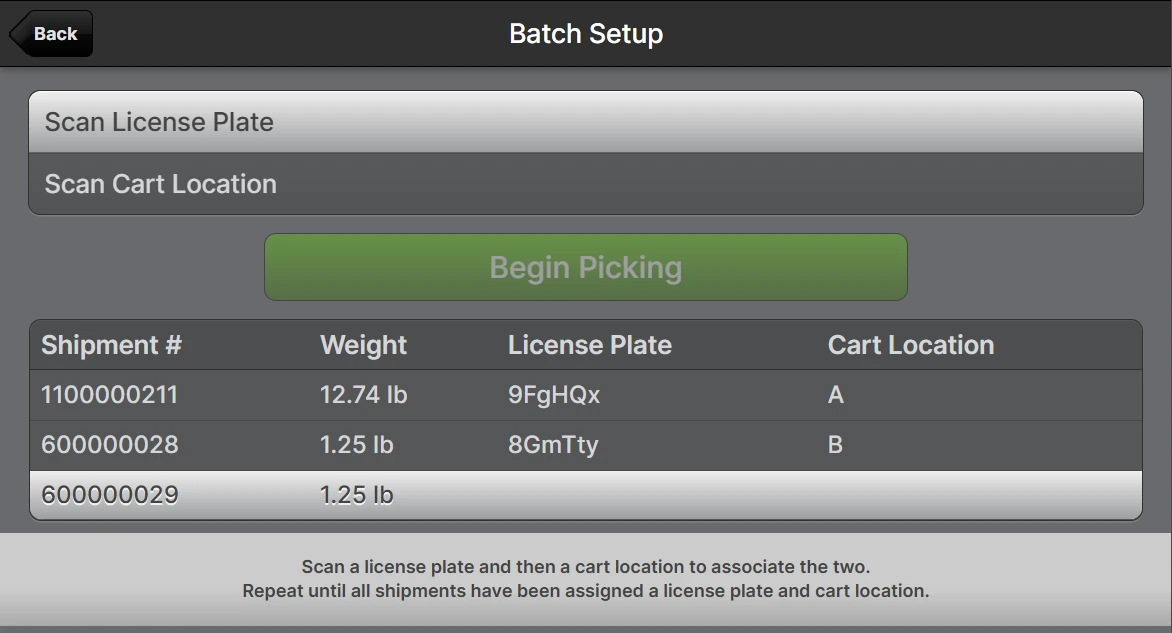
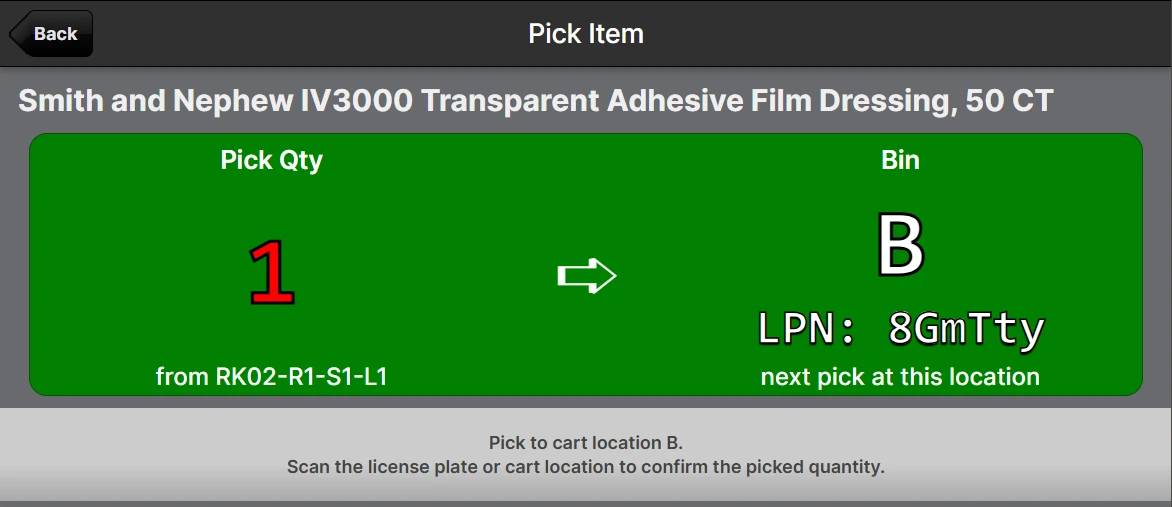
The setup step is performed similarly to the Paper-In-Bin method, whereby the user scans pairs of License Plate (LP:) and Cart Location (CL:) barcodes. In this case the picking steps will prompt the user to scan cart locations when picking. This is the most similar to the Paper-In-Bin workflow.
Setup:
Pick to pre-assigned bin with LPN:
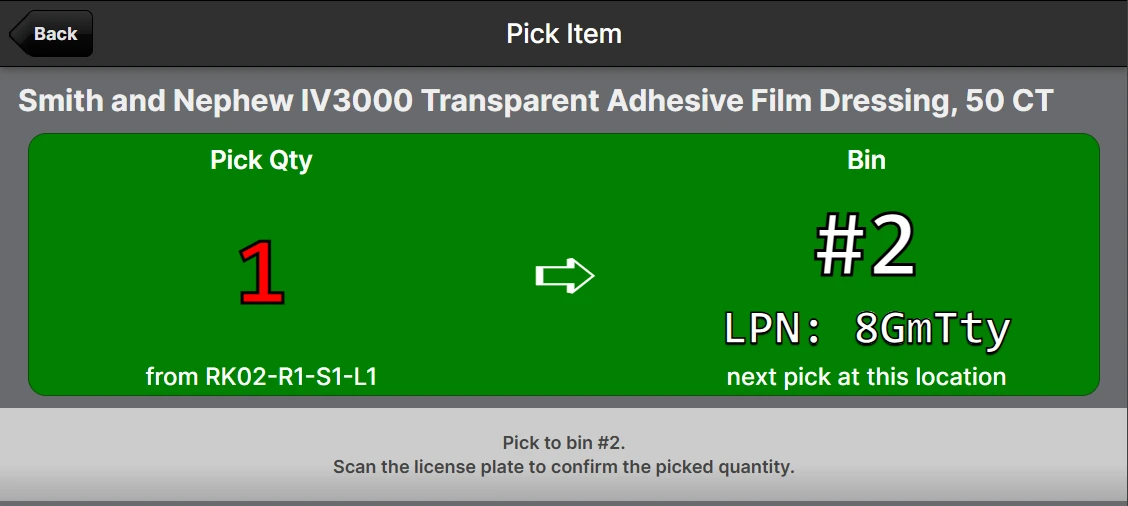
Numbered
This can work well when there are a small number of shipments on a batch. The first shipment gets number 1, the second shipment gets number 2, and so on. The user still must scan the LP barcodes, but this strategy eliminates the need for Cart Locations.
Batch Assignment
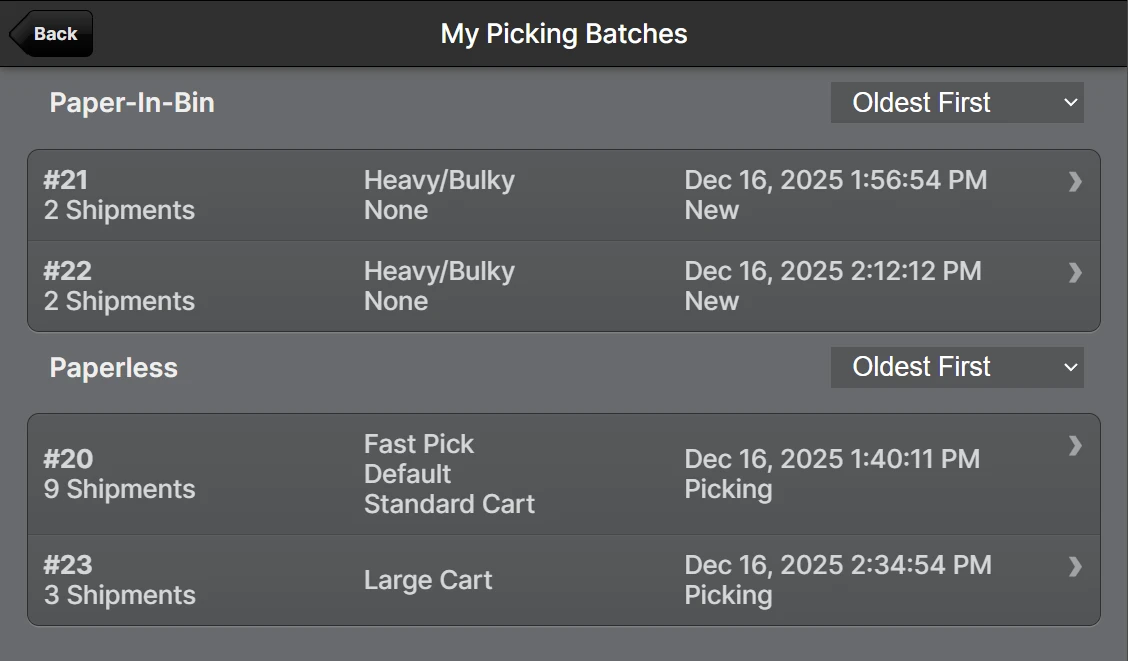
Particularly in the case of Paperless batches, one needs a way to "reach" their batches without a physical barcode to scan. A user will be assigned to any batch they create by default, making it easy to find them in the Picking UI by tapping My Picking Batches.
The list of the user's assigned batches:
If a user needs to transfer their batch to another user, they can first Unassign themselves, then the other user can find the batch in the Unassigned list.
Alternatively, a user with the Operations -> Picking Batches -> Change Assignments permission can use mass actions on the Picking Batches grid to Change Assignments to a new user.
Any user may also use the Unassign Self mass action to unassign all of their batches at once.
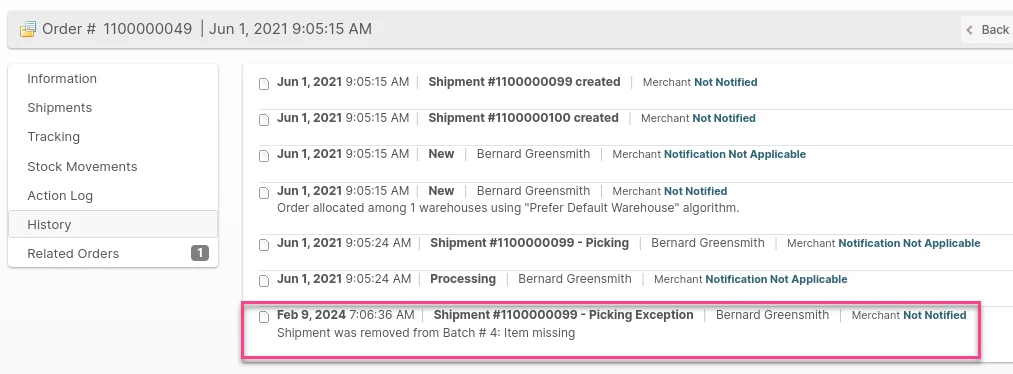
Picking Exceptions
When using the "Remove From Batch" button on the pick screen or the mass action on the Shipments grid on the Batch or Bulk Fulfill Order page, the shipment will be removed and recorded as a "Removed Shipment" along with the user's provided text explanation. The status of the removed shipment will be changed from Picking to Picking Exception.
Upon clicking OK, the user will be advanced to the next pick if there are any remaining shipments:
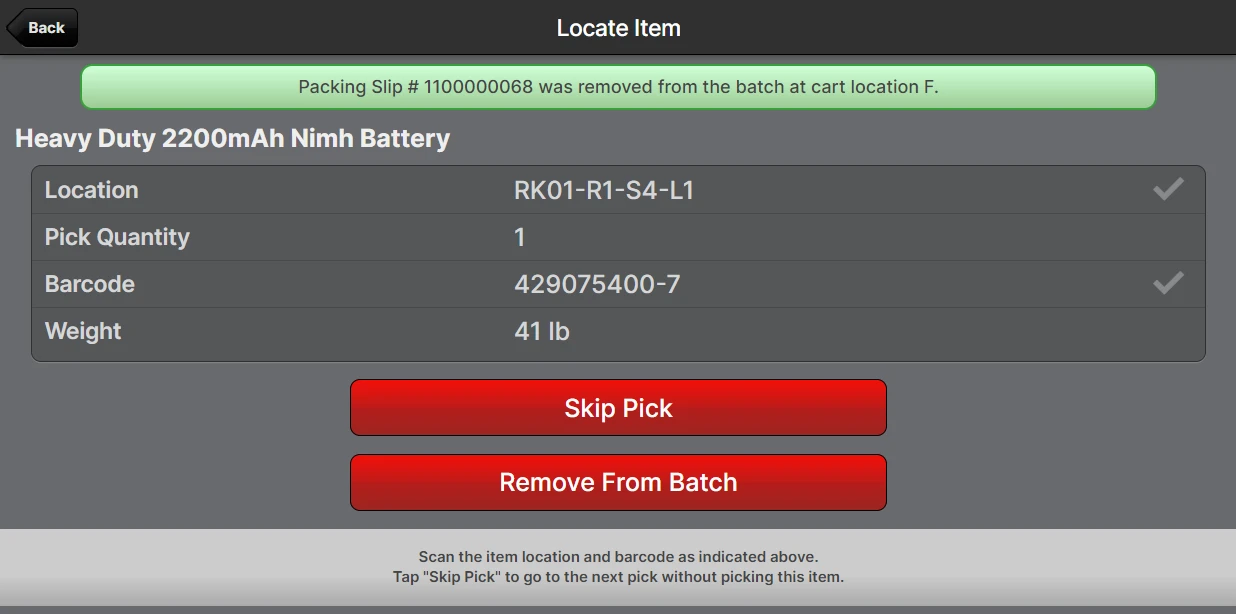
If there are no remaining shipments the user will be returned to the Picking screen:
When a comment is provided via either the Picking UI or the mass action, it will be copied to the order status history:
Print Documents
In addition to Packing Slips there are 6 other types of documents that can be associated with a shipment:
- Packing Slip Promos
- Shipping Labels
- Bills of Lading
- Customs Documents
- HazMat Shipping Papers
- Packing Instructions
- SSCC Labels
These can all be printed from the Print Documents dialog by clicking Print Documents on the batch page, or from most grids containing shipments using a mass action also called Print Documents.
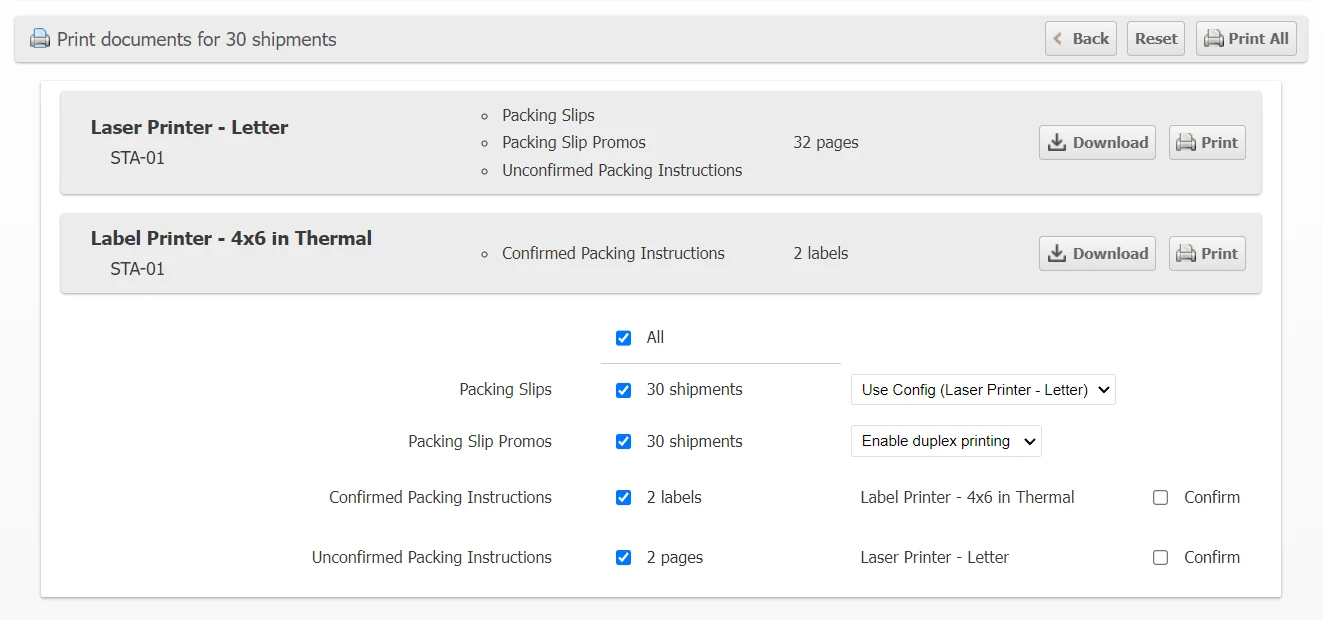
Only applicable document types will be listed in the dialog, each with a checkbox to indicate if you want to print them and a summary of how many pages will be consumed.
A grey box will appear for each printer type which has documents to be printed. Uncheck the document types which you do not want to print and the summary will be updated with the document types and page count.
Click Print All to send all of the selected documents to the appropriate printer(s) or click Print for a given printer type to only print the documents for that printer type.
Clicking Download will download a PDF file containing the documents instead of sending them to the printer (only available when a printer is selected by scanning the device barcode).
Choose Locations
ShipStream determines the pick locations for shipments at the time they are "processed" (which is when a shipment is added to a batch or when a user clicks Process) based on the Reservation Options > Pick Source option of the Picking Class to which the shipment is assigned.
Barring any Burn Order requirements, when using the Prefer Pickable or Prefer Non-Pickable options, ShipStream will reserve the locations that are closest in proximity to the rest of the batch picks to optimize travel time.
If, for any reason, you want to pick one or more items from a location other than the ones chosen automatically, click Choose Locations on the batch page (or on an individual shipment's page) to load the Choose Locations page. Check the boxes for the SKUs you want to modify the pick locations for and then enter new quantities to be picked for each location. The numbers must add up to the original amount.
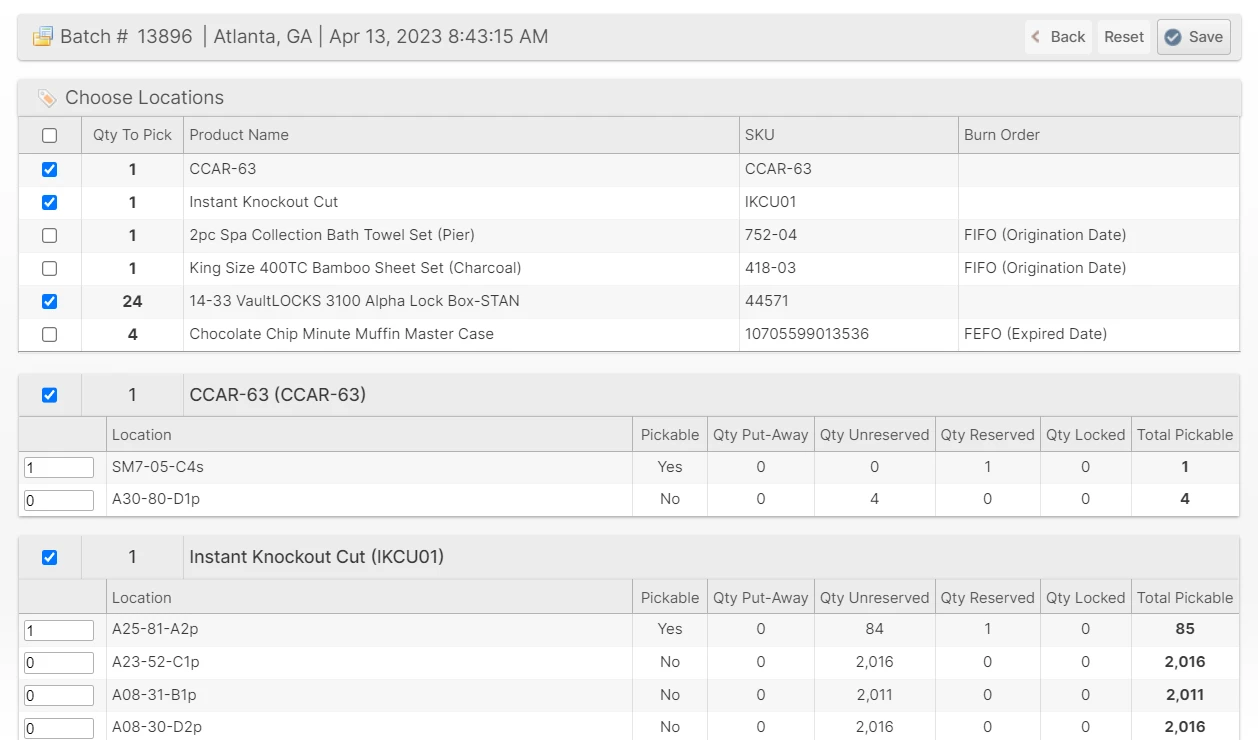
Upon clicking Save, the shipments will be re-reserved to the chosen pick locations, which will now be "locked" to avoid getting re-optimized as relocations occur.