Getting Started
Interface Basics
Printers and Scales
Shipping
Order Processing
Order Allocation
Order Processing Loop
Packing Solutions
Backorders
Ready to Ship
"Unable to Process" Order status
Address Validation and Classification
Packaging Features
Orders
Custom Fields for Orders
Reference Numbers
Other Shipping Options
Packing Instructions
Shipping Accounts
External Shipping Methods
Third Party Billing
Manifest Couriers
Packing Slip Design
Service Levels and Target Ship Dates
Outbound SSCC Barcodes
International Shipping
Tracking Numbers for Offline Shipments
Serial Number Tracking
Custom Fields for Shipments
Receiving
Catalog
Bill of Materials/Work Orders
Bill of Materials
Bill of Materials - Quantity-types
Work Orders
Import Bill of Materials
Virtual Inventory
Regulations
Products
Product Attributes
Lots/Expirations Tracking
Product Velocity
Import Products
Operations
Warehouse
Picking Classes
Picking Batches
Bulk Fulfill Orders
Put-Aways
Manifests (Loading)
License Plates
Time Tracking for Administrators
Time Tracking for Staff
Relocations
Import Locations, Lots and Inventory
Assets
Batching Presets
Rating
Rate Shopping
Rating Maps
Rate Groups and Plans
Fee Schedules and Adjustments
Virtual Shipping Methods
System
Configuration
Merchants and Brands
Warehouses
User Management
User Roles
User Groups
Login via Badge
Protected Customer Data
Enumerations
Technical Contact
Integrations
Shopify
Integrations Overview
Amazon Merchant Fulfillment
Amazon Selling Partner
CartRover
EasyPost
eHub
External Shipping Method API
Freight Club
Magento 1 / OpenMage
Merchant API Users and Roles
SPS Commerce
ShipStream Plugin Fostering Program
Webhooks
Global Integrations
Magento 2 / Adobe Commerce
WooCommerce
UPS
Scripting
Scripting Basics
Before Create Order Scripts
Before Create Order scripts Cookbook
Preprocess Packing Solution Scripts
Ready to Ship Time Scripts
Picking Class Shipment Matching Scripts
FAQ
How-To: FedEx Production Key Certification
How-To: Brand-Specific Shipping Account
Pattern and Replacement RegEx
ShipStream's Subprocessors
ISO Alpha-2 Country Codes
Printer Troubleshooting
ShipStream Flow
Release Notes
ShipStream Releases
Version 2026.1
Version 2026.0
Version 2025.7
Version 2025.6
Version 2025.5
Version 2025.4
Version 2025.3
Version 2025.2
Version 2025.1
Applicable Quantity Migration Guide
Version 2025.0
Revamped Delivery Processing
Version 2024.6
Version 2024.5
Version 2024.4
Version 2024.3
Version 2024.2
Version 2024.1
Version 2024.0
Version 2023.2
Version 2023.1
Version 2023.0
Package Tracking API Migration Guide (2023.0)
Version 2022.2
Version 2022.1
Version 2022.0
Version 2021.6
Version 2021.5
Version 2021.4
Version 2021.3
Version 2021.2
Version 2021.1
Version 2021.0
Version 2020.2
Version 2020.1
Version 2020.0
Version 2019.9
Version 2019.8.1
Version 2019.8
Version 2019.7
Version 2019.6
Version 2019.5
Device Hub Client Updates
Table of Contents
- All Categories
- Shipping
- Packing Slip Design
Packing Slip Design
This article describes the configuration options for ShipStream's automatically generated Packing Slips. Packing Slips are always generated at the time they are downloaded or printed so you can updat…

This article describes the configuration options for ShipStream's automatically generated Packing Slips. Packing Slips are always generated at the time they are downloaded or printed so you can update the configuration and re-download the Packing Slip any time to see the new result.
Navigate to System > Configuration > Packing Slip Design and choose the correct configuration scope. Packing Slip designs can be modified at the Merchant and Brand scopes allowing you to present a different design for each to the customer.
General
Default Paper Size
The Default Paper Size will be used except for when a different paper size is chosen in the "Print Documents" dialog.
The sizes available are:
- Letter (8.5" x 11") - sent to Laser Printer
- Half-Letter (5.5" x 8.5") - sent to Laser Printer
- Label (4" x 6") - sent to Label Printer
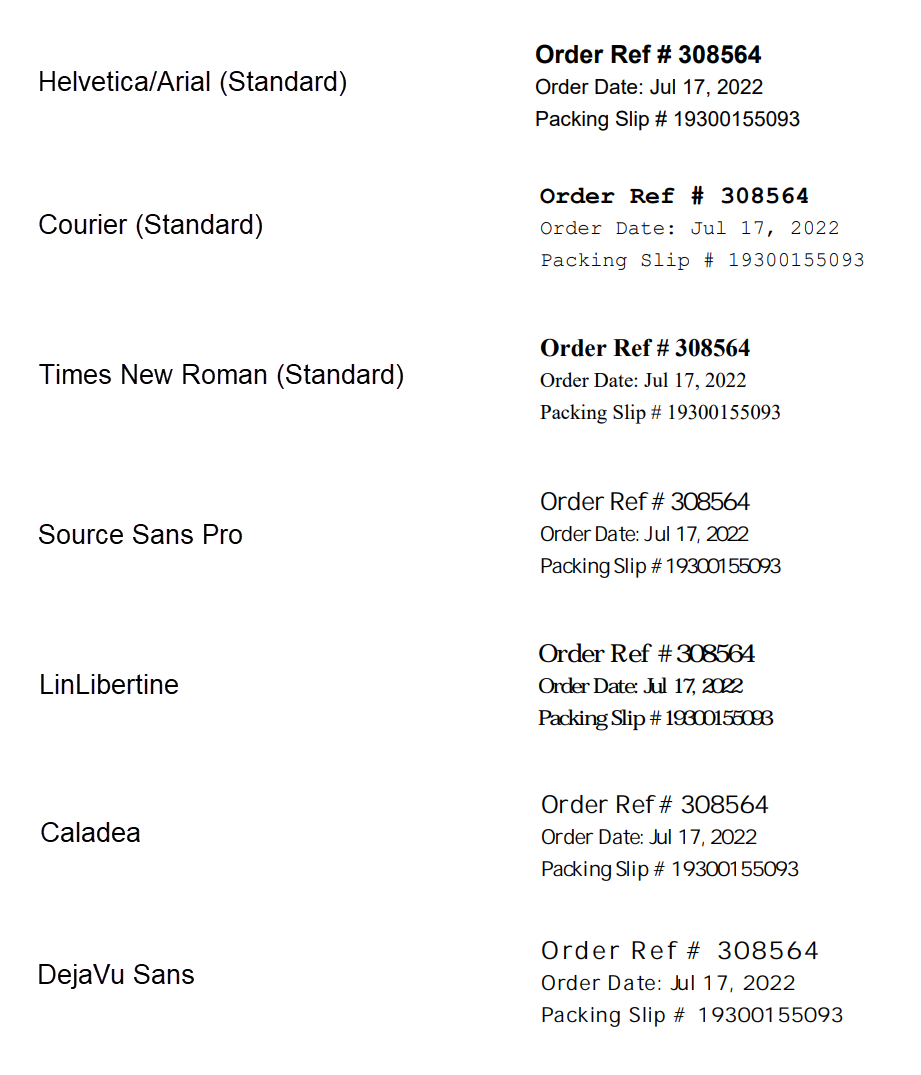
Font Family
The "Standard" fonts do not have to be embedded in the PDF files and are therefore more efficient and faster to print so are recommended if it is not necessary to use special characters and symbols.
Header
Logo
Choosing "Square Logo" will position the order information to the right of the logo:

Choosing "Wide Logo" will position the order information below the logo:
- Images larger than 60KB will be compressed and/or shrunk to reduce file size to 60KB.
- 8-bit PNG without alpha channel is recommended for most logos.
- All images are scaled by height to fit assigned space.
- Add white padding to adjust size and position of logo.
Header Text
The Header Text can be positioned left, center or right in the header text area. For the Wide Logo layout the Header Text will be on the opposite side of the logo, or below the logo if "Center".
Display Order ID
Option | Description |
None | No Order # or Order Ref # will be displayed |
Order Ref # OR Order # | The Order Ref # will be displayed if present, otherwise the Order # |
Order Ref # AND Order # | Both will be displayed |
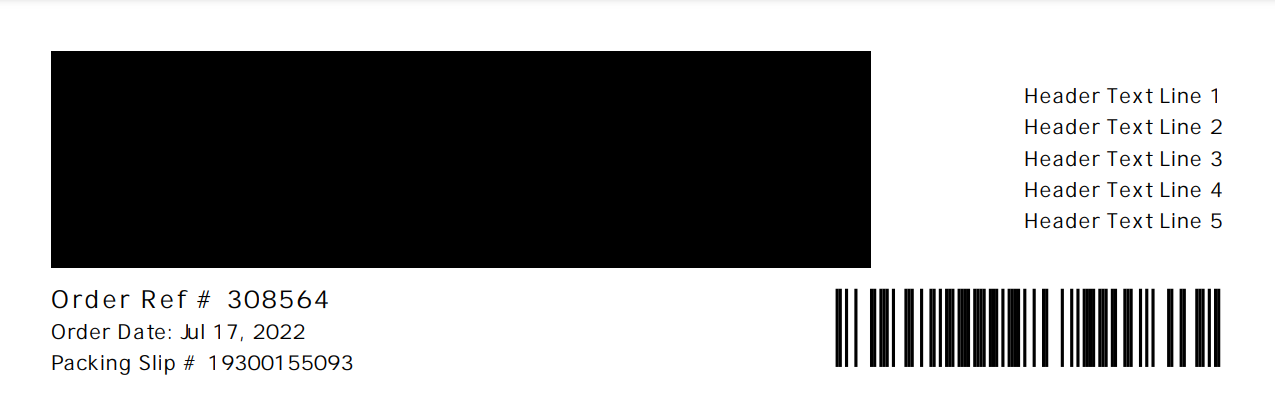
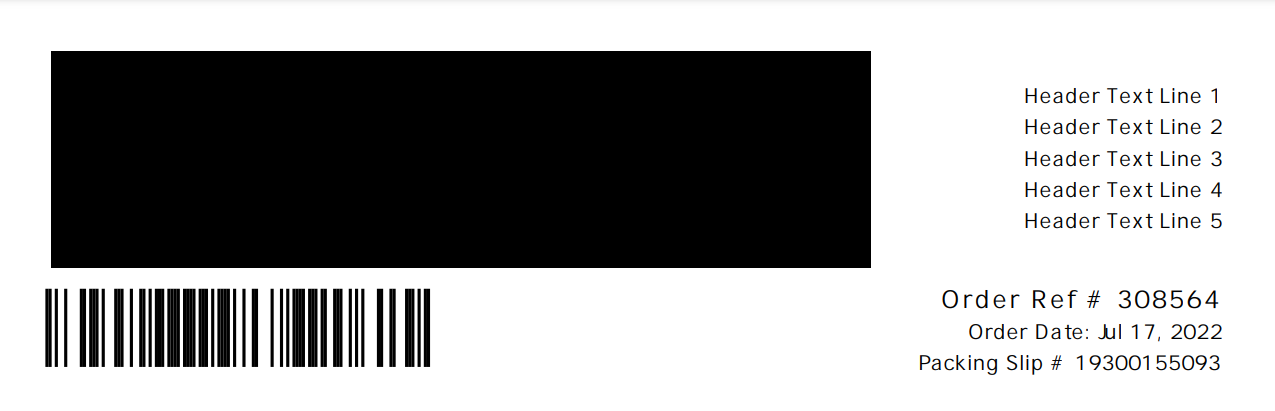
Barcode Position
The packing slip barcode used for picking and packing can be displayed either to the left or right of the Order #, Order Date and Packing Slip #.
Example with Barcode Position: Left
Body
You can choose to hide the following fields on the Packing Slip by changing options in this section:
- Country
- Telephone
- Packing Solution Container
- Product SKUs
Greetings
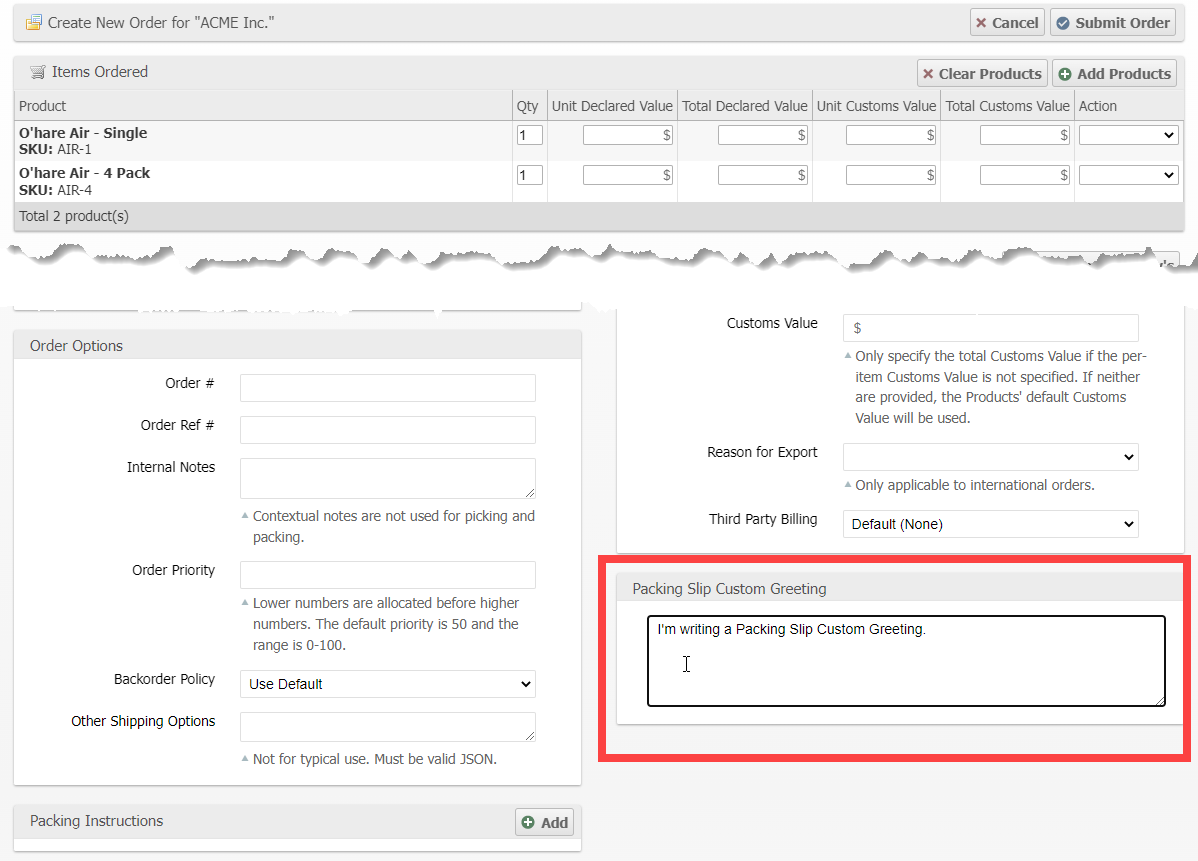
The "Greetings" appear just below the items list and can be controlled with three config fields: Top Greeting, Default Greeting and Bottom Greeting.
The Default Greeting will be replaced by the Packing Slip Custom Greeting order field, if it is specified, so that each order can have a unique greeting in addition to default greeting above or below.
A Default Greeting is shown when there is no Packing Slip Custom Greeting on the Order. This may be provided from the User Interface, API or Scripts.
Footer
At the Global and Warehouse scope you can customize the footer with features that may be useful operationally.
Field | Description |
Shipment ID Barcode | The Shipment ID without the "S:" prefix. |
External ID Barcode | The External ID can be set with a script in Warehouse > Operations > Batching > Prepare Shipment Script. (Replaces Shipment ID Barcode) |
Alphabetic Index | Allows for easily determining the sort order of a Packing Slip within a batch. Starts with A, B, etc.. |
Batch ID Barcode | Render a barcode with the Picking Batch ID prefixed with "B:". |
Example
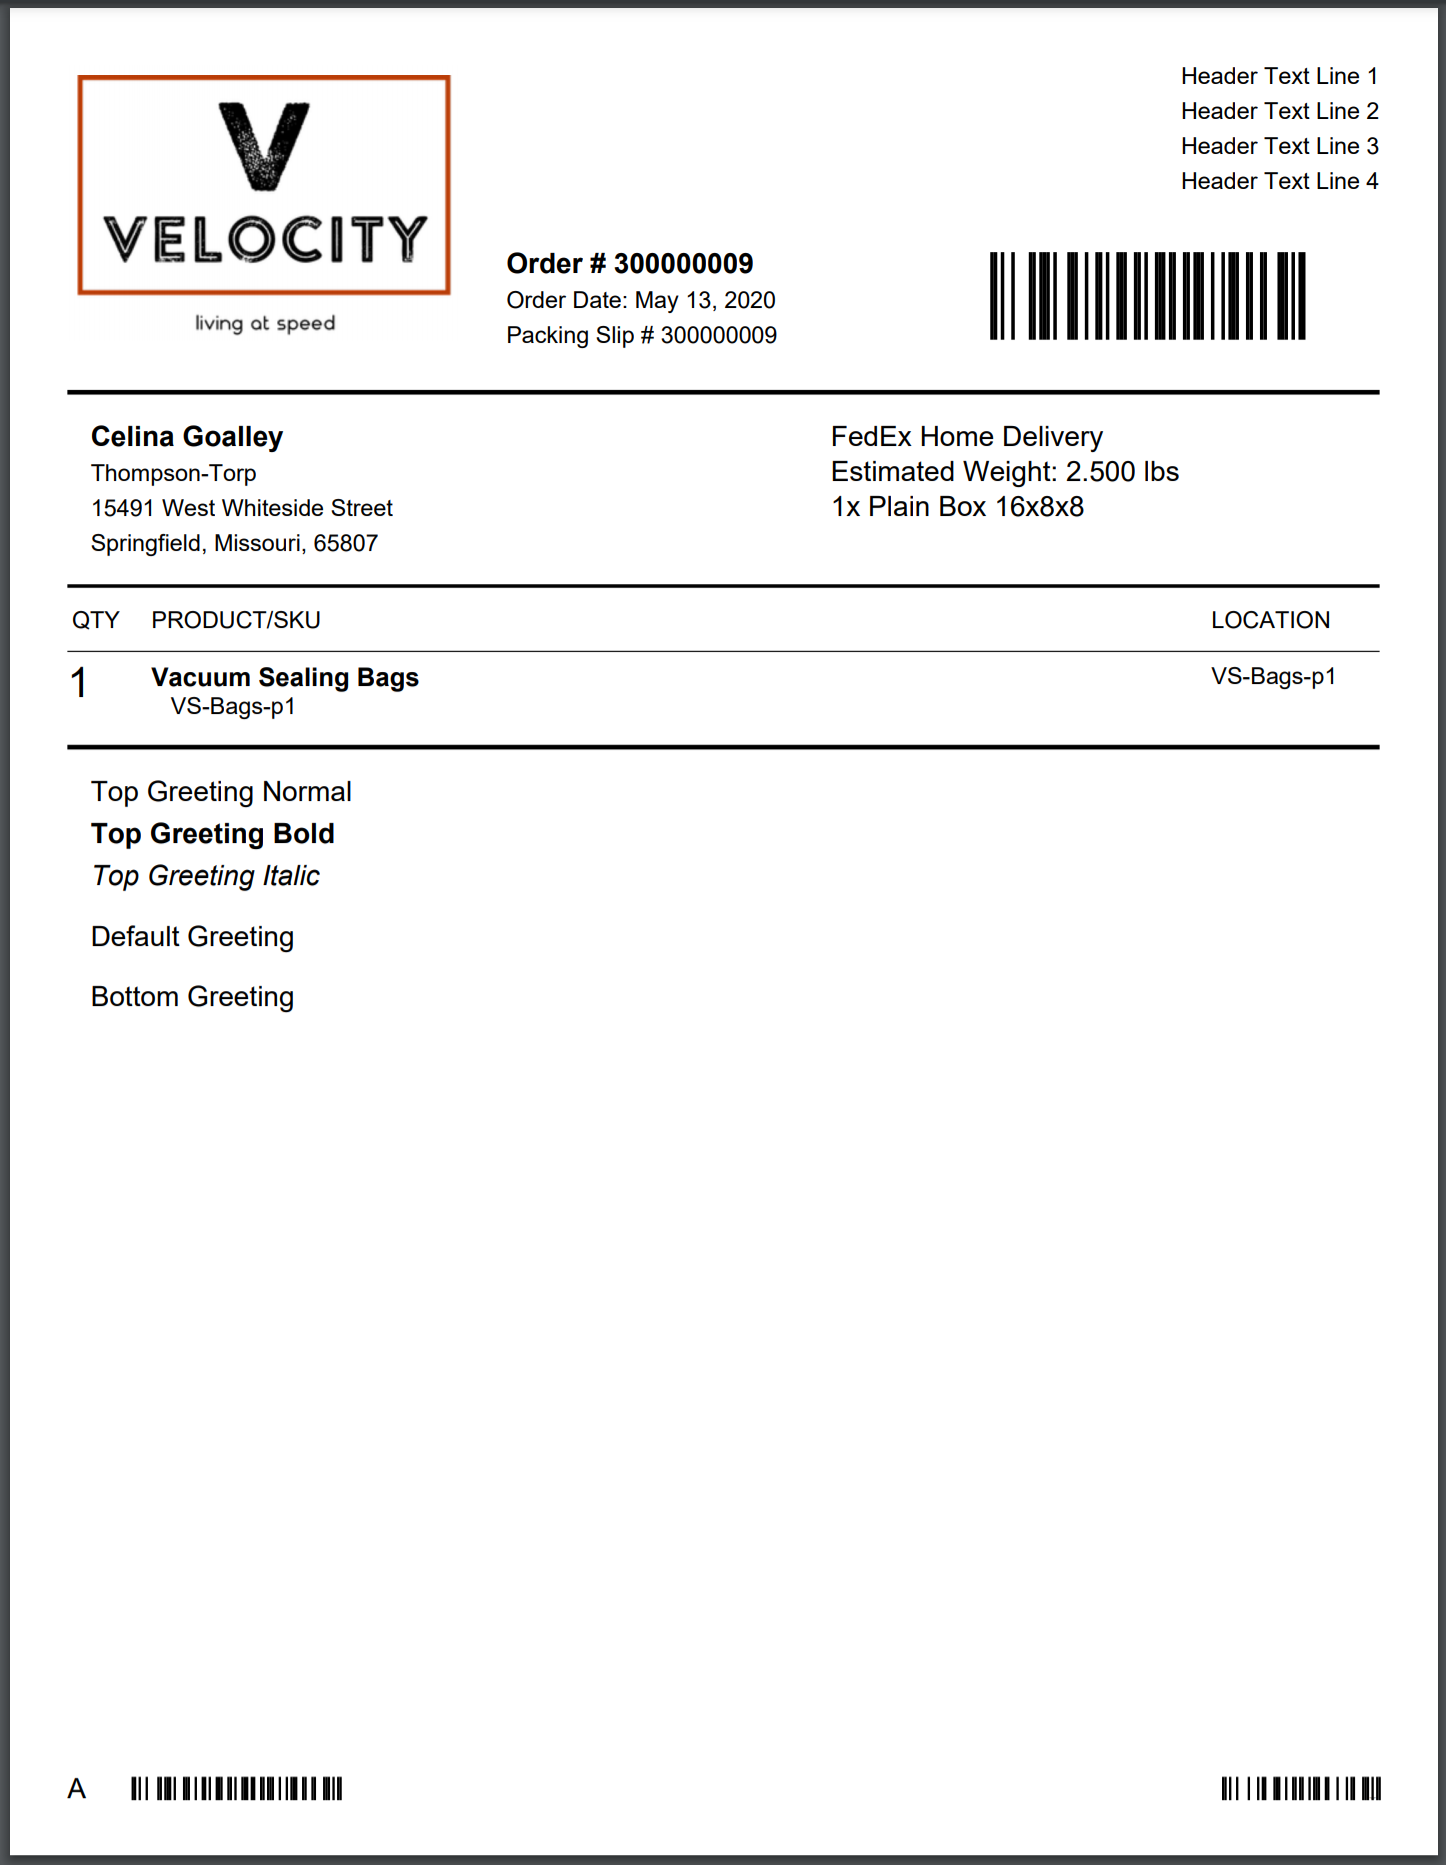
The example Packing Slip above was generated with the following configuration:
General
Default Paper Size | Letter (8.5" x 11") |
Font Family | Caladea |
Header
Logo Style | Square Logo |
Logo Image |  |
Header Text Position | Right |
Header Text | Header Text Line 1 Header Text Line 2 Header Text Line 3 Header Text Line 4 |
Display Order ID | Order Ref # OR Order # |
Barcode Position | Right |
Contents
Display Country in Shipping Address | No |
Display Telephone in Shipping Address | No |
Display Packing Solution Container | Yes |
Display Product SKUs | Yes |
Top Greeting | Top Greeting Normal <b>Top Greeting Bold <i>Top Greeting Italic |
Default Greeting | Default Greeting |
Bottom Greeting | Bottom Greeting |
Footer
Shipment ID Barcode | Yes |
External ID Barcode | Yes |
Alphabetic Index | Yes |
Batch ID Barcode | Yes |
How did we do?
Manifest Couriers
Service Levels and Target Ship Dates