Table of Contents
Deliveries (ASNs, RMAs, etc.)
ShipStream implements multiple types of deliveries which are for receiving inventory. These delivery types are: ASNs, RMAs, ...

ShipStream implements multiple types of entities related to receiving inventory using a common entity type known as a Delivery. These entities are:
- ASNs - Advanced Shipment Notices
- RMAs - Return Merchandise Authorizations
- Other Deliveries - Any other user-created delivery that isn't an ASN or RMA
- Cancellations - Inventory that was picked and needs to be re-stocked
- Work Order Outputs - The result of a Work Order that needs to be re-stocked
These deliveries can all be managed under the Receiving menu in ShipStream. They also all use the same API methods under the "delivery" namespace. However, there are a few notable differences in how these different types are processed.
Workflow
The stages that a delivery flows through are: Accepting, Processing, Put-Away, and Commit. The Work Order Output type skips the Accepting and Processing steps.
All of the possible statuses of a delivery are detailed below.
New
A delivery that has been created but is not yet accepted is in the "New" status. All of its items and details can be edited and it may be canceled.
You may also create an ASN Shipping Label or an RMA Return Label at this stage. This allows you to use your connected carrier accounts to generate a label with the destination address being your warehouse address.
Accepting
Accepting a delivery involves identifying the delivery that corresponds to the physical shipment received and recording some basic information about the delivery including
- Number of containers
- The type and weight of each container
- Any damage noted at the container level (individual items damaged will be handled later in processing)
Accepting an ASN or Other Delivery also determines the "Origination Date" if the products have Lot Tracking enabled which is used to inform FIFO burn order.
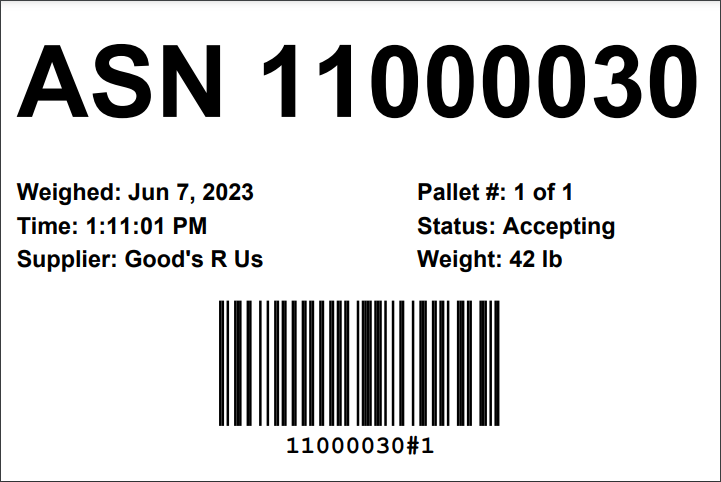
Upon acceptance, you can print a "delivery label" for each container received to uniquely identify it. If using the Scanner UI, this label will be automatically printed upon receiving each container and then later scanned during Processing.
Accepted / Ready To Process
Upon completion of accepting each of the containers, the status will advance to either Accepted if the delivery is empty and waiting for line items to be added, or Ready To Process.
The Receive By Deadline is based on the time the delivery is first Ready to Process and can be configured at System > Configuration > Warehouse > (ASN / RMA / Other Deliveries) > Receive By Deadline.
Processing
Processing a delivery involves verifying that the line items received match what was expected or else recording Exceptions with details about the discrepancies. These exceptions are either Shortages or Overages and denote items that are missing or damaged in the delivery or items that were received but not expected to be received.
Processing Exception / Processed
Upon completion of the Processing step, the status will advance to either "Processed" if there were no exceptions recorded or "Processing Exception". In the latter case in the Admin UI, the exceptions must all be either accepted or rejected, and then when a user clicks "Finish Processing" the status will finally advance to "Processed".
Put-Away
The Put-Away process consists of moving the processed inventory to a shelf location. Upon completing the put-away step, the delivery is now complete from an operational perspective.
Commit
The final step can be performed either automatically or manually by a user. This step is what moves the inventory from the "Put-Away" status to "Available". When the inventory is committed it will be automatically allocated to existing backorders and made available for new orders.
When inventory is put away but not yet committed, the inventory that was put away is not available for sale. This may be desirable, for example, to allow the merchant time to update their pricing before the inventory is made available for sale. The Commit step may be completed by either Organization Users or Client Users.
Auto-Commit
The Auto-Commit behavior causes inventory to automatically be committed as soon as the put-away is complete. The default for this option can be configured per Merchant at System > Configuration > Warehouse > (ASNs / RMAs / Other Deliveries) > Put-Away, and each delivery can either inherit the default or override the default. When disabled, a user must click Commit on the delivery page to make the put-away inventory available for sale.
Status Diagram
The following diagram shows the complete progression through each status excluding Cancel/Void.
ASN Special Fields
ASNs have three additional fields: Shipment Type, BOL, and SCAC. The latter two may be configured at System > Configuration > Warehouse > ASNs > General to be either Disabled, Optional or Required depending on your preferences.
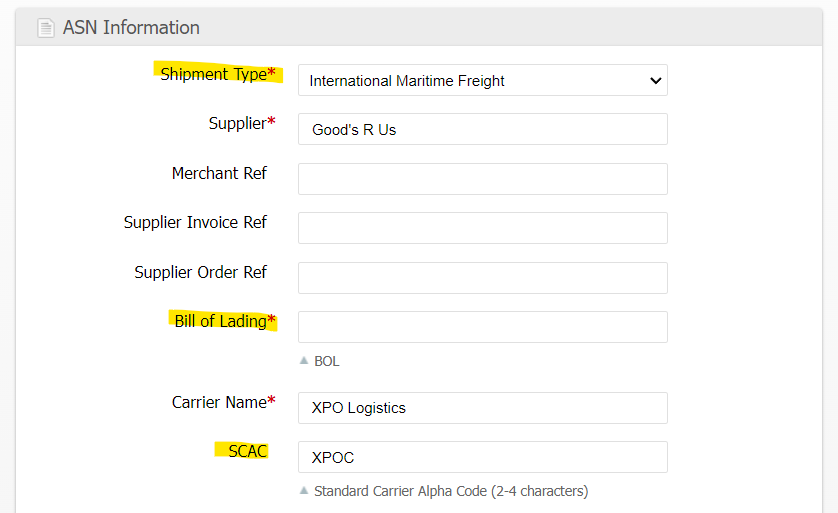
Shipment Type
The Shipment Type helps determine which other fields should be optional or required. The options are:
- International Maritime Freight
- International Air Freight
- FTL Freight
- LTL Freight
- Parcel
- Other/Unknown
Bill of Lading
The Bill of Lading is a legal document commonly used in freight shipping and issued by the carrier to detail the goods being shipped and the destination. This field is not displayed for Parcel or Other/Unknown shipment types.
SCAC
The SCAC (Standard Carrier Alpha Code) is typically clearly marked on a shipper's containers and can be useful for identifying the carrier for International Maritime Freight type shipments. This field accepts 2 to 4 characters as these codes are assigned by a central authority. A list of common SCACs is provided but the user may provide any 2-4 character code.
How did we do?