Getting Started
Interface Basics
Printers and Scales
Shipping
Order Processing
Order Allocation
Order Processing Loop
Packing Solutions
Backorders
Ready to Ship
"Unable to Process" Order status
Address Validation and Classification
Packaging Features
Orders
Custom Fields for Orders
Reference Numbers
Other Shipping Options
Packing Instructions
Shipping Accounts
External Shipping Methods
Third Party Billing
Manifest Couriers
Packing Slip Design
Service Levels and Target Ship Dates
Outbound SSCC Barcodes
International Shipping
Tracking Numbers for Offline Shipments
Serial Number Tracking
Custom Fields for Shipments
Receiving
Catalog
Bill of Materials/Work Orders
Bill of Materials
Bill of Materials - Quantity-types
Work Orders
Import Bill of Materials
Virtual Inventory
Regulations
Products
Product Attributes
Lots/Expirations Tracking
Product Velocity
Import Products
Operations
Warehouse
Picking Classes
Picking Batches
Bulk Fulfill Orders
Put-Aways
Manifests (Loading)
License Plates
Time Tracking for Administrators
Time Tracking for Staff
Relocations
Import Locations, Lots and Inventory
Assets
Batching Presets
Rating
Rate Shopping
Rating Maps
Rate Groups and Plans
Fee Schedules and Adjustments
Virtual Shipping Methods
System
Configuration
Merchants and Brands
Warehouses
User Management
User Roles
User Groups
Login via Badge
Protected Customer Data
Enumerations
Technical Contact
Integrations
Shopify
Integrations Overview
Amazon Merchant Fulfillment
Amazon Selling Partner
CartRover
EasyPost
eHub
External Shipping Method API
Freight Club
Magento 1 / OpenMage
Merchant API Users and Roles
SPS Commerce
ShipStream Plugin Fostering Program
Webhooks
Global Integrations
Magento 2 / Adobe Commerce
WooCommerce
UPS
Scripting
Scripting Basics
Before Create Order Scripts
Before Create Order scripts Cookbook
Preprocess Packing Solution Scripts
Ready to Ship Time Scripts
Picking Class Shipment Matching Scripts
FAQ
How-To: FedEx Production Key Certification
How-To: Brand-Specific Shipping Account
Pattern and Replacement RegEx
ShipStream's Subprocessors
ISO Alpha-2 Country Codes
Printer Troubleshooting
ShipStream Flow
Release Notes
ShipStream Releases
Version 2026.1
Version 2026.0
Version 2025.7
Version 2025.6
Version 2025.5
Version 2025.4
Version 2025.3
Version 2025.2
Version 2025.1
Applicable Quantity Migration Guide
Version 2025.0
Revamped Delivery Processing
Version 2024.6
Version 2024.5
Version 2024.4
Version 2024.3
Version 2024.2
Version 2024.1
Version 2024.0
Version 2023.2
Version 2023.1
Version 2023.0
Package Tracking API Migration Guide (2023.0)
Version 2022.2
Version 2022.1
Version 2022.0
Version 2021.6
Version 2021.5
Version 2021.4
Version 2021.3
Version 2021.2
Version 2021.1
Version 2021.0
Version 2020.2
Version 2020.1
Version 2020.0
Version 2019.9
Version 2019.8.1
Version 2019.8
Version 2019.7
Version 2019.6
Version 2019.5
Device Hub Client Updates
Table of Contents
- All Categories
- Printers and Scales
- Device Hub
- Adding Printer and Scale Devices
Adding Printer and Scale Devices
With a Device Service connected and displayed on Device Hub, you may only modify the devices from Device Hub. With a Device App connected and displayed on Device Hub, you can either add devices from…
With a Device Service connected and displayed on Device Hub, you may only modify the devices from Device Hub.
With a Device App connected and displayed on Device Hub, you can either add devices from the Device Hub or from the Device App on the machine that is connected to the printers/scales.
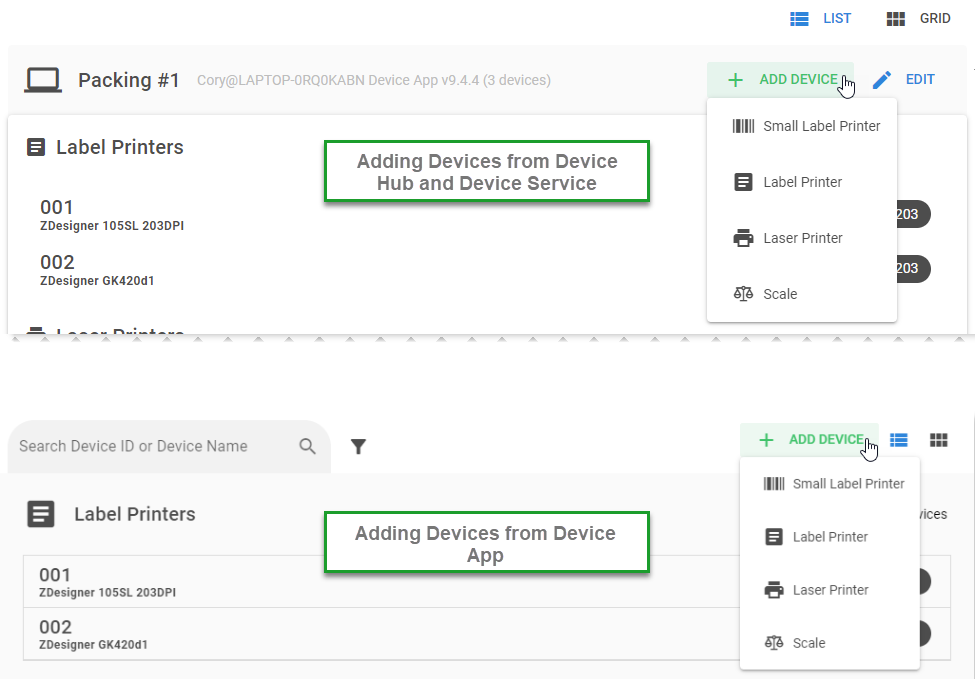
Adding Printers
- Click "+ Add Device" at the top right of the connected machine in Device Hub. In the Device App this is simply at the top right of the window.
- You will notice the Client field will already be set on the Machine label you clicked "Add Device" from. Otherwise set this to the desired Machine Label.
- The Device ID needs to be unique, so it may be a good idea to use numbers such as "001", "002", etc.
- The Device dropdown will show available printers to choose from. If it is not visible in the dropdown menu, verify that it is installed correctly by visiting your Printers and Scanners settings in Windows. Only devices detected by Windows and with drivers installed correctly will be available to the Device Hub.
- Advanced Options includes Paper Type and DPI for Label Printers and Paper Type, Color, and Paper Source for Laser Printers.
- Tags are used for filtering in the Device Hub or Device App UI but have no effect on the device itself
- Click Save and your device should appear on the list.
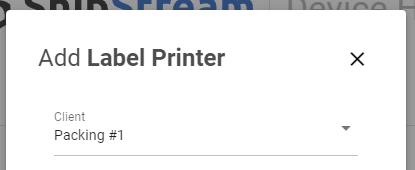
Adding Scales
- Click "+ Add Device" at the top right of the connected machine in Device Hub. In the Device App this is simply at the top right of the window.
- Choose the Scale device type from the menu. You will notice the Client field will already be set on the Machine label you clicked "Add Device" from.
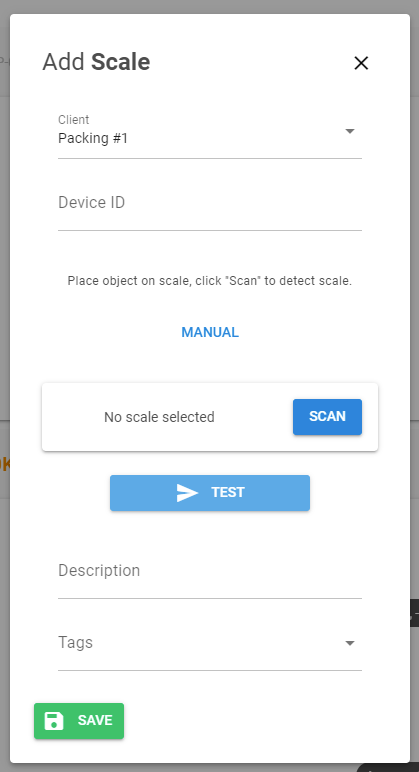
- A dialog will appear such as the one shown above for you to enter the following properties:
- The Device ID needs to be unique, so it may be a good idea to use numbers such as "001", "002", etc.
The Device ID is used within the ShipStream WMS. For example, "SCALE:001" within ShipStream would correspond to a scale with the Device ID "001".- If the selected client has a scale or scales connected to it with a weight reading, then clicking "Scan" will automatically detect it and return a list of scales and their weight readings.
- Clicking Manual allows the user to manually select a USB or Serial scale from the "Connection Type" field.
- For USB Scales...
- Port will be a numeric value (e.g. "1") for USB scales.
- For Serial Scales...
- Port will be a COM port dropdown menu.
You can display your valid serial COM port numbers in Windows using the Windows PowerShell, and entering the command:Get-WMIObject Win32_SerialPort | Select-Object Name,DeviceID,Description- Baudrate is usually 9600.
- Print Command is a single capital letter and is device-specific. Some common print commands are: H, W, S, or P
- Terminator shows a dropdown menu of terminator characters depending on your scale device. It can be one of these options:
- -CR
- -LF
- -ETX
- CR
- CR-ETX
- LF
- CRLF
- CRLF-LF
- Tags are used for filtering in the Device Hub or Device App UI but have no effect on the device itself
Users may click Test to see if their selected settings yield a successful response from the scale device. The response is logged in the Event Logs page. - Click Save and your device should appear on the list.
How did we do?
Install the Device Service
Device Hub Troubleshooting