Table of Contents
Shipping Accounts
This article explains how Shipping Account Groups allow you to dynamically assign the right shipping account to each shipment.
ShipStream provides the concept of Shipping Accounts and Shipping Account Groups to provide maximum flexibility in the assignment of shipping accounts to shipments while keeping management as simple as possible.
Shipping Accounts are organized into Shipping Account Groups to make it easier to change shipping methods for a given order without also having to change the Shipping Account to match the carrier of the new shipping method. For example if the "Default" Shipping Account Group contains Shipping Accounts for both UPS and FedEx, you can change the shipping method for an order between FedEx and UPS methods without having to choose a corresponding Shipping Account Group for that order. In the case of Rate Shopping where the shipping method is resolved in real-time and automatically this is an important feature.
Assigning a Shipping Account Group
In most cases one can simply use the Shipping Account Group named "Default" for all Shipping Accounts. In case you need to use multiple carrier accounts for the same carrier and split your shipments among them using more complex criteria besides warehouse and merchant, you can create additional Shipping Account Groups and assign those to orders using configuration or the API or scripting.
Orders are assigned a Shipping Account first by resolving a Shipping Account Group. This will normally be the Shipping Account Group selected at the Brand or Merchant scope in the configuration field located at System > Configuration > Shipping Settings > General > Shipping Account Group.
Resolving a Shipping Account
A Shipping Account Group may contain any number of Shipping Accounts for the same carrier. The Shipping Account selected for a shipment will be the first account belonging to the group sorted by the Sort Order field from lowest to highest which matches the Carrier, Warehouse, Merchant and Allowed Methods/Services called for by the shipment. Using these fields you can arrange the Shipping Accounts to be resolved and matched to a shipment based on your specific needs.
Inheritance
Shipping Account Groups can "inherit" accounts from one another using the "Inherit From" field. This is useful if you want to assign a merchant, brand or order to an alternate account but do not want to manage any duplicates of your other accounts. If no Shipping Account can be resolved for a shipment the system will then check for matching shipping accounts in the Shipping Account Group chosen in the Inherit From field. Thus, even if you have a very complex assignment of shipping accounts, by organizing your accounts appropriately you can avoid having to duplicate any shipping accounts making future account management that much more efficient.
Adding a Shipping Account Group
- To begin using the Shipping Account Group feature, navigate to System > Shipping Accounts.
- Click Add New Shipping Account Group at the top of the grid.
- Choose a unique Name that describes the group of third party carriers you wish to make available for shipping, then click Save.
- If applicable, choose an account group to Inherit From. See Inheritance section above for details.
- From here you can either go back to return to the Shipping Account Groups grid or set up a new shipping account to be assigned to your new group.
Adding a Shipping Account
- After just creating a new Shipping Account Group or clicking a Shipping Account Group from the System > Shipping Accounts page, add a new account to your group by clicking Add New Shipping Account.
- Choose a Label that describes the shipping account. For example, "FedEx Primary (*1234)".
- In the Shipping Account Information pane, open the selection menu to choose an available shipping carrier.
- Once a carrier is selected, input forms will appear which vary depending on the carrier.
- Some carrier integrations may require you to first create a connection or authorization using either a Global Integration or Merchant Integration depending on your needs. A connection created for a Global Integration can be used for accounts that apply to multiple merchants whereas a connection created for a Merchant Integration can only be used for the same merchant that created the connection.
- Select the warehouses that this Shipping Account account will apply to, or leave it blank to apply it to "All Warehouses".
- Select the Merchants who will have access to this Shipping Account.
- The account number field will require a number set-up by the administrator and the carrier.
- After the information is filled out, click Save Shipping Account to add it to the group you created.
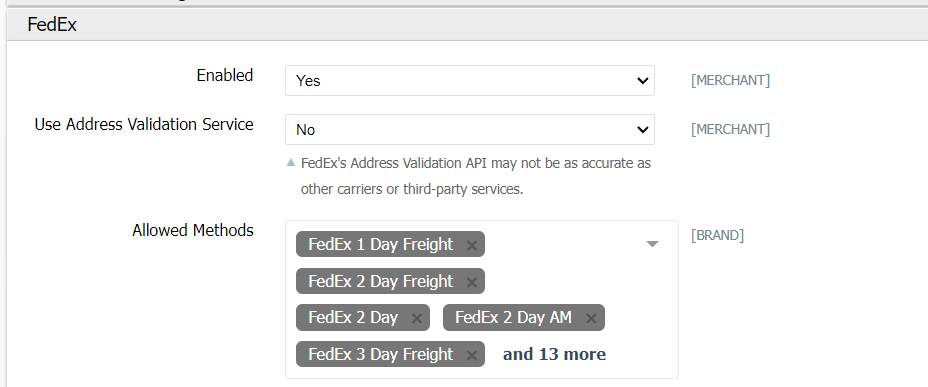
Enabling Carriers and Services
In addition to setting up the Shipping Accounts you must activate each carrier and service you wish to use in the configuration. Navigate to System > Configuration > Shipping Methods and then set Enabled to "Yes" for each carrier you'd like to enable. You can limit which services are available by setting Allowed Methods in this same configuration section as well as many other configuration options specific to each carrier.
How did we do?
Packing Instructions
External Shipping Methods