Getting Started
Interface Basics
Printers and Scales
Shipping
Order Processing
Order Allocation
Order Processing Loop
Packing Solutions
Backorders
Ready to Ship
"Unable to Process" Order status
Address Validation and Classification
Packaging Features
Orders
Custom Fields for Orders
Reference Numbers
Other Shipping Options
Packing Instructions
Shipping Accounts
External Shipping Methods
Third Party Billing
Manifest Couriers
Packing Slip Design
Service Levels and Target Ship Dates
Outbound SSCC Barcodes
International Shipping
Tracking Numbers for Offline Shipments
Serial Number Tracking
Custom Fields for Shipments
Receiving
Catalog
Bill of Materials/Work Orders
Bill of Materials
Bill of Materials - Quantity-types
Work Orders
Import Bill of Materials
Virtual Inventory
Regulations
Products
Product Attributes
Lots/Expirations Tracking
Product Velocity
Import Products
Operations
Warehouse
Picking Classes
Picking Batches
Bulk Fulfill Orders
Put-Aways
Manifests (Loading)
License Plates
Time Tracking for Administrators
Time Tracking for Staff
Relocations
Import Locations, Lots and Inventory
Assets
Batching Presets
Rating
Rate Shopping
Rating Maps
Rate Groups and Plans
Fee Schedules and Adjustments
Virtual Shipping Methods
System
Configuration
Merchants and Brands
Warehouses
User Management
User Roles
User Groups
Login via Badge
Protected Customer Data
Enumerations
Technical Contact
Integrations
Shopify
Integrations Overview
Amazon Merchant Fulfillment
Amazon Selling Partner
CartRover
EasyPost
eHub
External Shipping Method API
Freight Club
Magento 1 / OpenMage
Merchant API Users and Roles
SPS Commerce
ShipStream Plugin Fostering Program
Webhooks
Global Integrations
Magento 2 / Adobe Commerce
WooCommerce
UPS
Scripting
Scripting Basics
Before Create Order Scripts
Before Create Order scripts Cookbook
Preprocess Packing Solution Scripts
Ready to Ship Time Scripts
Picking Class Shipment Matching Scripts
FAQ
How-To: FedEx Production Key Certification
How-To: Brand-Specific Shipping Account
Pattern and Replacement RegEx
ShipStream's Subprocessors
ISO Alpha-2 Country Codes
Printer Troubleshooting
ShipStream Flow
Release Notes
ShipStream Releases
Version 2026.0
Version 2025.7
Version 2025.6
Version 2025.5
Version 2025.4
Version 2025.3
Version 2025.2
Version 2025.1
Applicable Quantity Migration Guide
Version 2025.0
Revamped Delivery Processing
Version 2024.6
Version 2024.5
Version 2024.4
Version 2024.3
Version 2024.2
Version 2024.1
Version 2024.0
Version 2023.2
Version 2023.1
Version 2023.0
Package Tracking API Migration Guide (2023.0)
Version 2022.2
Version 2022.1
Version 2022.0
Version 2021.6
Version 2021.5
Version 2021.4
Version 2021.3
Version 2021.2
Version 2021.1
Version 2021.0
Version 2020.2
Version 2020.1
Version 2020.0
Version 2019.9
Version 2019.8.1
Version 2019.8
Version 2019.7
Version 2019.6
Version 2019.5
Device Hub Client Updates
Table of Contents
- All Categories
-
- Printer Setup
Printer Setup
How to setup printer resources for ShipStream.

Upon sign up you will be provided with a link to manage your Printers and a username and password.
Each connected client (see Installing the Printer and Scale Client) will appear in the list. Click Edit to manage the resources for a given client.
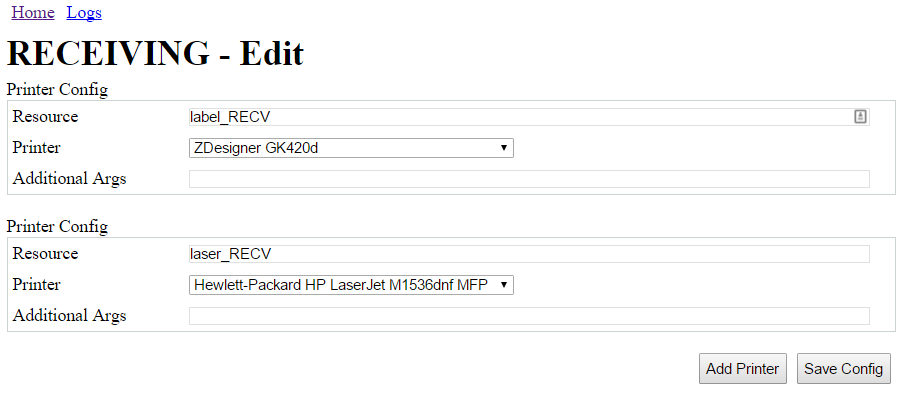
Adding a Printer
On the Edit page click "Add Printer" for each printer you wish to expose to ShipStream.
- Resource — The resource name must follow the format listed below based on which type it is. These should be unique for each device, but the latter part does not have to be unique for each device type. E.g. "001" can be used for both LABEL:001 and LASER:001
- For label printers use a barcode prefix "LABEL:". For example, for label printer "001" the barcode would be LABEL:001 and the "Resource" would be specified as "label_001".
- For laser printers use a barcode prefix "LASER:". For example, for laser printer "001" the barcode would be LASER:001 and the "Resource" would be specified as "laser_001".
- For small label printers use a barcode prefix "SMLABEL:". For example, for small label printer "001" the barcode would be SMLABEL:001 and the "Resource" would be specified as "smalllabel_001".
- Printer - Select the printer from the list.
- Note, if you disconnect a printer and reconnect it and Windows gives the printer a new name (like "ZDesigner GK420d (Copy)") then you will need to make sure the right driver is selected here.
- Additional Args (JSON format)
- These are usually not needed, but you can pass additional options like
-monoto force monochrome printing. Just let us know if you have issues with things not printing correctly.
- These are usually not needed, but you can pass additional options like
Send Test Print
Click "Test" to send a test print job to the printer.
How did we do?