Table of Contents
Version 2025.7
Supercharged warehouse workflows: Paperless picking, smart batch creation, and enhanced asset management unleashed!

Supercharged Batch Creation
On-the-fly batch creation from both the Admin UI and the Scanner UI is now easier and more robust. In the last release we introduced Batch Presets and Asset Types as new concepts, and this release allows you to more fully embrace them into your daily workflows, in particular using new barcode labels (fully optional).
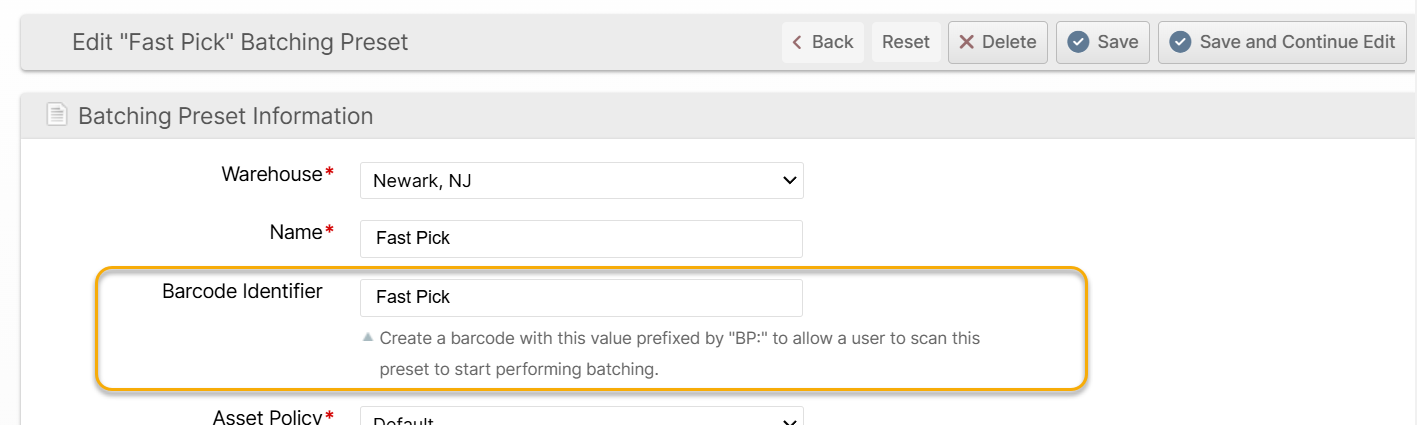
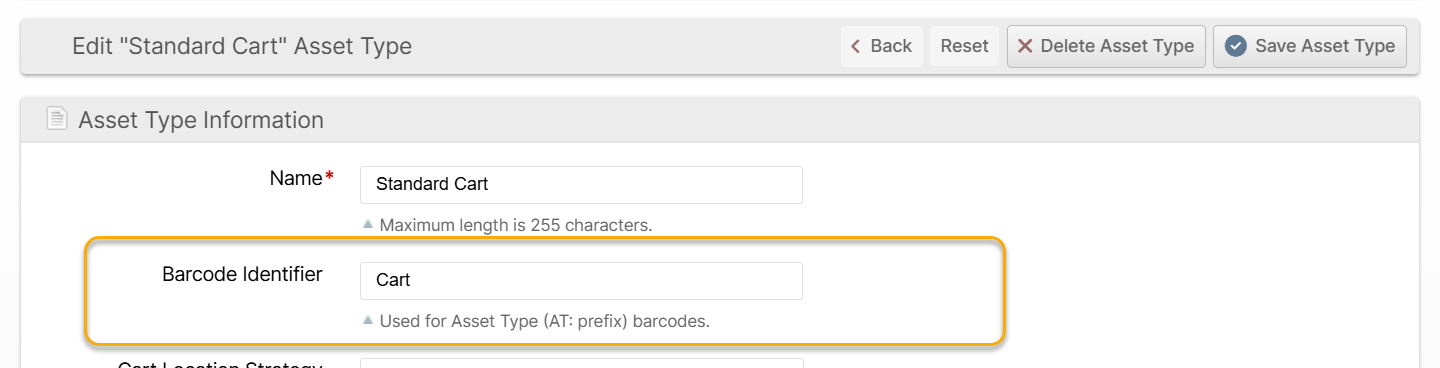
New Barcode Types
By setting a "Barcode Identifier" value and creating barcode labels with a BP: prefix for Batch Presets and an AT: prefix for Asset Types, you can set up your physical environment so that staff can go to a designated place to scan a Batch Preset barcode, scan the barcoded pick equipment, then start creating batches that are tailored to their circumstances. The user's last-scanned options are persisted automatically for the rest of their session and they can also be changed on the Picking page.
Next Up vs. Quick Batch vs. Precise Batch
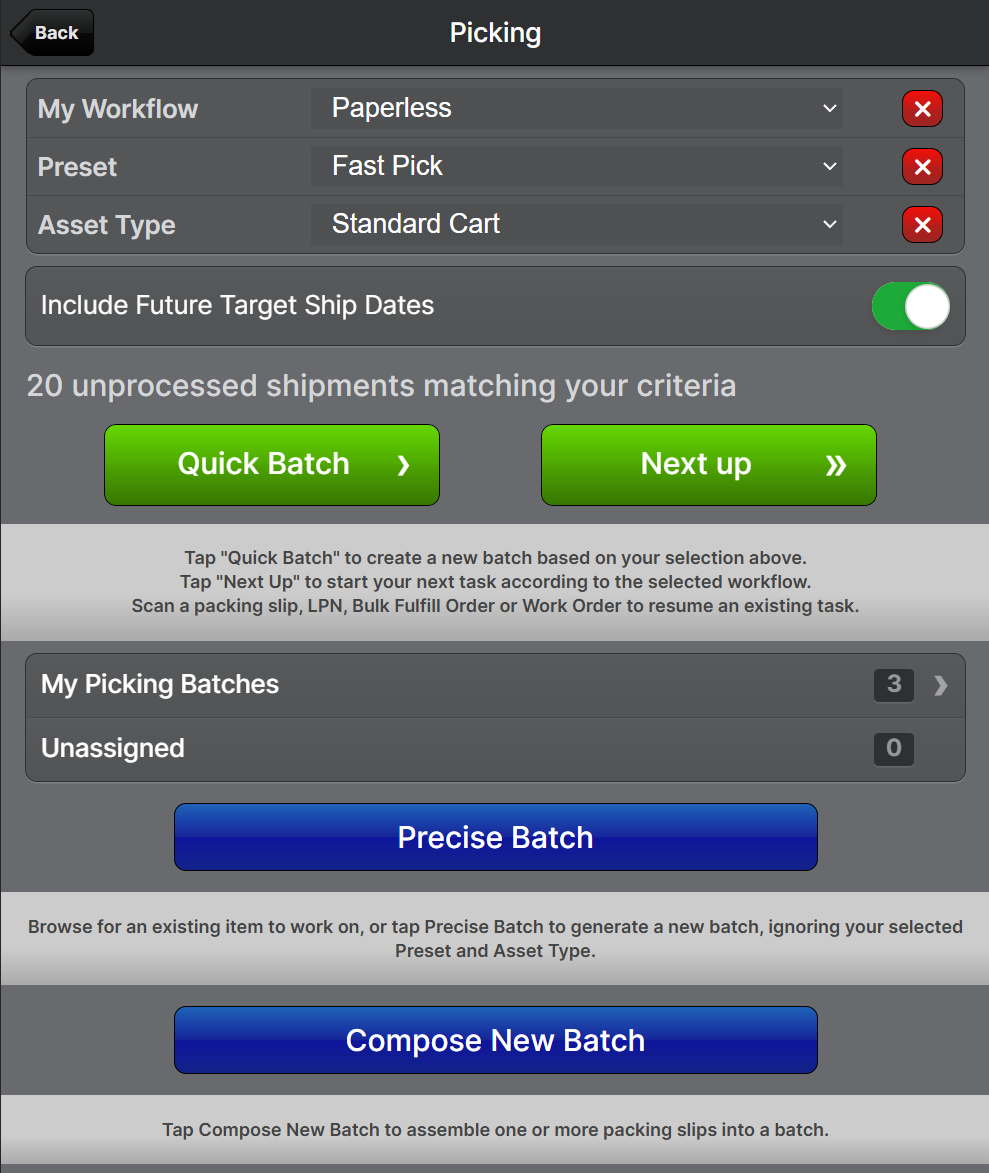
By scanning/choosing both a Preset and an Asset Type, the user can now create a precisely targetted batch one just one click by tapping Next Up! If the user already has unfinished batches assigned to themselves which match the criteria, the existing batch will be loaded, or if no such batch exists, a new one will be generated on the fly.
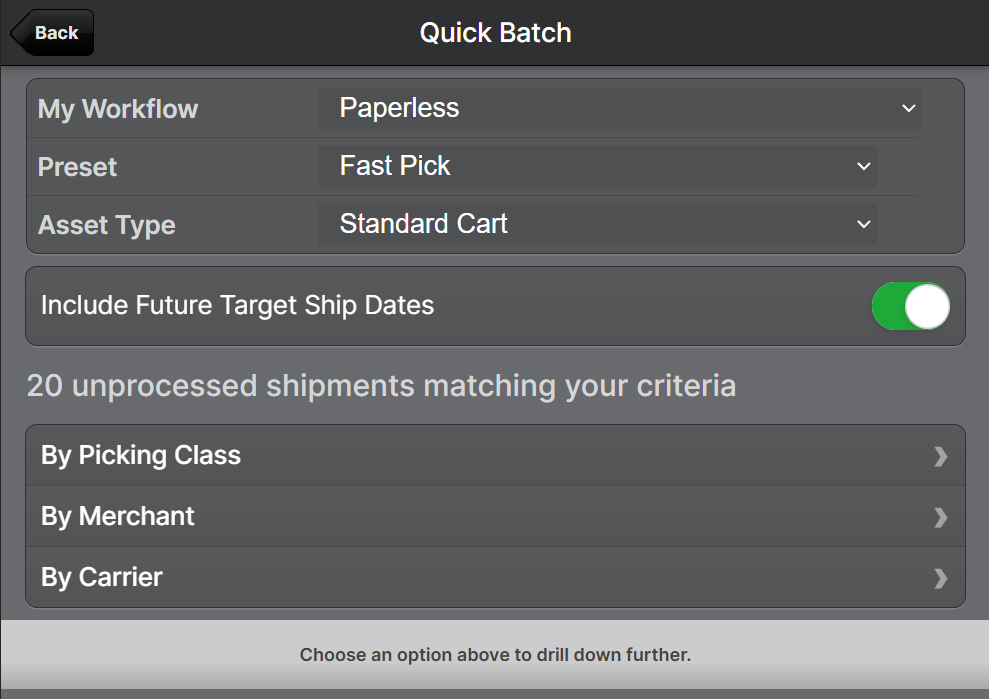
The new Quick Batch button is the preferred method of creating simple batches with more control; just scan (as per above) or select your Preset and Asset Type, and the results are pre-filtered based on your selections. This allows targetted operations with minimal thinking and effort .
The Precise Batch button, on the other hand, is a more general purpose tool which lets you quickly explore the data across many dimensions in whatever drill-down path fits your needs best. This allows quick exploration of the pending shipments and greater flexibility to apply your warehouse wherabouts and equipment most effectively.
Paperless Picking
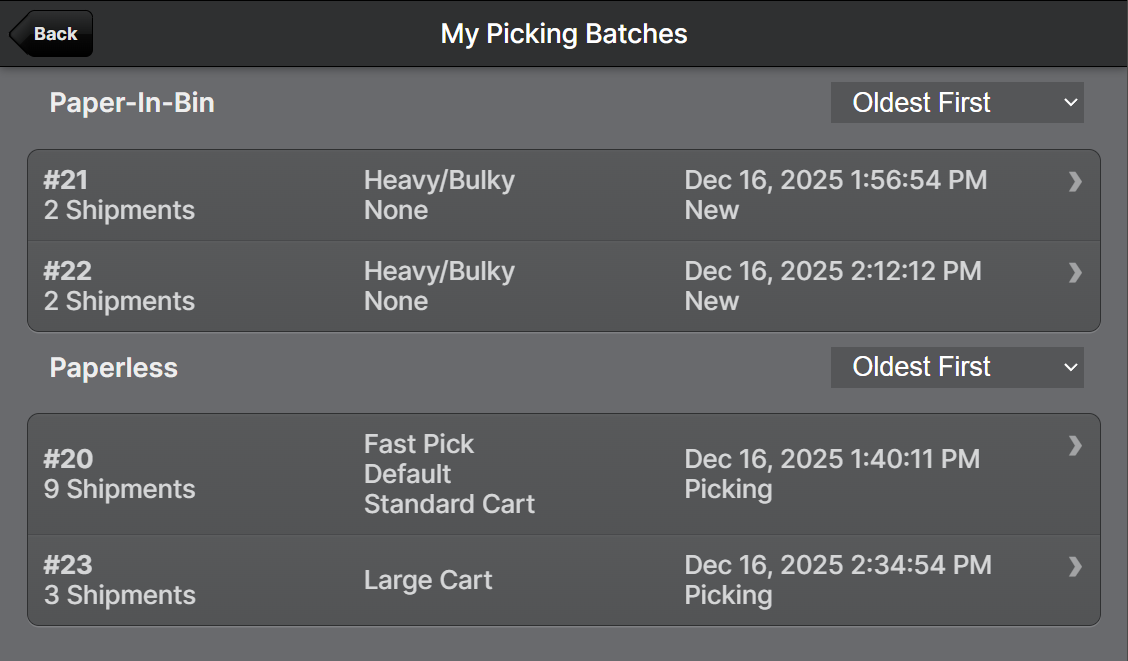
Get ready to cancel your Dunder Mifflin contracts, Picking receives another major update allowing for multiple Workflows and the introduction of our first Paperless workflow. The existing paper-based workflow is now known as "Paper-In-Bin" since it involves using a paper packing slip and assigning it to a Bin/Cart Location. The new workflow, known simply as "Paperless", as the name implies, allows you to complete your picks without printing or scanning paper packing slips.
In a nutshell, you'll use License Plates as the "container" or identifier for the picked items until they reach the packing station. If your customers/merchants do not require a packing slip, this can increase pick speed by eliminating the printing and handling of paper and reducing the number of total scans depending on the configuration.
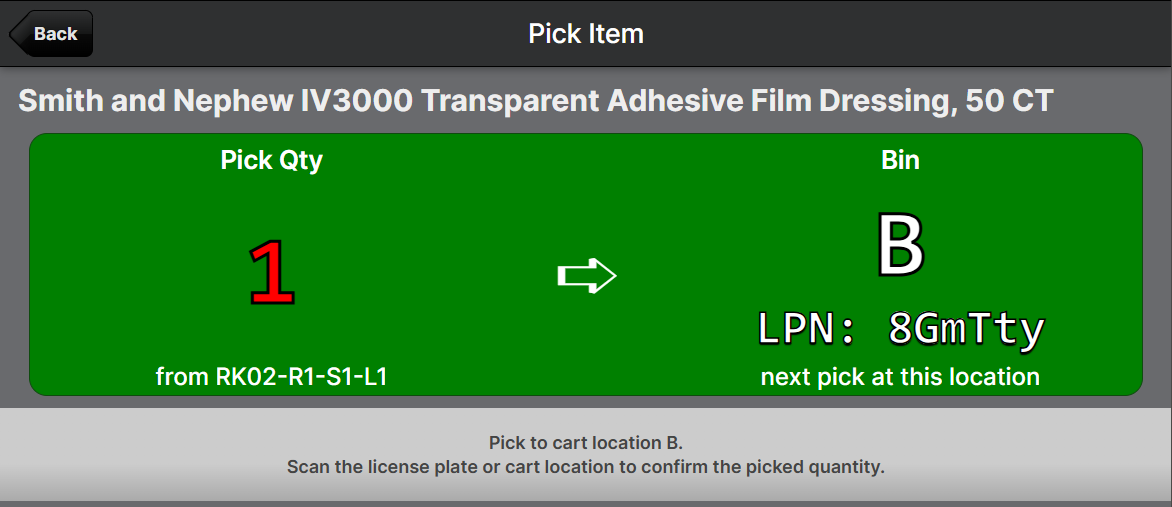
Paperlessly picking a shipment item with an LPN:
There are three Cart Location Strategies for Paperless picking:
- Assigned Upfront: (Default) Pre-assign all License Plates to Cart Locations before picking. Confirming picks allows either to be scanned. This strategy should be most familiar for pickers accustomed to the Paper-in-Bin strategy.
- Assigned Just-in-Time: First pick requires License Plate and Cart Location scan, subsequent picks for the same shipment accept either. This strategy gets you started picking with no setup.
- Numbered: Shipments are assigned an index (1 to N) on the first pick and the License Plate must be scanned to confirm. Cart Locations are not used. This strategy also gets you started with no setup and is ideal for batches with a asset types with a small number of locations.
You can configure a global default for the Cart Location Strategy and optionally override the default for each Asset Type.
Additionally, a new permission was added which is required for users to change the workflow of a batch between Paper-In-Bin and Paperless: Operations -> Picking Batches -> Change Workflow.
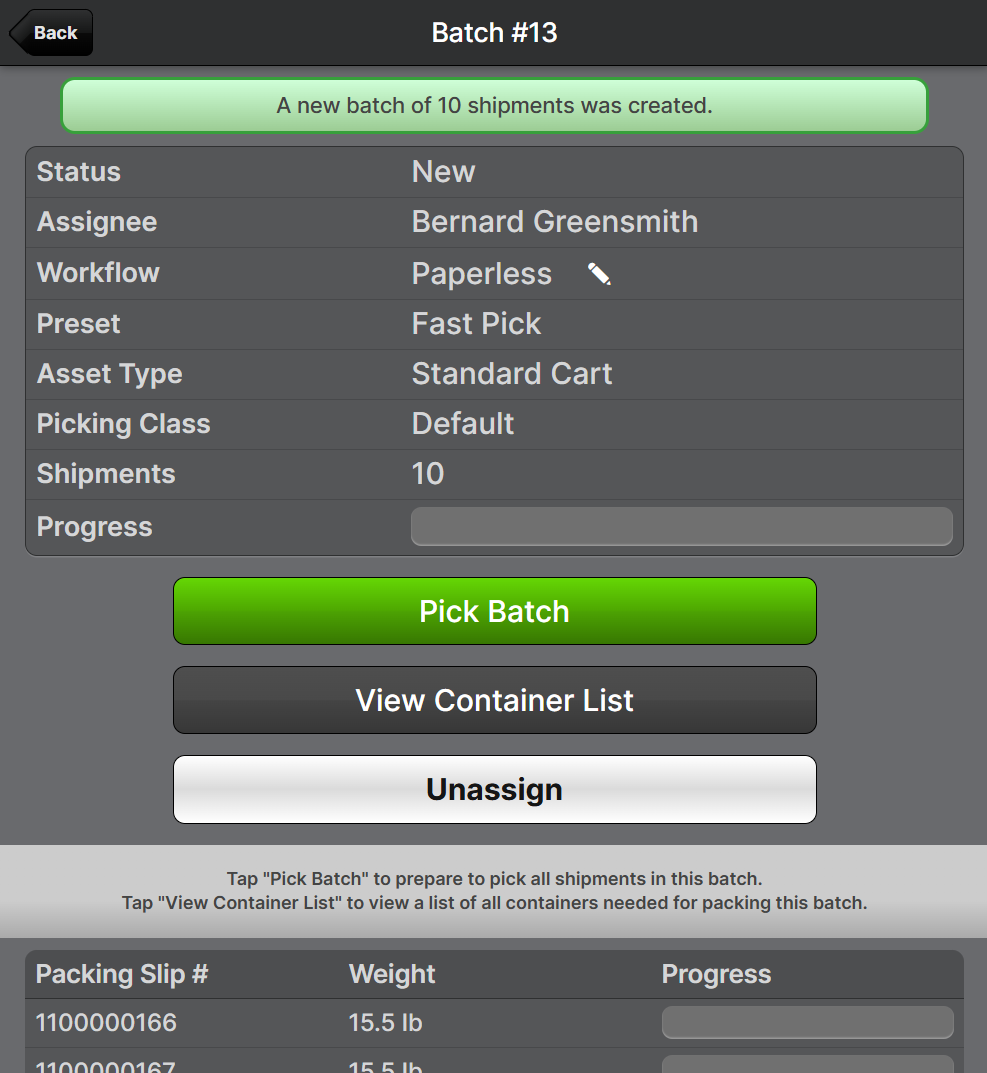
Batch Assignment
Related to the Paperless Picking feature, we've added some basic features around assignment of batches to users in order to facilitate locating batches that have no physical paper to accompany them. The user that creates a batch is automatically assigned to the batch and can then find it easily in the Scanner UI.
Two new permissions were added:
- Operations -> Picking Batches -> Changes Assignments
- Use the Batches grid Change Assignments mass action to assign one or more batches to a specific user.
- Operations -> Picking Batches -> Unassign Self
- Users can unassign themselves so other users can easily pick up the unassigned batches on the Picking screen by tapping Unassigned.
Asset Policy Exclusivity
We replaced the Batch Presets' Accessibility (Accessible/Inaccessible/Either) field with a new field, Asset Policy Exclusivity. The Asset Policy is now always a "positive" match rather than potentially a "negative" match with the Inaccessible option. With the understanding that the Asset Policy is always a positive match, this new field now determines only how "exclusive" the match is. The filter is applied as an early culling operation when aggregating shipment counts during UI interaction with batch creation, and as a final criteria during actual batch creation. The three Asset Polict Exclusivity options are None, Partial and Full.
None
- Only locations with positive inventory and proper lot burn order (if applicable) are considered.
- All items exist in preferred locations, but are not necessarily exclusive.
Partial
- Only locations with positive inventory and proper lot burn order (if applicable) are considered.
- At least one item exists exclusively in preferred locations (does not exist in non-accessible locations)
Full
- Only locations with positive inventory and proper lot burn order (if applicable) are considered.
- All items exist exclusively in preferred locations.
- Re-validate all items exist exclusively in preferred locations per burn order after allocating each shipment.
Using Partial or Full, you can ensure that shipments which could be picked fully from accessible locations will be excluded from your inaccessible pick routes. This can, for example, more effectively help you separate your ground-level fast picks from your picks requiring heavy equipment, and avoid sending the heavy equipment into areas reserved for fast picks.
Locate Shipment
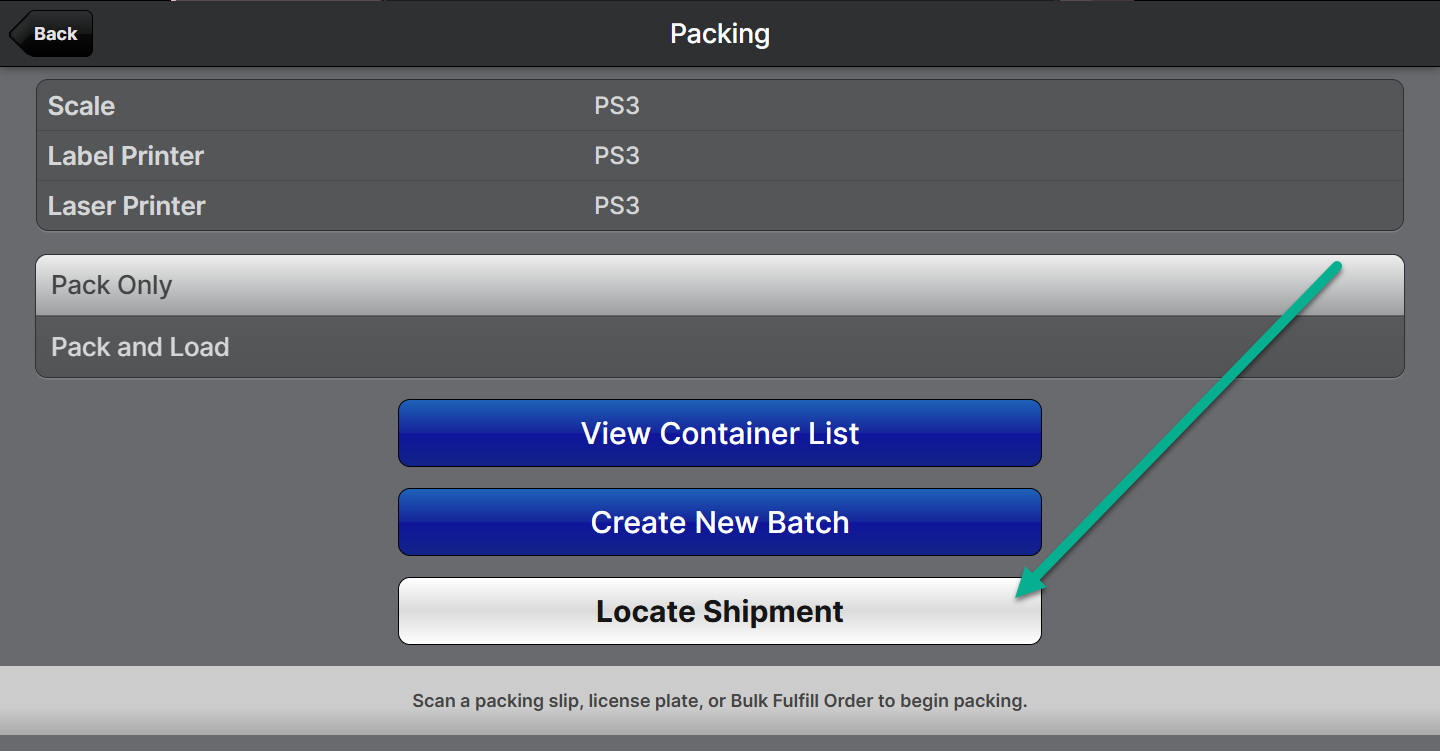
If you've ever had a shipment picked but not yet packed and the packing slip was lost, fear not! We've added a Locate Shipment feature to the Scanner UI Packing page which lets you locate a picked shipment by scanning the items. If it's fully picked you can then proceeed to packing, and if not you can print a packing slip and continue picking it.
The results will refresh as you scan more items:
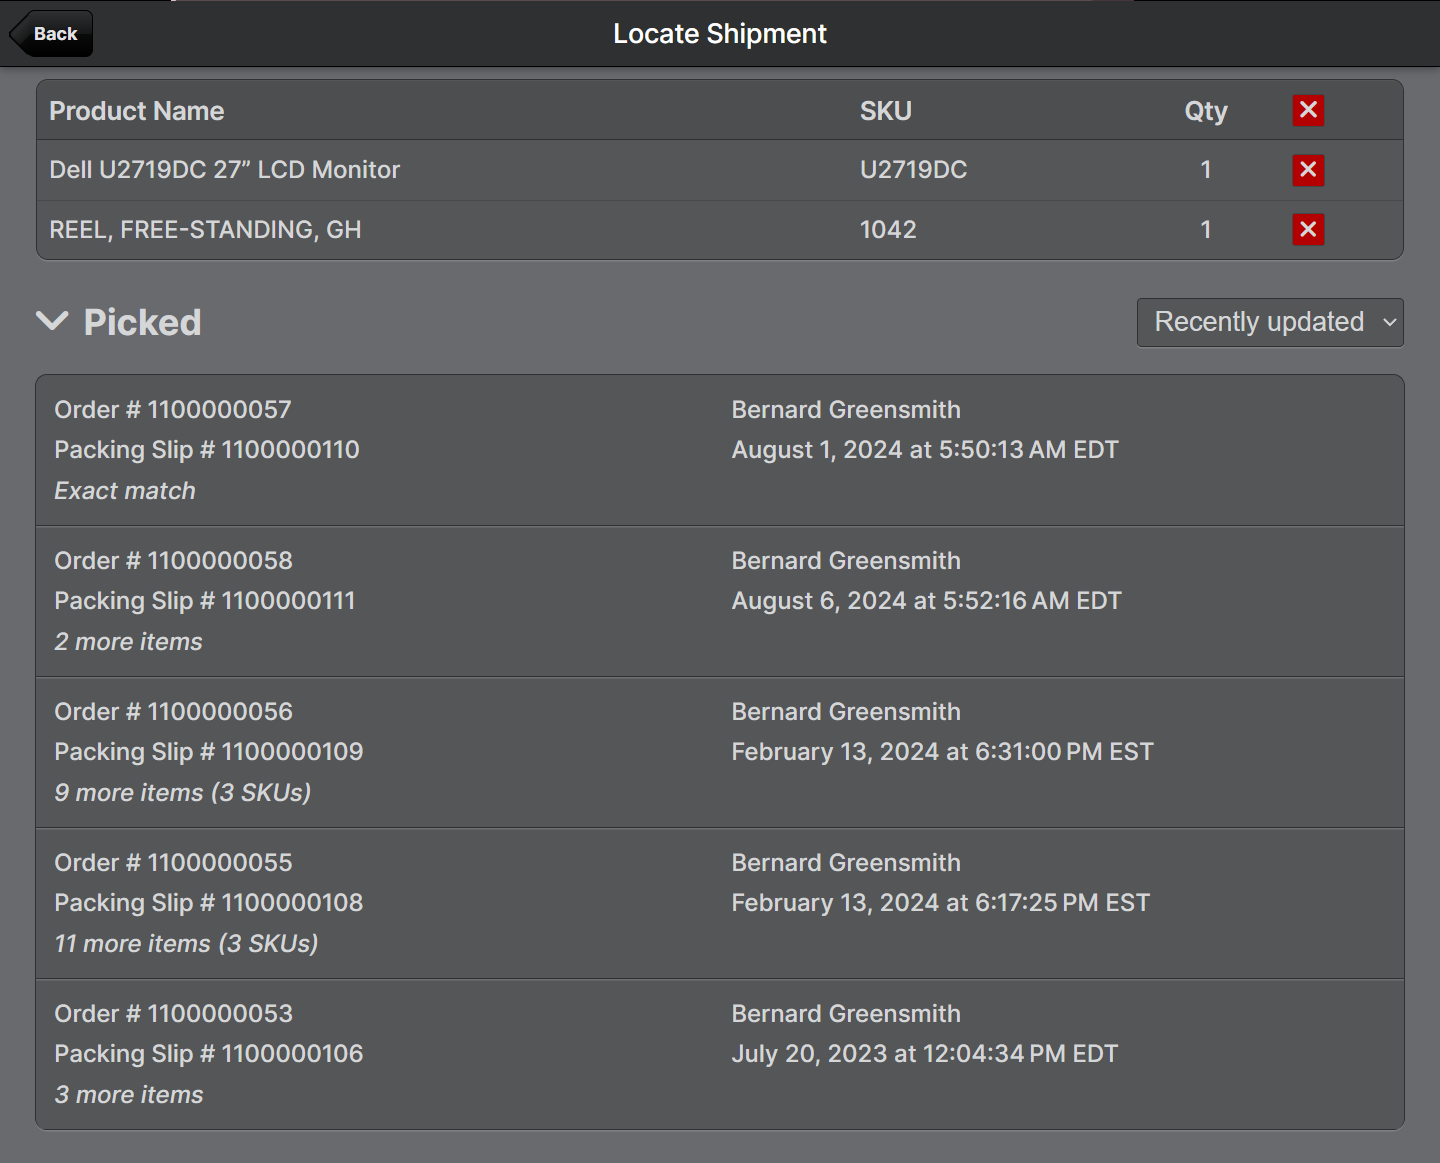
The feature is particularly useful for paperless shipments in case the items in a shipment get separated from their License Plate.
Asset Policies for Bulk Fulfill Orders
You can now choose "Bulk Fulfill Pick" as the Operation for Asset Policies and then use those policies to filter results when creating Bulk Fulfill Orders. This will also ensure that the auomatically suggested locations adhere to the Asset Policy selected.
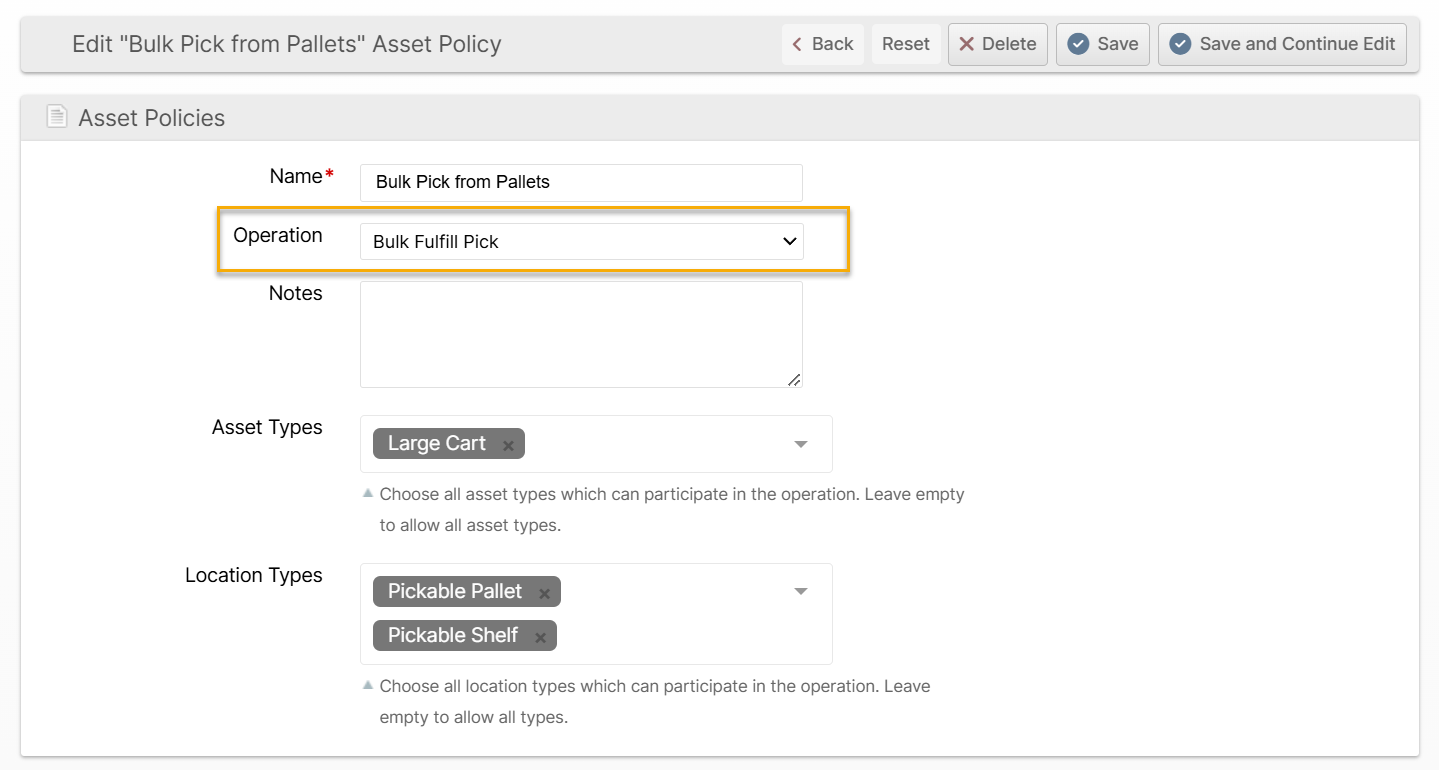
Creating a policy like the above allows applying a filter as seen below:
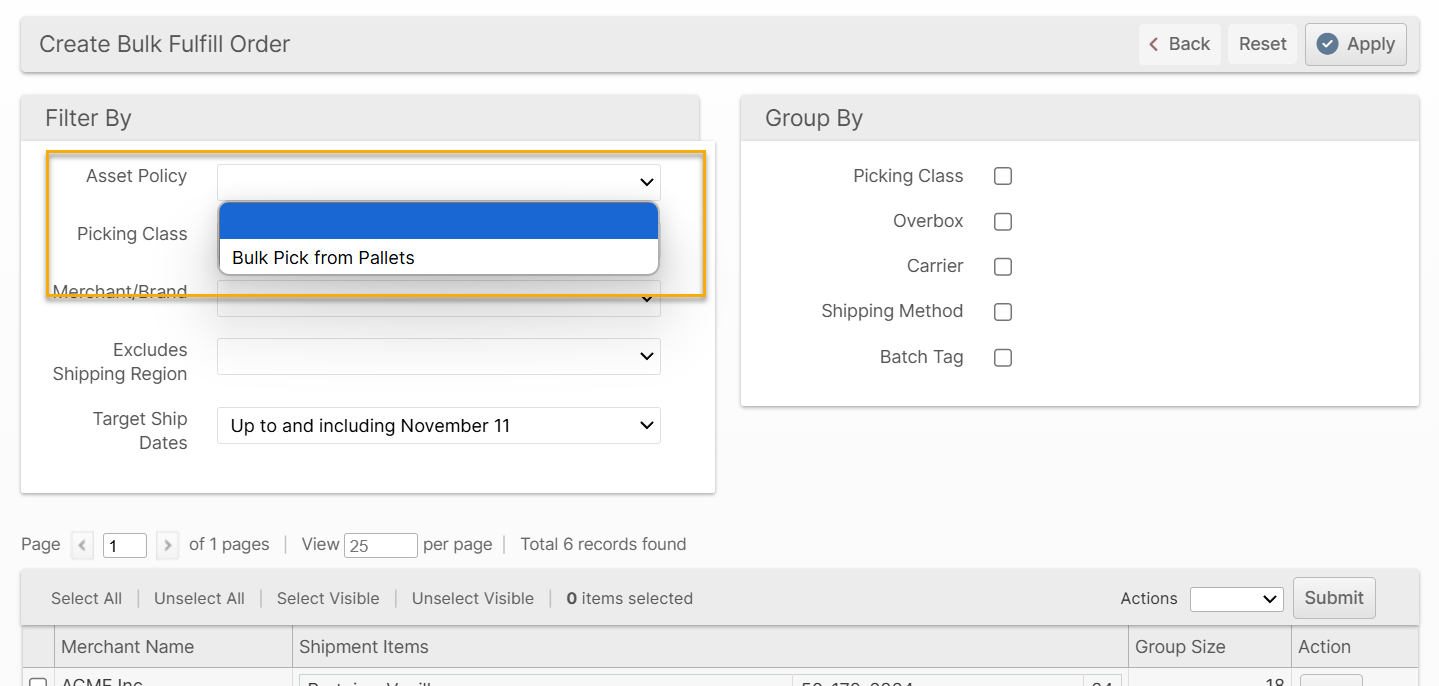
This option applies advanced filtering to ensure that only shipments that can be picked with the constraints of the selected Asset Policy will be included.
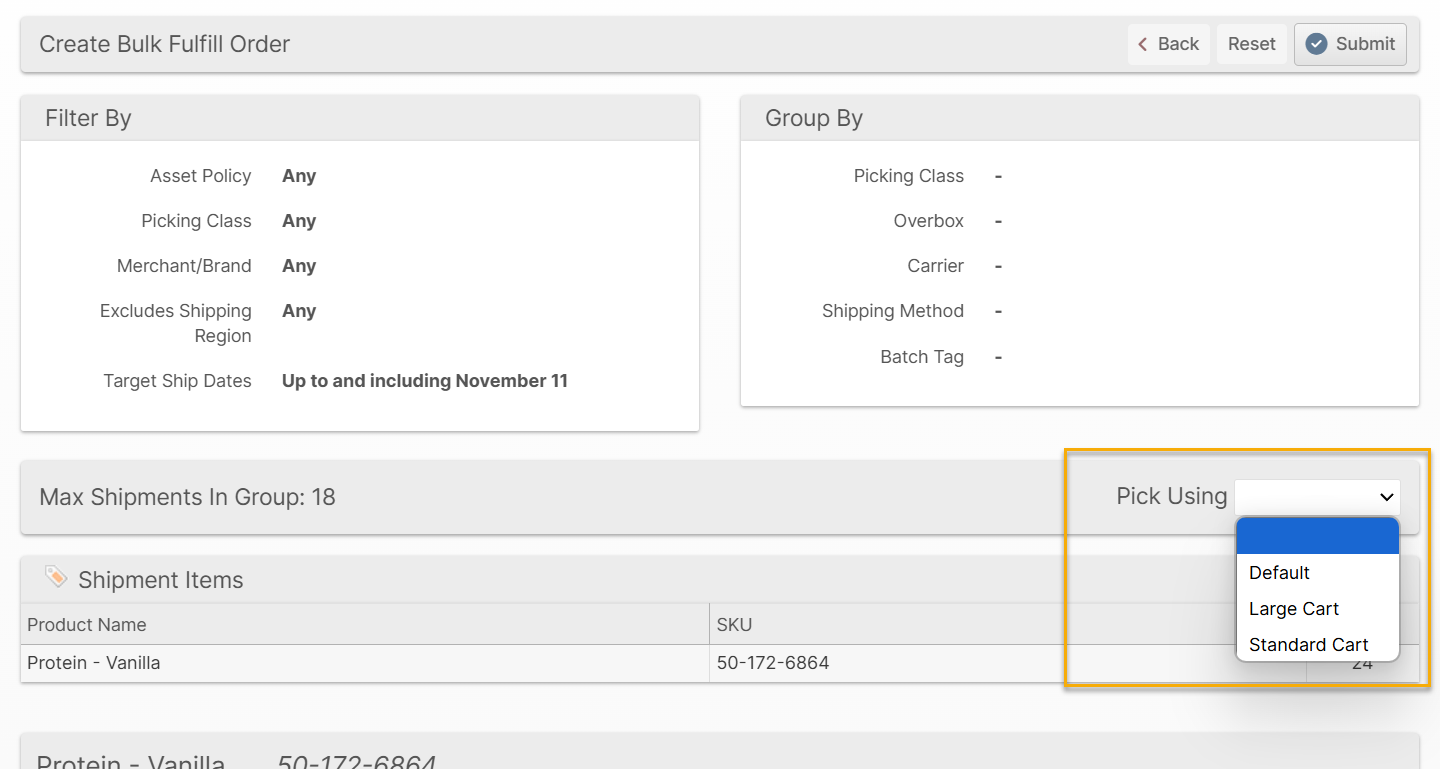
Asset Types for Bulk Fulfill Orders
To begin collecting better data on which asset types are being used and to pick what types of shipments, you can now select the Asset Type used to pick a BFO.
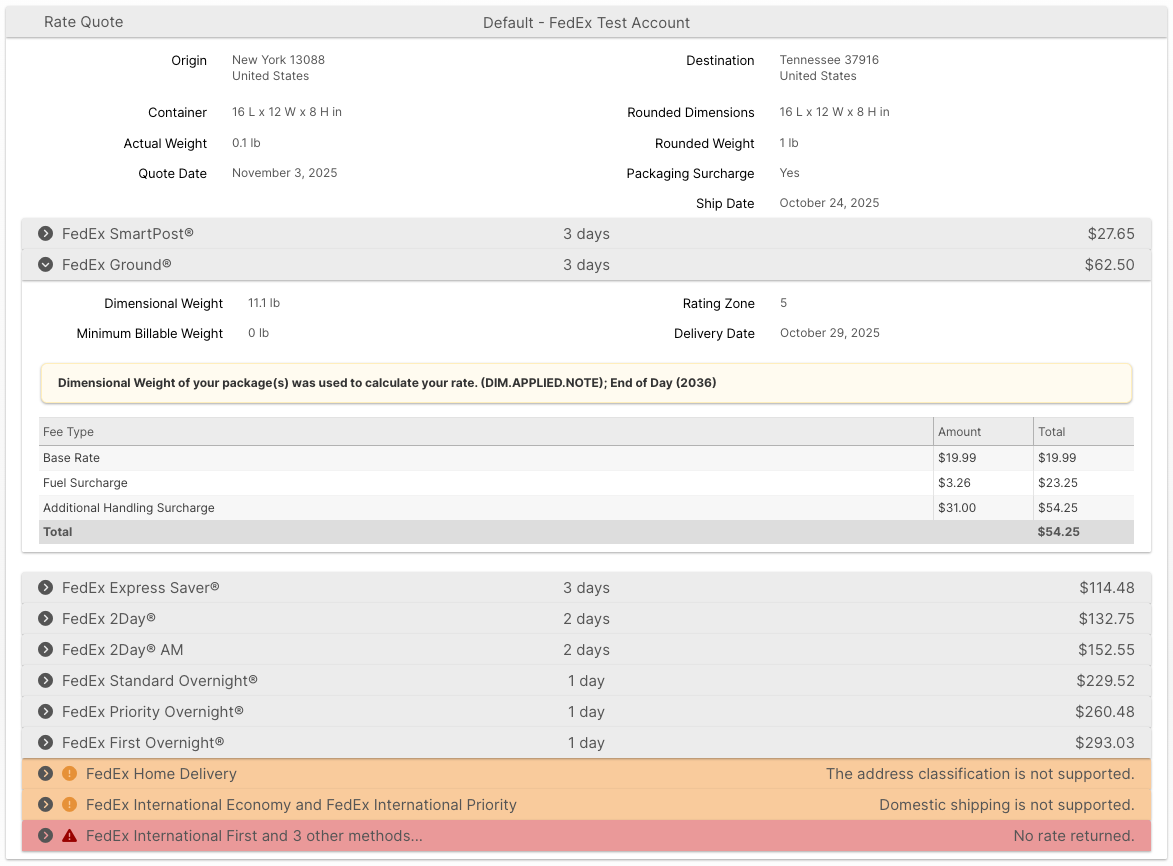
FedEx Rate Quotes
You can now check your FedEx negotiated rates directly in ShipStream! Navigate to the appropriate Shipping Account (System -> Shipping -> Shipping Accounts -> {group} -> {account}) and click Get Rates.
New Main option for Shipment Custom Fields
You can now specify "Main" as an option to specify for Shipment Custom Fields in which grids the field should be included/displayed in (in addition to the Parcel and Freight options).
This affects the following attributes of the Shipment Custom Fields:
- Display in Admin Grid
- Export in Admin Grid
- Display in Client Grid
- Export in Client Grid
Other Improvements
- Update the "Send Cancellation Request" button in the Client UI to only place the order on hold indefinitely when a client user requests a cancellation if the user has the Hold permission. Without the Hold permission or if "Hold On Request Cancellation" is No, the order will not be held, though a cancellation request email will still be sent.
- Added a new configuration option to address slow Packages grid load times for merchants with a large order history. Update General → User Interface → Packages Grid → Default Date Filter config to Yes to enable a default date filter of "today - 6 months" to the Created At column.
- Added a new configuration option Shipping -> Shipping Methods -> DHL eCommerce -> Default Duties and Taxes Payor to allow setting hte default behavior, consistent with FedEx and UPS. The default is Recipient to be consistent with the prior behavior.
- Added some minor performance optimizations for order allocations.
- Fixed UPS tracking info missing status description text.
- Fixed JSHint errors causing users to be unable to save scripts containing return statements by switching from JSHint to ESLint.
- Fixed saving Client roles while there are inactive merchants present.
- Fixed forgot password form not submitting.
- The Order grid Change Shipping Method mass action will now process all orders in a single transaction for improved performance and reduced impact.
- Optimized locking of inventory during inventory adjustments to reduce impact.
- Fixed a display issue affecting some orders with BOM items which causes incorrect Packed vs Shipped counts.
- Fixed display of Created By column for Work Order -> Stock Movements tab.
- Fixed Transit/Zone Map Warehouse selection not saving.
- Fixed potential race conditions resulting in "Code not recognized" or other strange errors when switching pages and scanning barcodes in the Scanner UI.
- Fixed the "Service" field on the package tracking information did not contain the carrier's description for the shipping service as it should have (all carriers affected).
- Fixed a display issue affecting some orders with BOM items which causes incorrect Packed vs Shipped counts.
- Fixed display of Created By column for Work Order -> Stock Movements tab.
- Fixed Transit/Zone Map Warehouse selection not saving.
- Fixed potential race conditions resulting in "Code not recognized" or other strange errors when switching pages and scanning barcodes in the Scanner UI.
- Fixed Estimated Delivery At field not updated properly for UPS package tracking.
- Fixed Initial Delivery Attempt field should only be updated once in package tracking (all carriers).
- Changed styling of "communication error" rows in tracking details to better indicate that these are ShipStream-specific details, not part of the carrier tracking information.
- Added less-than and greater-than operators to Velocity Tiers and changed Strategy Value to a decimal field to allow more precise filtering.
- Fixed possibility of creating a product with an invalid status via Product Import.
- Improve error messages for Easypost errors which are missing a human-friendly message.
- Fixed sealing manifests with Easypost packages when the shipments can no longer be found on Easypost's end.
Global API Updates
- Added
tracking_numberandalt_tracking_numberto the list of fields that are supported for filtering in theGET /api/global/v1/shipping/shipmentsendpoint. - Added
tracking_numbersto the list of fields that are supported for filtering in theGET /api/global/v1/receiving/{type}endpoint. - Added two new Global API endpoints for orders:
- GET /api/global/v1/shipping/orders - Search/list orders with filtering and pagination
- GET /api/global/v1/shipping/orders/{id} - Get a single order by internal ID
- Removed
userfrom the Delivery model. This will be added back in the next release asrequester.
How did we do?
Version 2026.0
Version 2025.6